All toys Indiana Jones!
Click on thumbnails and close the window when done looking. ENJOY!


![]()
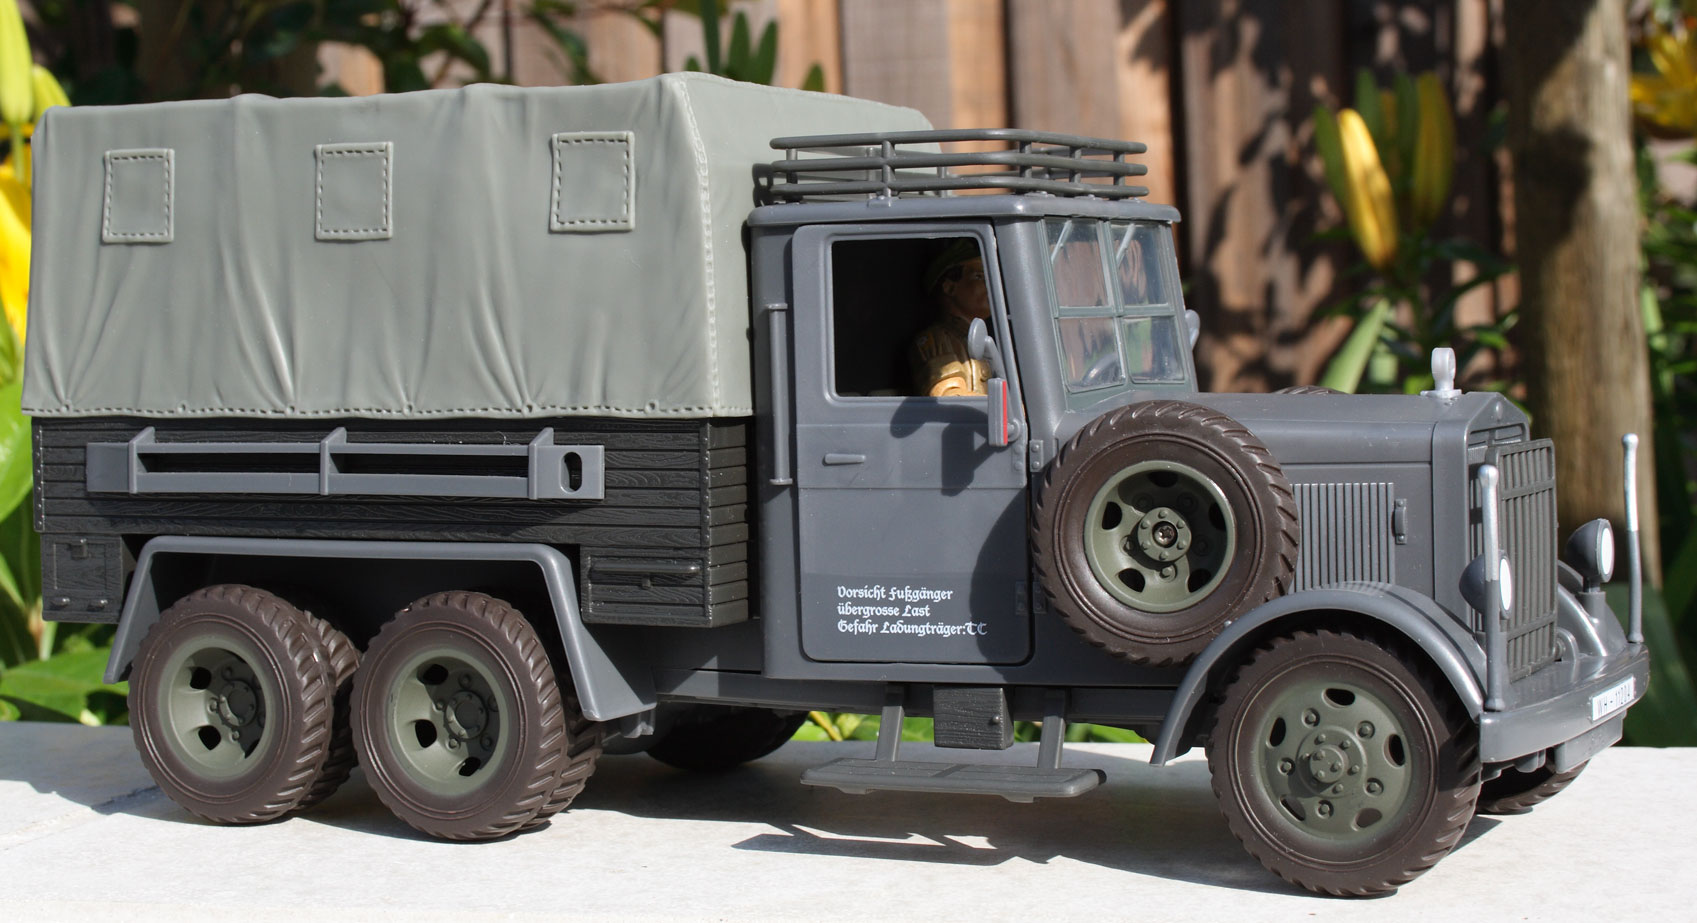
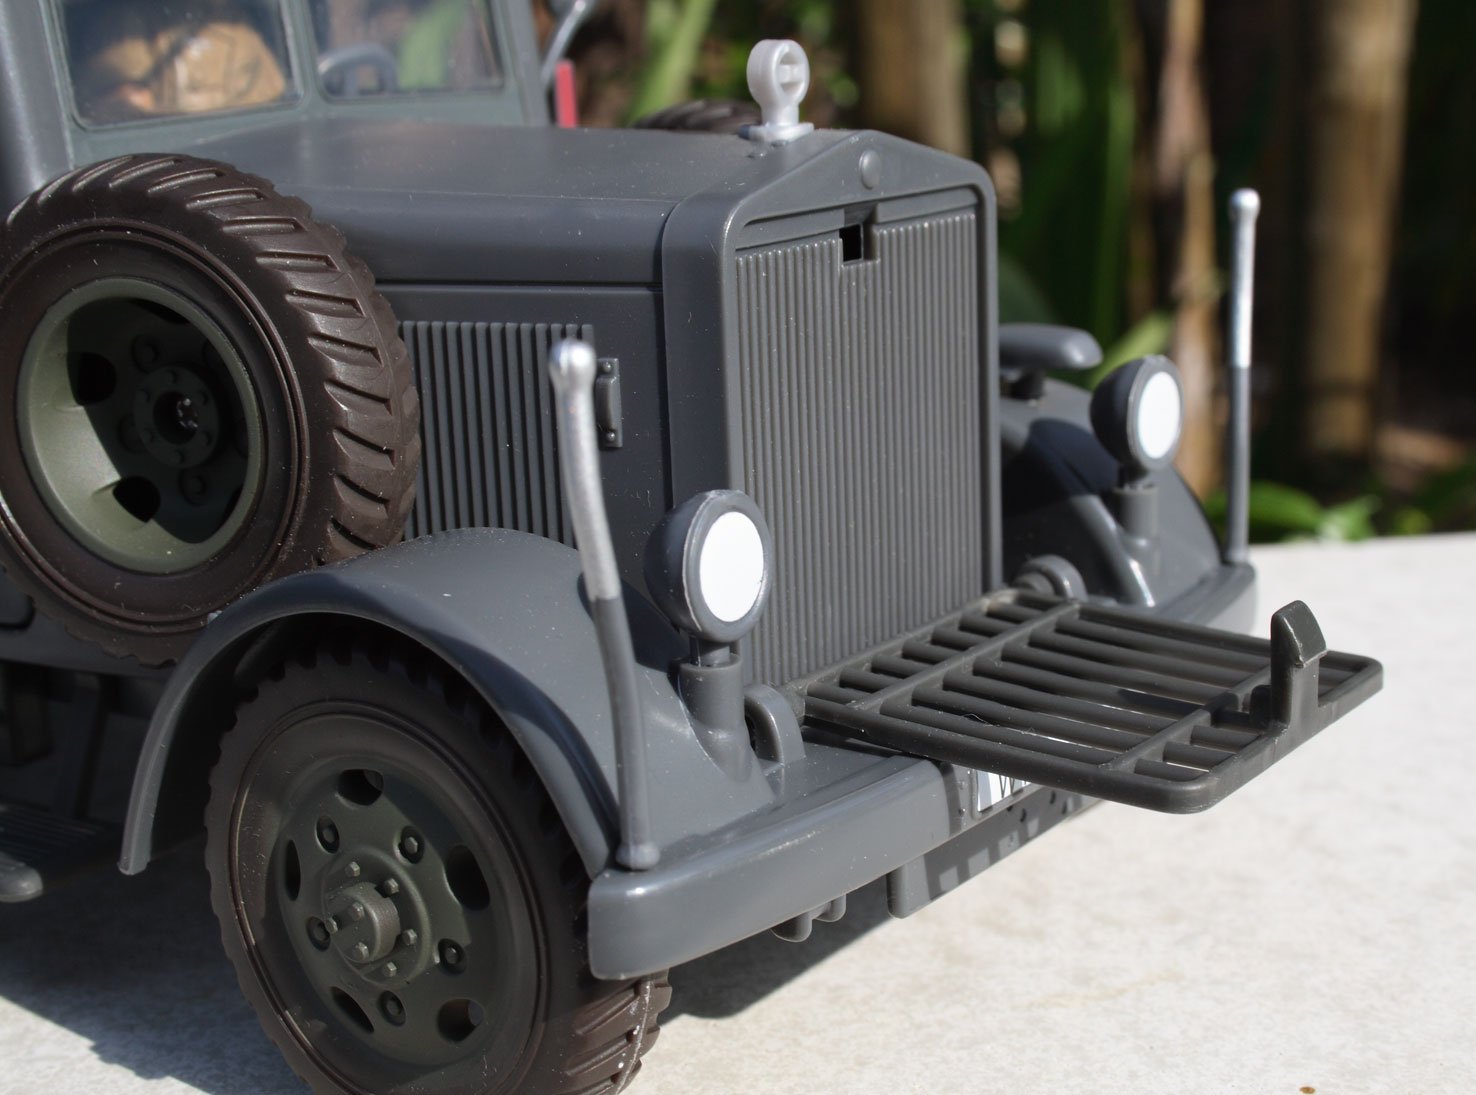 BEFORE. The unmodified Hasbro Indiana Jones Cargo truck from Raiders of the Lost Ark, just as it comes right out of the box.
![]()
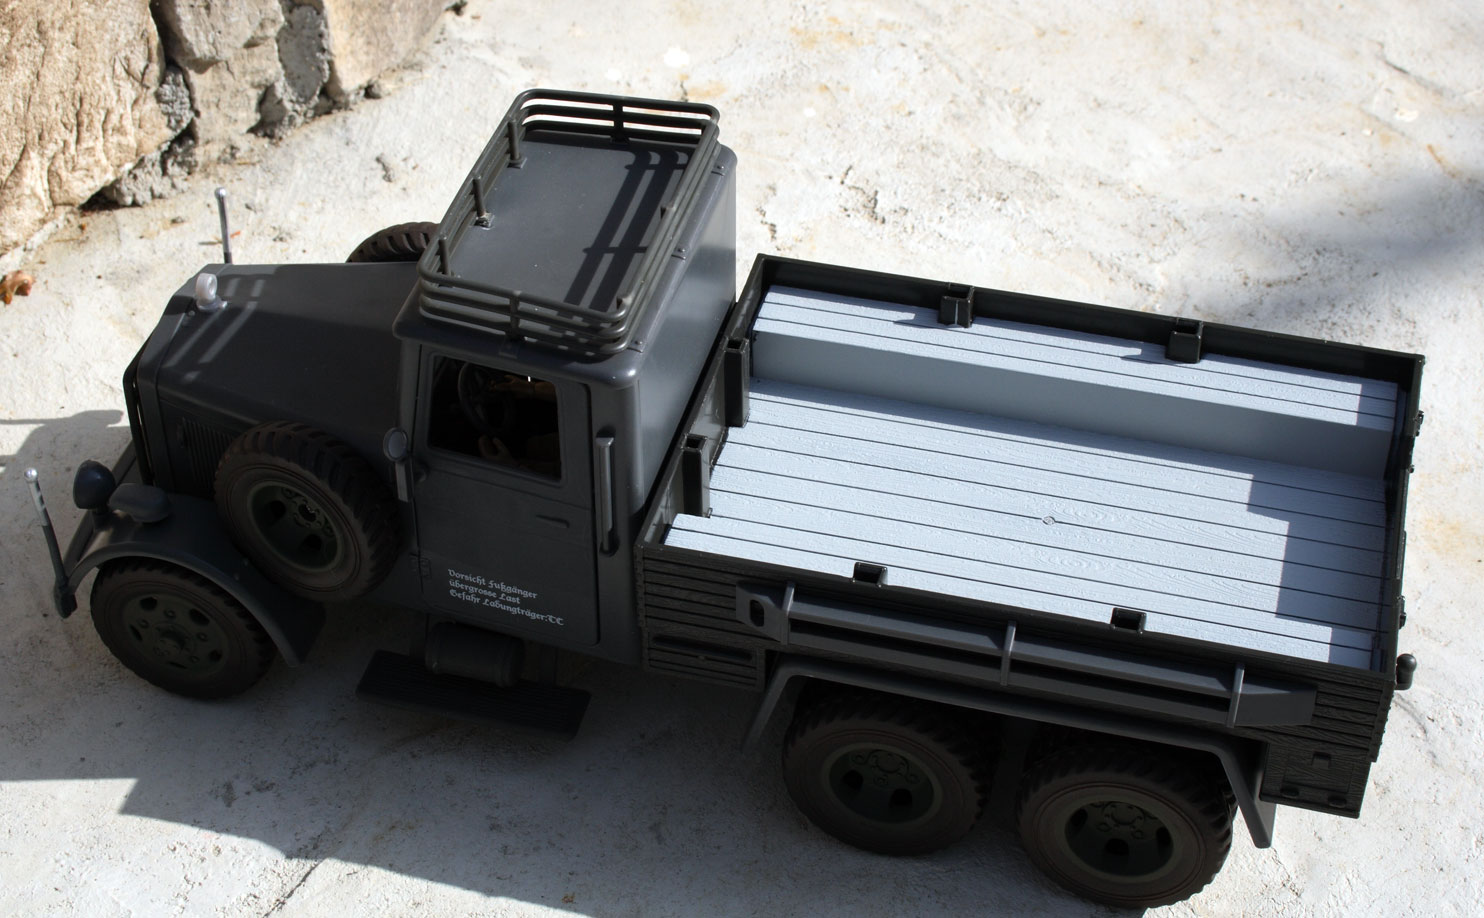
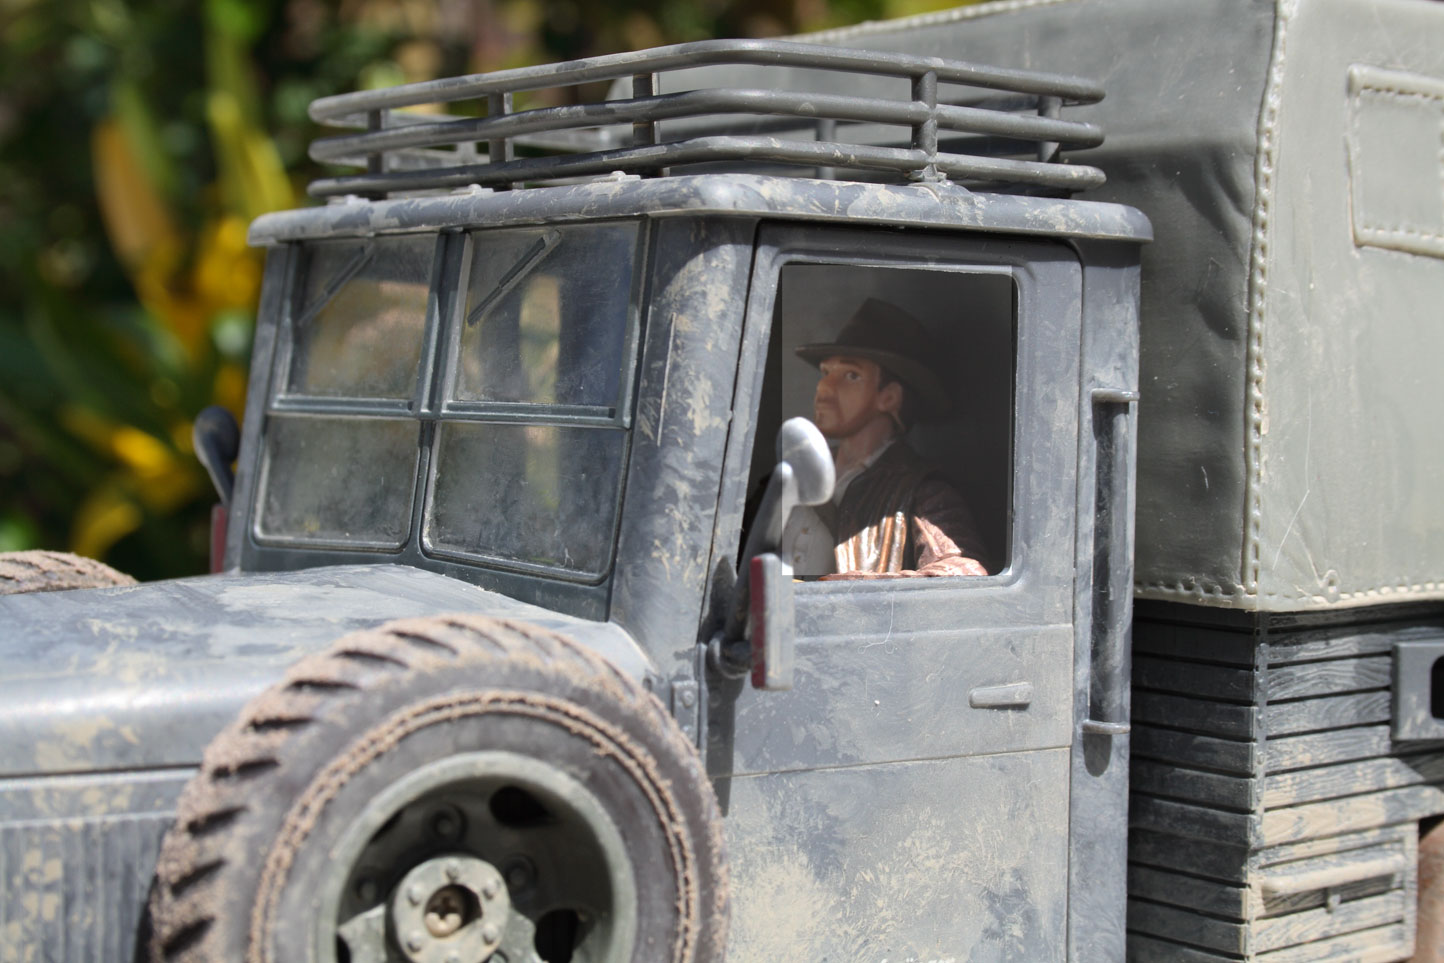
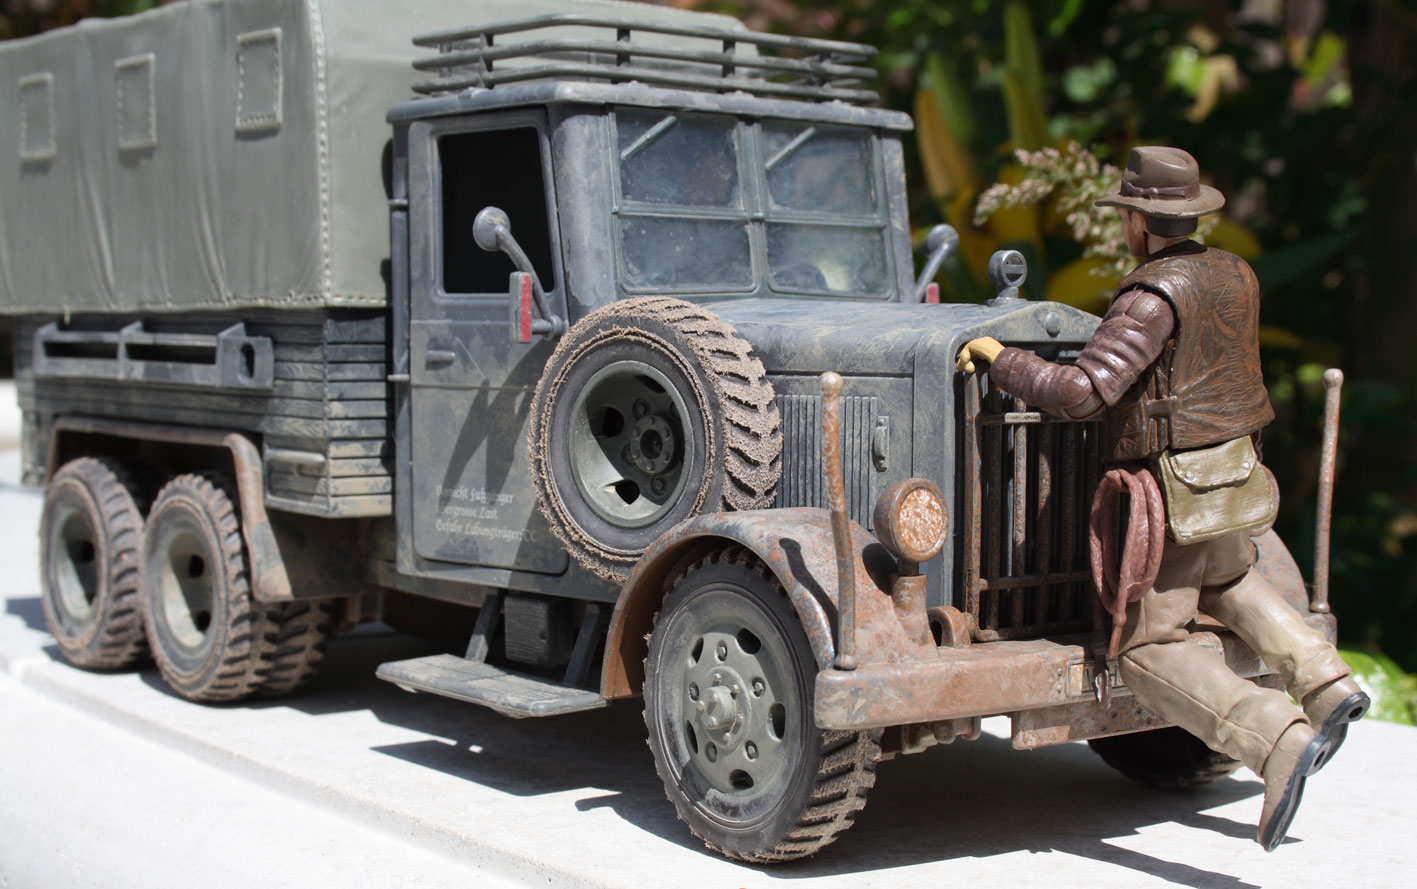
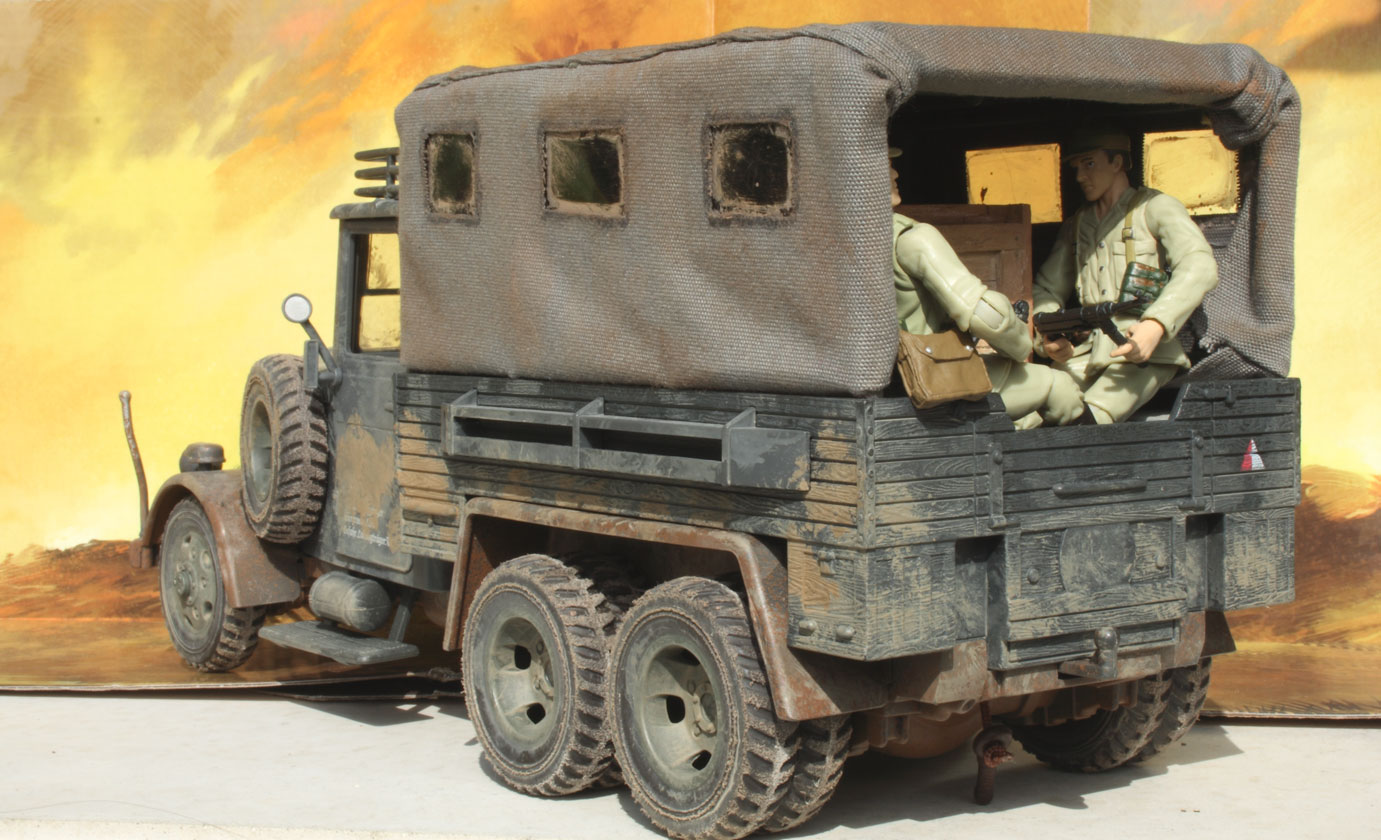
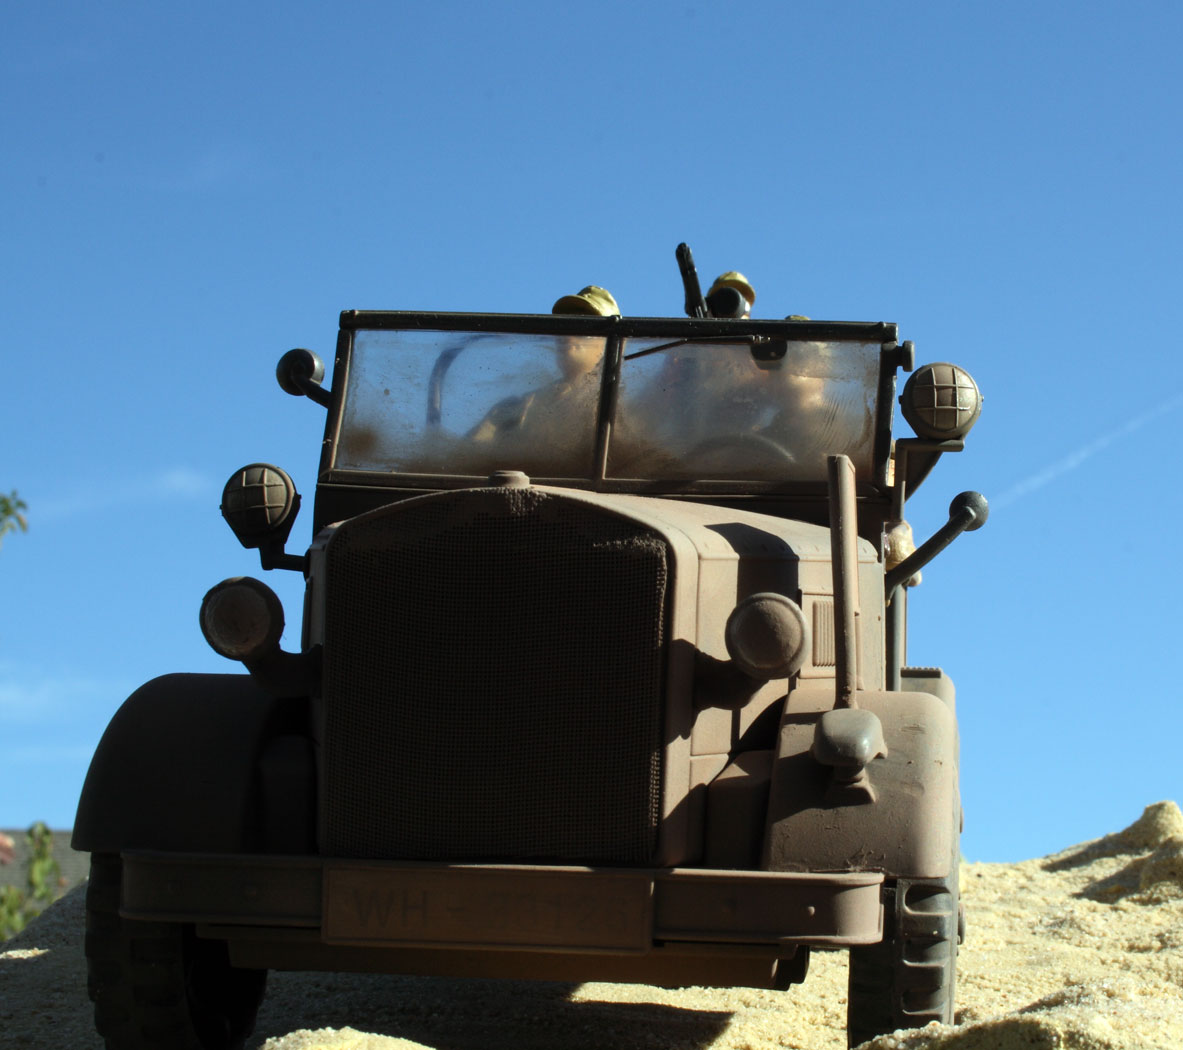
REVIEW: The Hasbro Indiana Jones Cargo Truck from Raiders of the Lost Ark is a pretty good representation of the vehicle seen in the movie and makes a fun toy. This is a brand new tooling and is not based on the old Kenner version. The truck comes in a plain grey finish, with the truck body being a darker color and the truck bed painted in light grey. The canvas top is in medium grey and clips onto the truck bed, though the pegs are a bit short to really hold it on securely. The darker color for the truck body is odd as it makes the truck look two-tone!
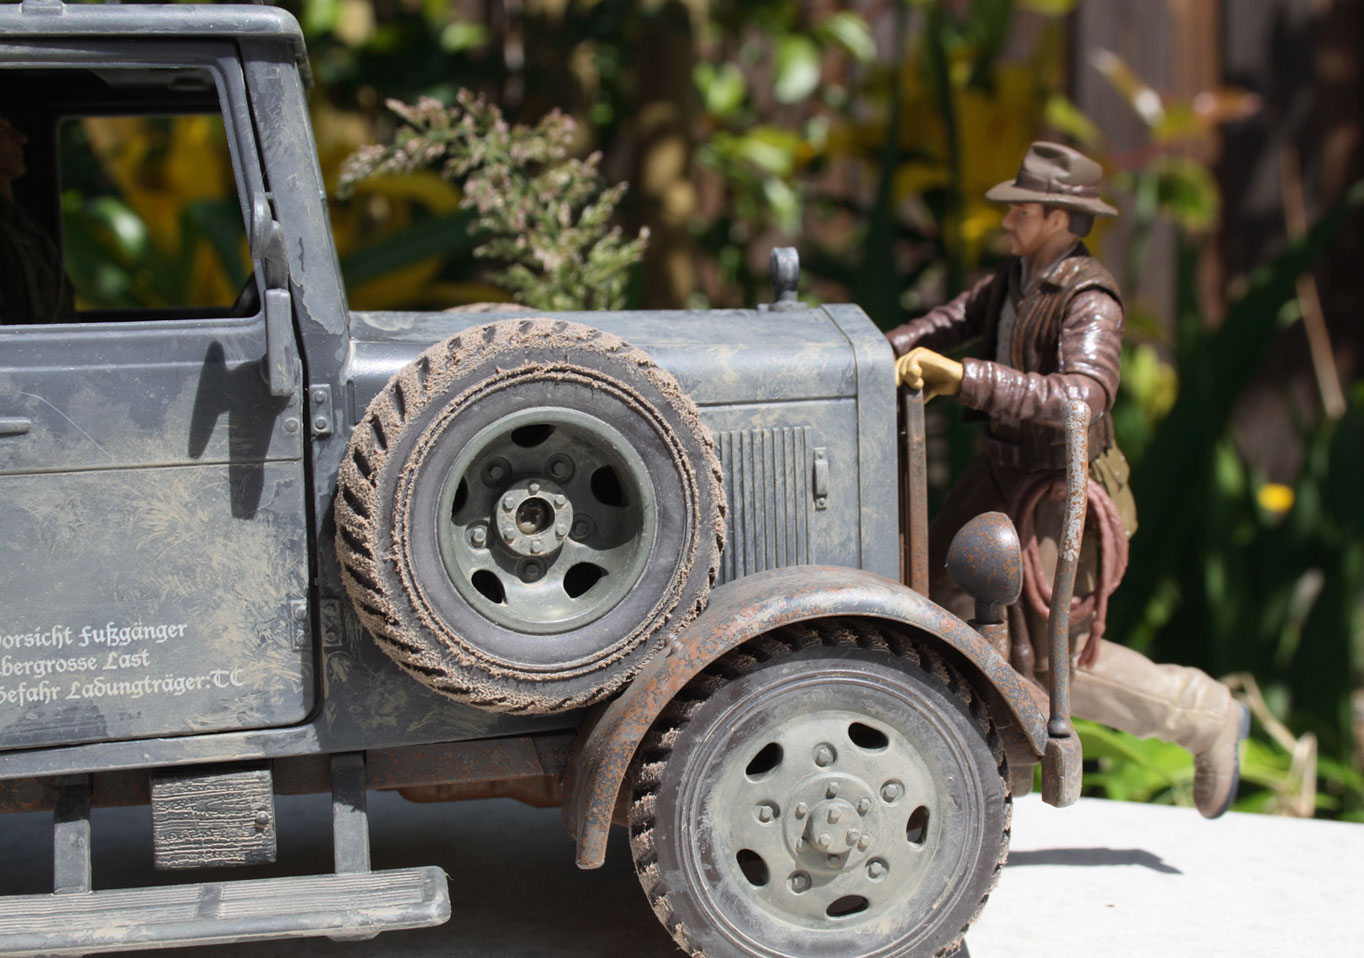
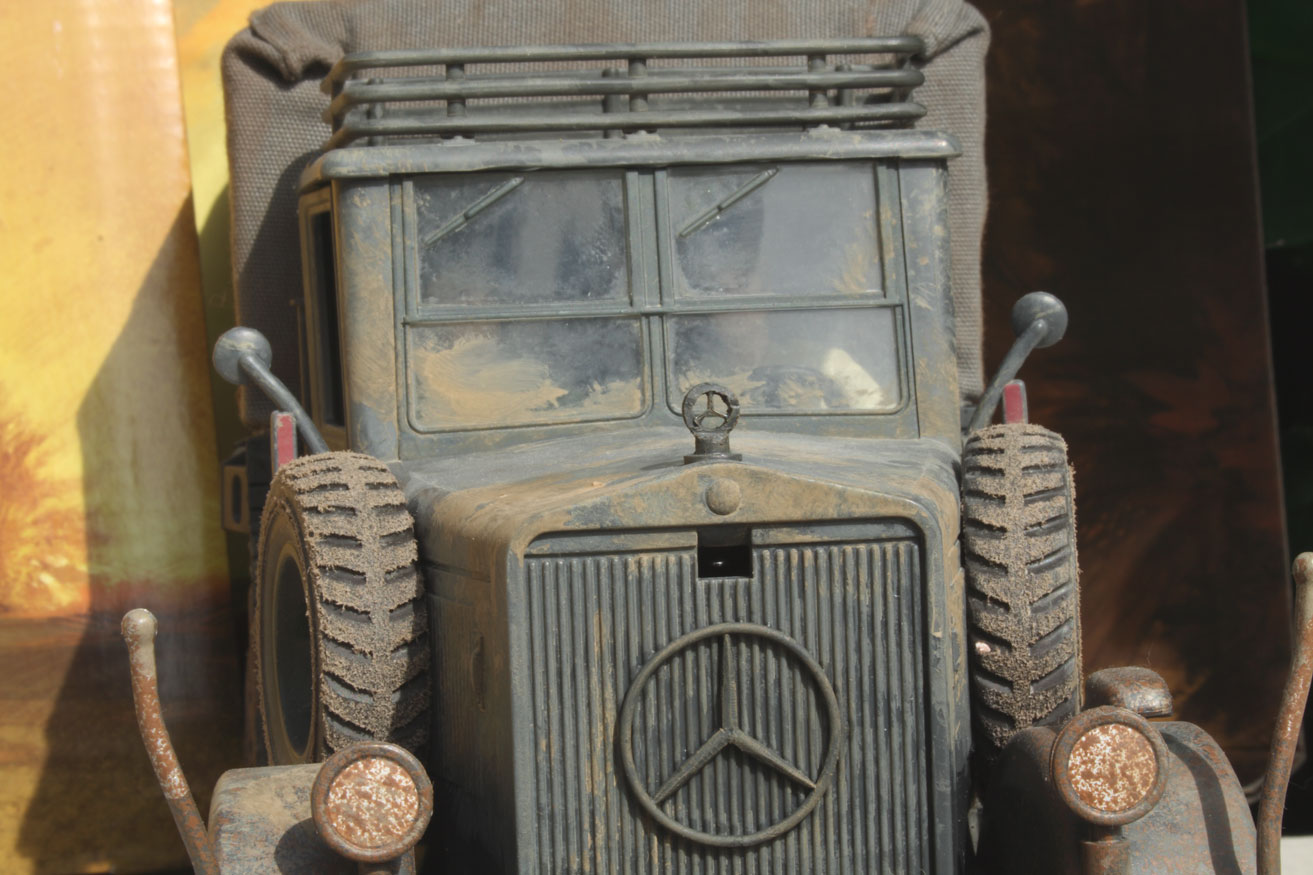
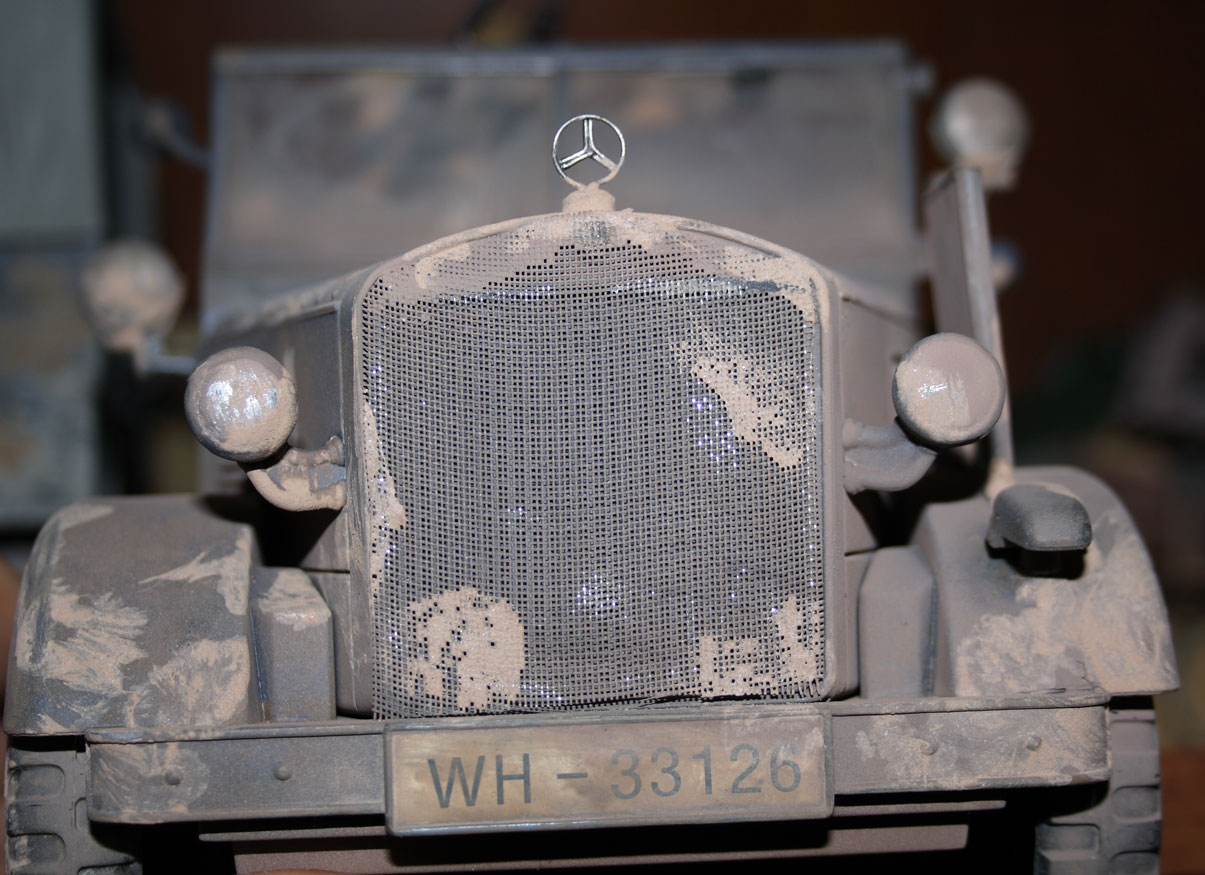
Starting at the front we have the authentic license plate numbers from the movie. Side markers are in soft plastic for safety, as are the headlights and Notek lamp (the thing on the left fender). Headlights are painted in an very pale grey where the lens would be. The radiator has a grill in front, and pressing down on the hood ornament makes the grill flop down on hinges to simulate the movie scene. This feature works well. The hood ornament in the move is clearly a Mercedes Benz symbol, and there is also a larger version on the front of the movie truck radiator with 'DIESEL' written beneath it. The Hasbro truck has a plain radiator, probably for licensing reasons and the hood ornament does not reproduce the symbol either. There are 2 spare wheels on either side of the hood, though they are noticeably "fatter" than the ones in the movie, with very pronounced tire tread. To my eyes they look very "modern", rather than the period look of the wheels on the movie truck. The front wheels themselves are hollow on the inside, not complete wheels. All the wheels are also very new looking and have a pronounced molding seam around the middle. On the good side the wheels are not jet black but done in a dirty grey color.
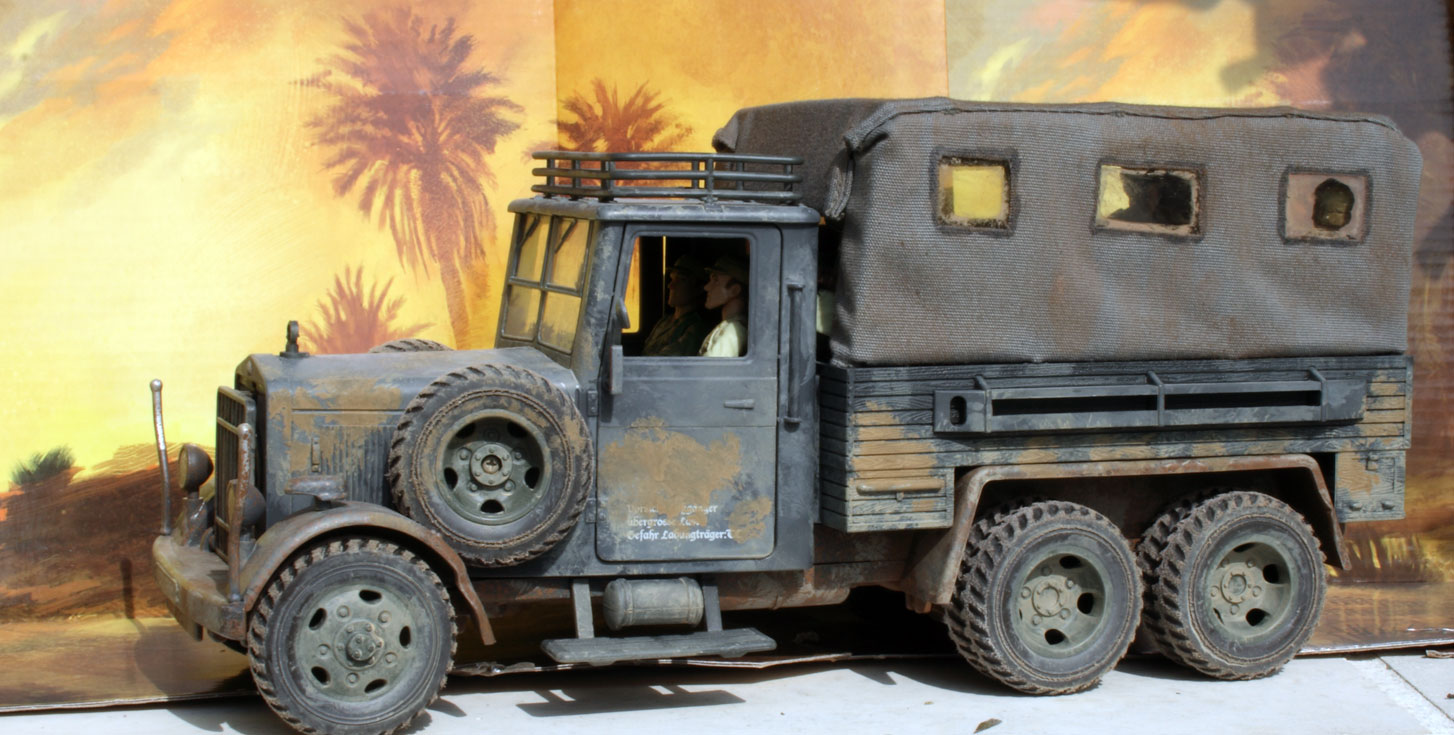
The cab features opening doors with some detail molded on the inside face, a seat for 2 figures and a steering wheel. The Hasbro steering wheel is grey just like the rest of the truck whereas it is black in the movie. There is a hole in the floor and it looks like a gear shift lever should go in there. This lever is missing, at least on the sample I purchased. I notice that the troop carrier truck does have a gear shift lever, so perhaps I should write to Hasbro? I was actually surprised to see that the windscreen is in clear plastic. I was expecting it to be left open so you could reproduce the movie scene. In fact early copy reports a "breakaway windshield" on this vehicle, but on the final product it is firmly fixed in place. Below the cab doors there are steps just like in the movie truck. The passenger side door does NOT come off, so no re-enacting THAT scene except in your imagination ( or if you disassemble the truck).
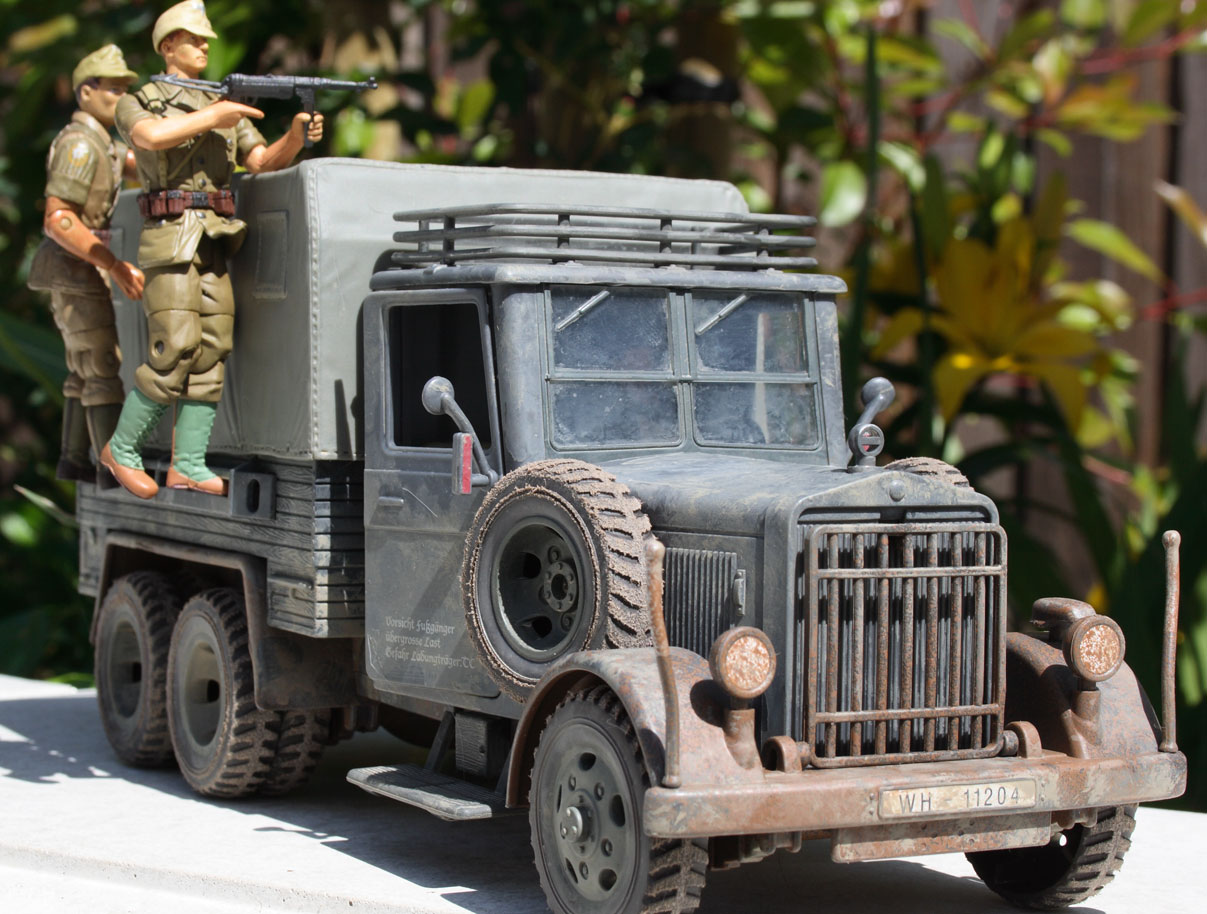
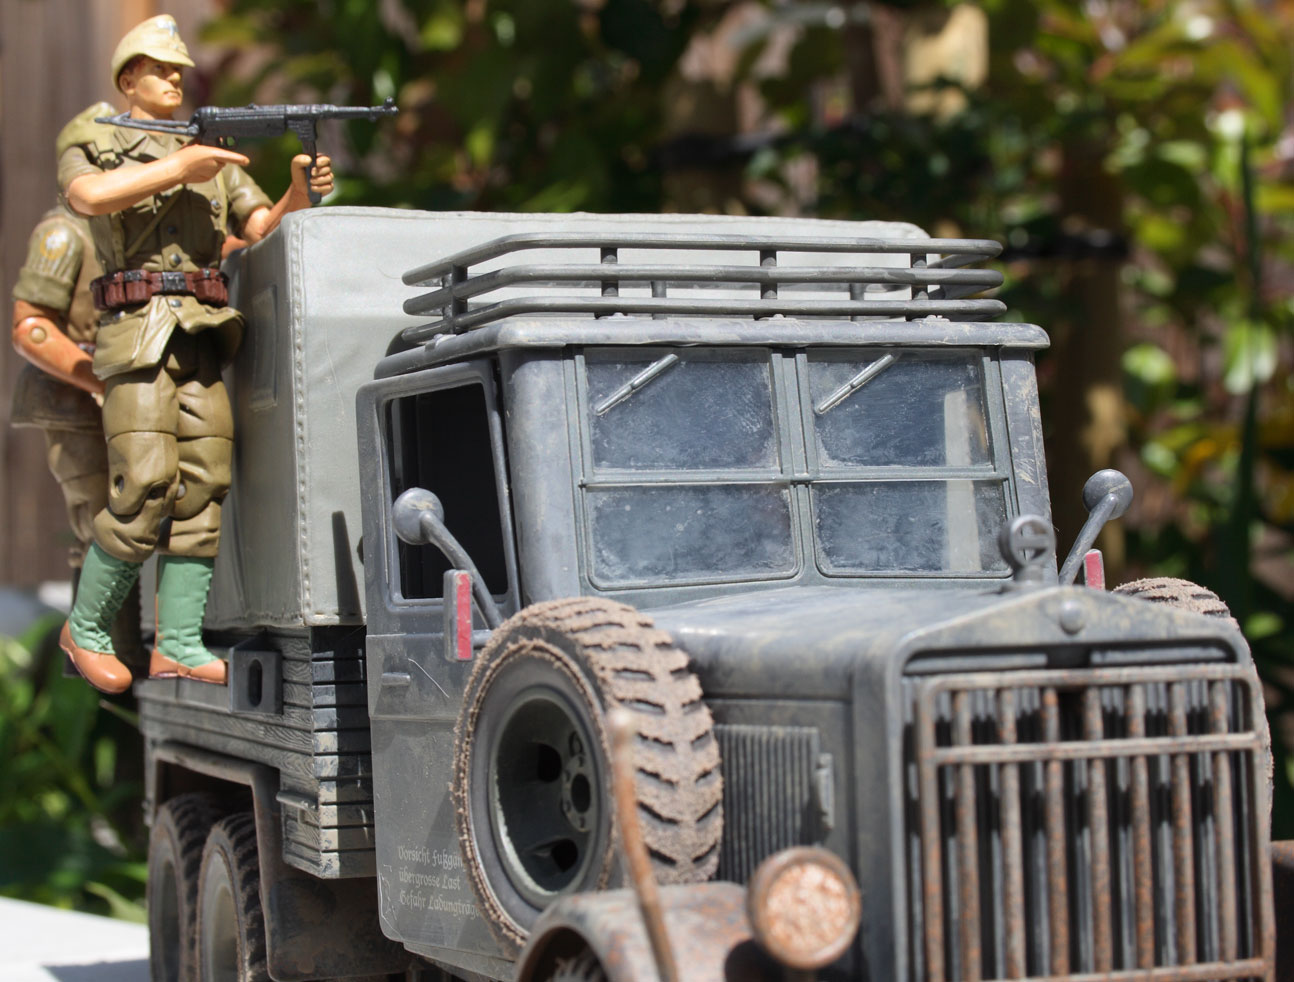
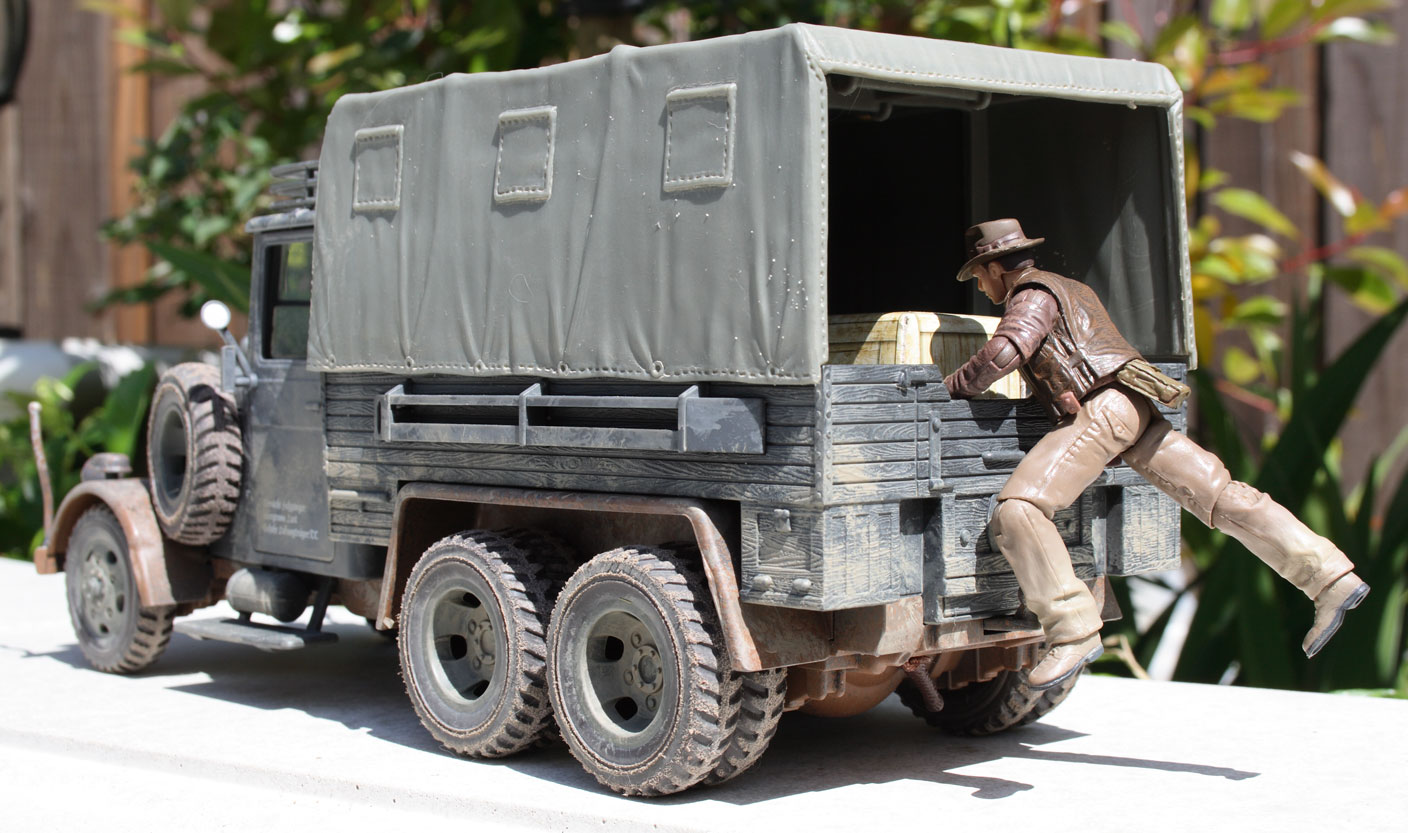
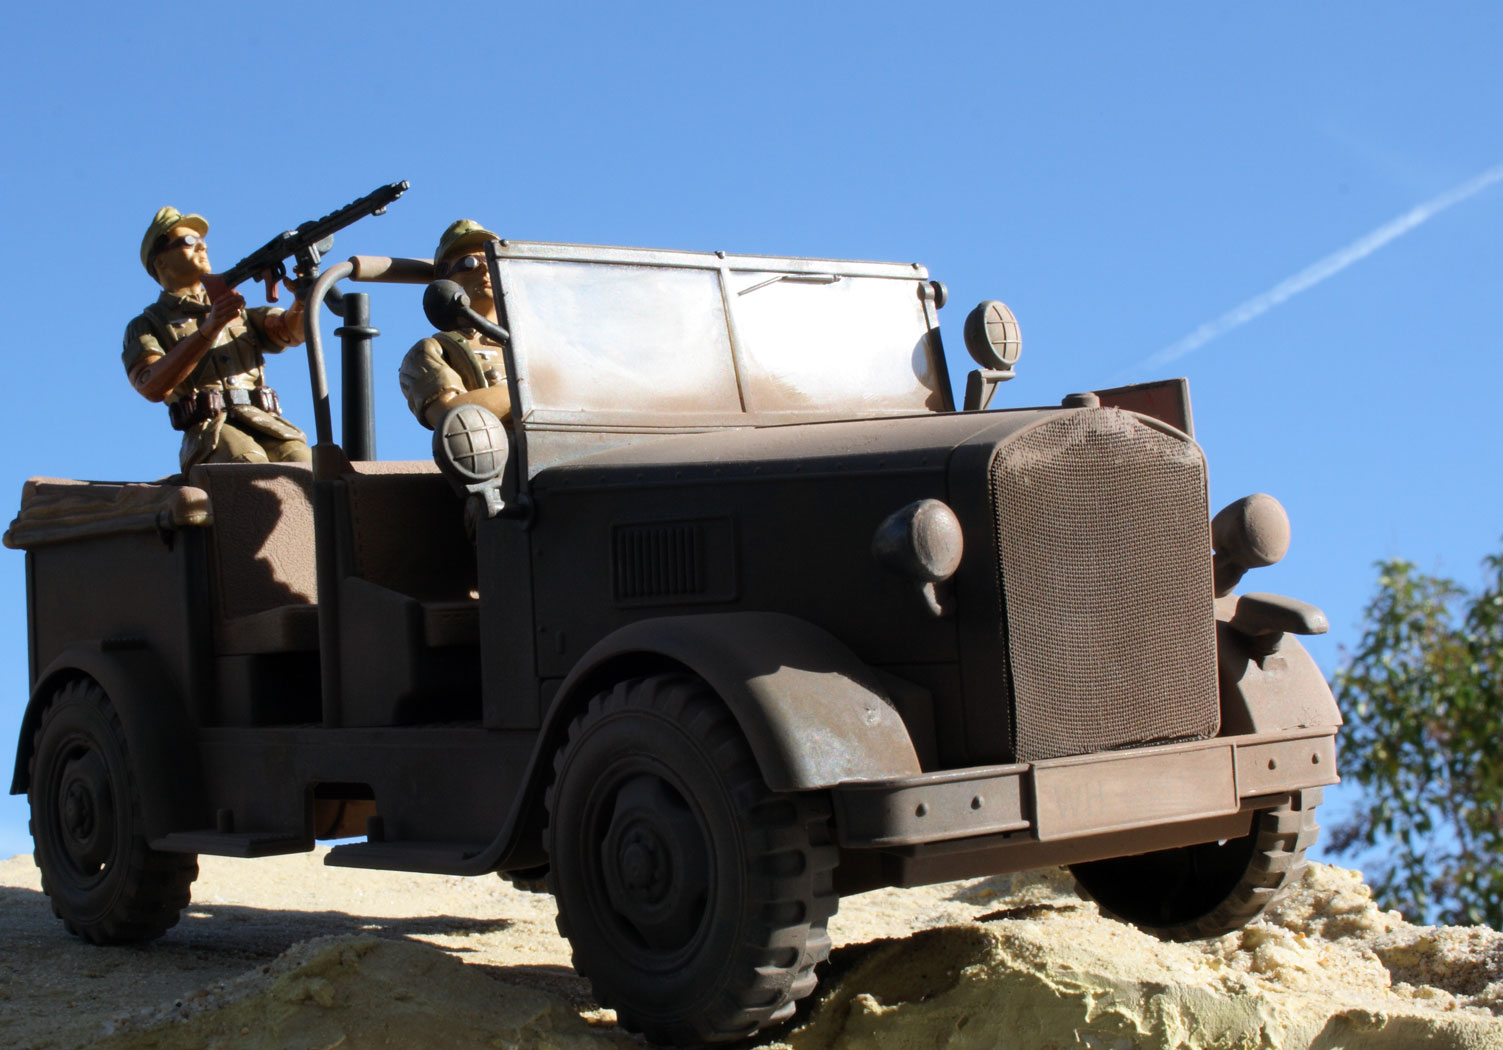
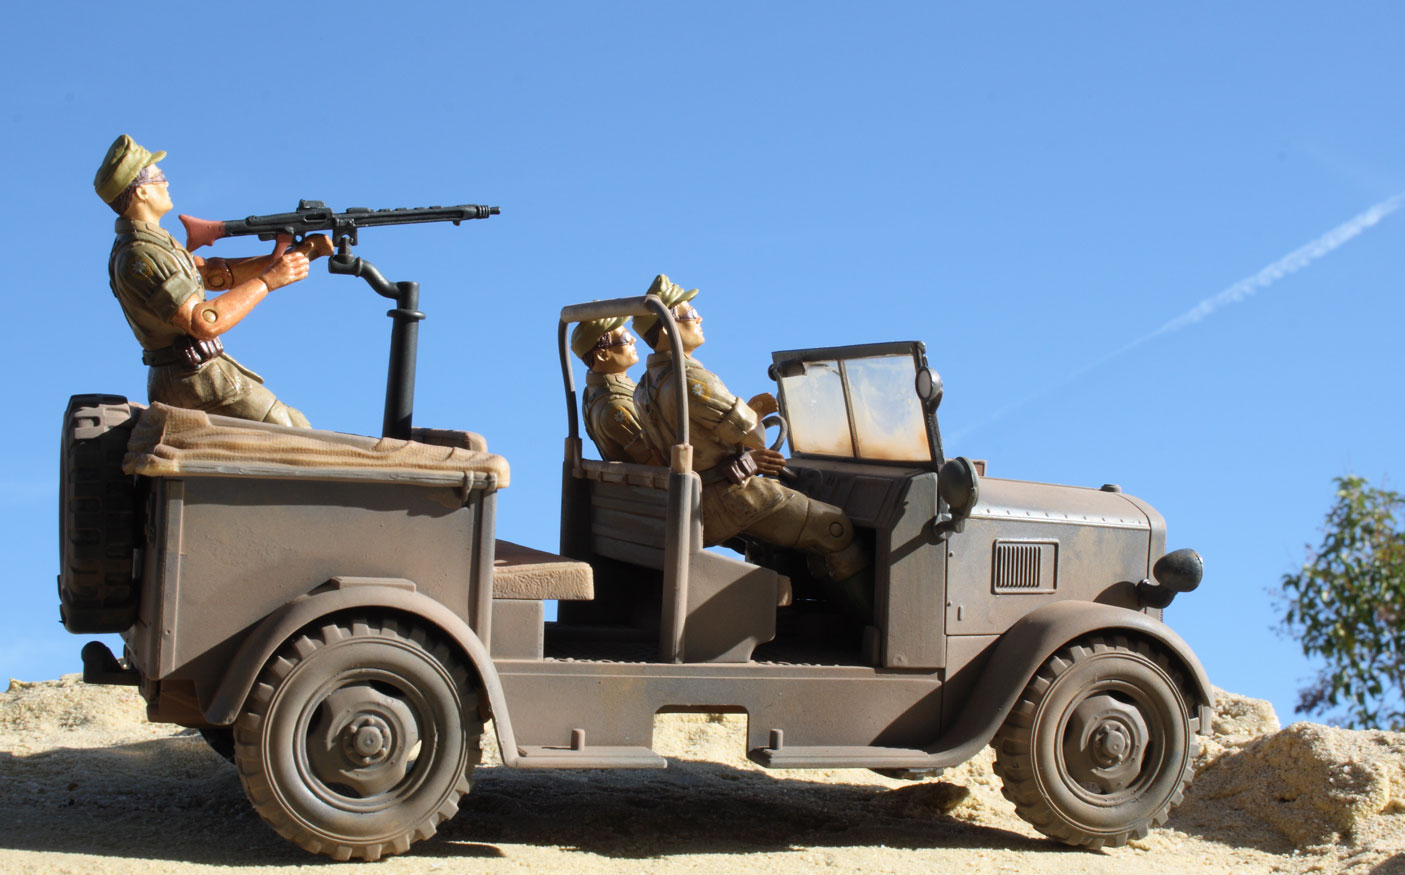
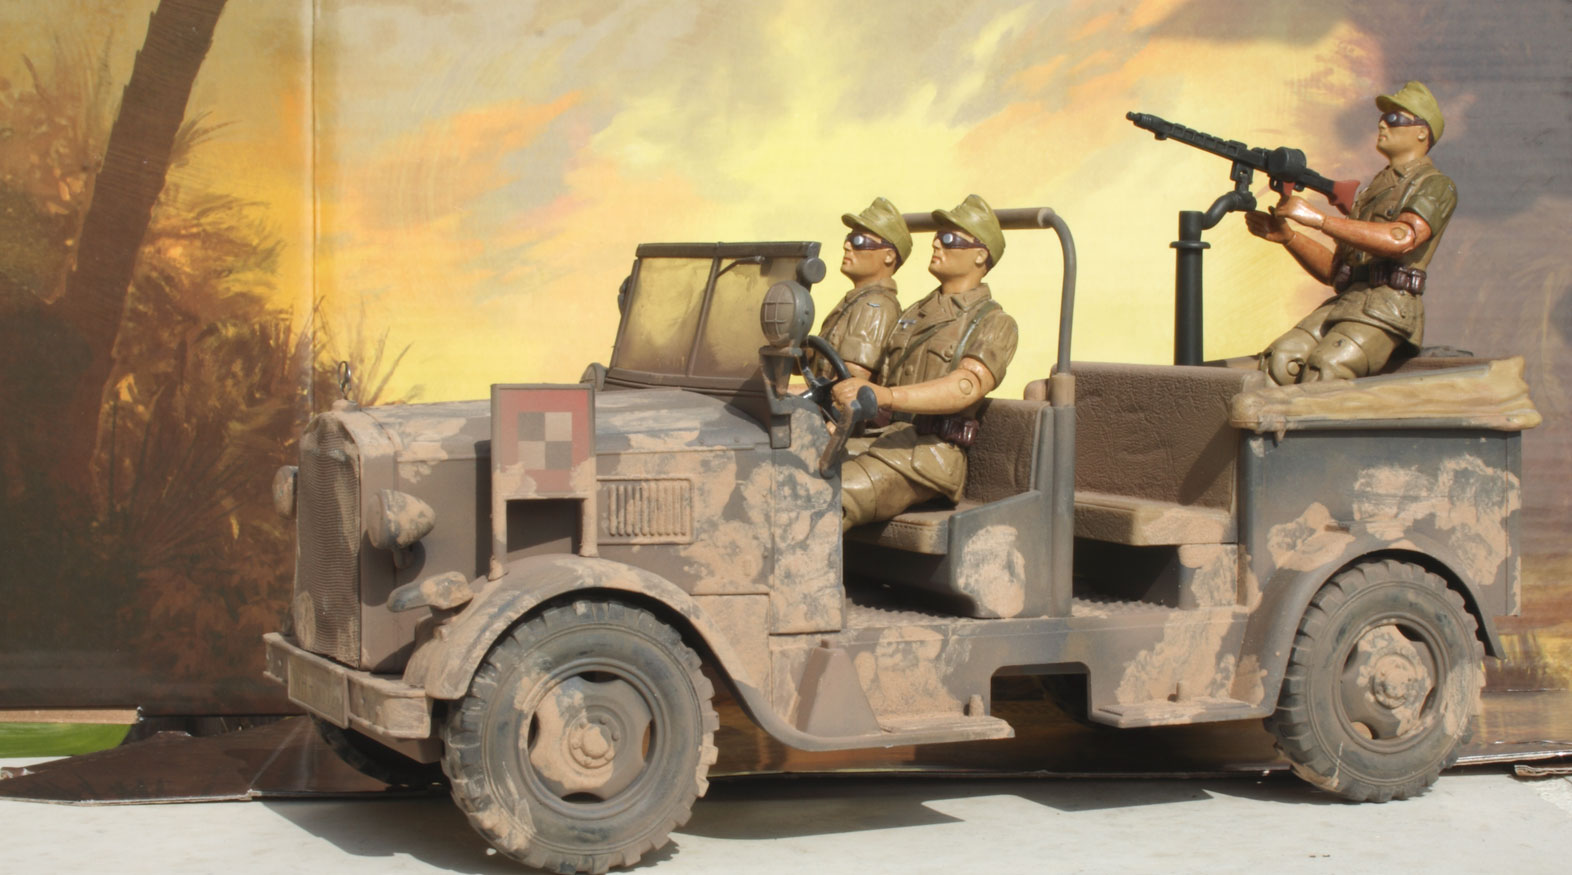
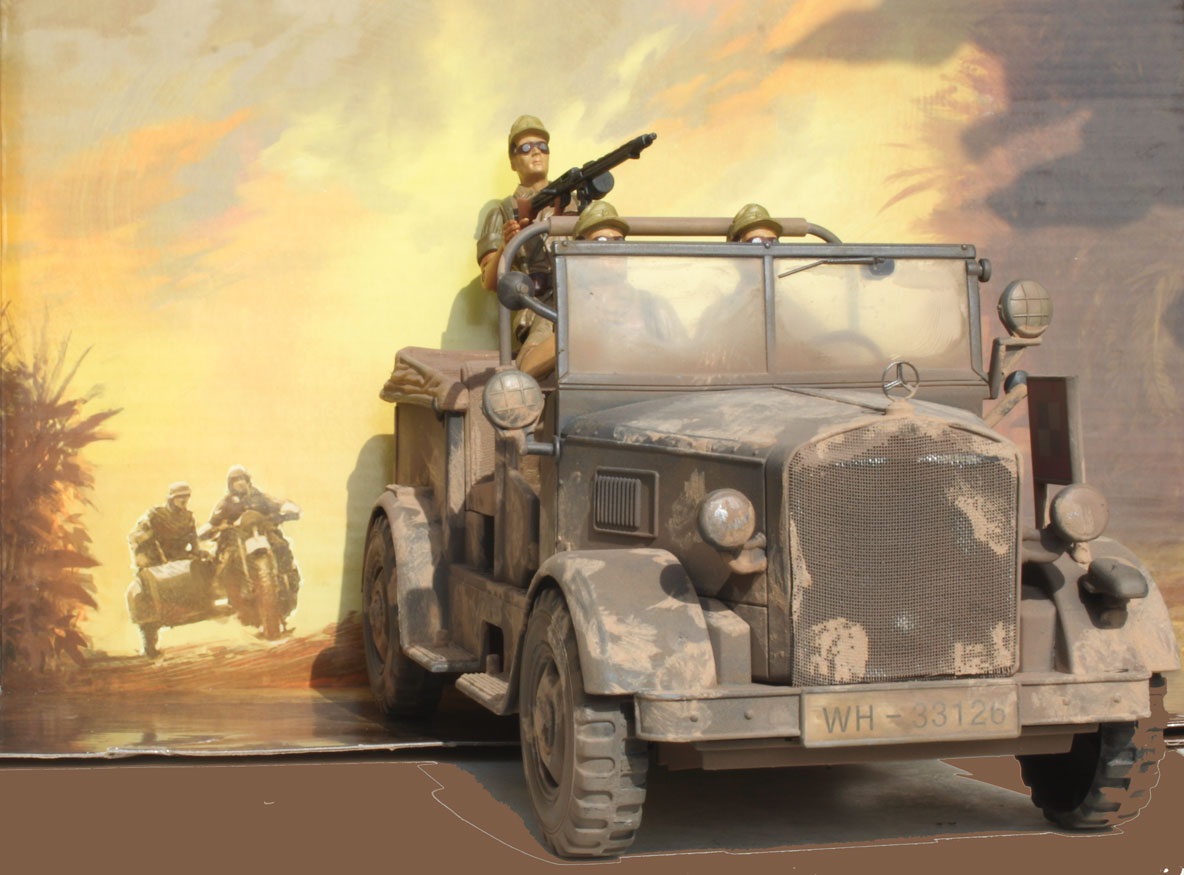
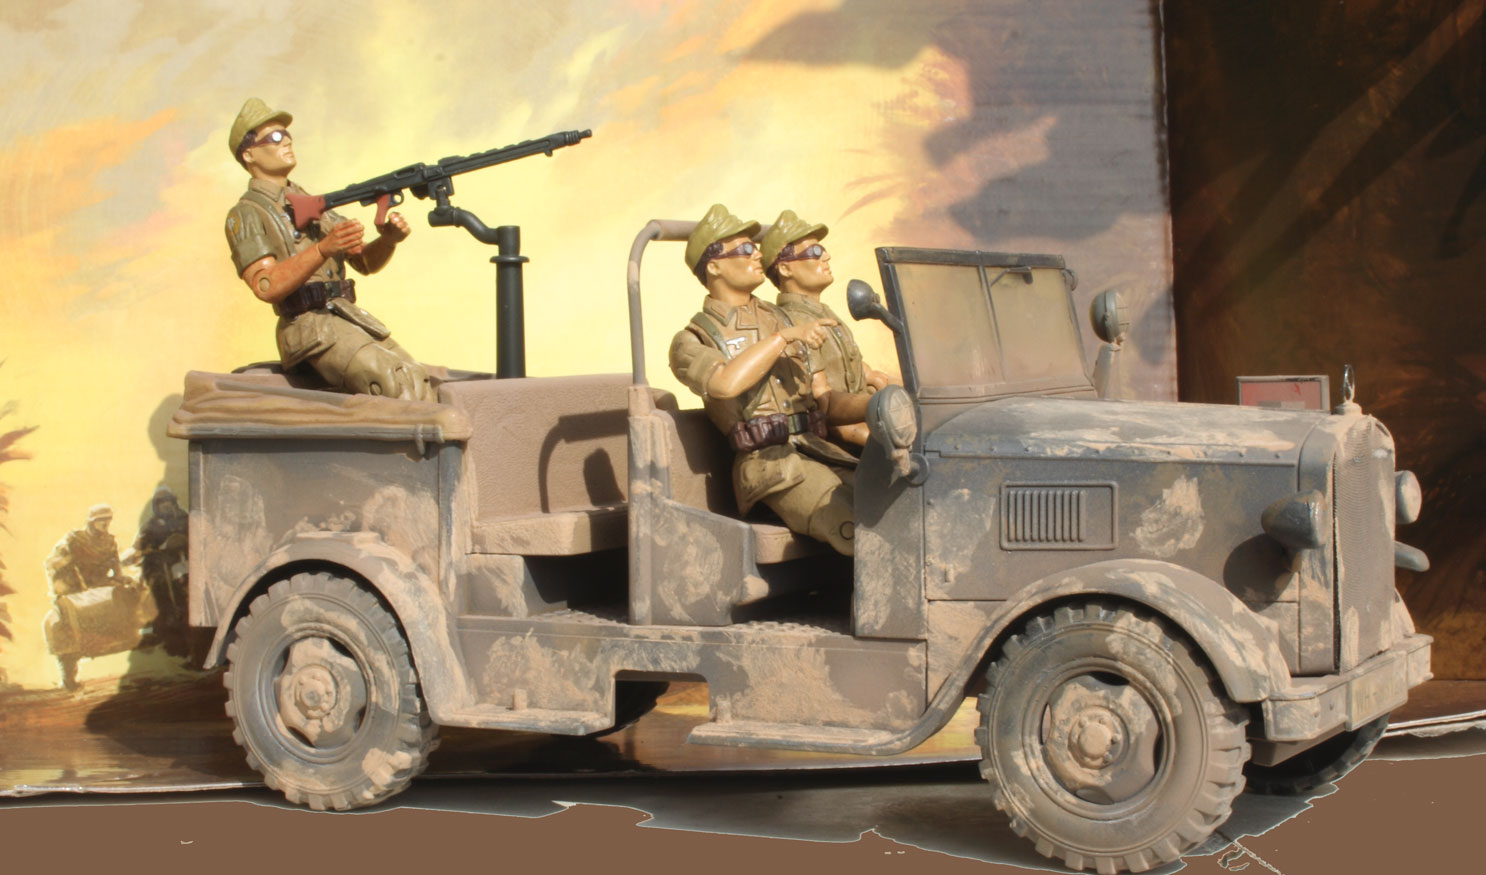
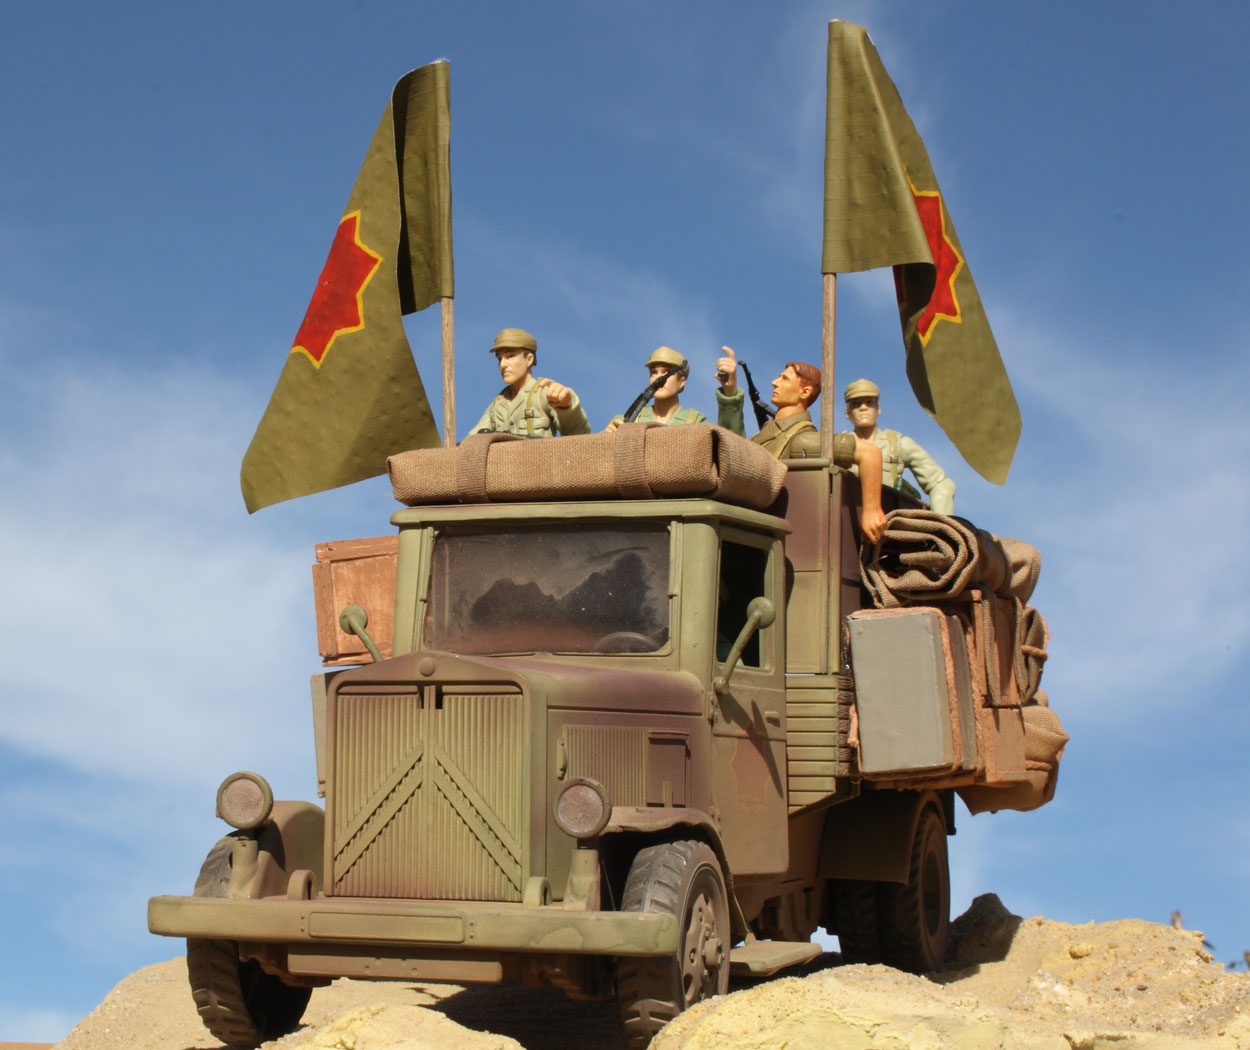
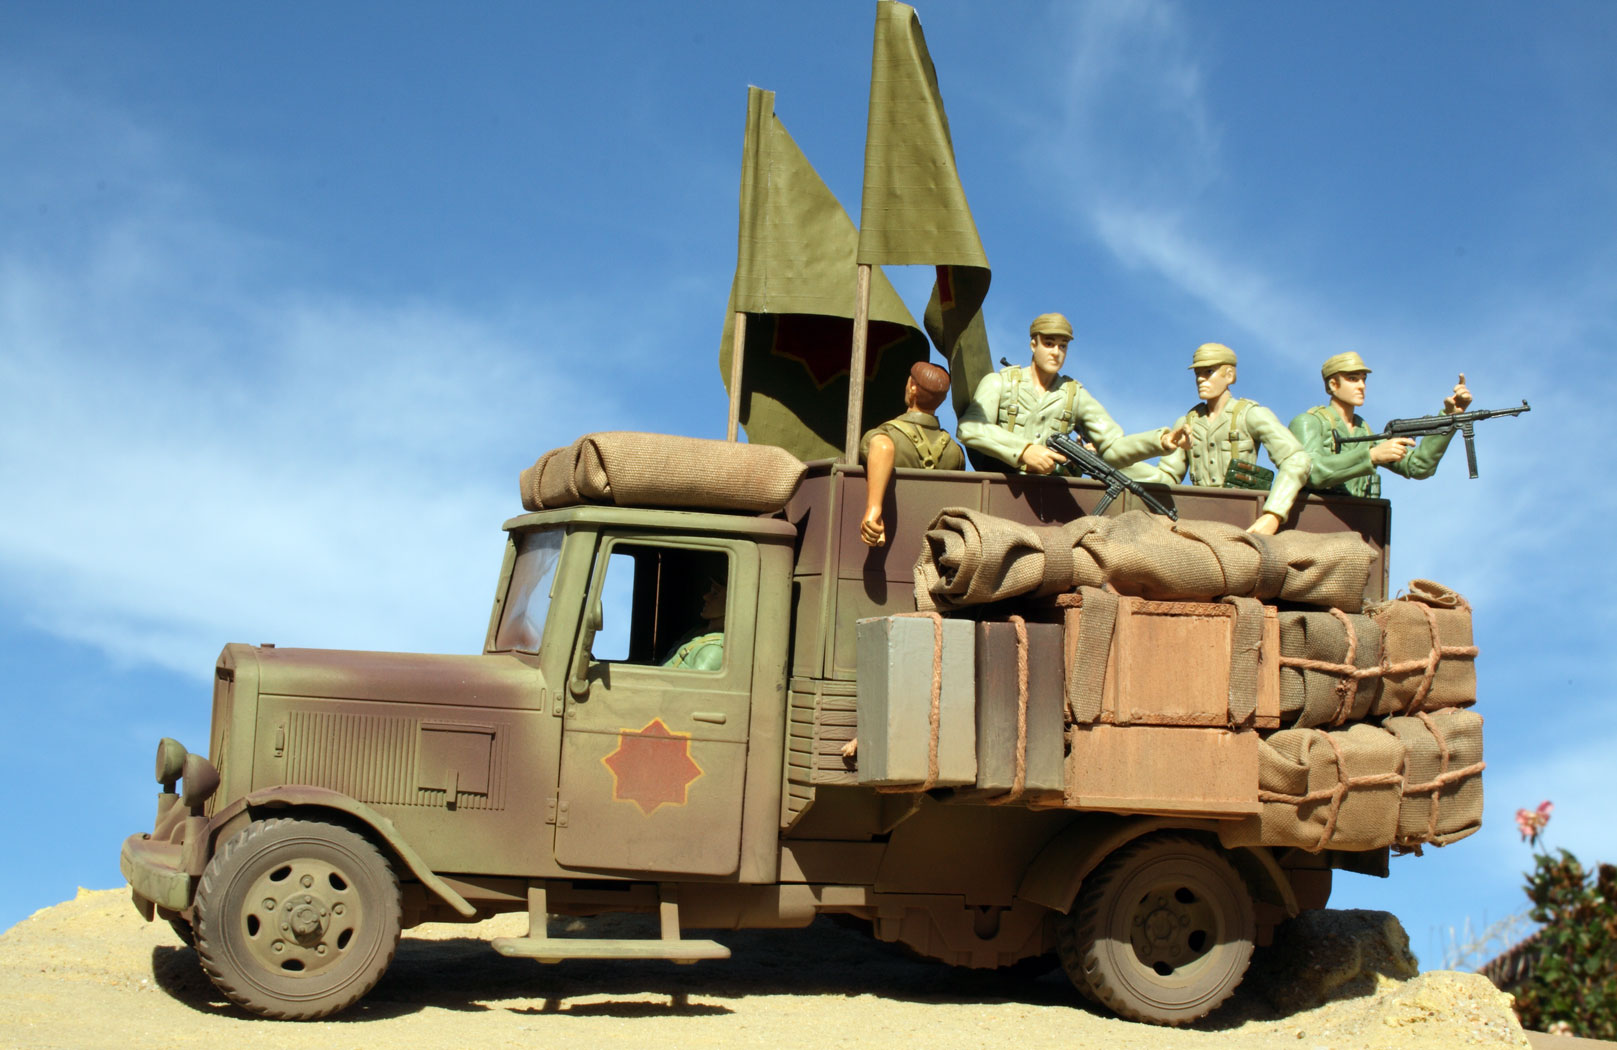
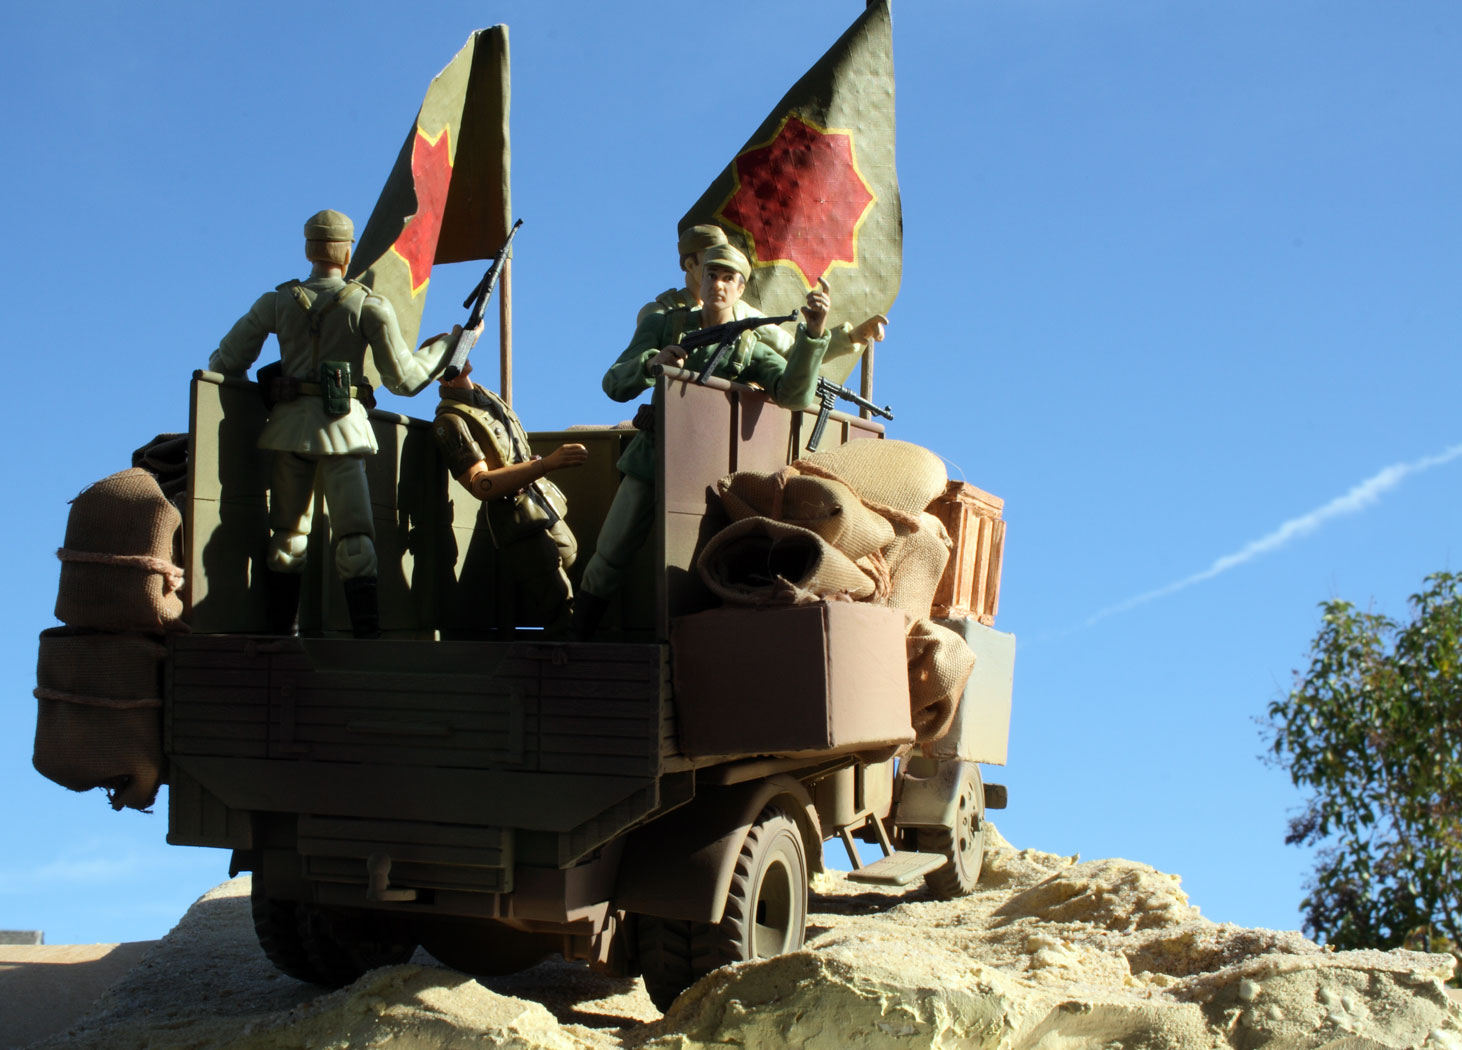
Another "action feature" allows German soldiers to hang off the side of the body. I have not tried this with Hasbro's soldier figures, but I was able to successfully hang some 21st Century figures off the side. Basically the feet stick into a rack at the side and the canvas top has little indents that a hand or elbow can dig into. This does not hold the figure too securely, but as the role of these figures is to be knocked off I suppose that is not so bad. There are only 2 of the indents per side however, so the third soldier might have trouble holding on! The truck bed can seat figures but is a little shallow, so your soldiers will be playing footsie. I put 6 21st Century guys in there for the photos.
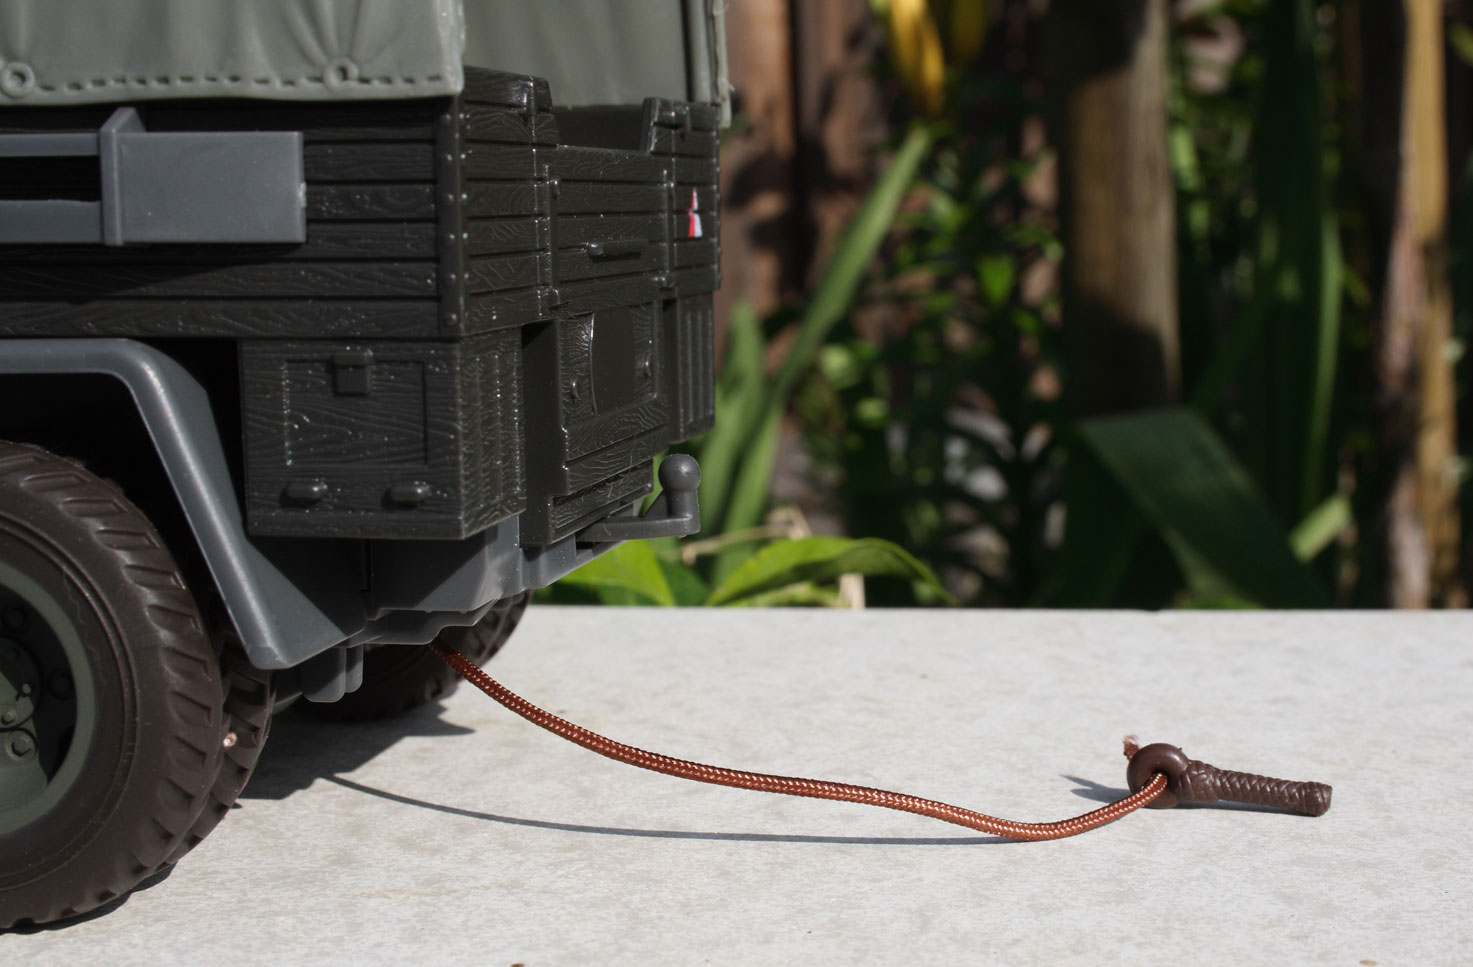
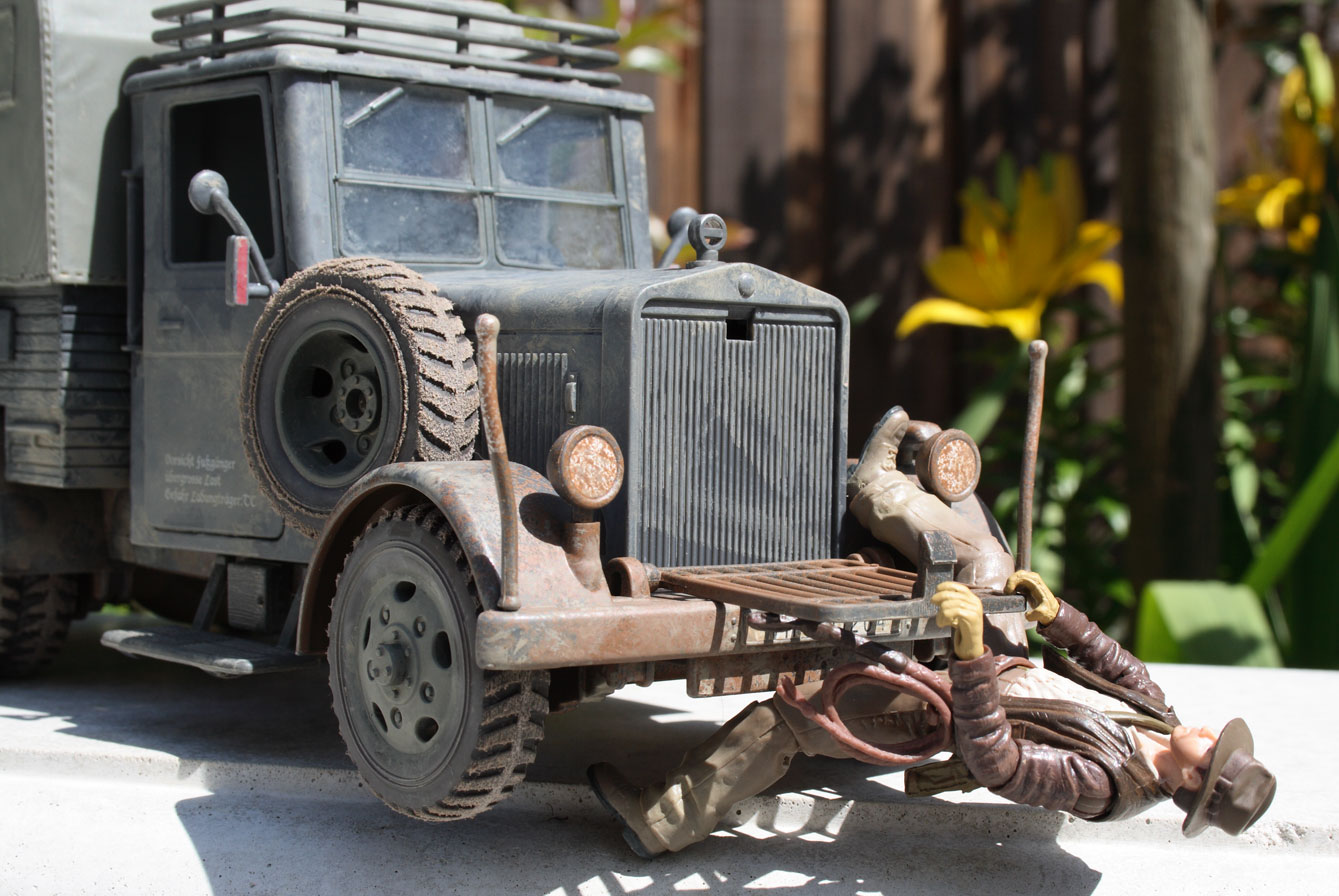
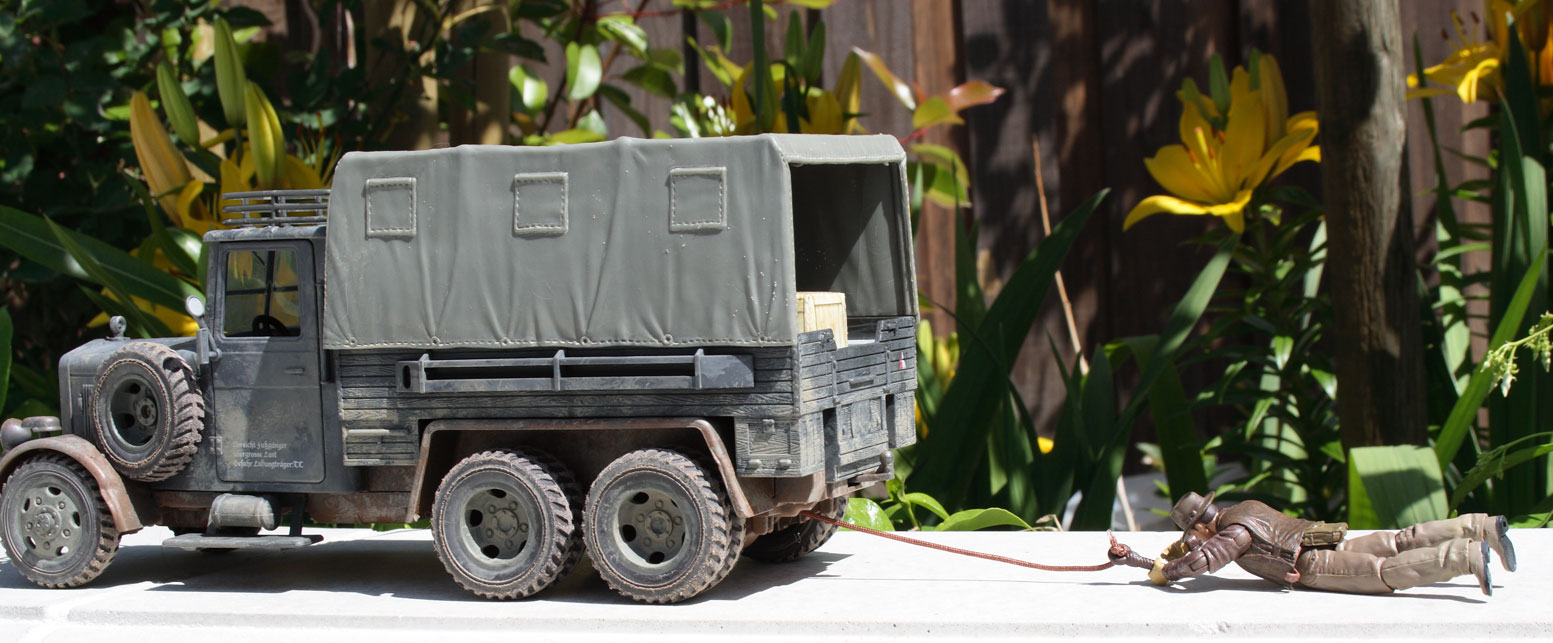
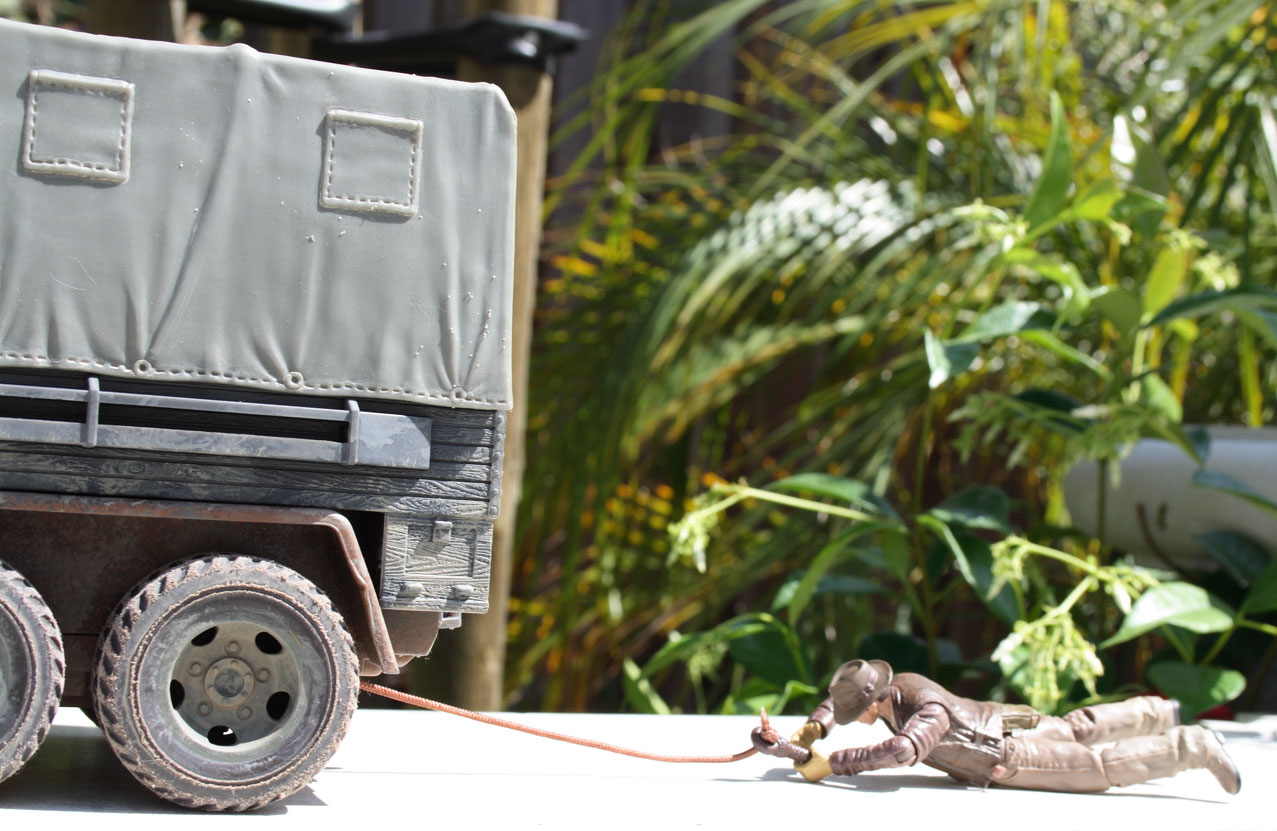
The back sports a little triangular symbol just like the movie truck, but there is no rear license plate. What we do have is the whip-dragging action feature. This is a piece of brown nylon string with a plastic whip handle on the end. Pull out the whip to drag a figure. There is a towing hook that also acts as a lever so you can drag or wind in the figure so it is pulled in closer to the truck. Inside there is a little "clutch" that when engaged wraps the string around the rear axle. Incidentally this truck has metal axles so that's good for ruggedness.
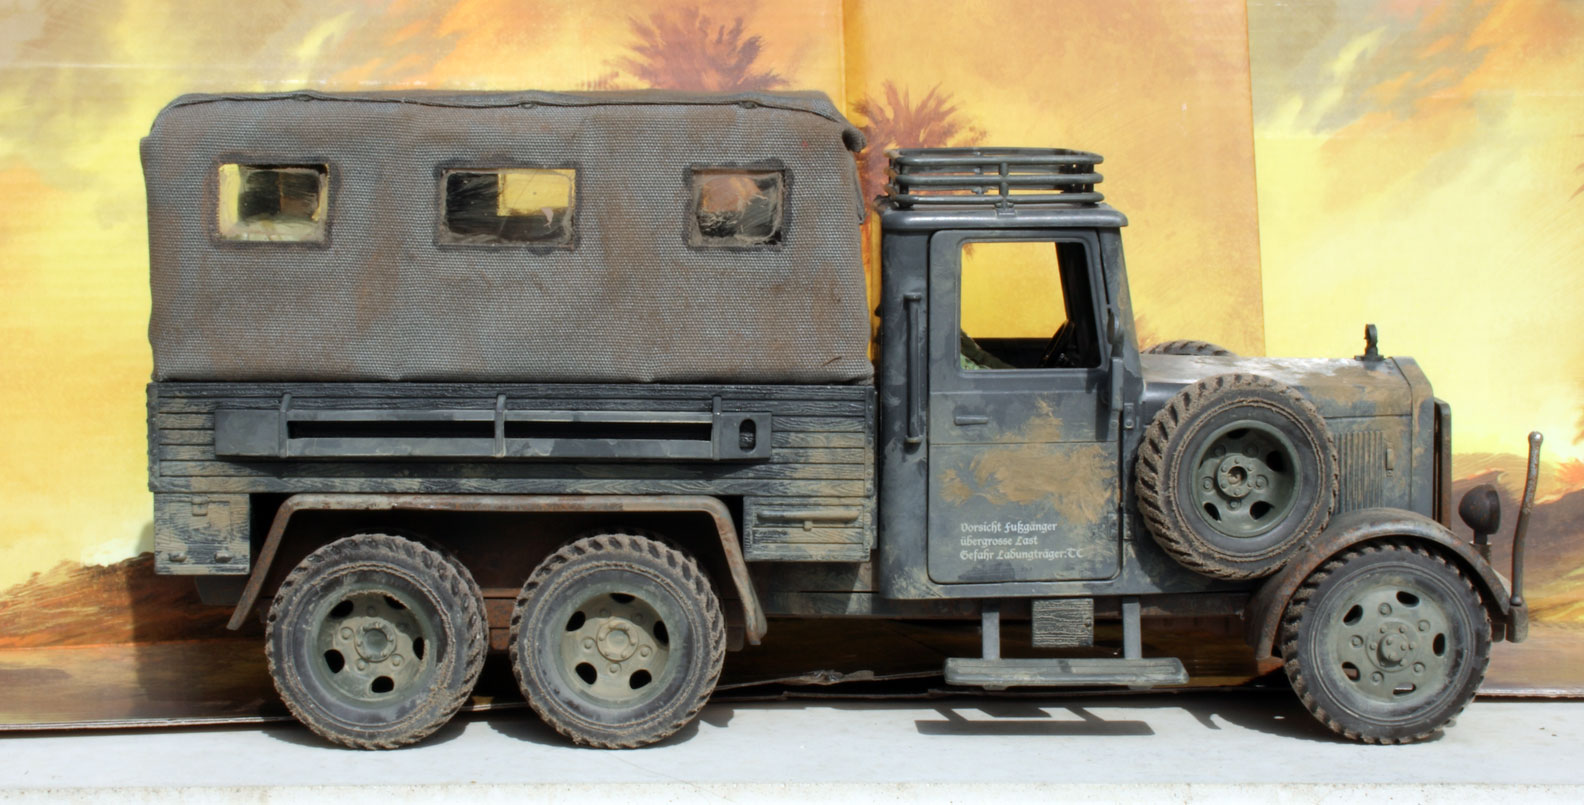
Overall accuracy to the movie truck is very good, given the limitations of it being a toy. With some work it could be turned into a pretty nice replica. I read that the movie truck was actually based on a GMC truck, but even so is a pretty fair replica of a German double axle truck of the period. Versions were actually produced by several manufacturers. With some painting it could be right at home with 1:18 military vehicles, but is a bit too clean, plasticy and toy-like right out of the box. I opted to add wear to the tires and dust and dirt to the model. Hasbro really should have added some "dirt" to this one, but perhaps that would have added to the cost. This feels like a solid value for the price of $19.99
UPDATE: Contrary to early reports, the windshield does NOT break away. The truck does NOT come with the Ark. There is a crate, of sorts, made of cardboard. However, this crate is NOTHING like the one used to transport the Ark. By-the-way, the movie has at least 2 different Ark crates! I have 2 freeze frames of the crate in the truck and it is clear that they are different crates!
![]()

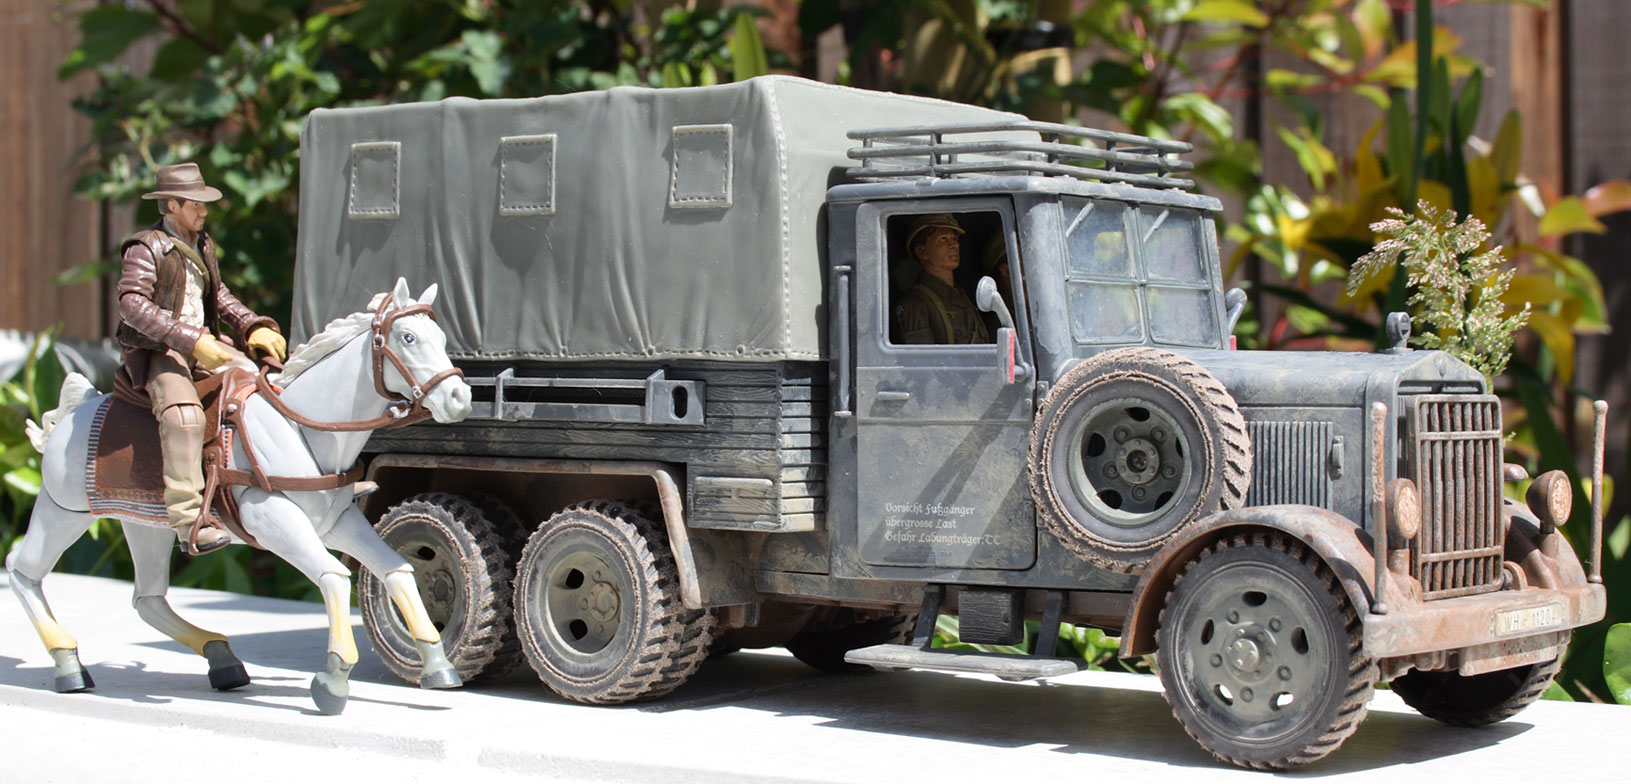
 AFTER! Here is the Hasbro Indiana Jones Cargo Truck after I have got my grubby little hands on it. All the dirt went onto the truck! The tires got worn down too. Actually after looking at the movie again I think I can go with even MORE dirt. I always start light because I can always add more...

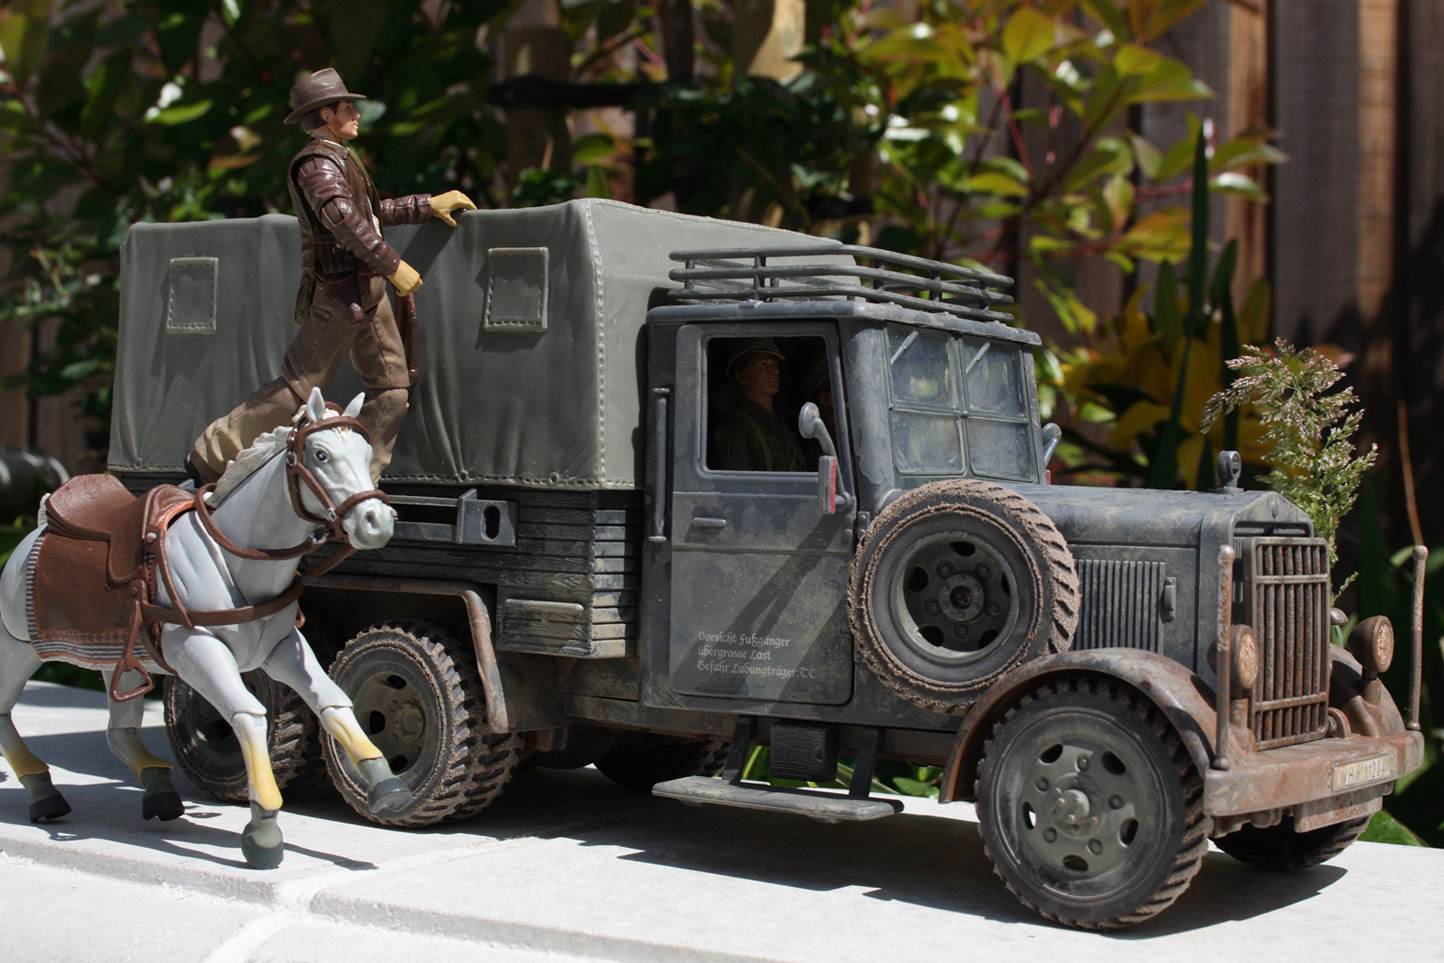

 Now for some fun!
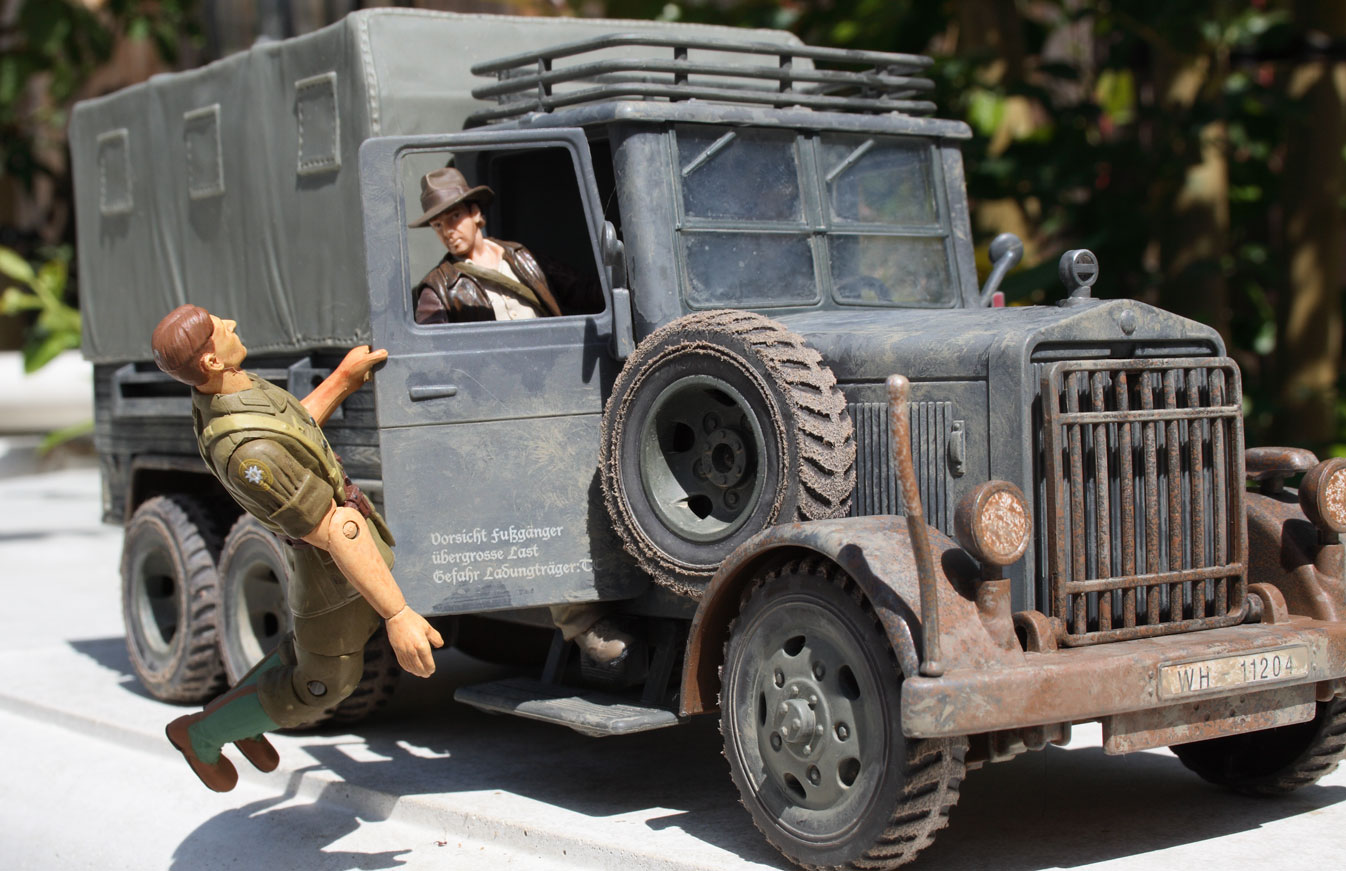
 More fun!
 More fun!
 Four additions: 1) More dirt! 2) Cloth top with windows added. 3) Famous hood ornament (but still operable as a toy). 4) Grill ornament, (But darn it I forget the 'DIESEL' that goes underneath!)


Construction notes!
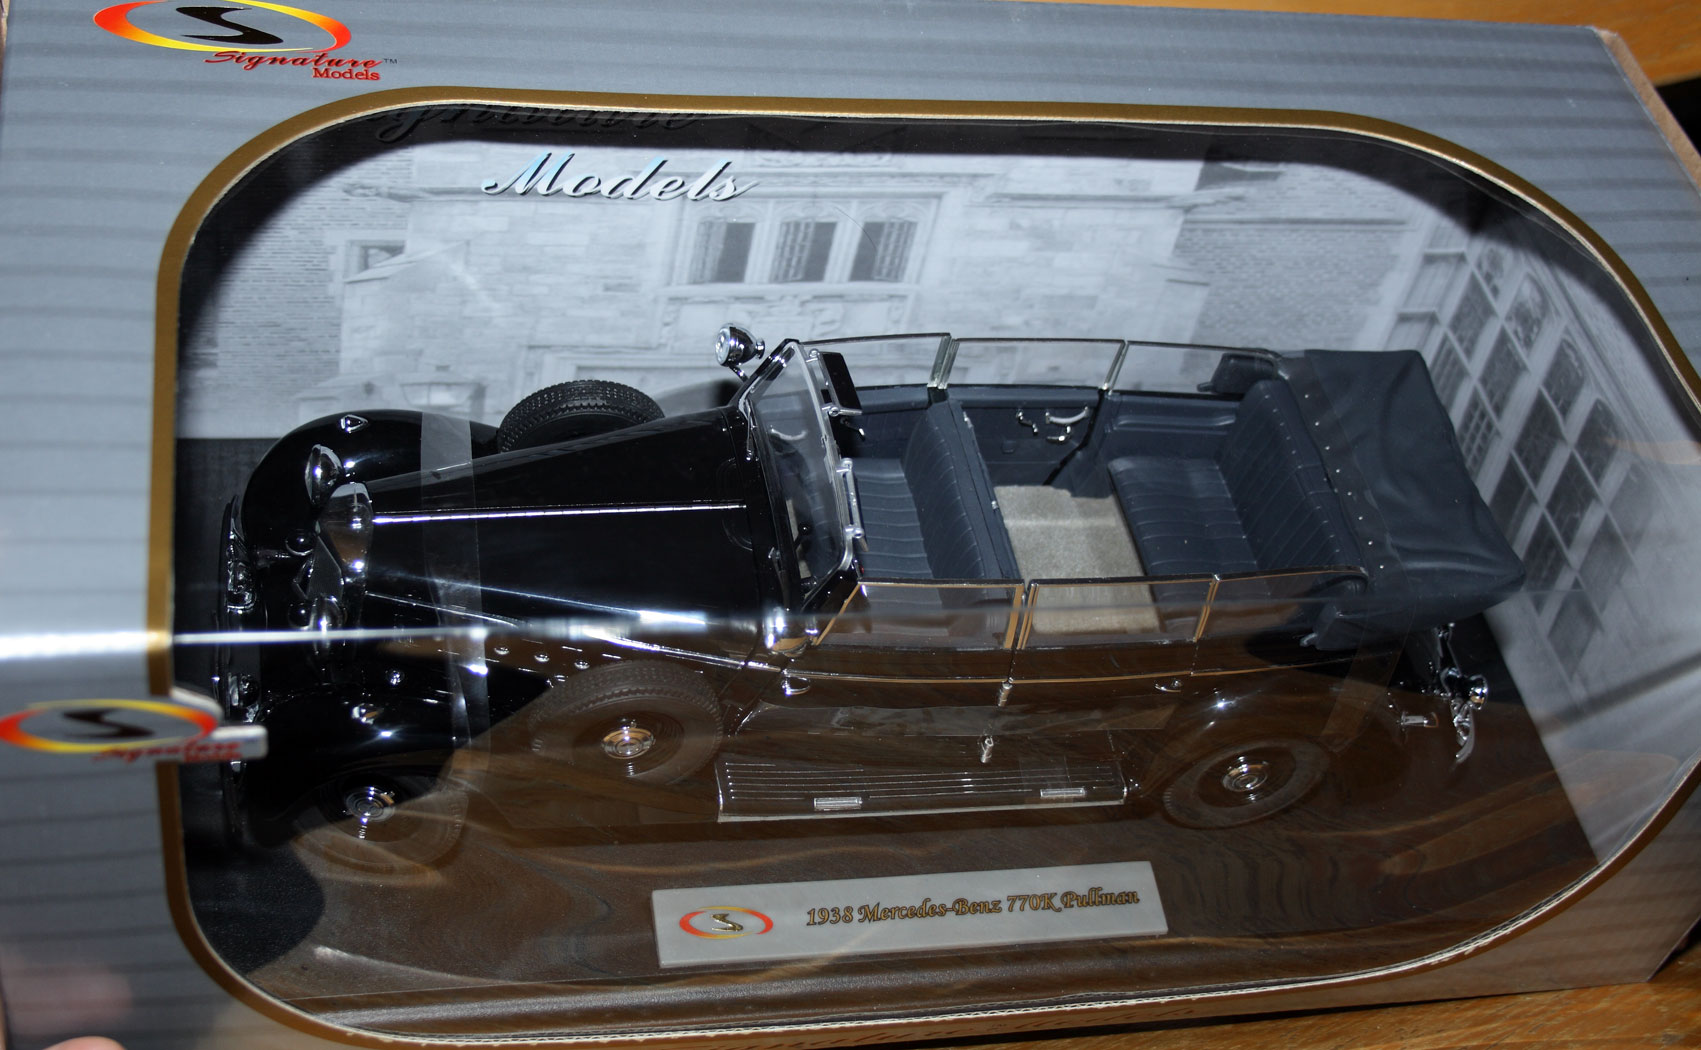
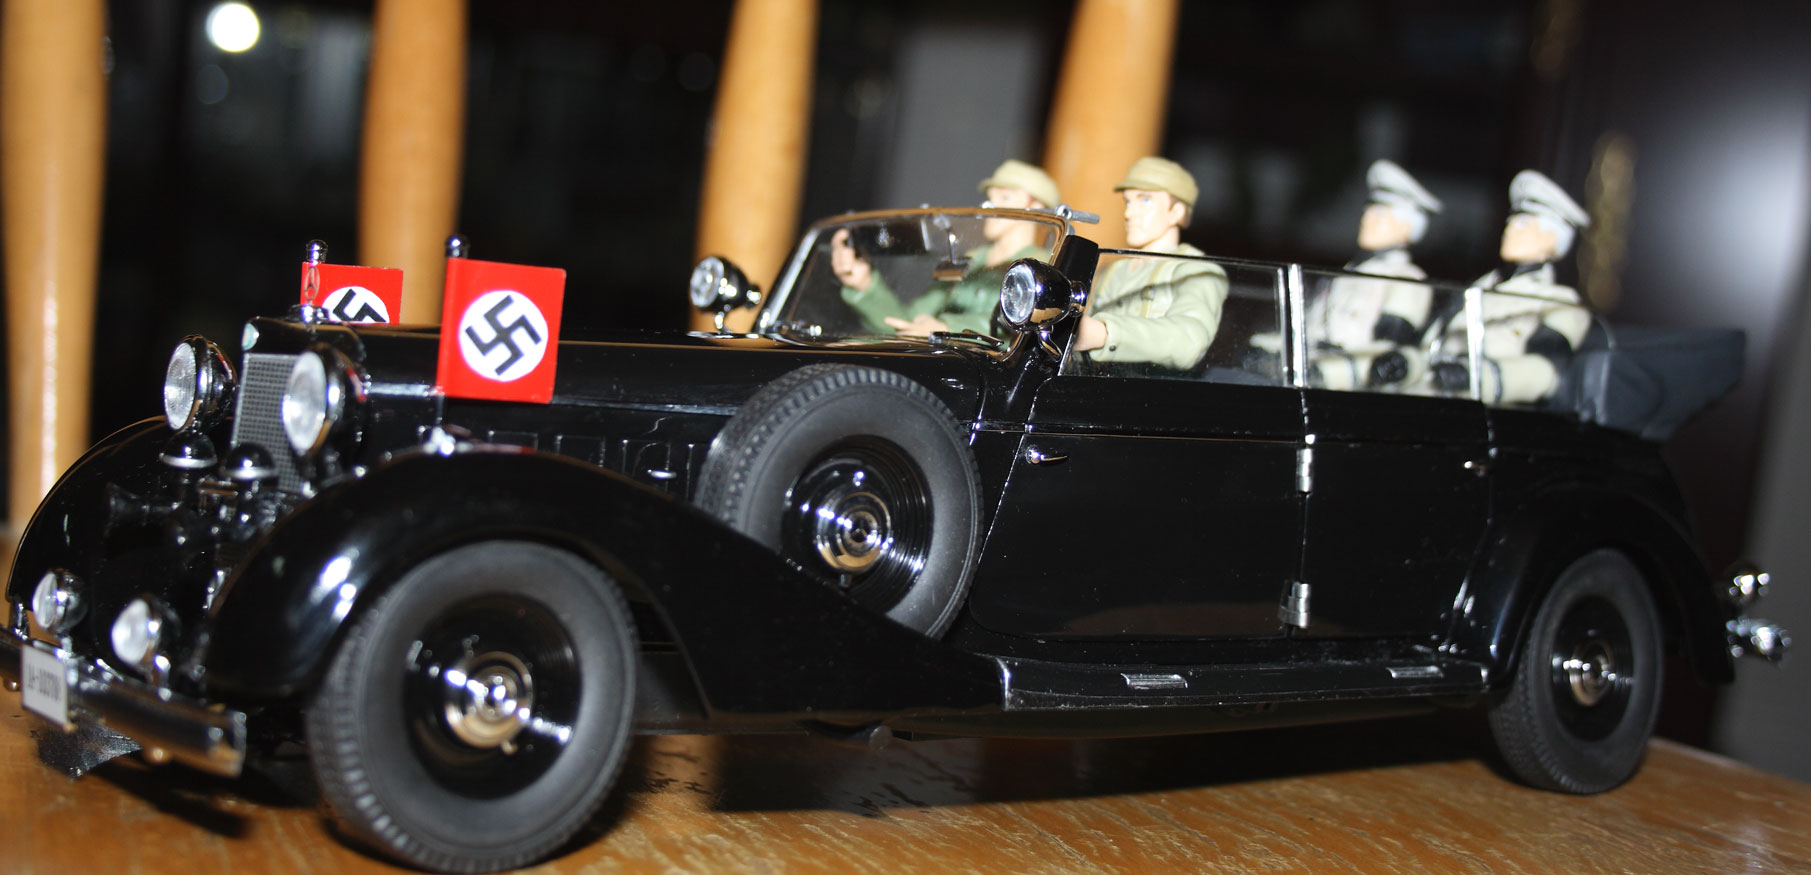
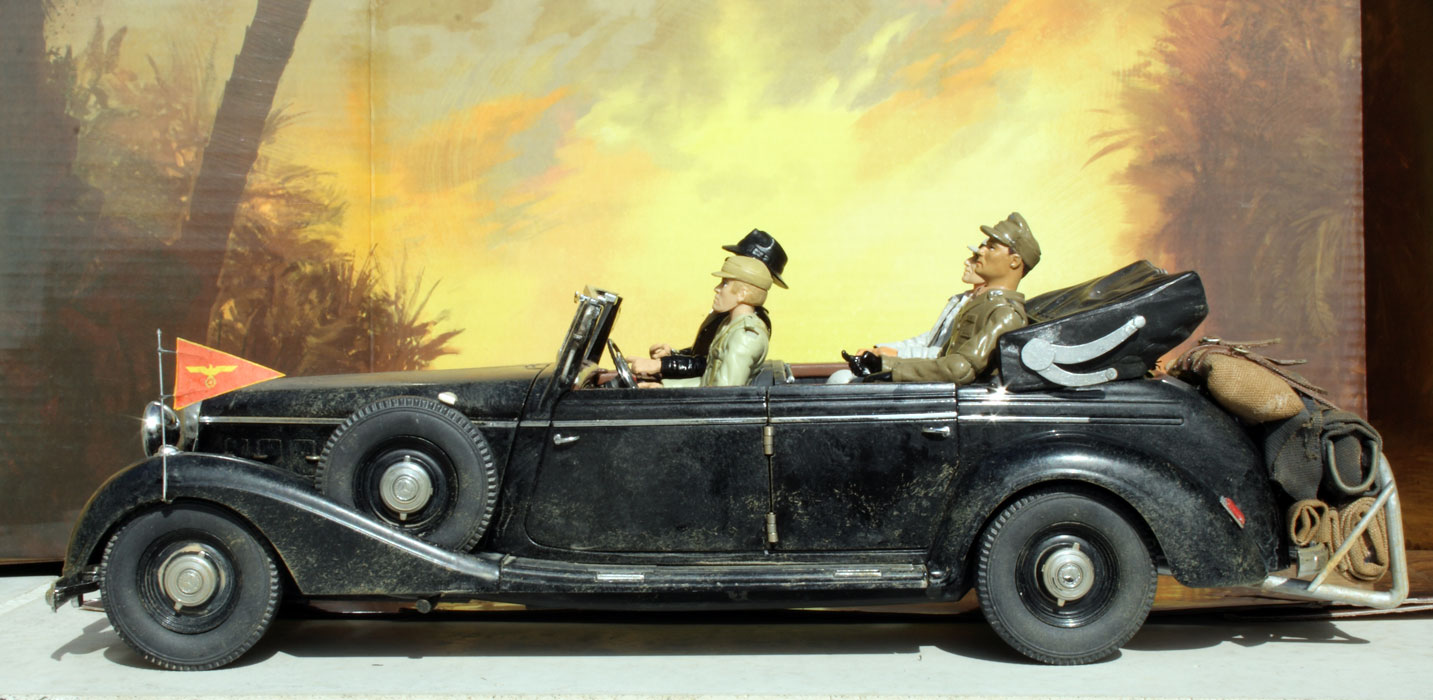
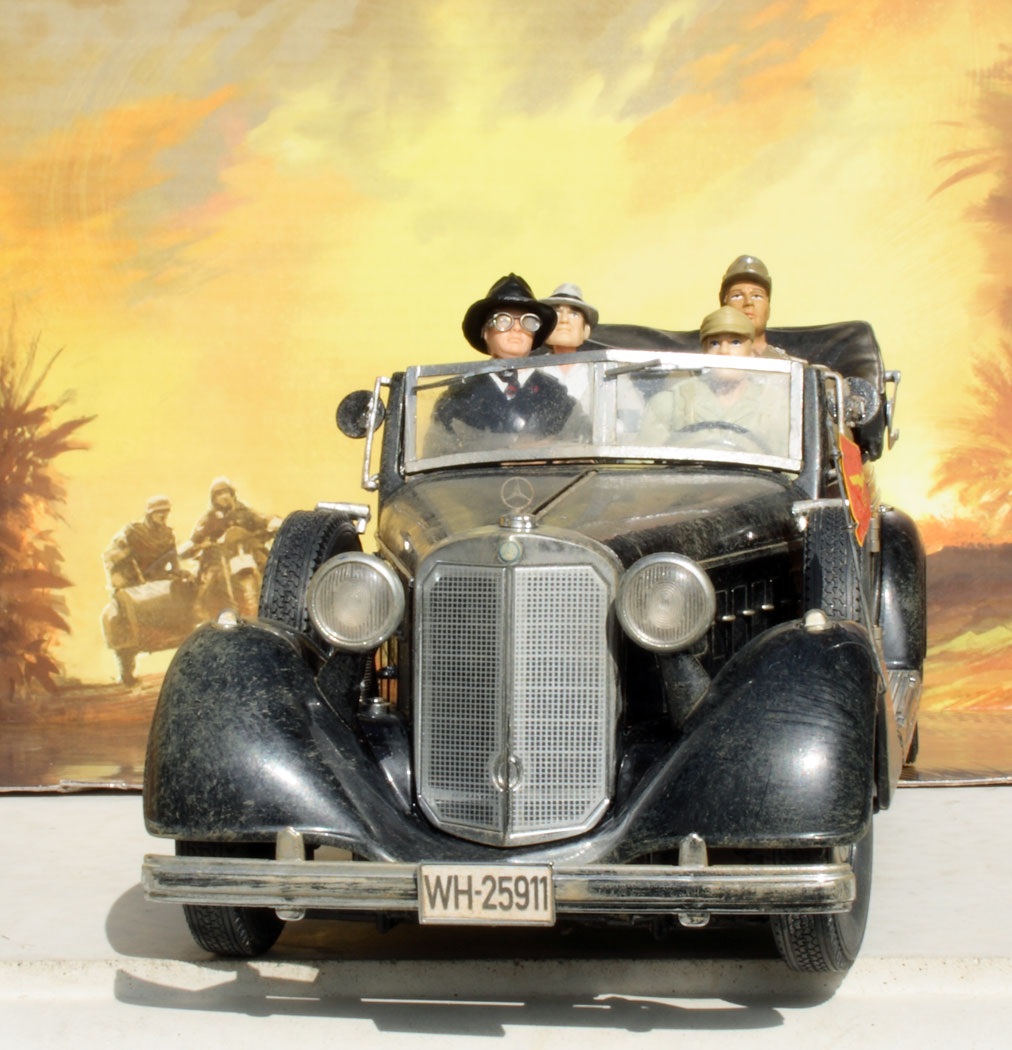
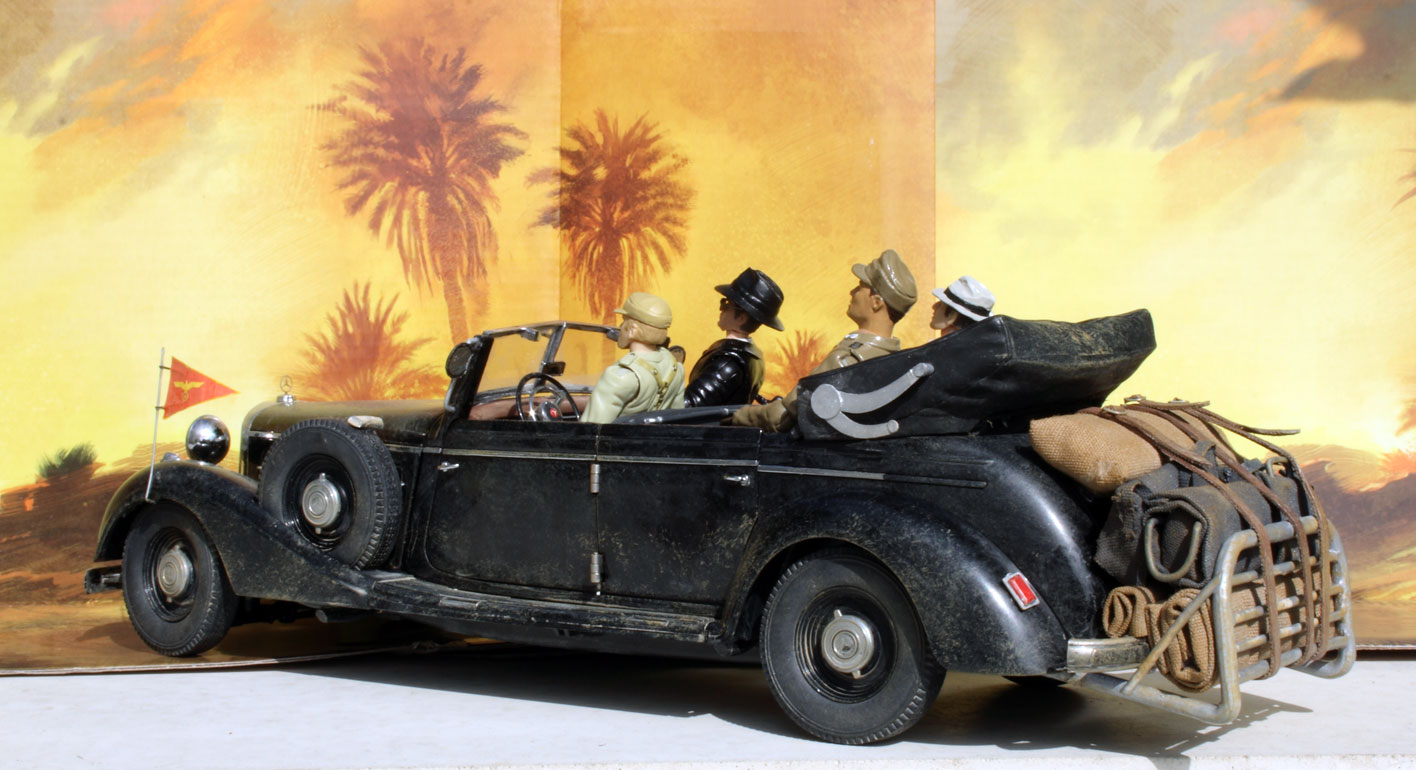
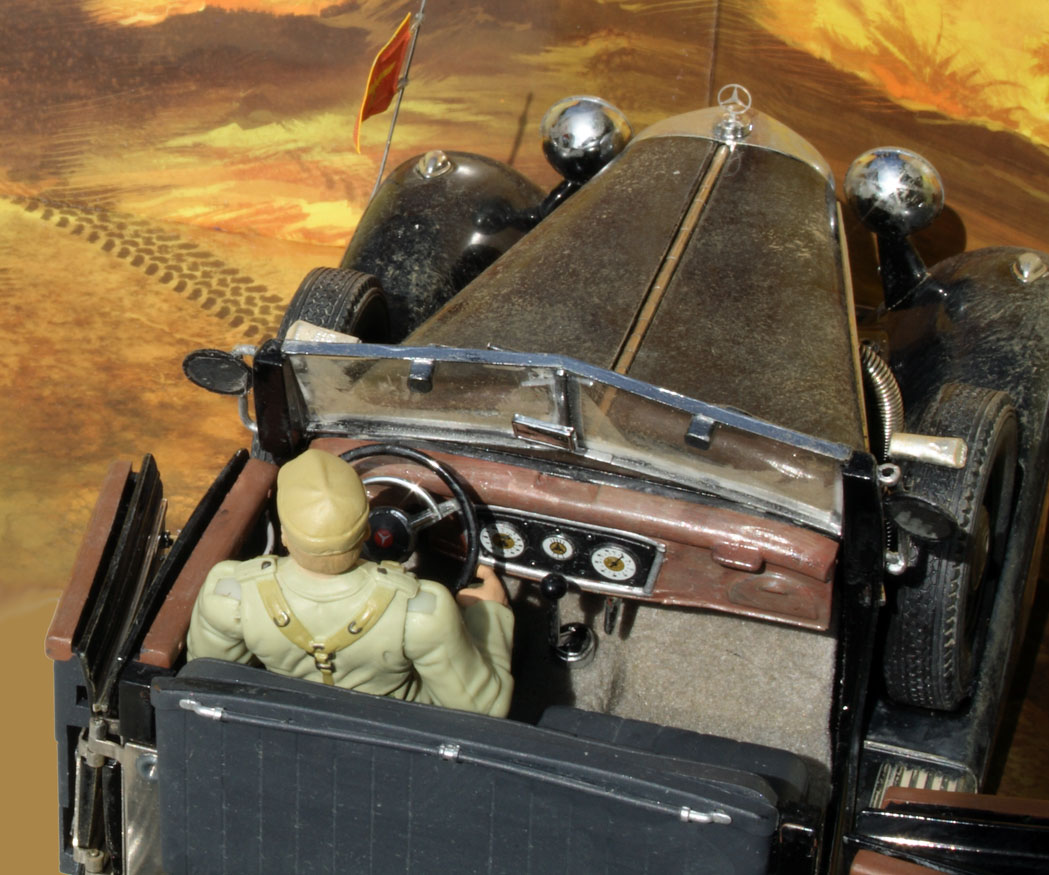
![]() First ya gotta take it all apart. The Mercedes 770K Pullman Convertible is a great starting point for our Raiders staff car. It is a 1:18 scale car, the hood and front grill look spot-on, the doors hinge in the center ("suicide" doors!), it's a convertible and the folded top look right too. The fenders are a good shape match. Wheels are fine. The rear is rather humped up for the trunk and should be "flatter" for our purposes, but since the rear is covered in external luggage I think it will be hidden quite well. The 770K is, however, the luxury model for diplomats and VIPs. The staff car version for officers is the stripped down model!. Off come the fancy horns, the fog lights, the side windows and the rear lights.
First ya gotta take it all apart. The Mercedes 770K Pullman Convertible is a great starting point for our Raiders staff car. It is a 1:18 scale car, the hood and front grill look spot-on, the doors hinge in the center ("suicide" doors!), it's a convertible and the folded top look right too. The fenders are a good shape match. Wheels are fine. The rear is rather humped up for the trunk and should be "flatter" for our purposes, but since the rear is covered in external luggage I think it will be hidden quite well. The 770K is, however, the luxury model for diplomats and VIPs. The staff car version for officers is the stripped down model!. Off come the fancy horns, the fog lights, the side windows and the rear lights.
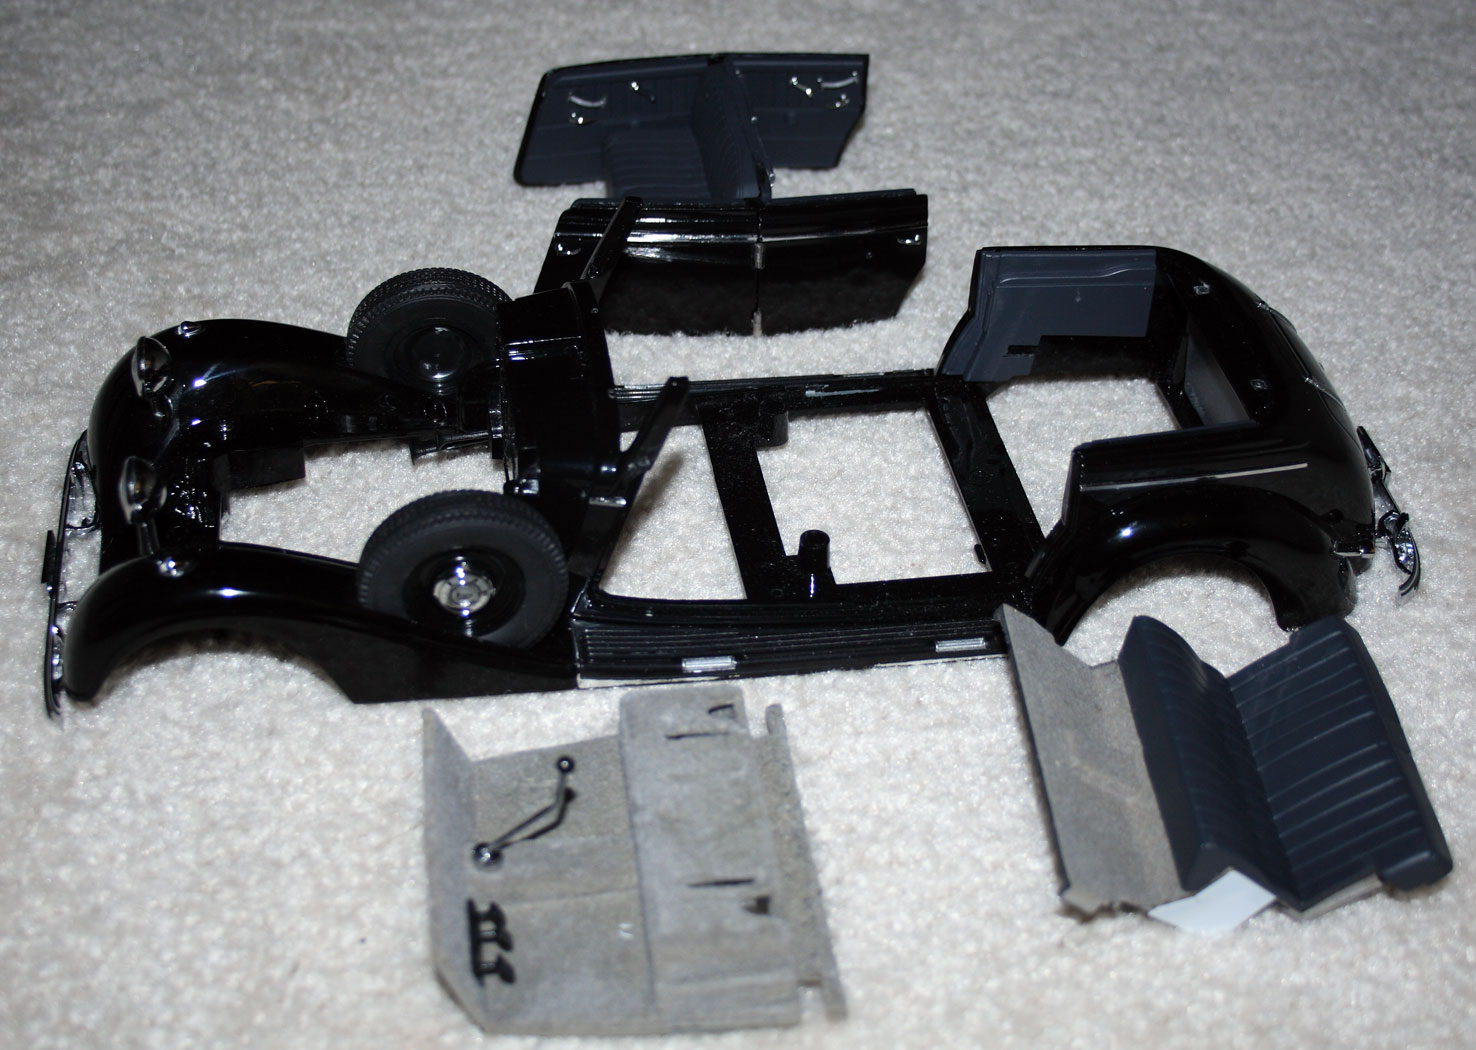
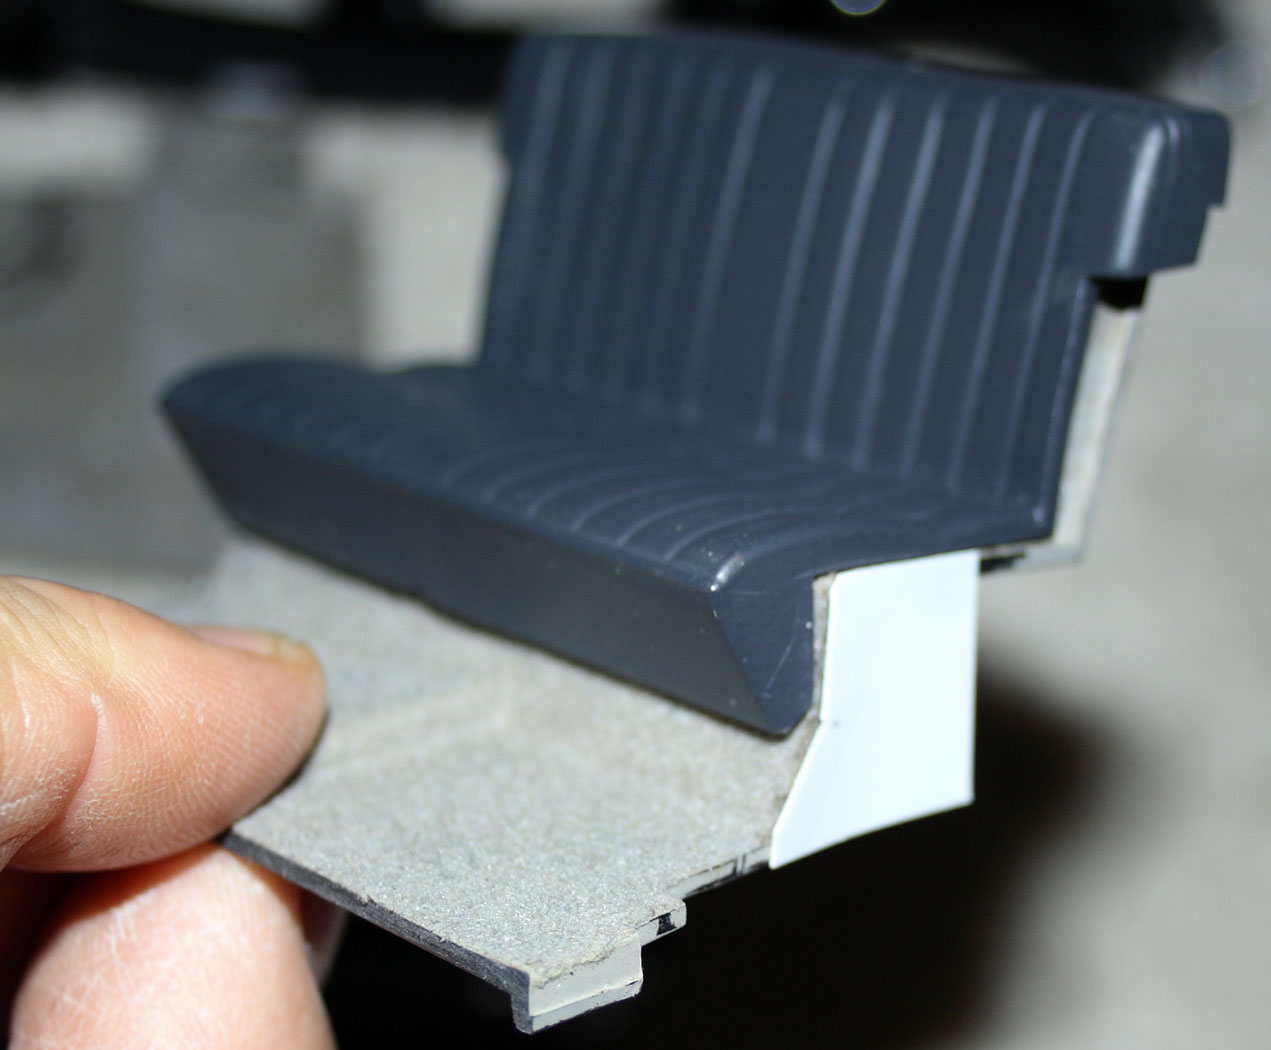
 The rear seat must be brought forward. The 770K has a huge rear area and fold up seats for extra passengers. The staff car we want is a standard four-seater, so the floor is cut and the rear seat brought forward. The white card at the side hides a gap and must be painted dark grey. I put a support across the rear for the seat (white bar).
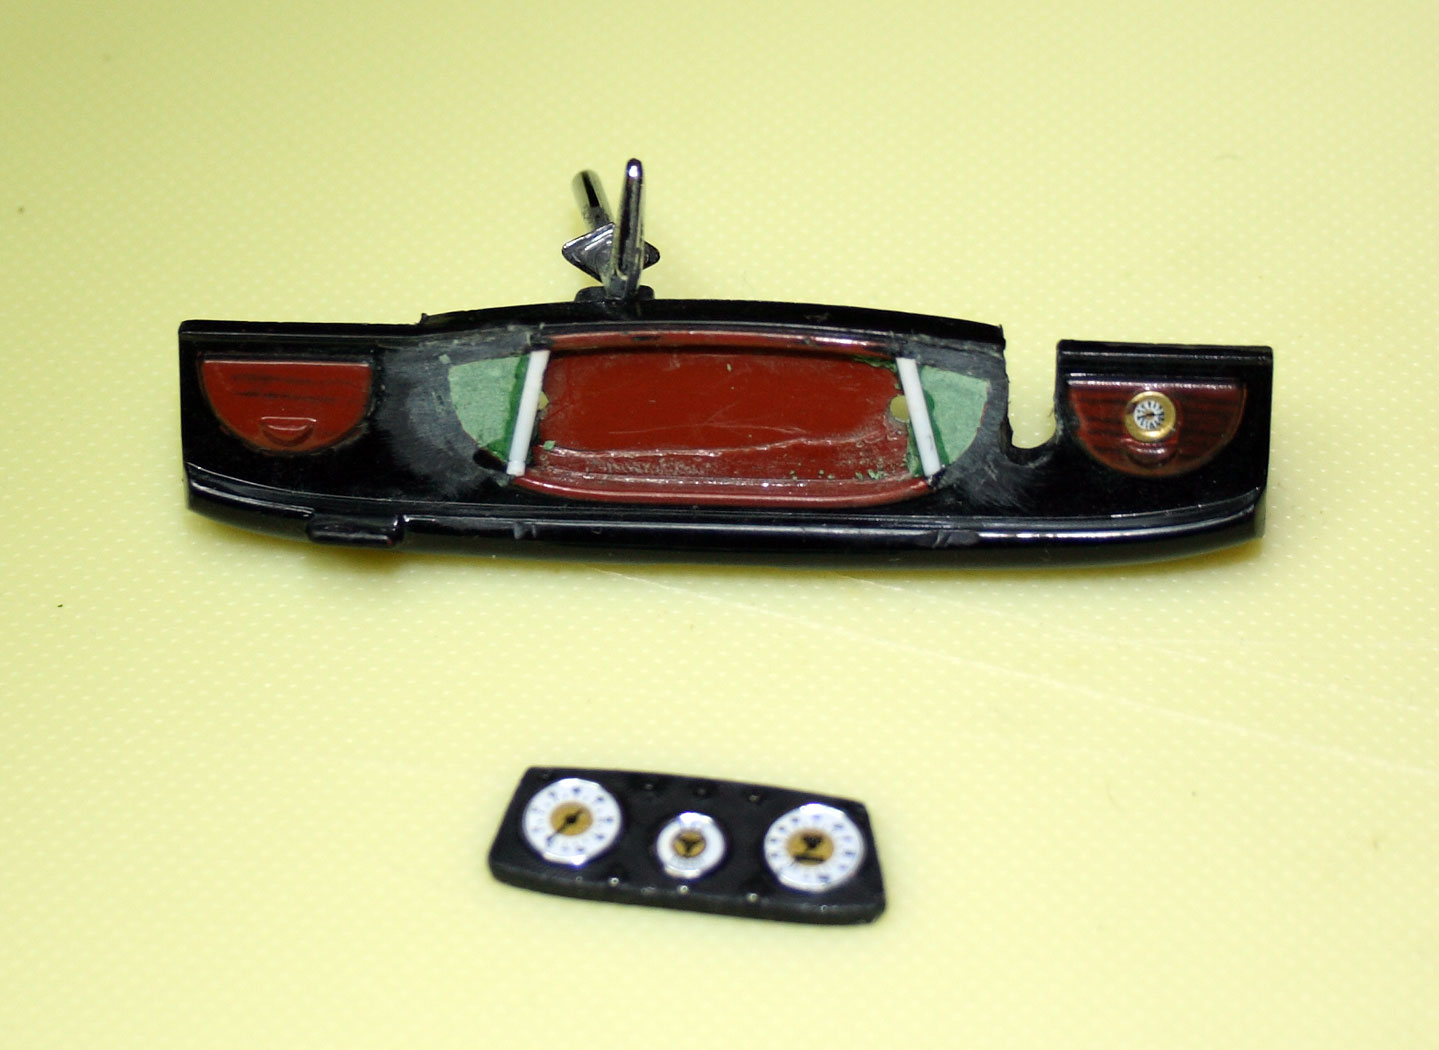 The dashboard on the 770K is too large so it must be cut down for an accurate representation. The instrument panel was prised out and the ends cut. The green areas on the dash are the putty I used to fill the gaps and the white strips reconstruct the trim. The rest is down to paint! The steering wheel was also trimmed down as it was too fancy.

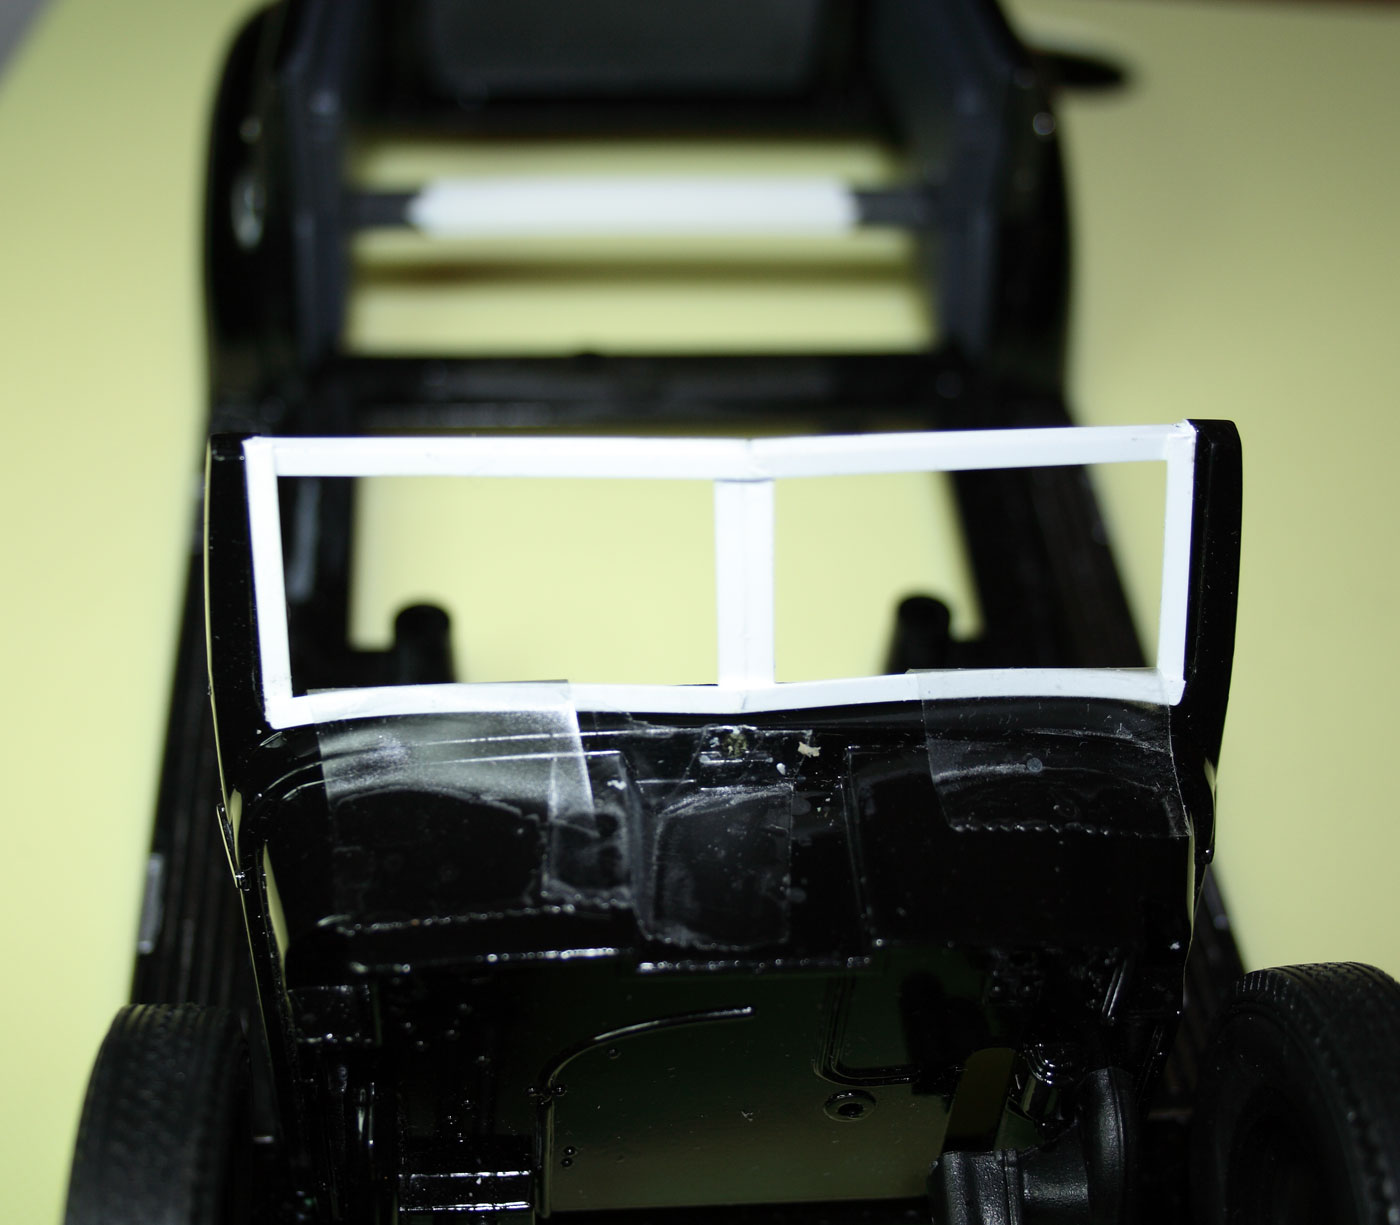 A major change must be made to the windshield. The Signature model is from 1938 and we want an earlier model with the split windshield and flat glass. I used angle plastic strip for this, and it is held in by tape in this construction shot.
 More dirt!! Back to the screen shots and my dirt is waaaaaaay too subtle. They must have applied it with a shovel for the movie!
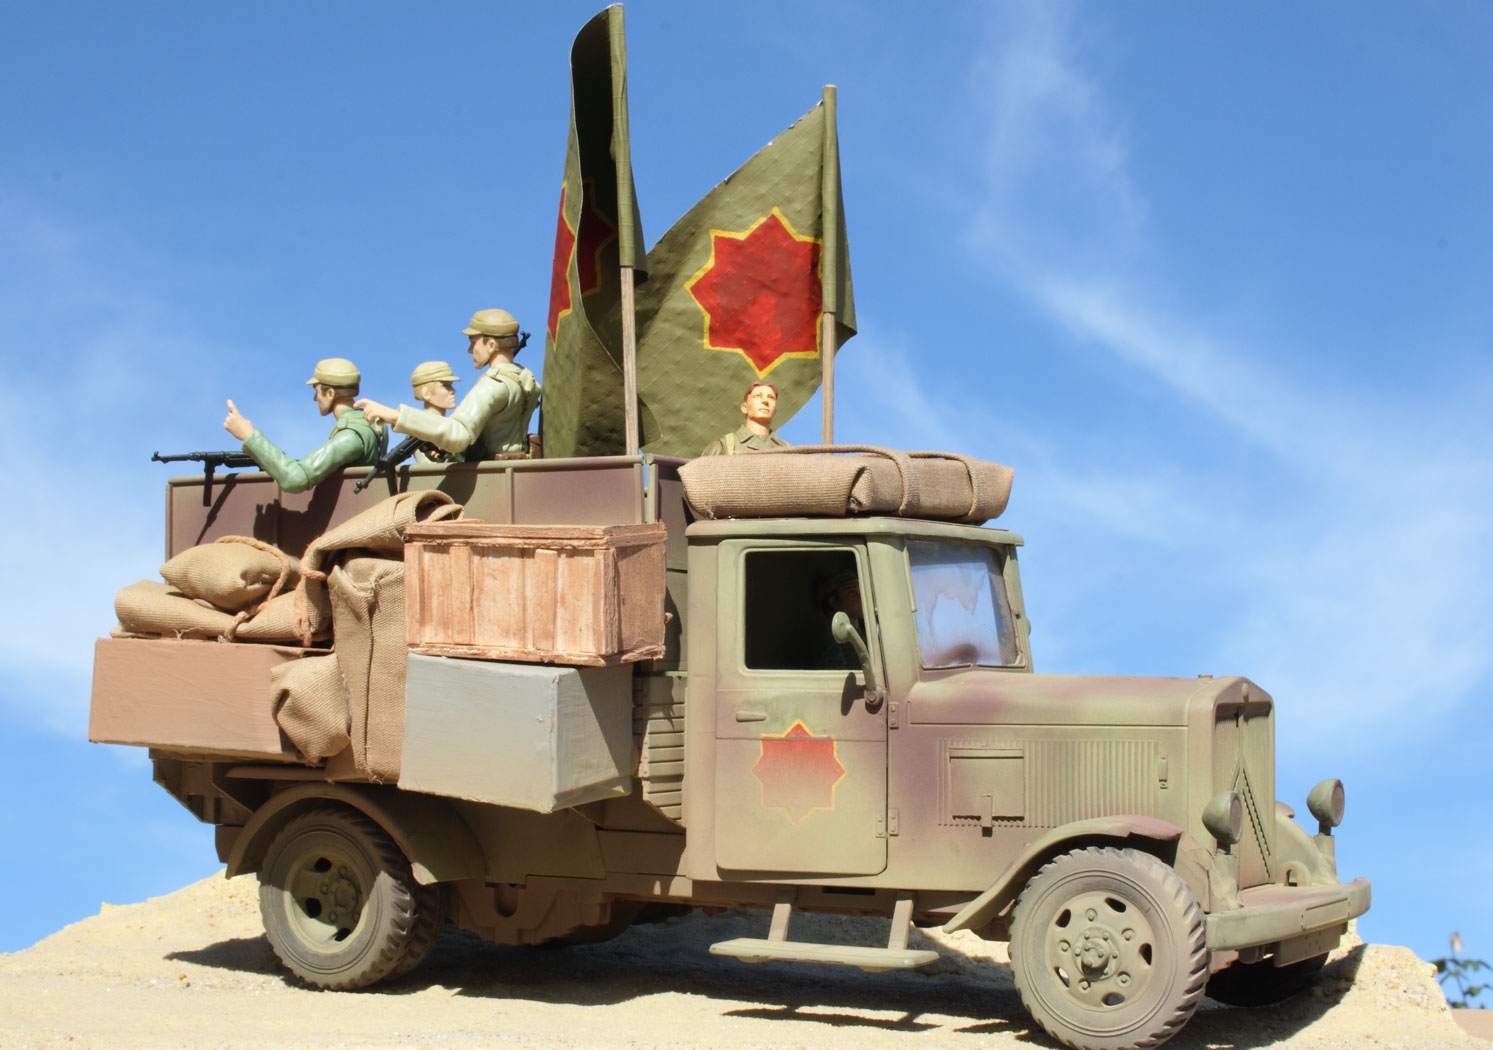
 I decided to create a truck from Hatay since the tank would take a while :-) I haven't seen anyone else try this yet...

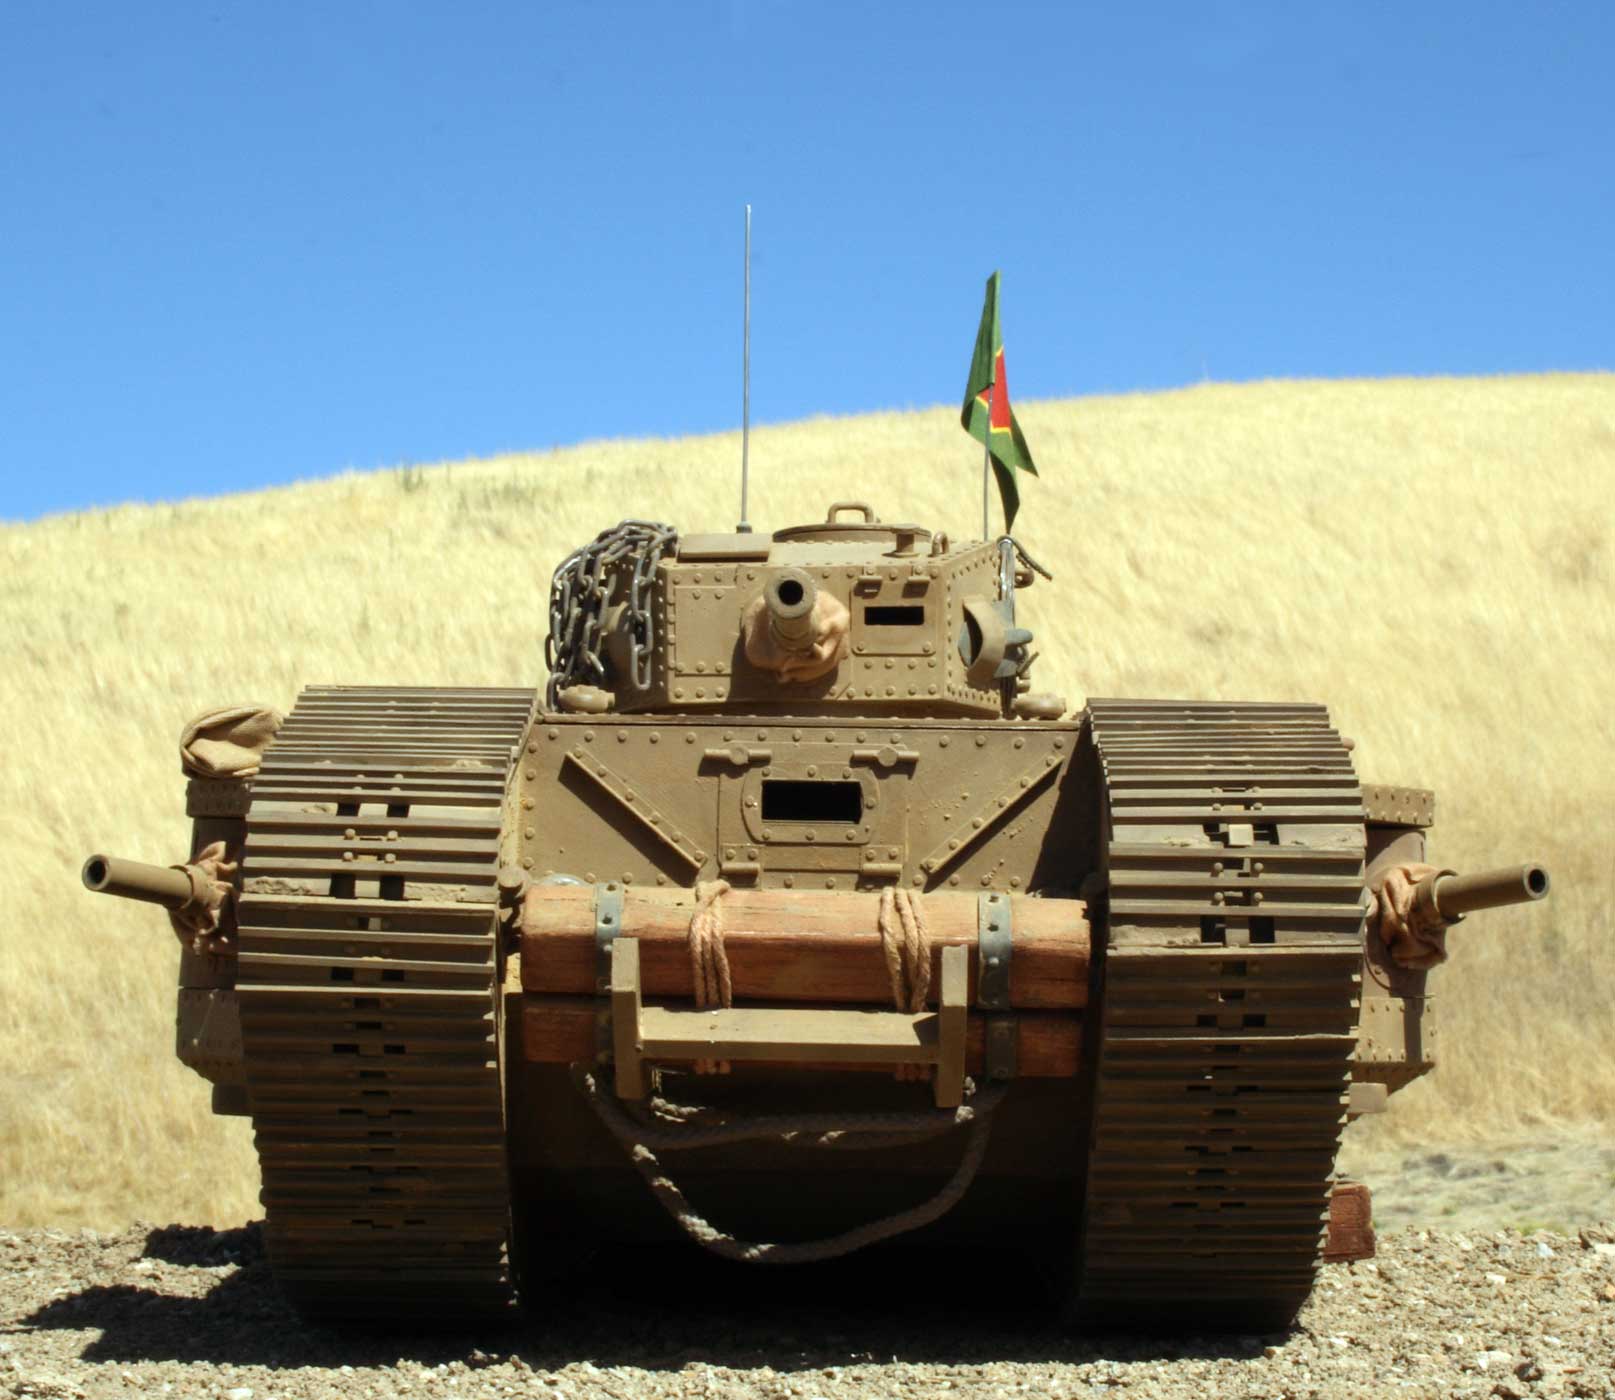
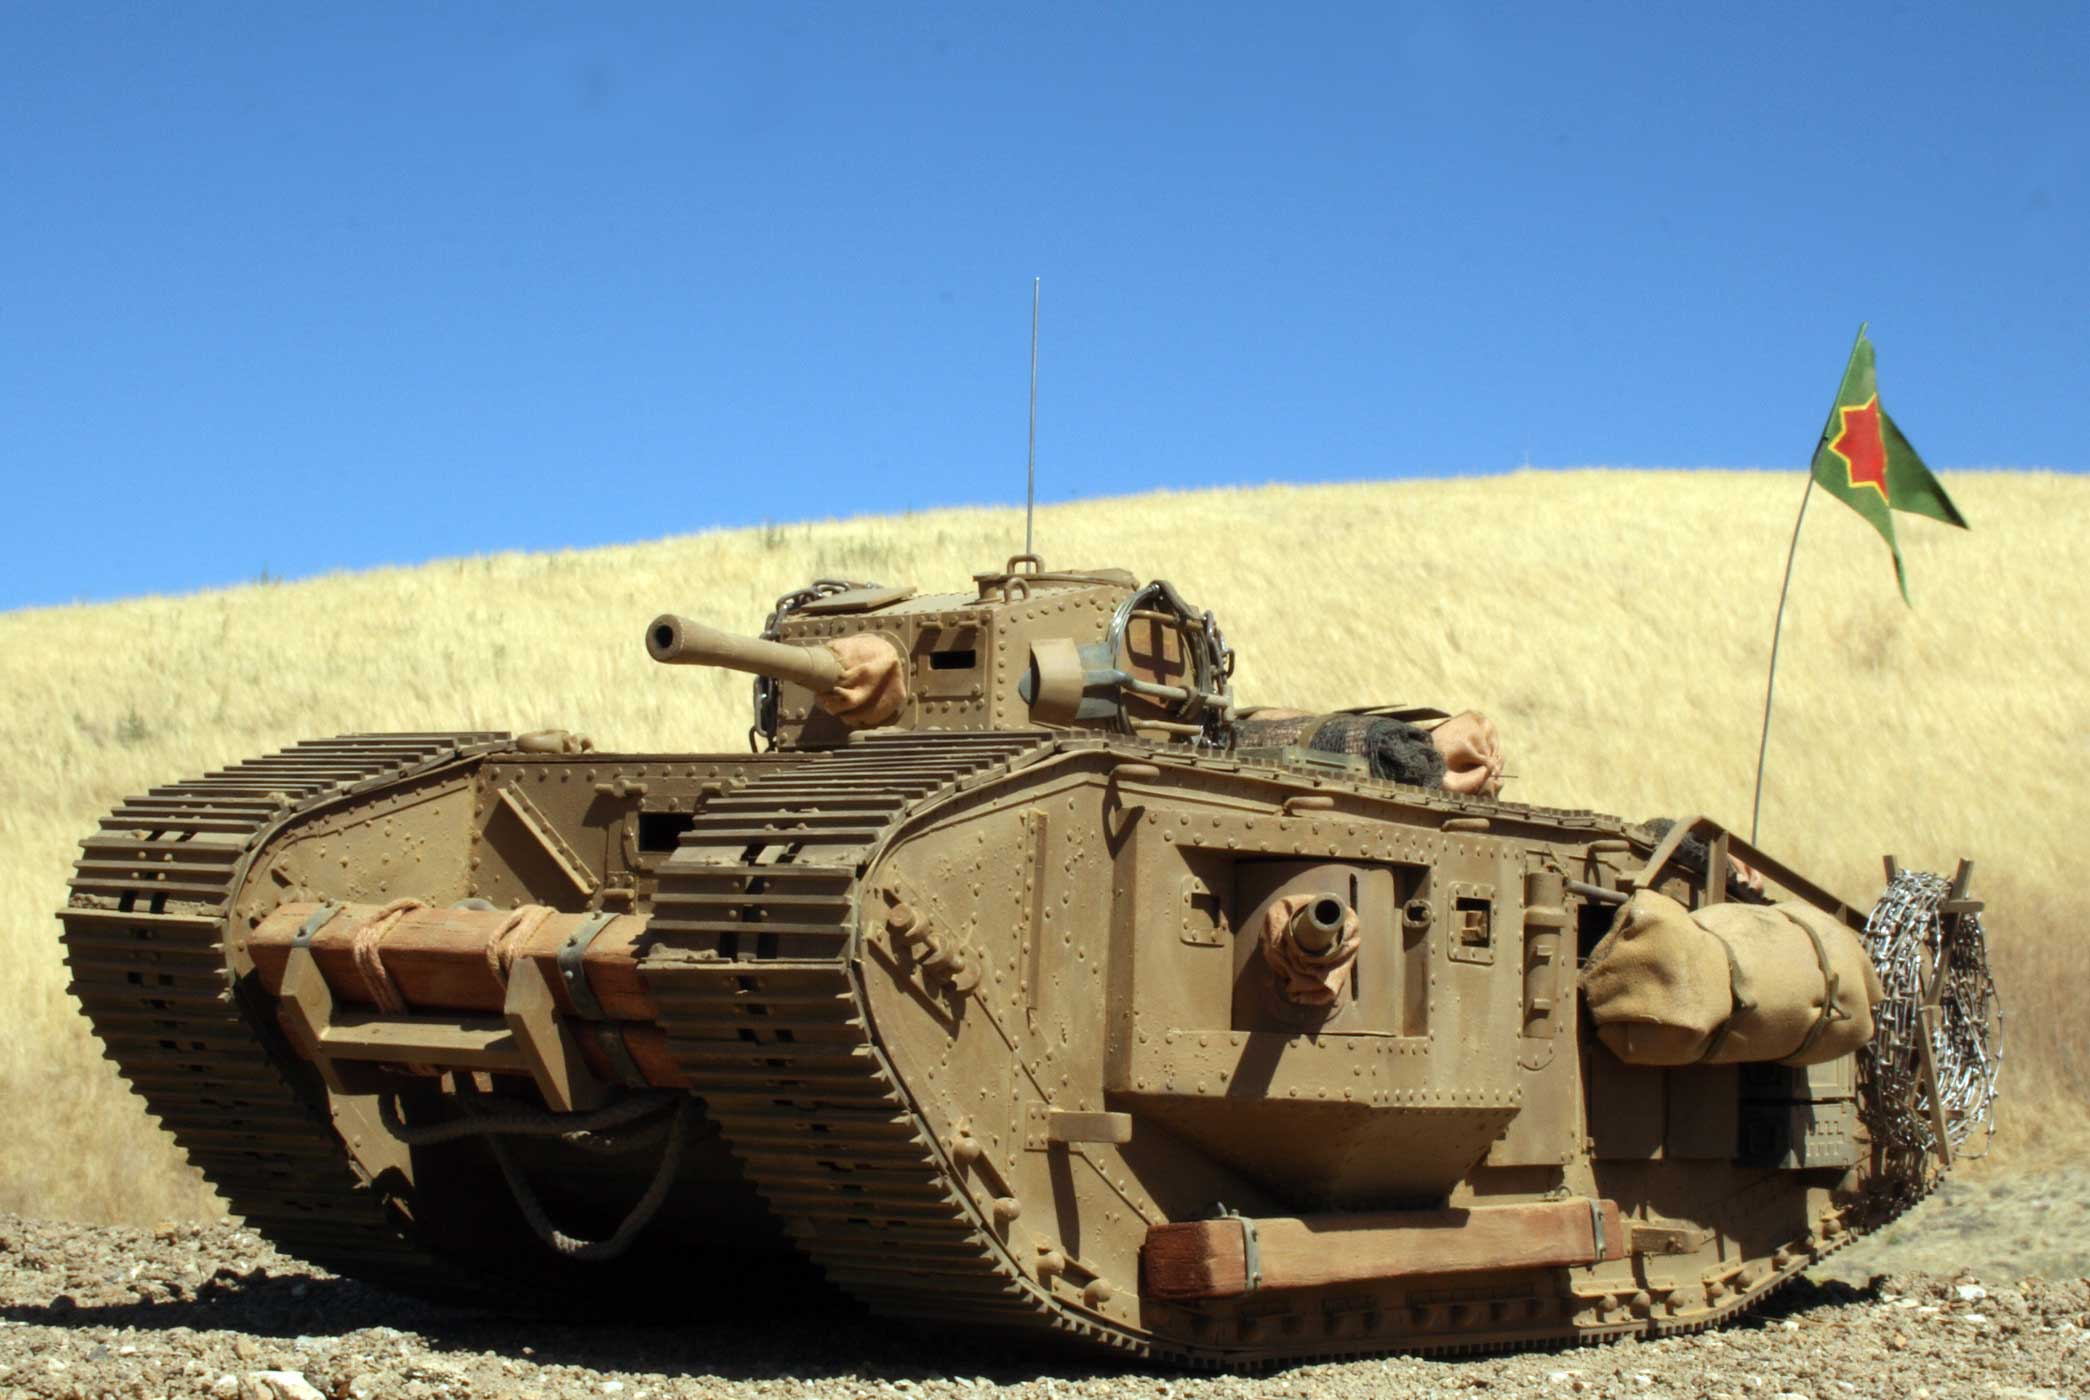
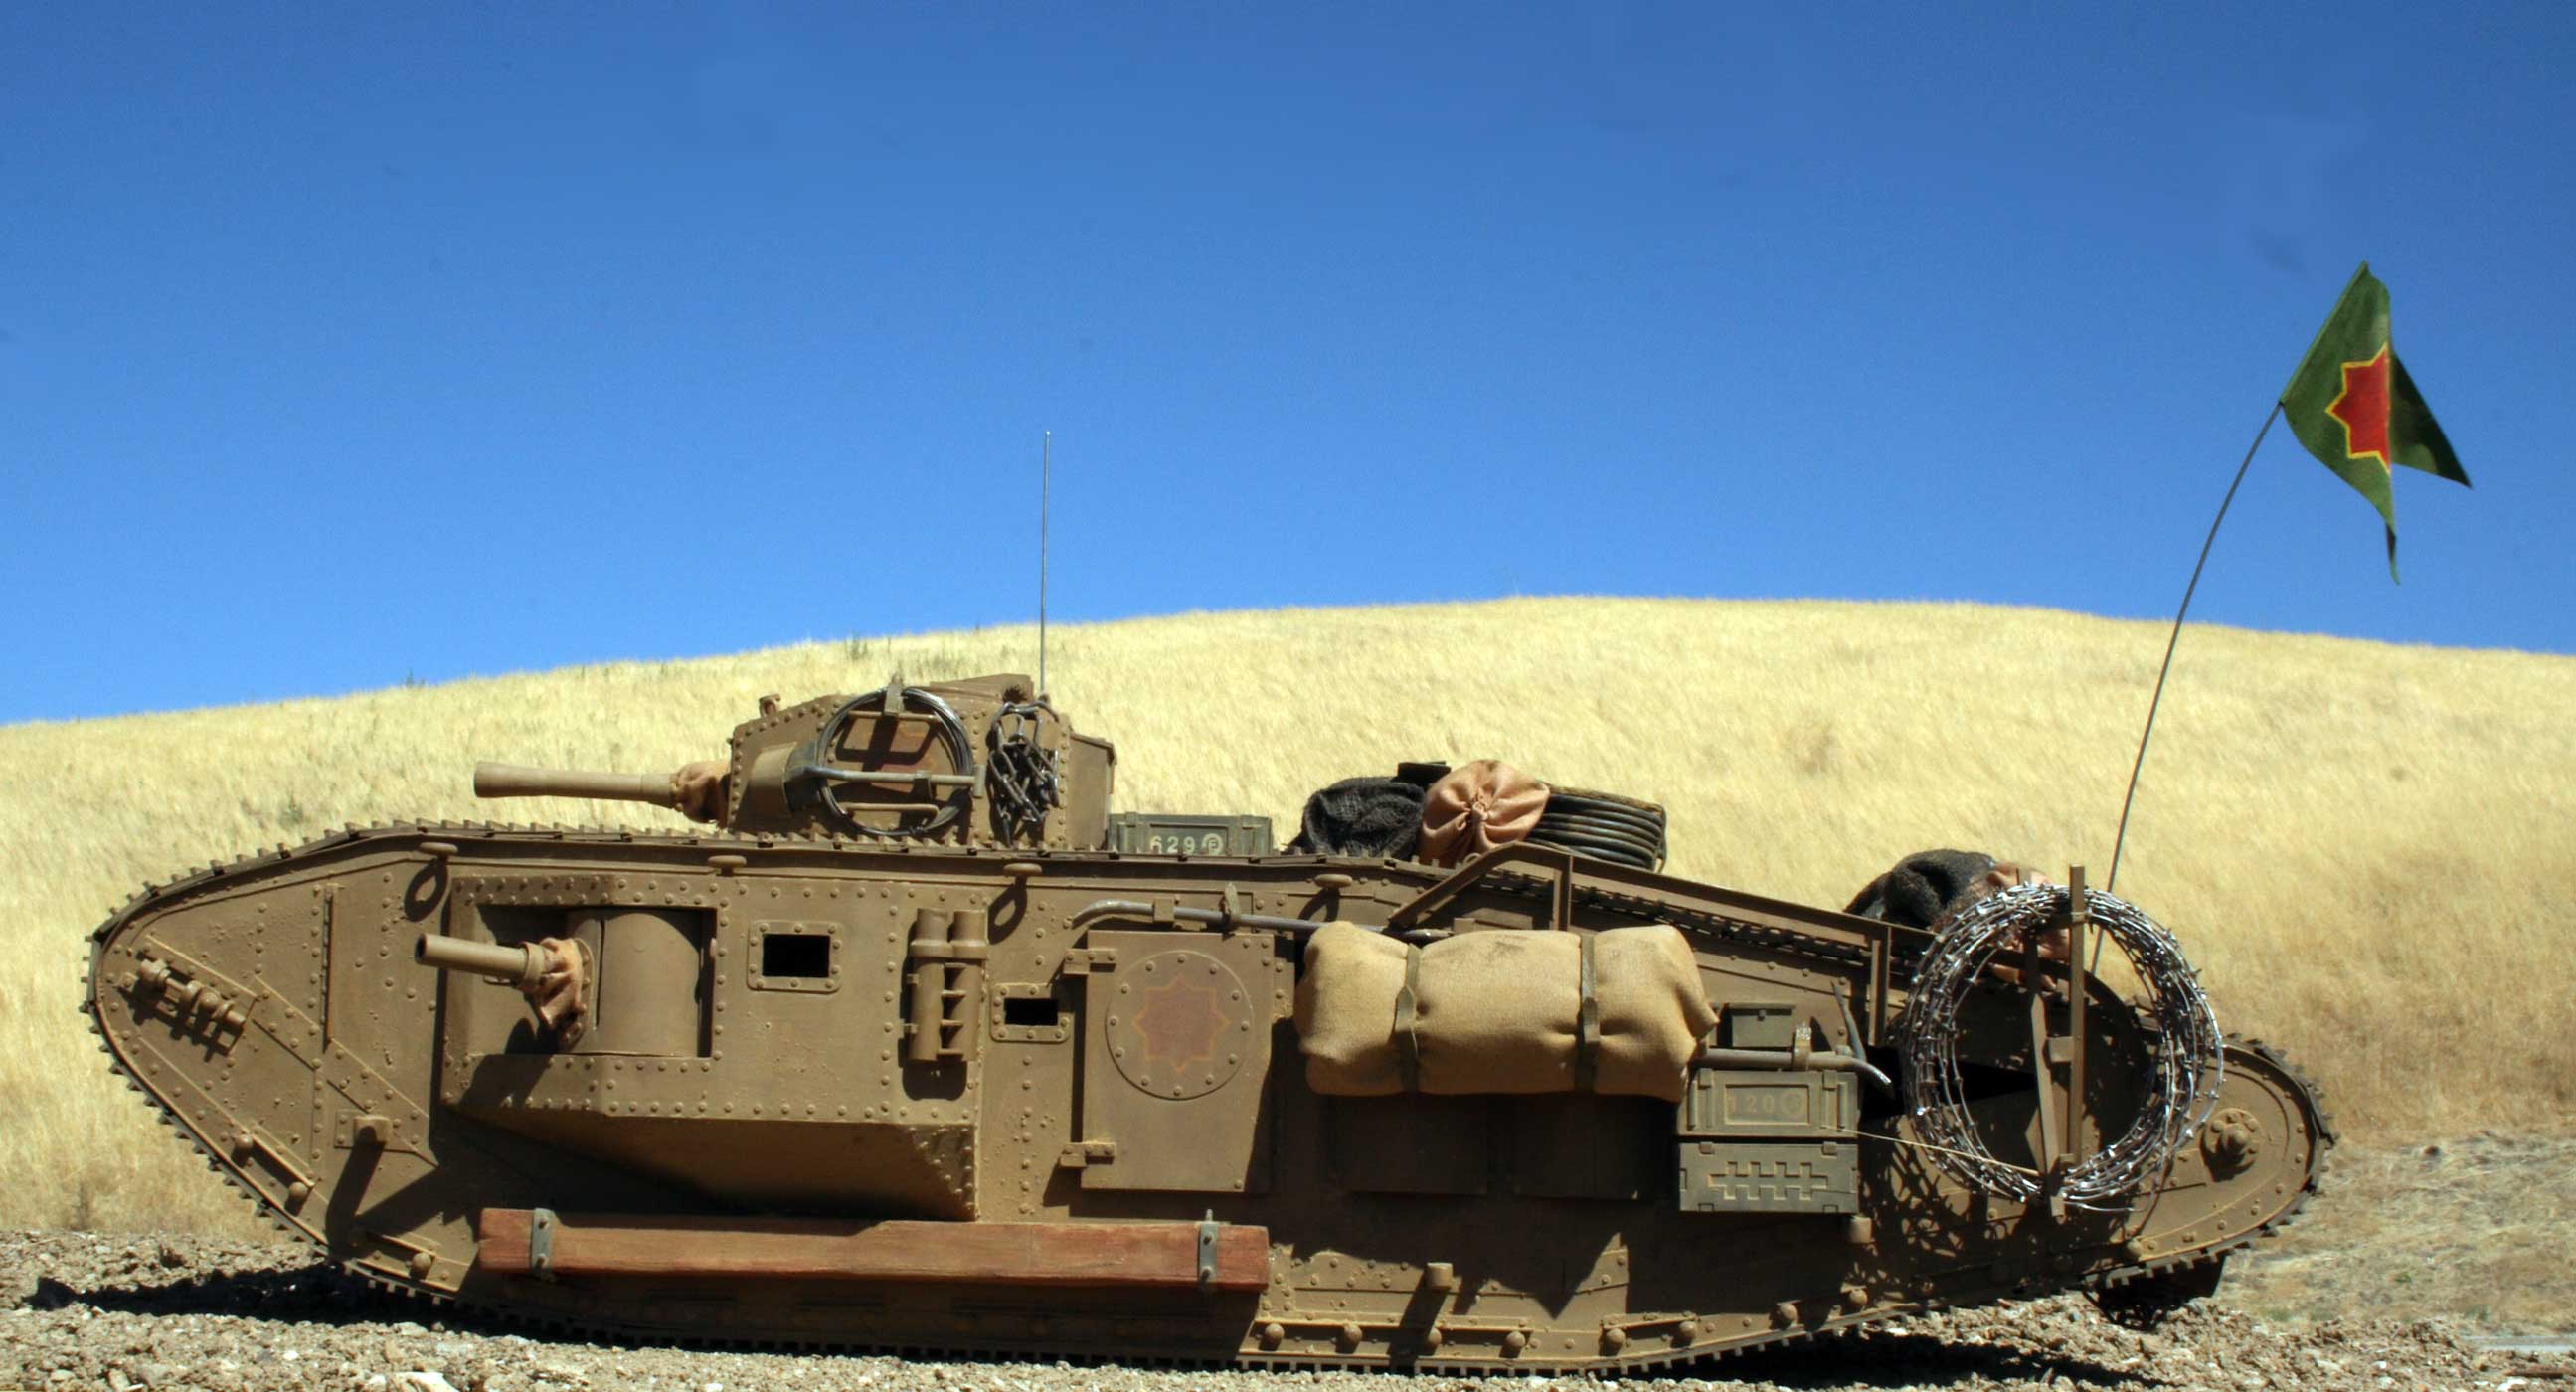
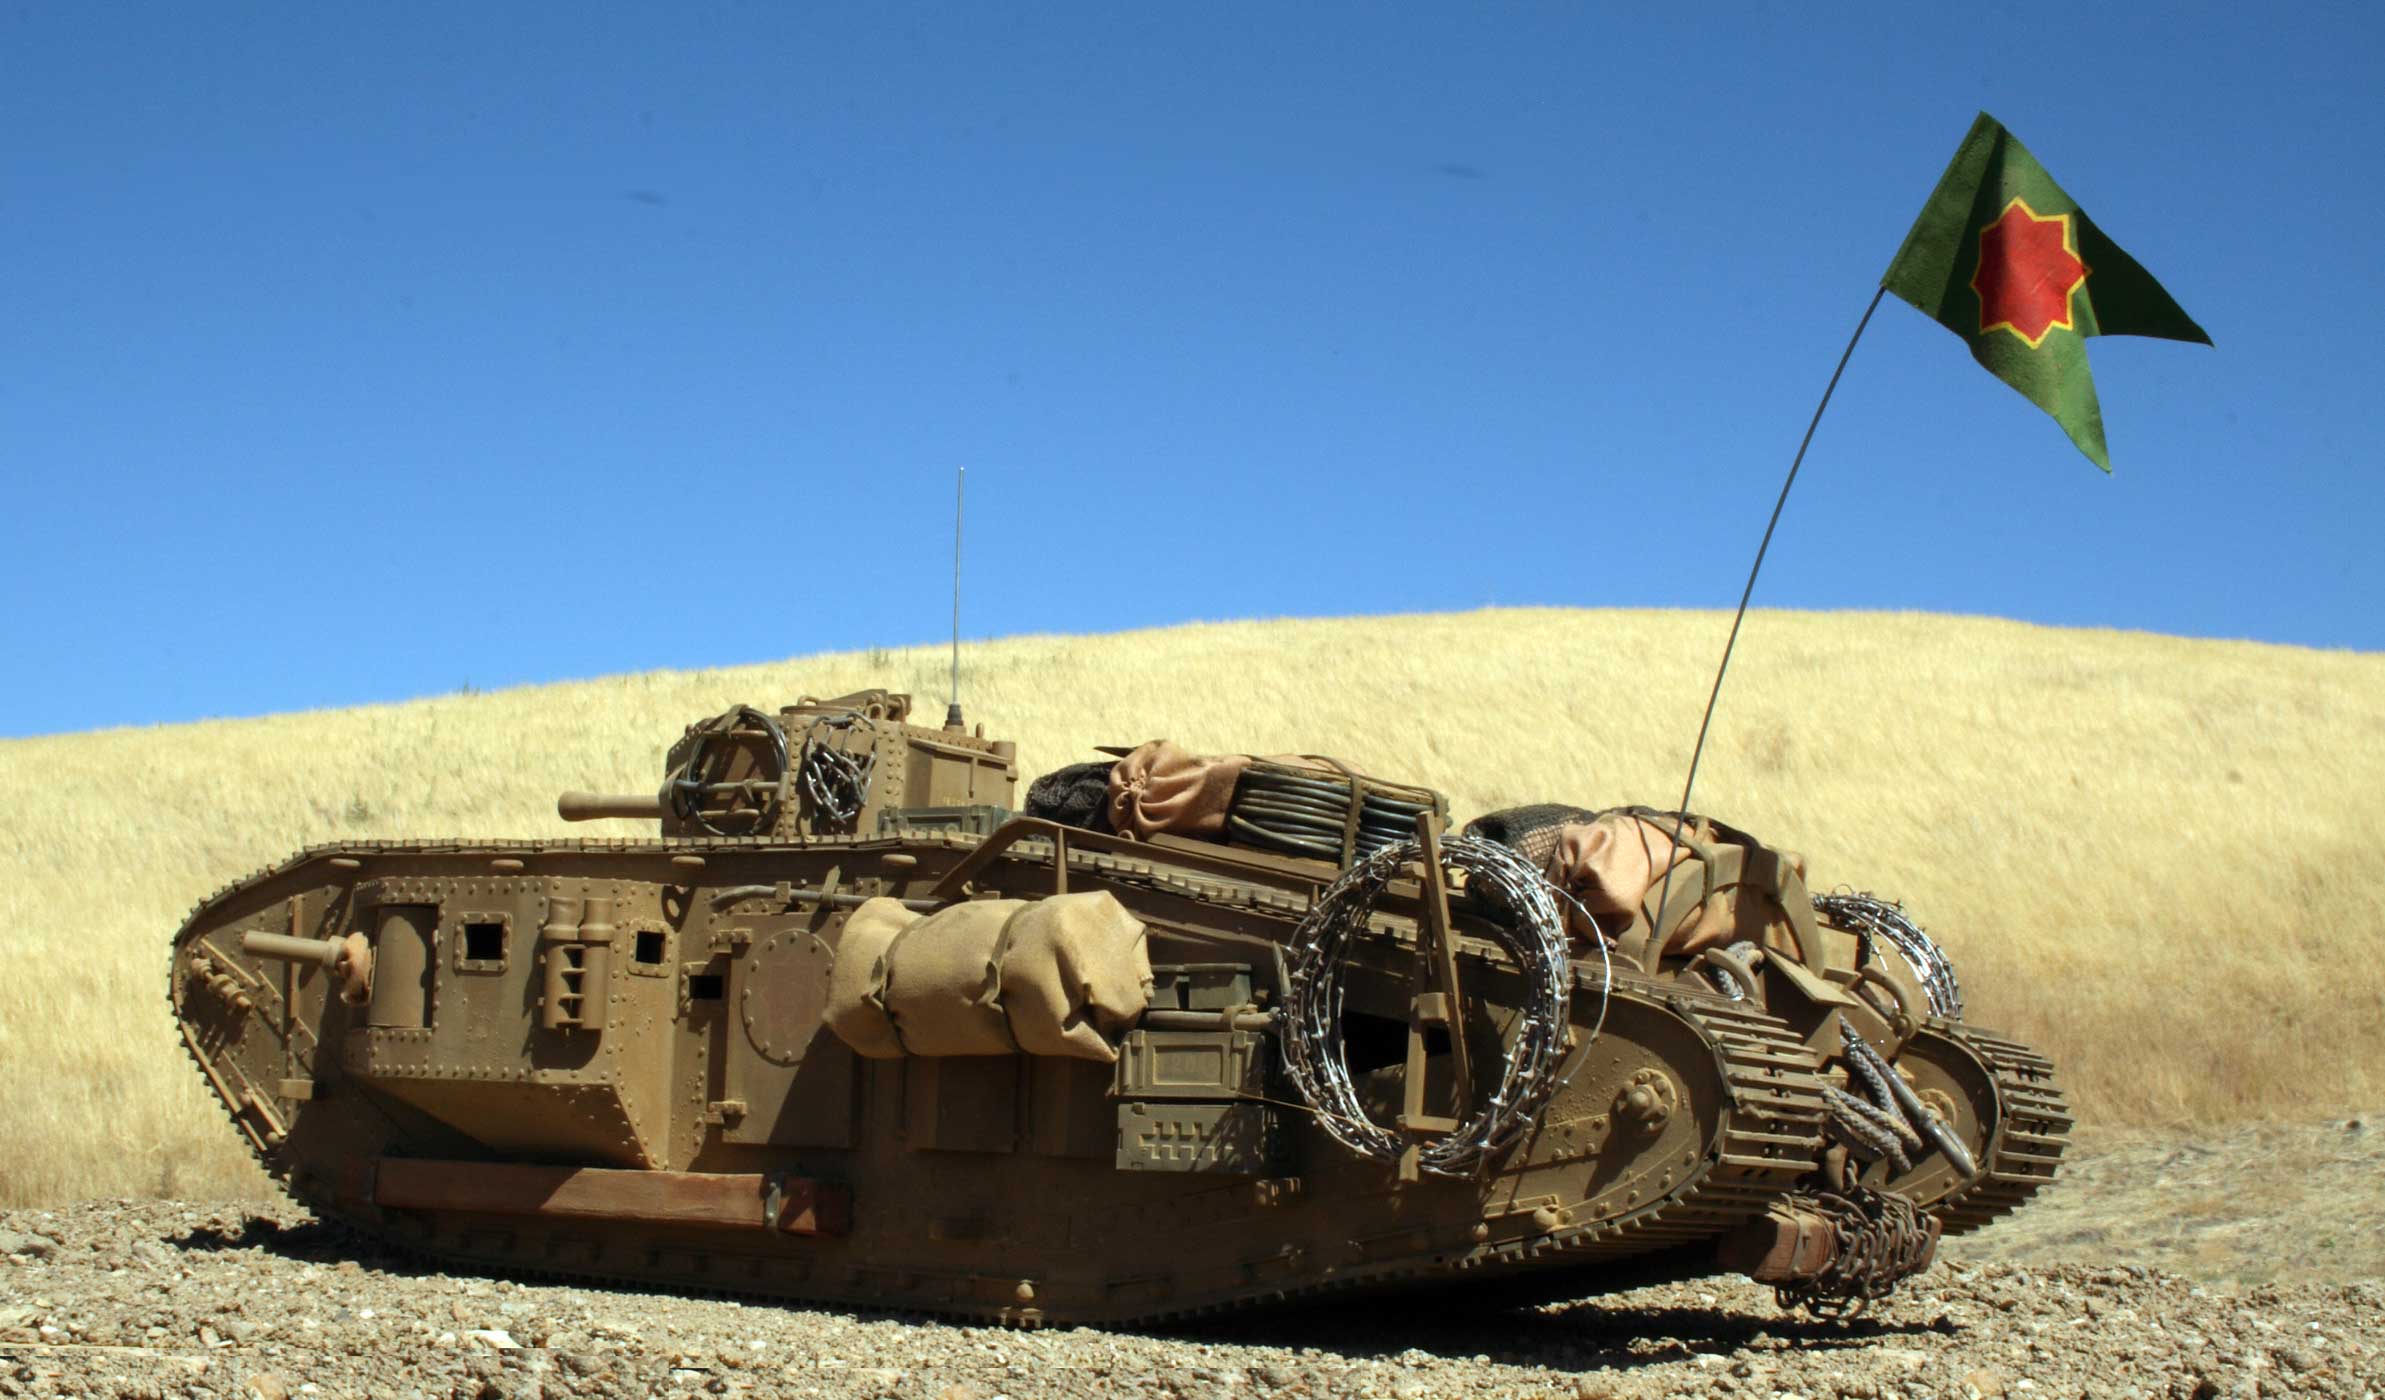
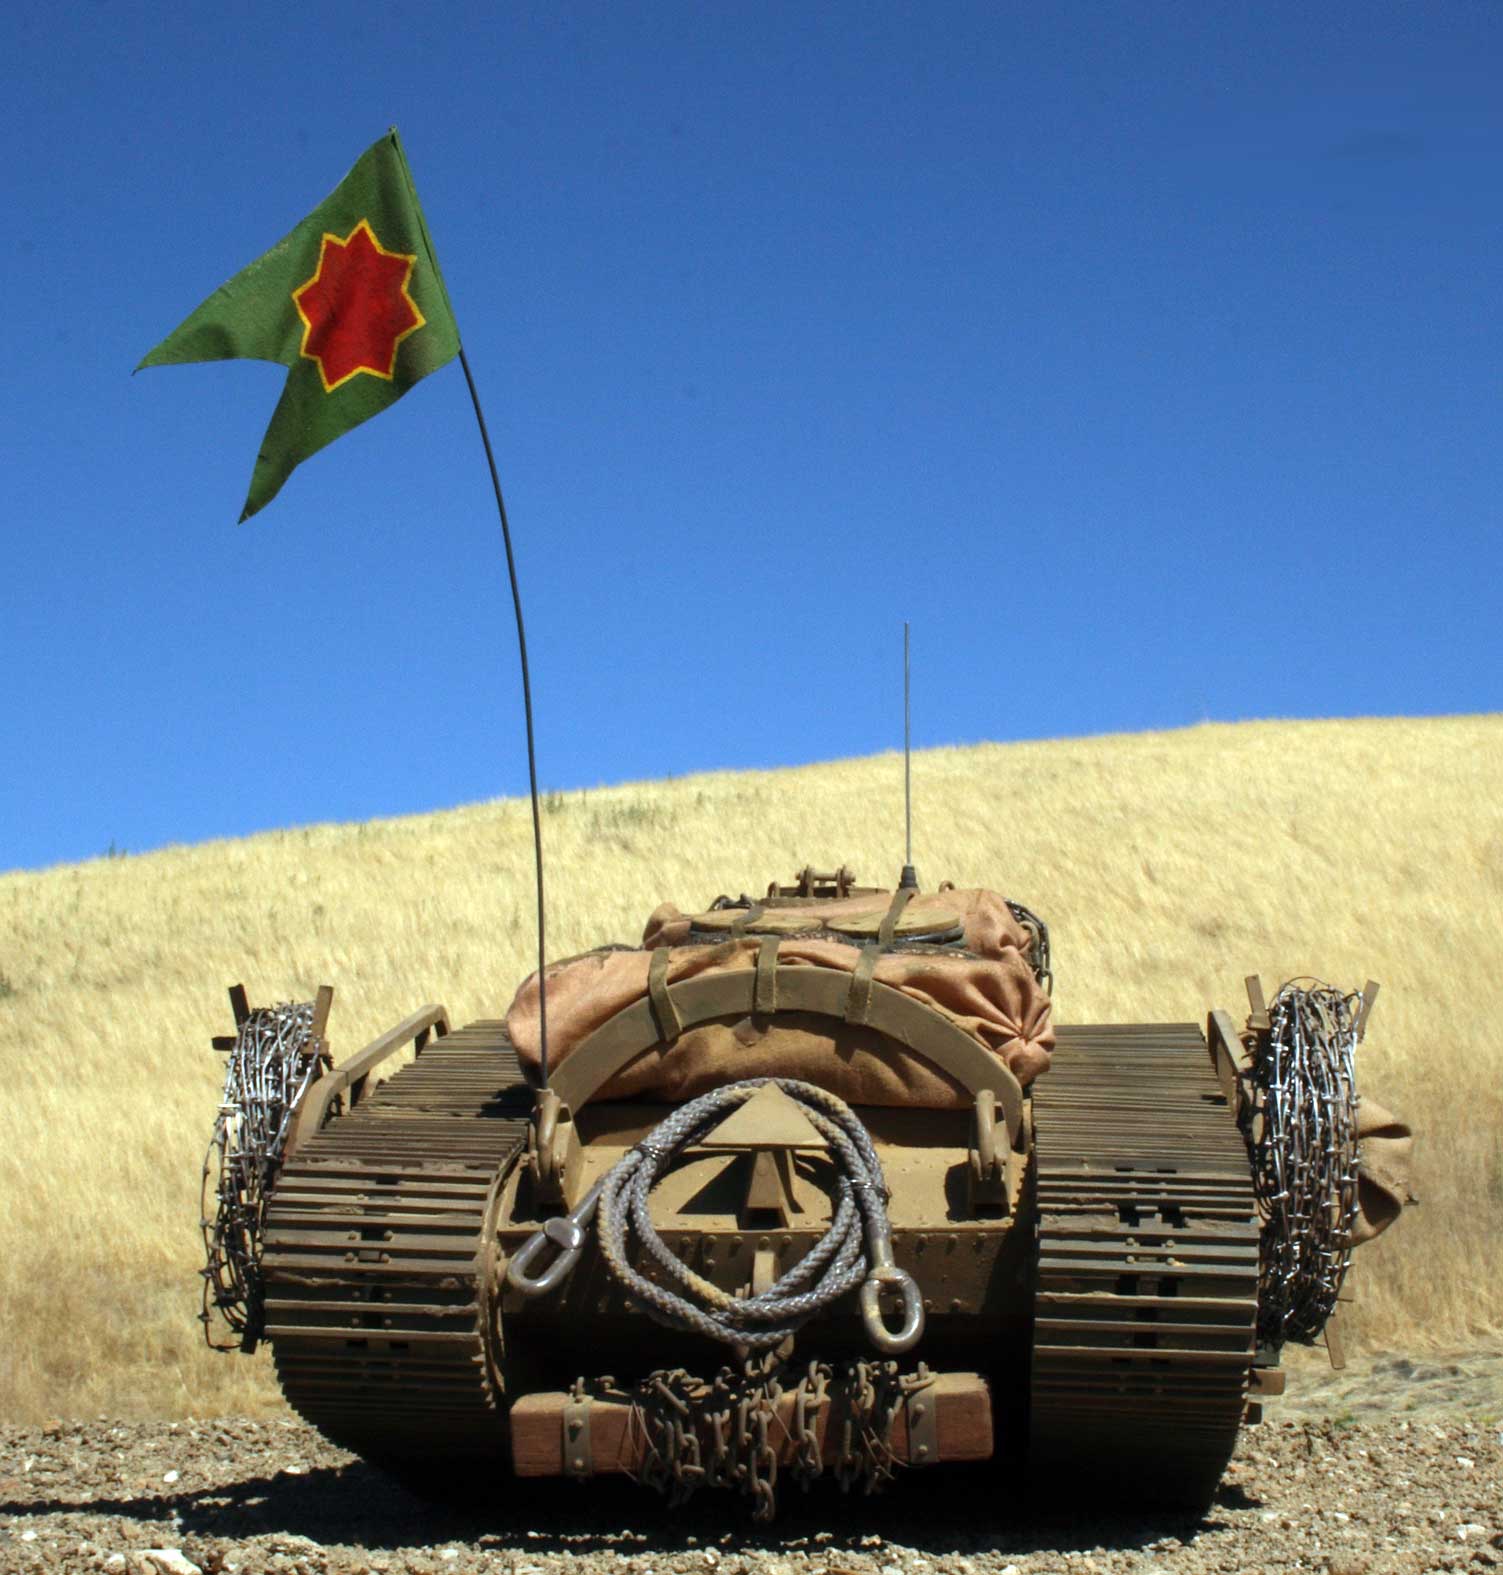
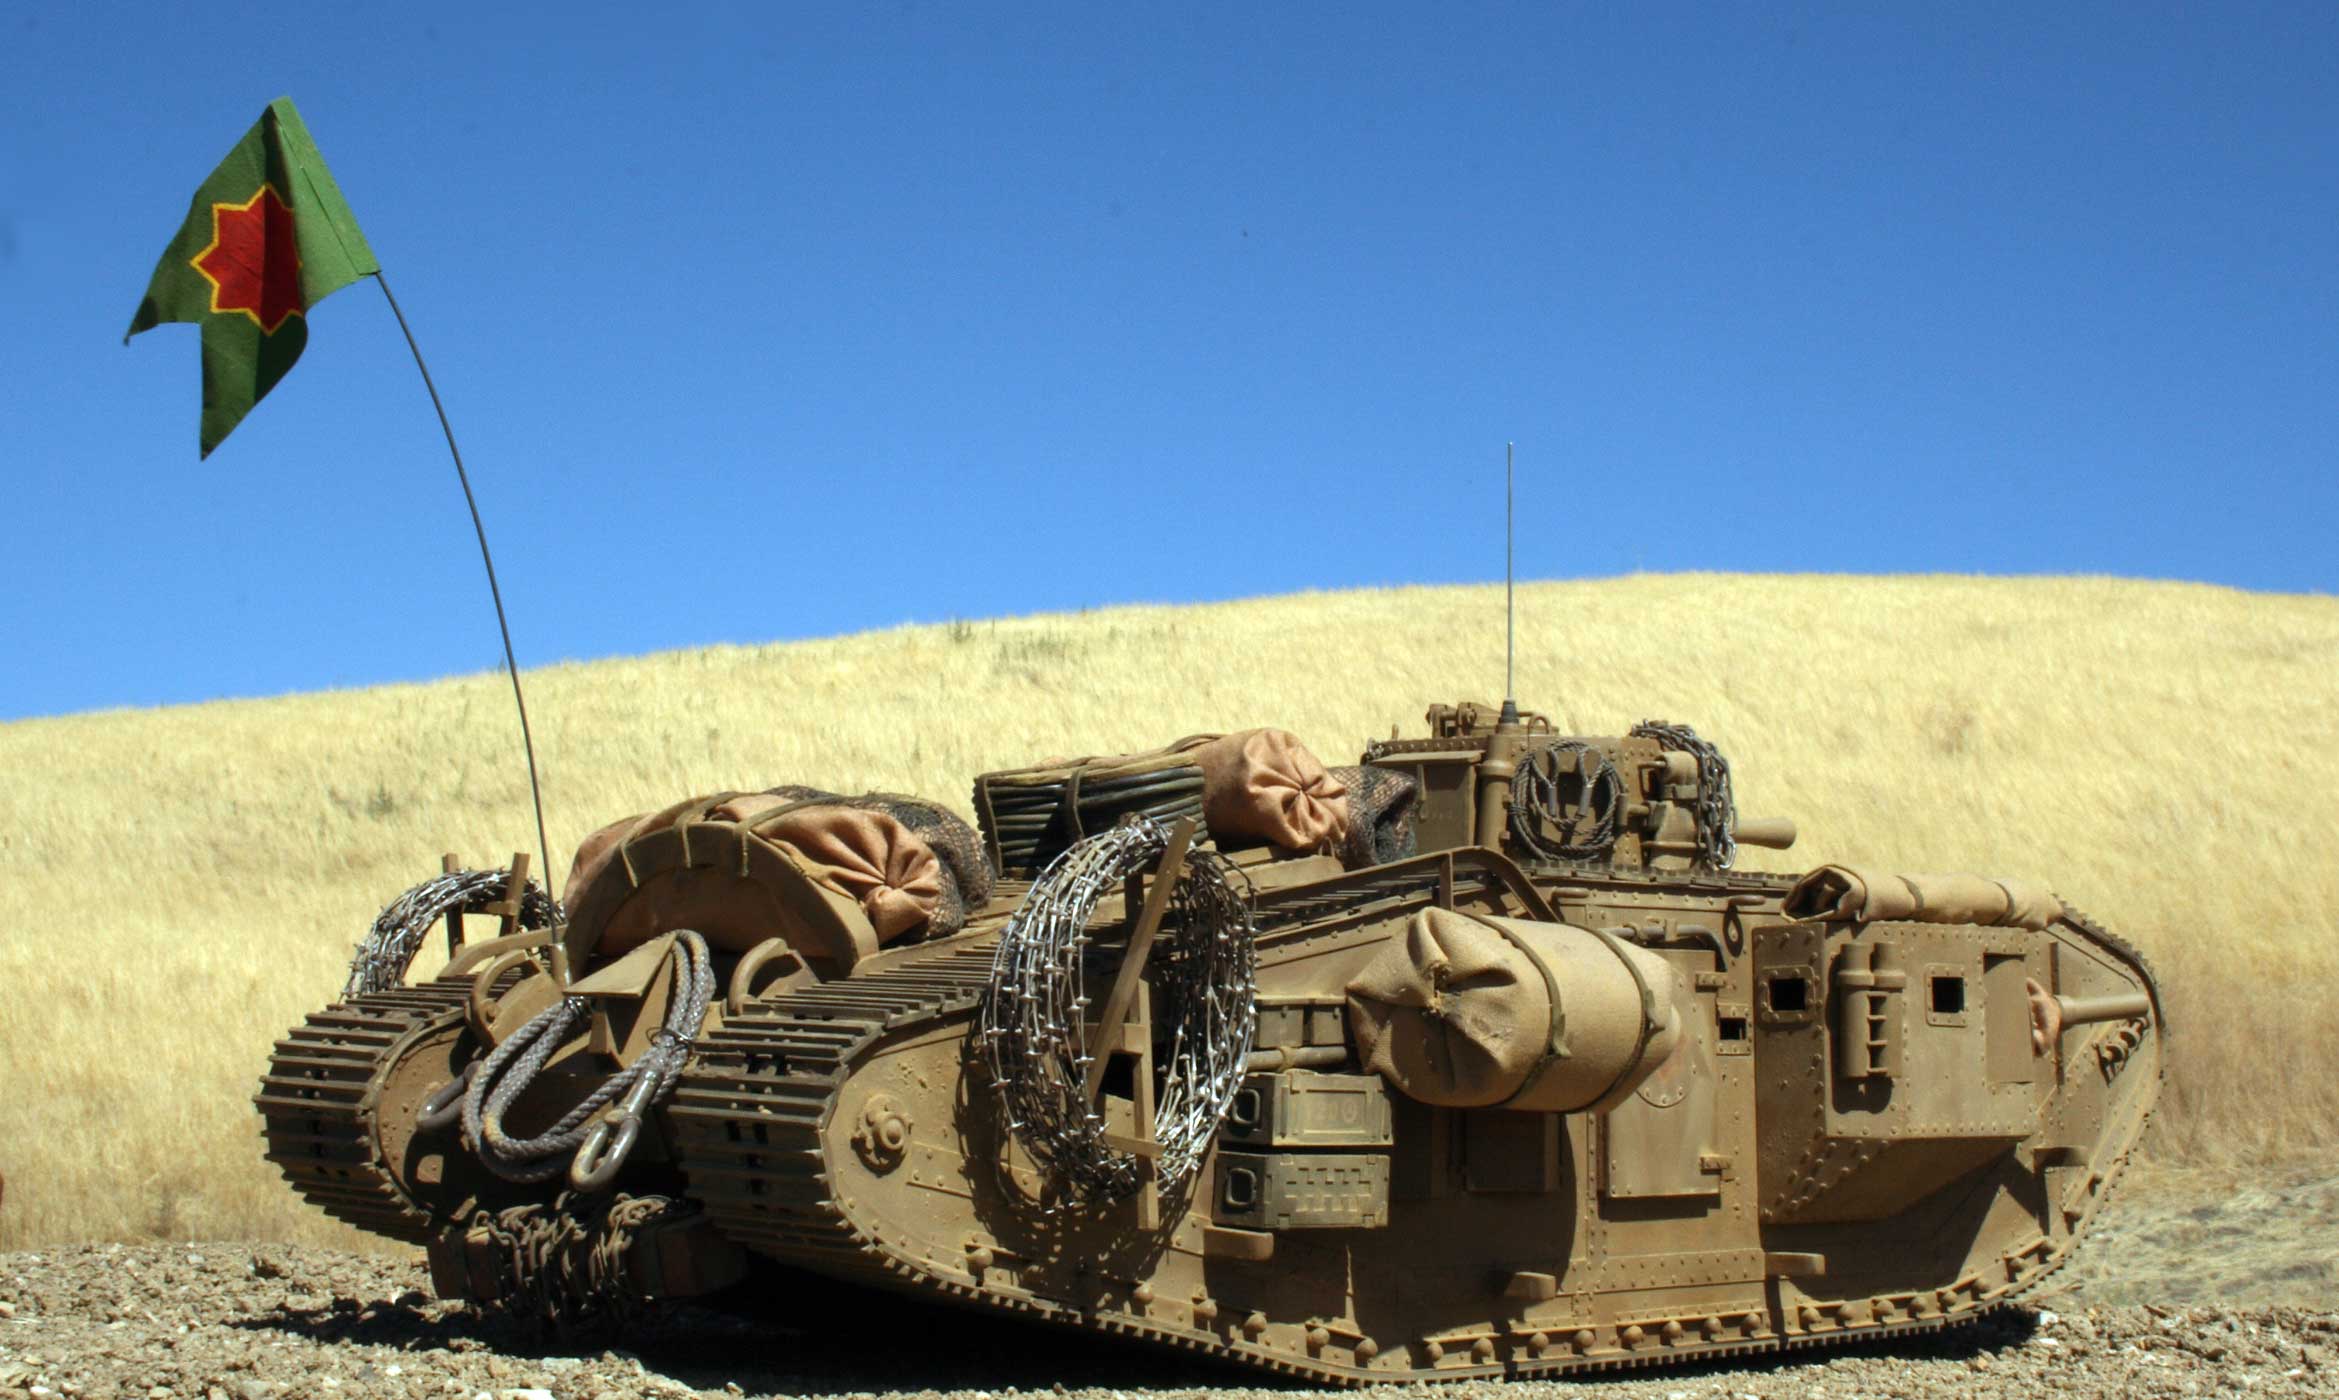
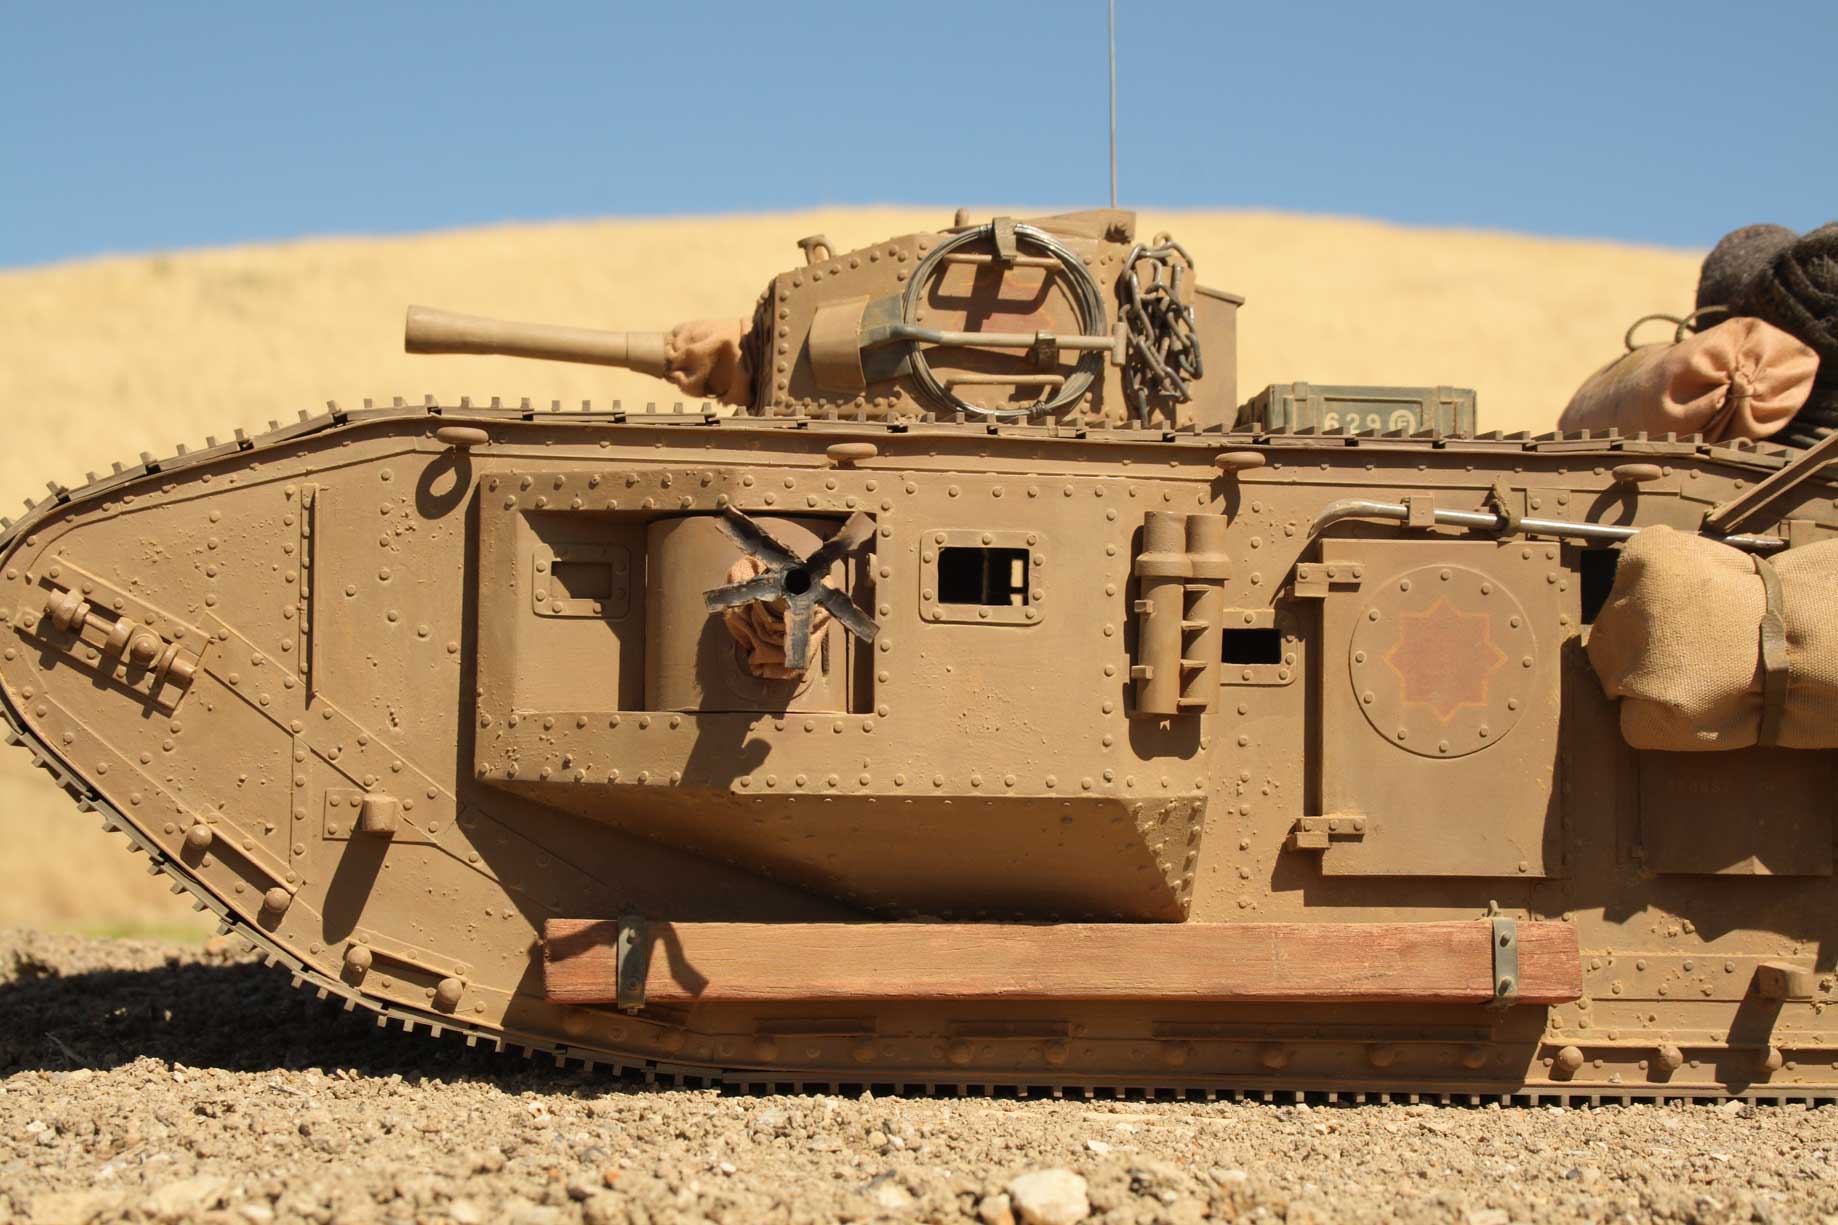
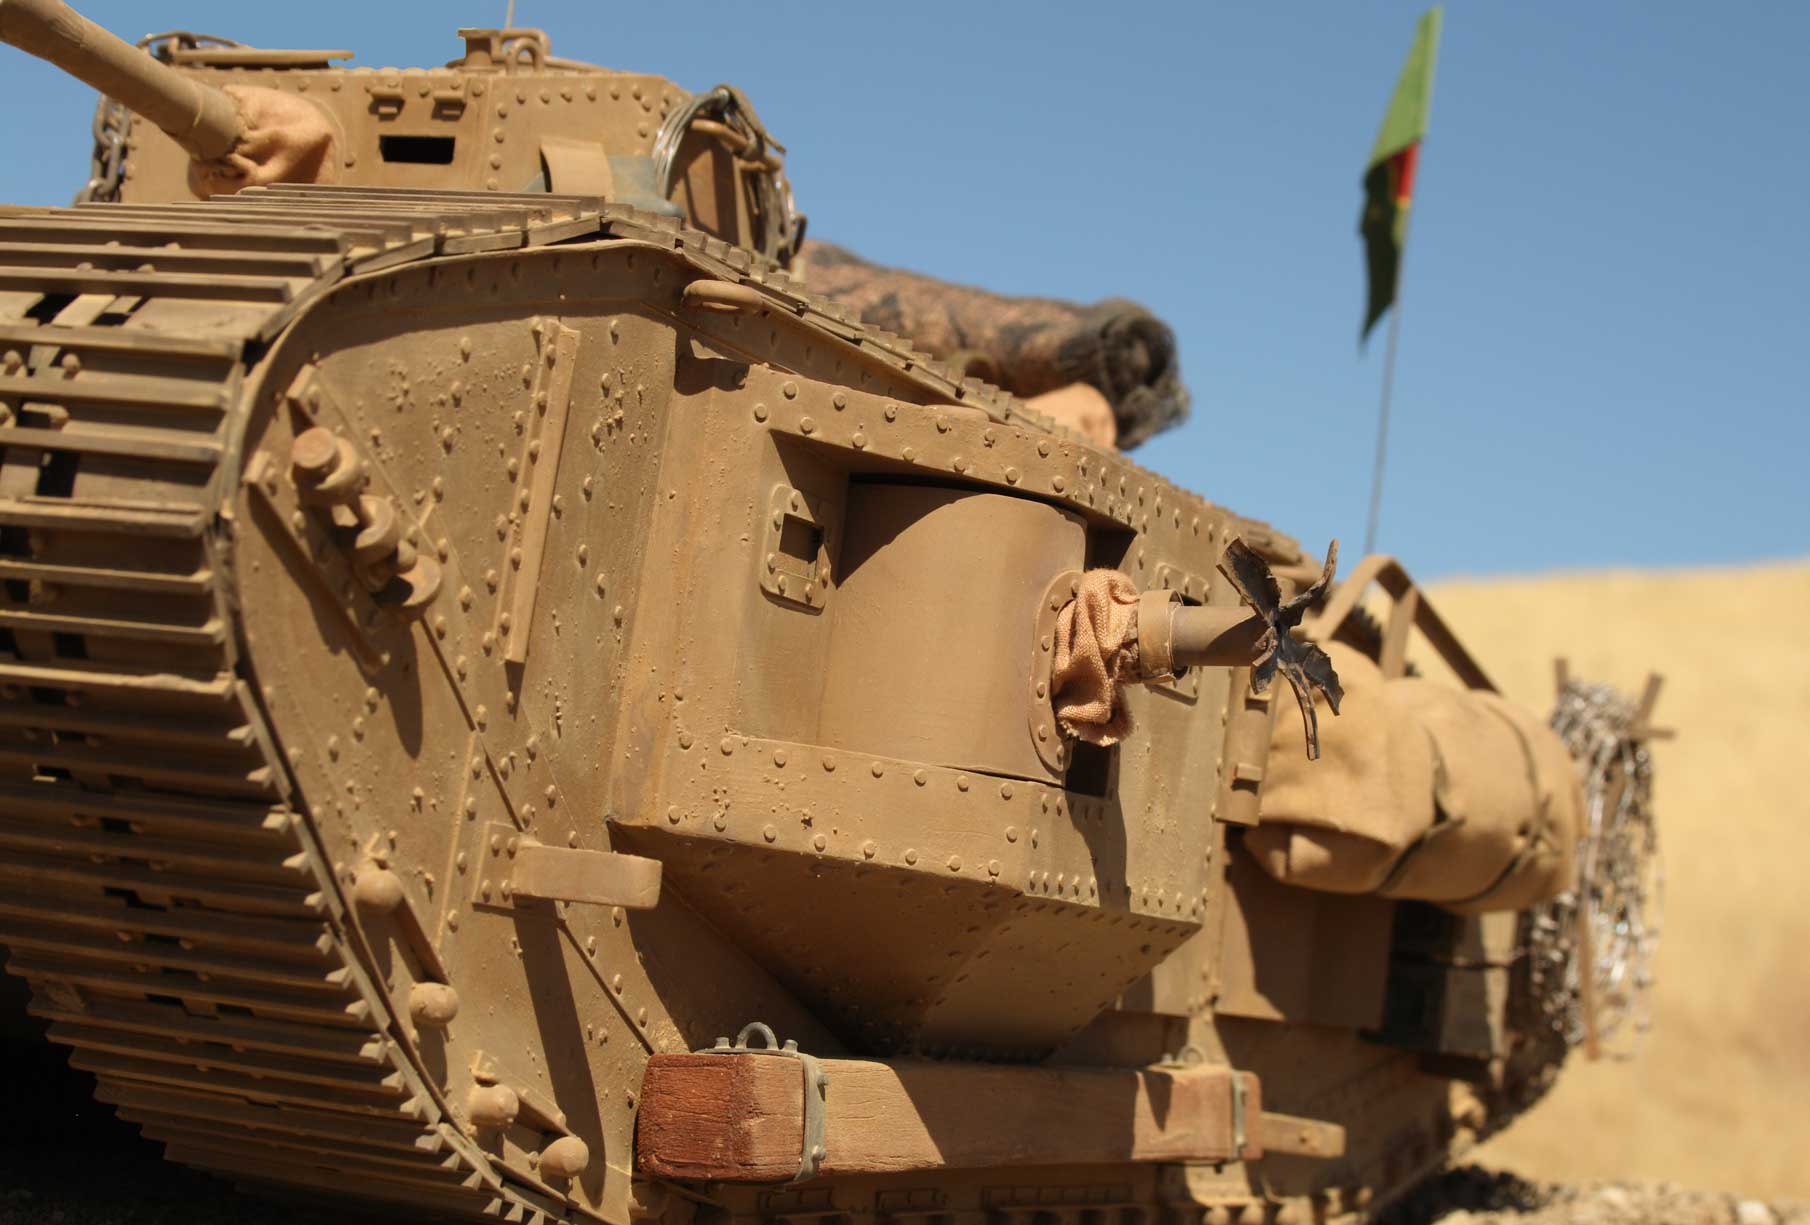
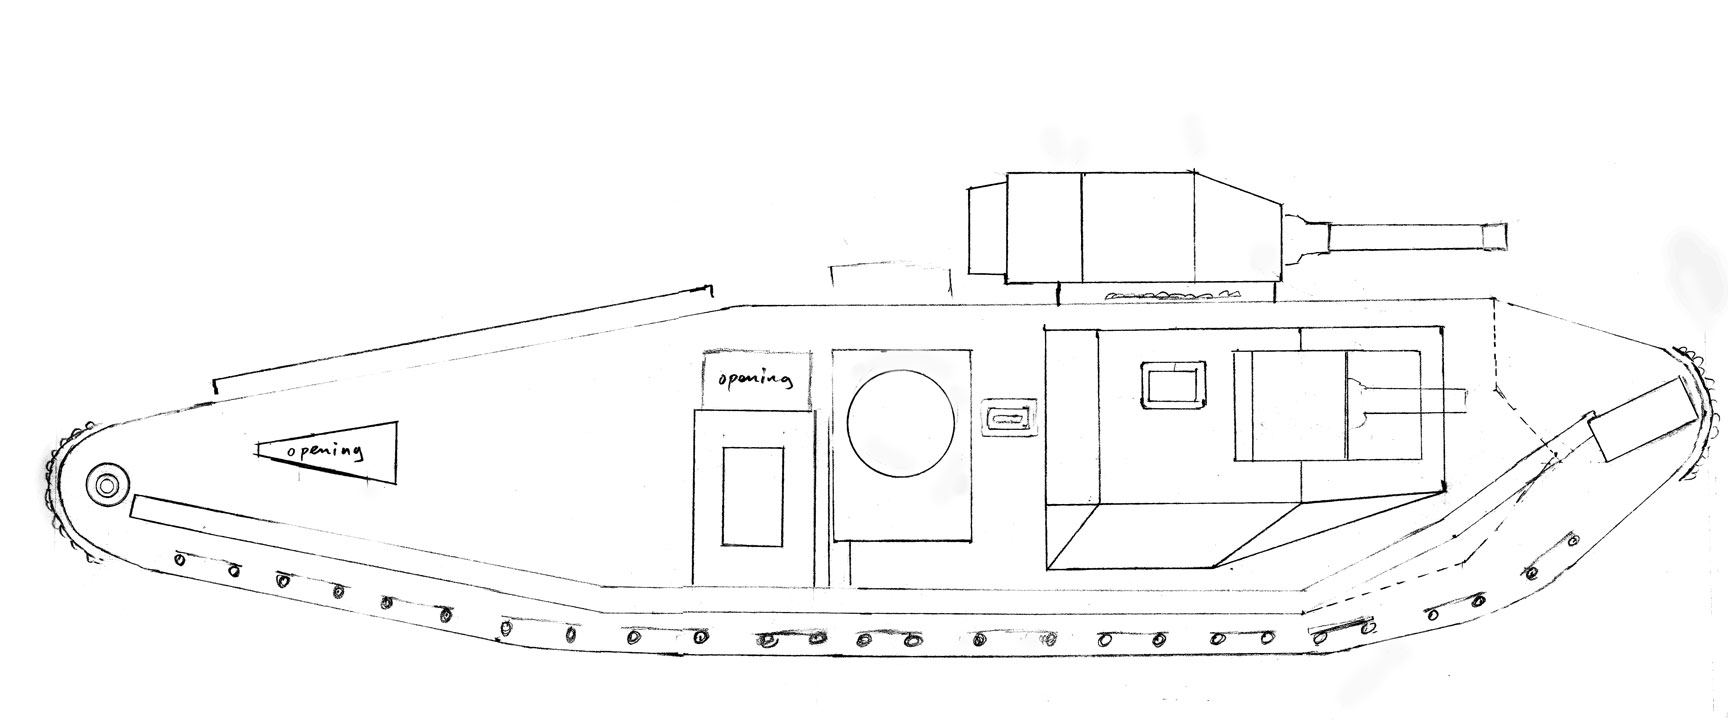
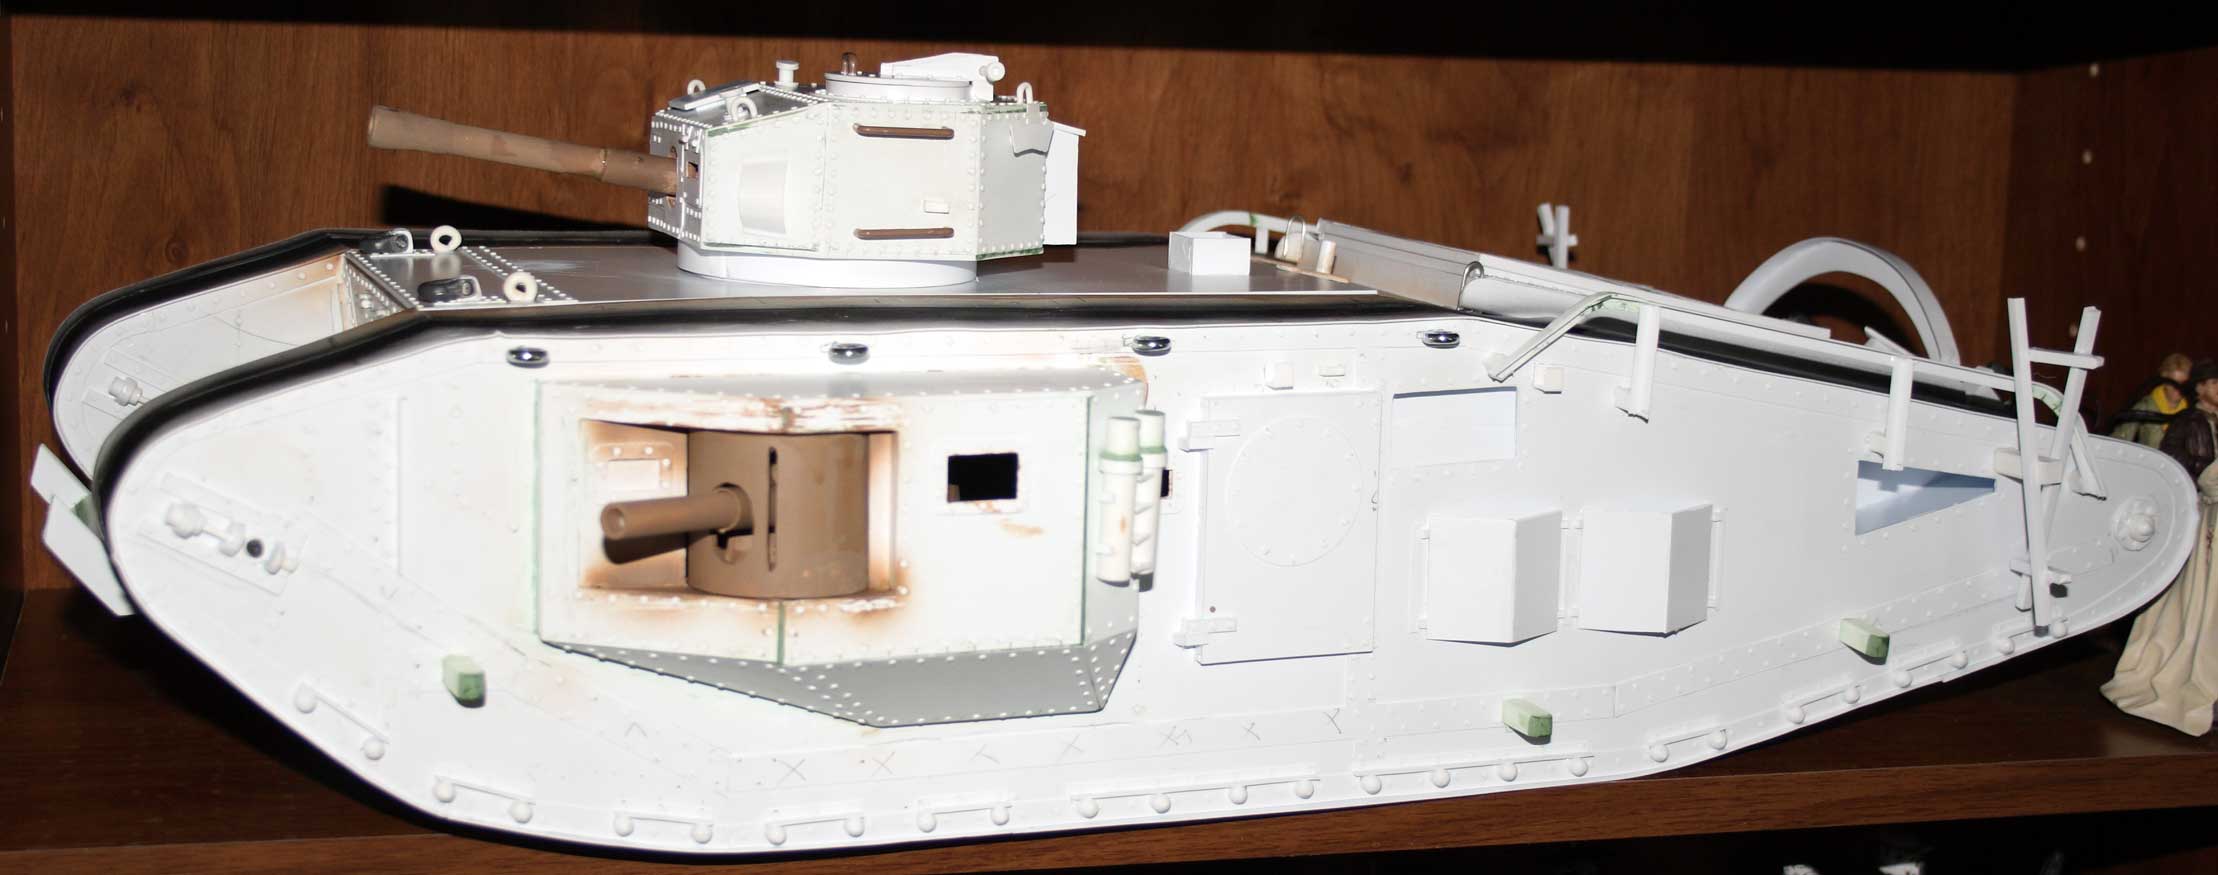
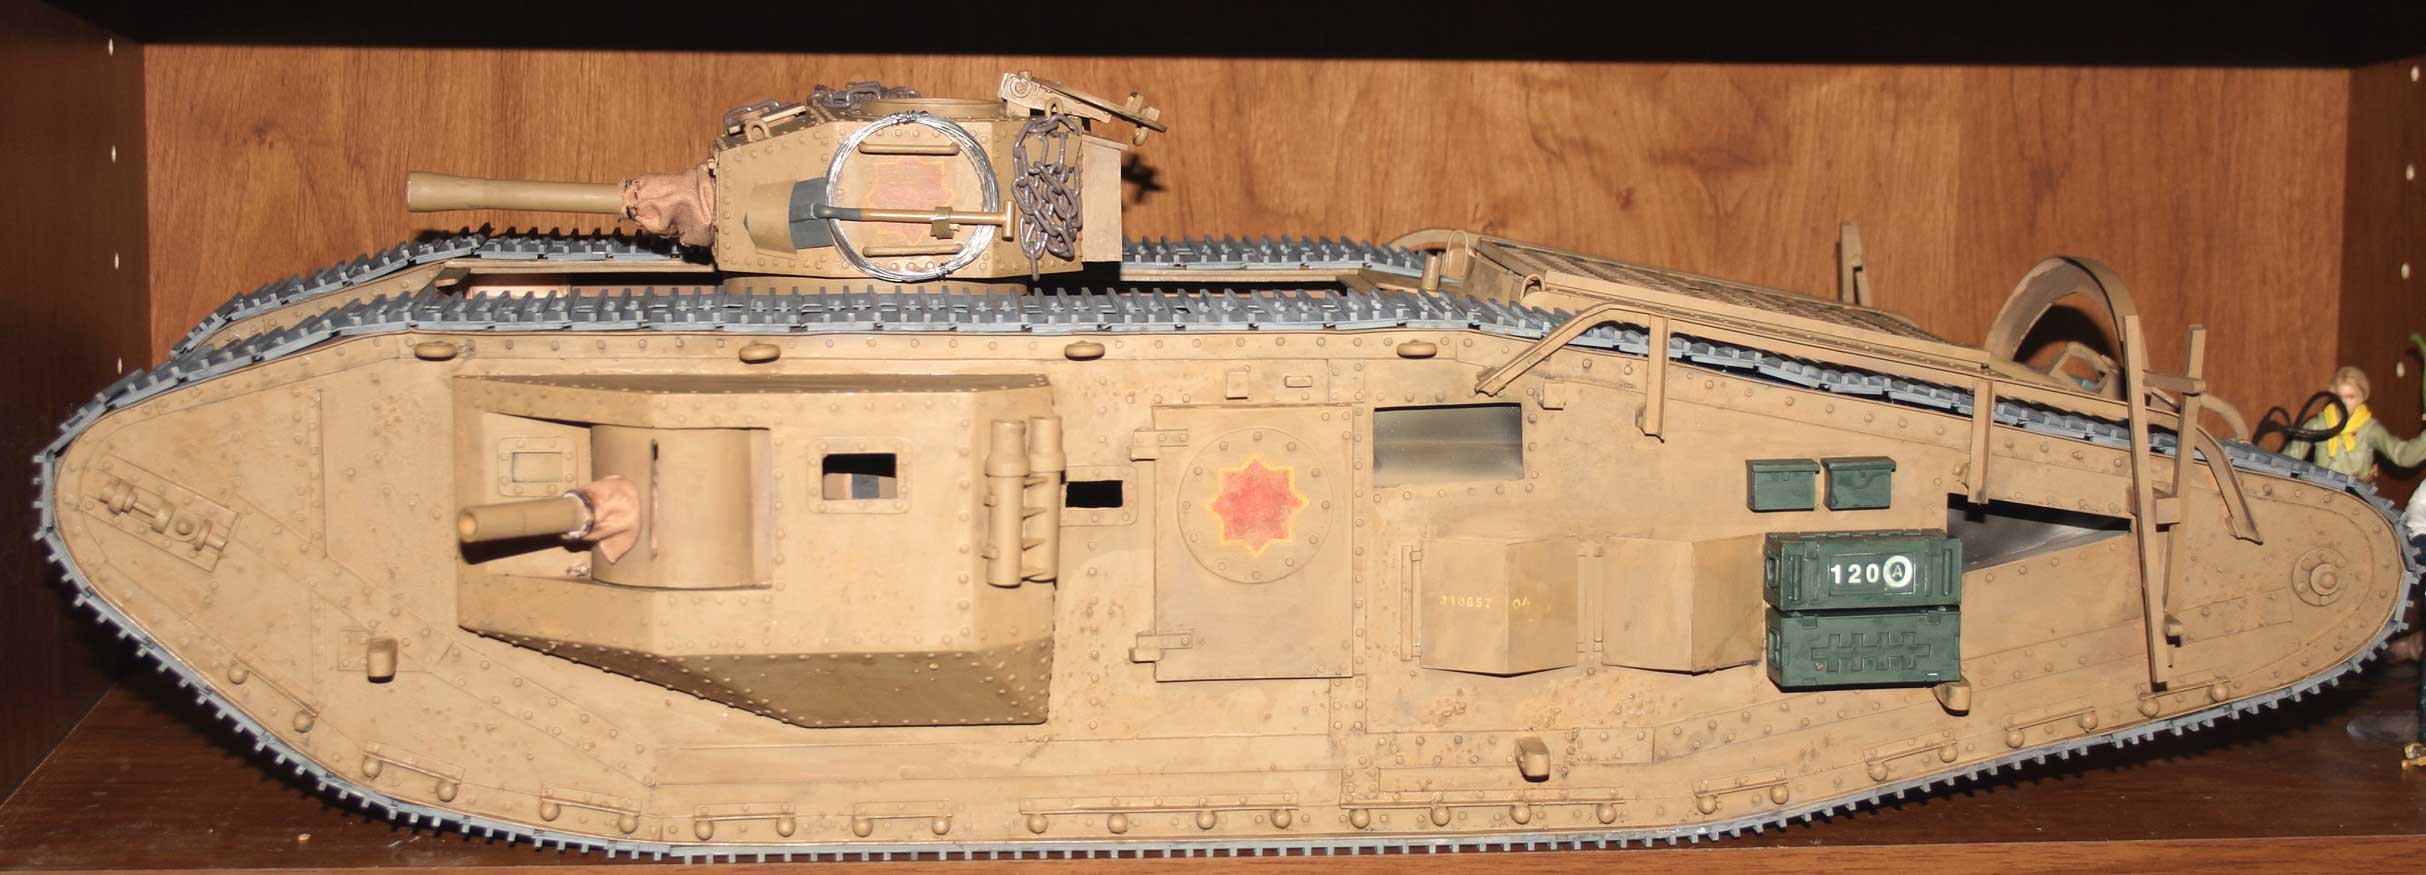
Hatay tank otherwise known as the Last Crusade Tank, or the Indiana Jones tank. Based on a WWI Joint UK/US "International" Mk VIII tank the actual design featured a wider body and narrower tracks in order to accommodate a turret. Despite what you might read elsewhere the turret design was unique to this tank and is not taken from an existing vehicle. This model is entirely scratch built from plastic card plus some Evergreen strips and tubes. Let us start out with a series of basic views of the tank in the closest I can get to a Hatay desert scene without taking a long drive to Death Valley!
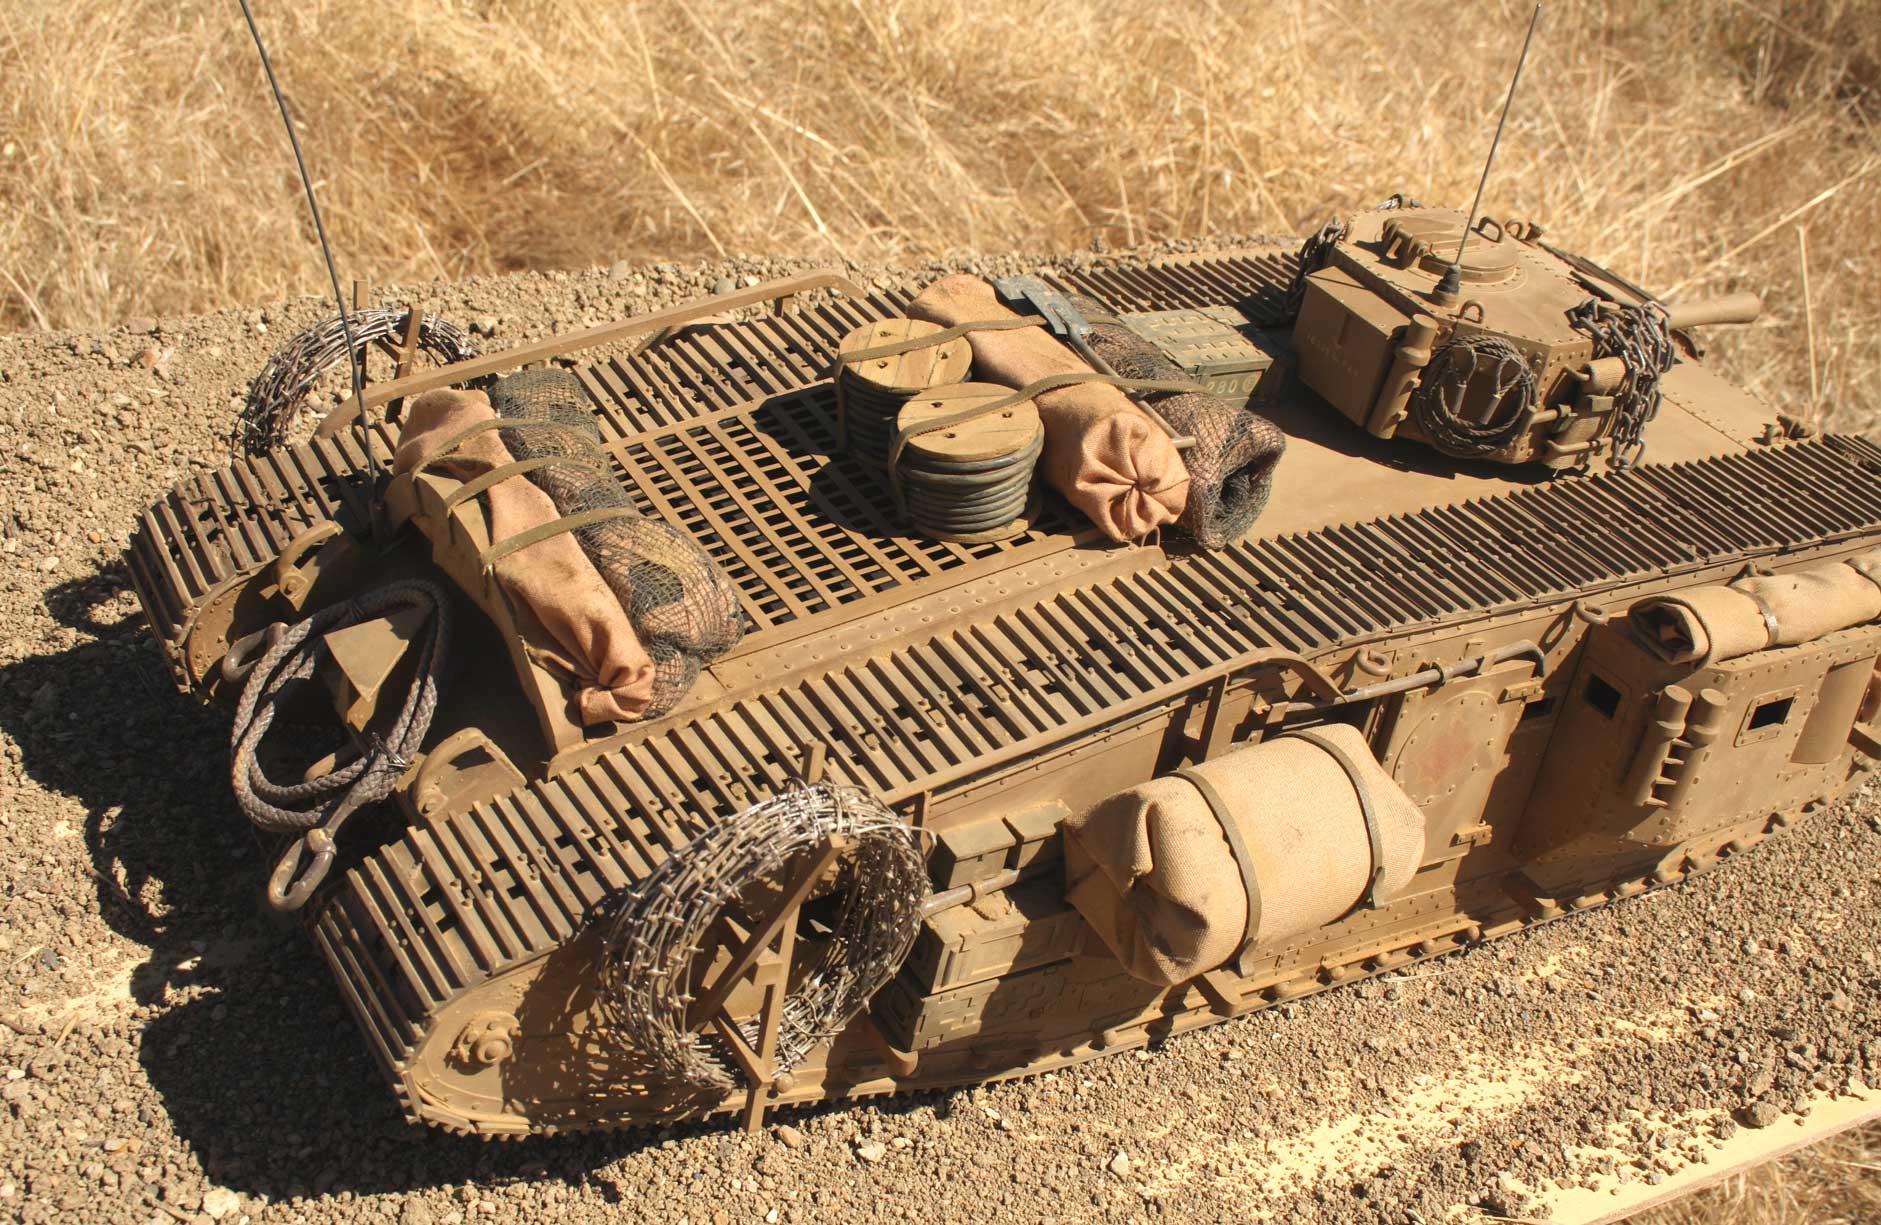

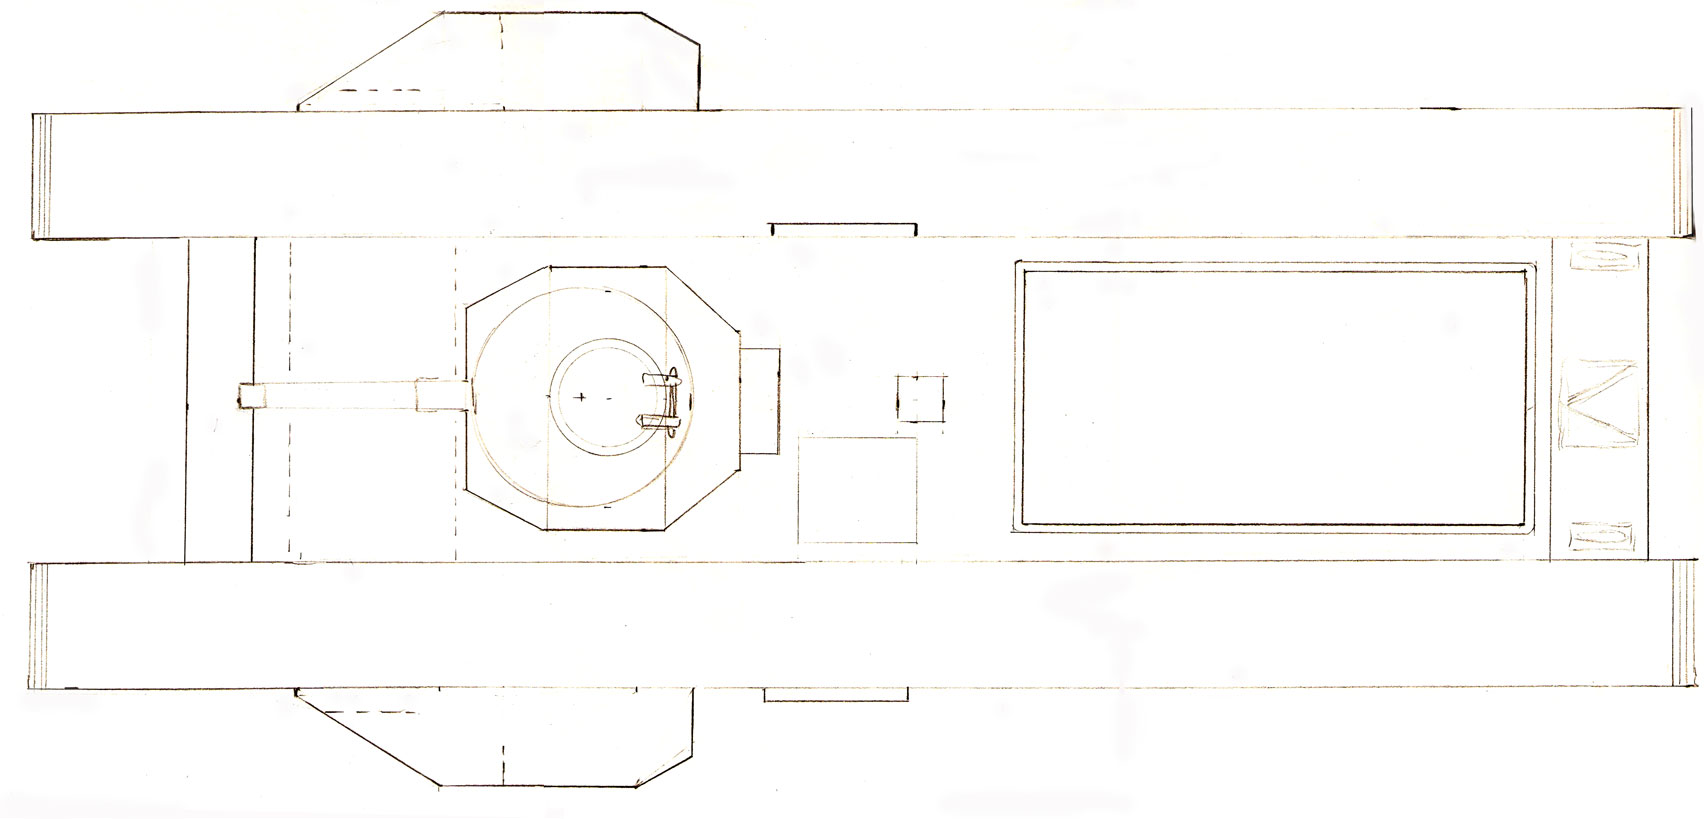
Now for some overhead views. These file sizes tend to be larger so be patient if you have a slow connection! Track links are individual links made up of 12 separate pieces!
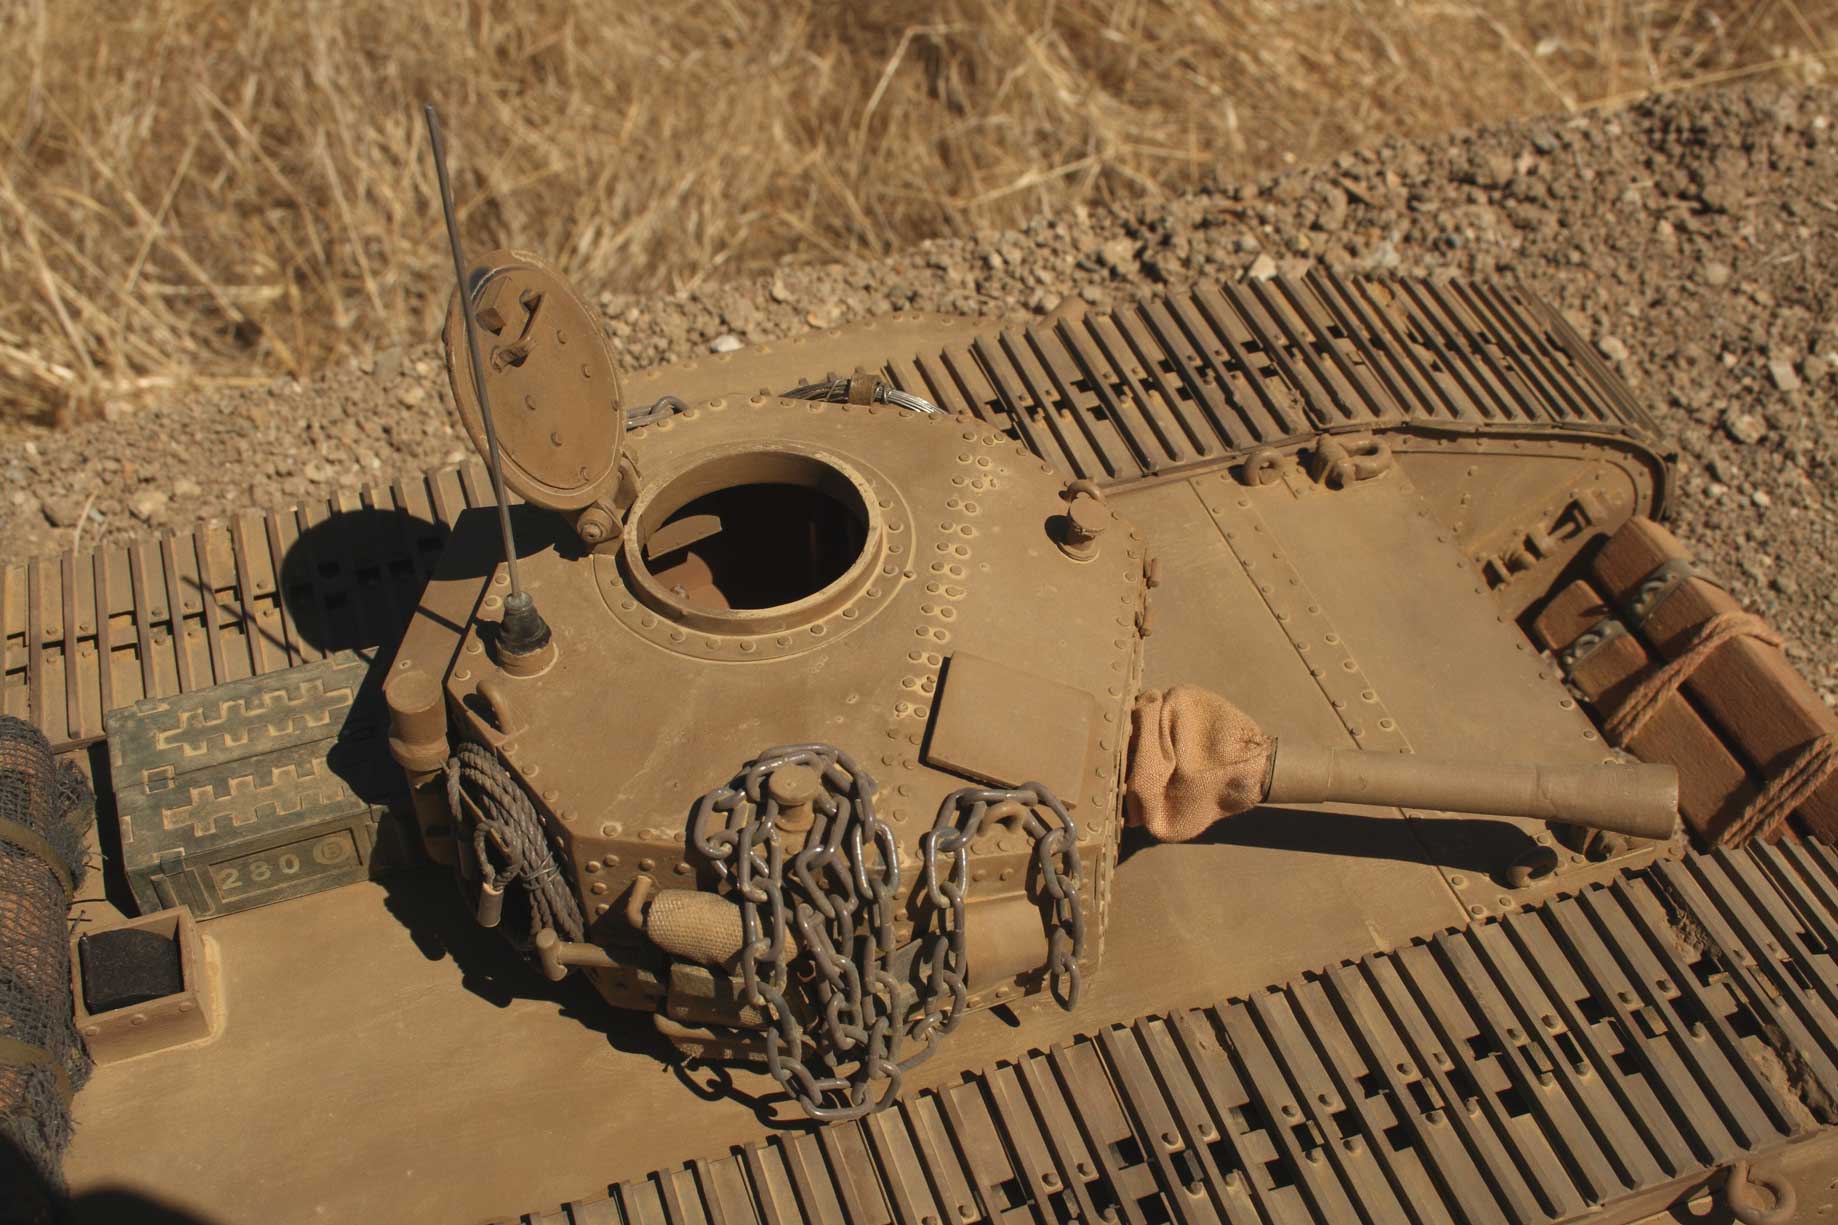
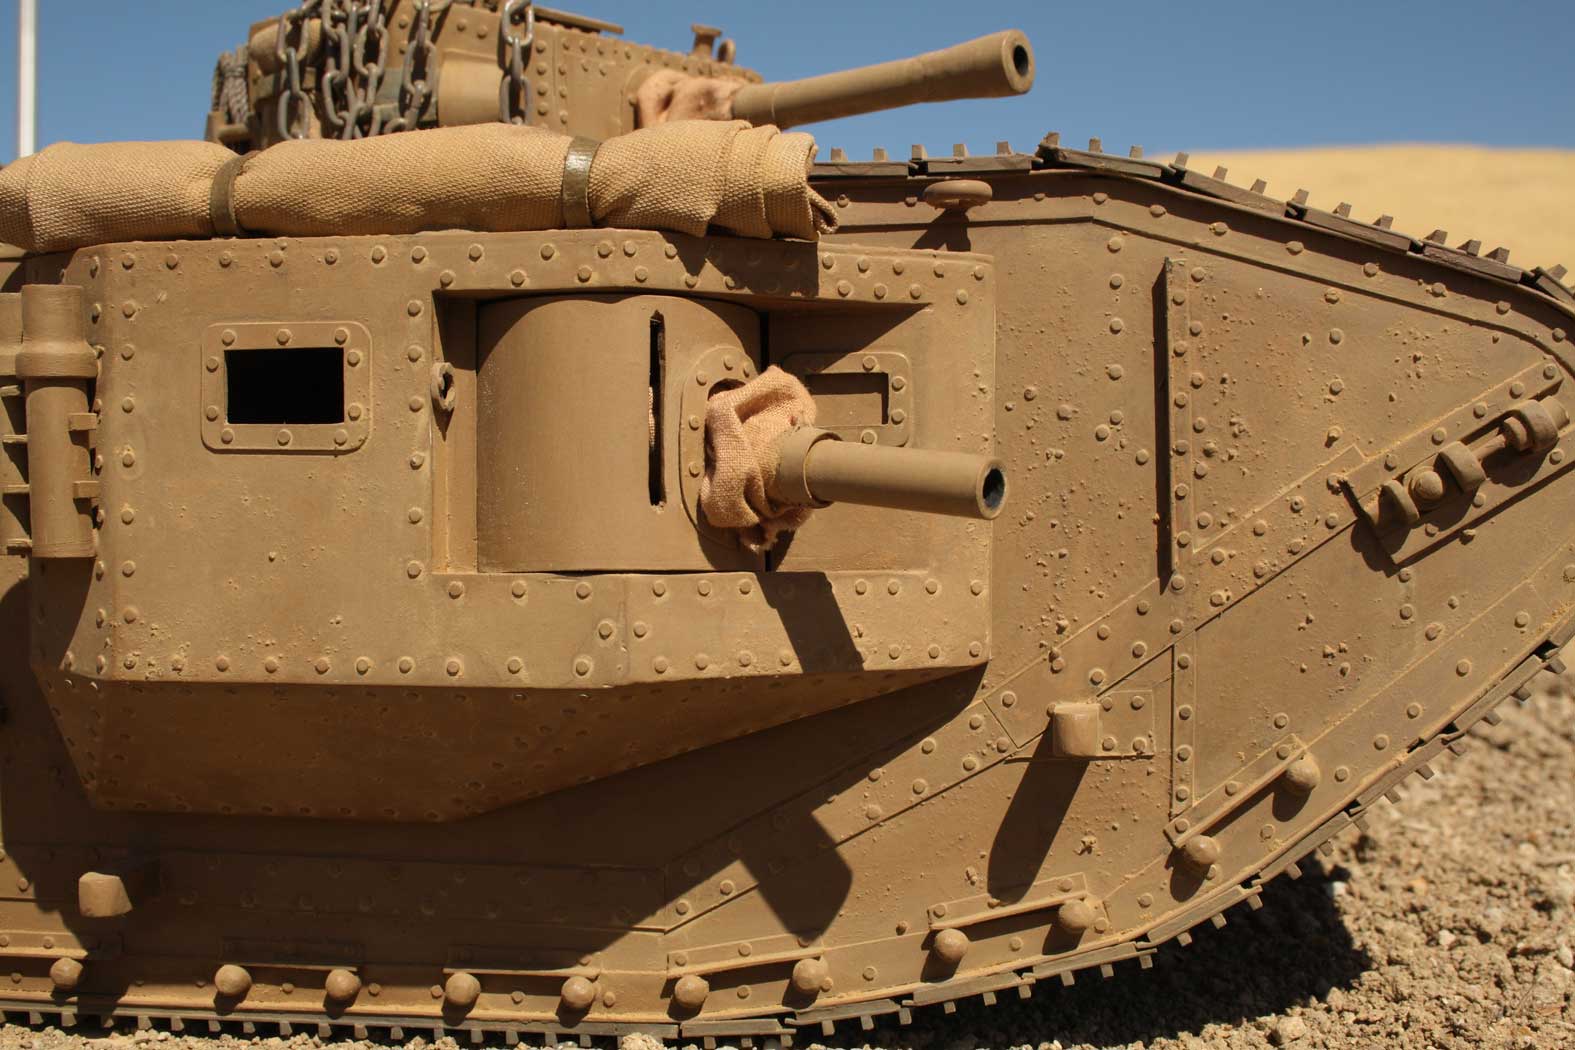
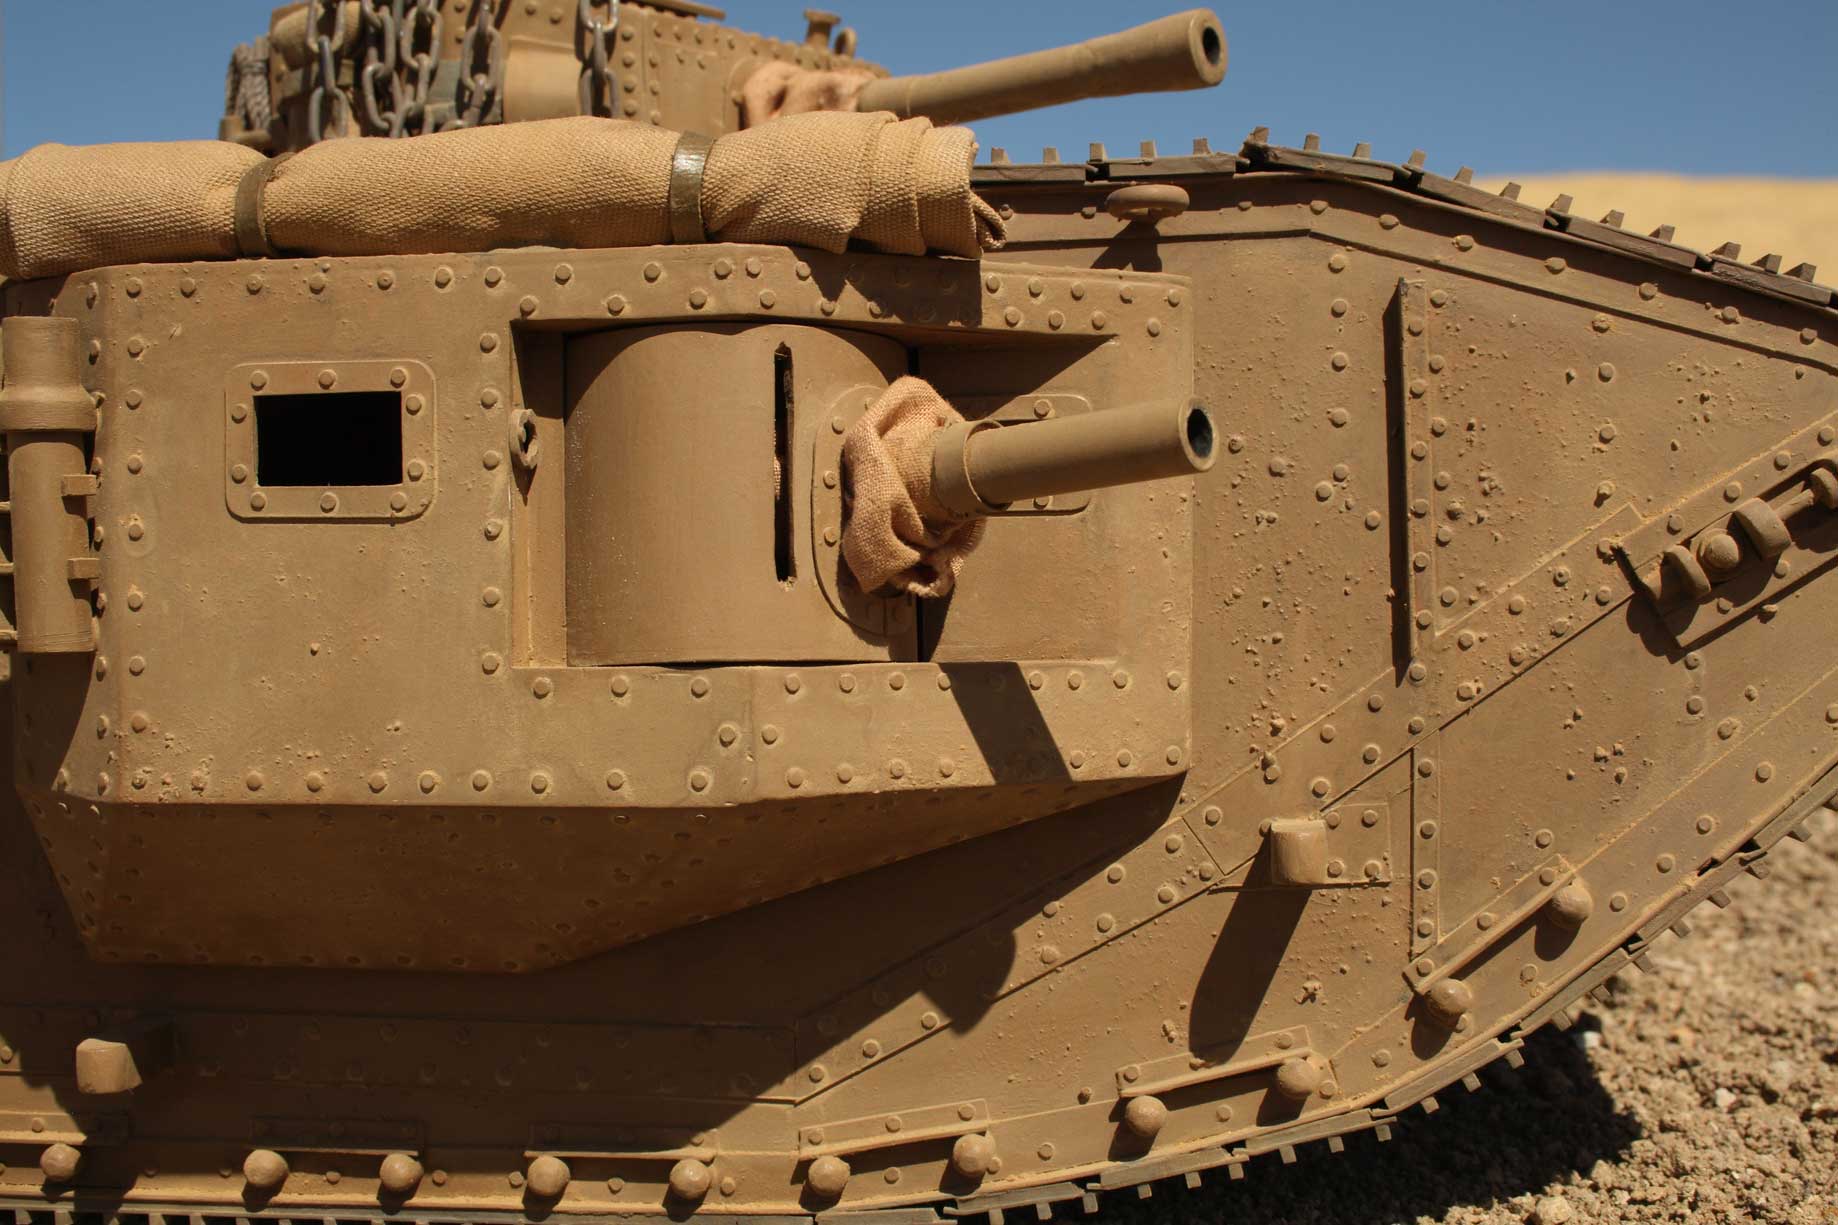
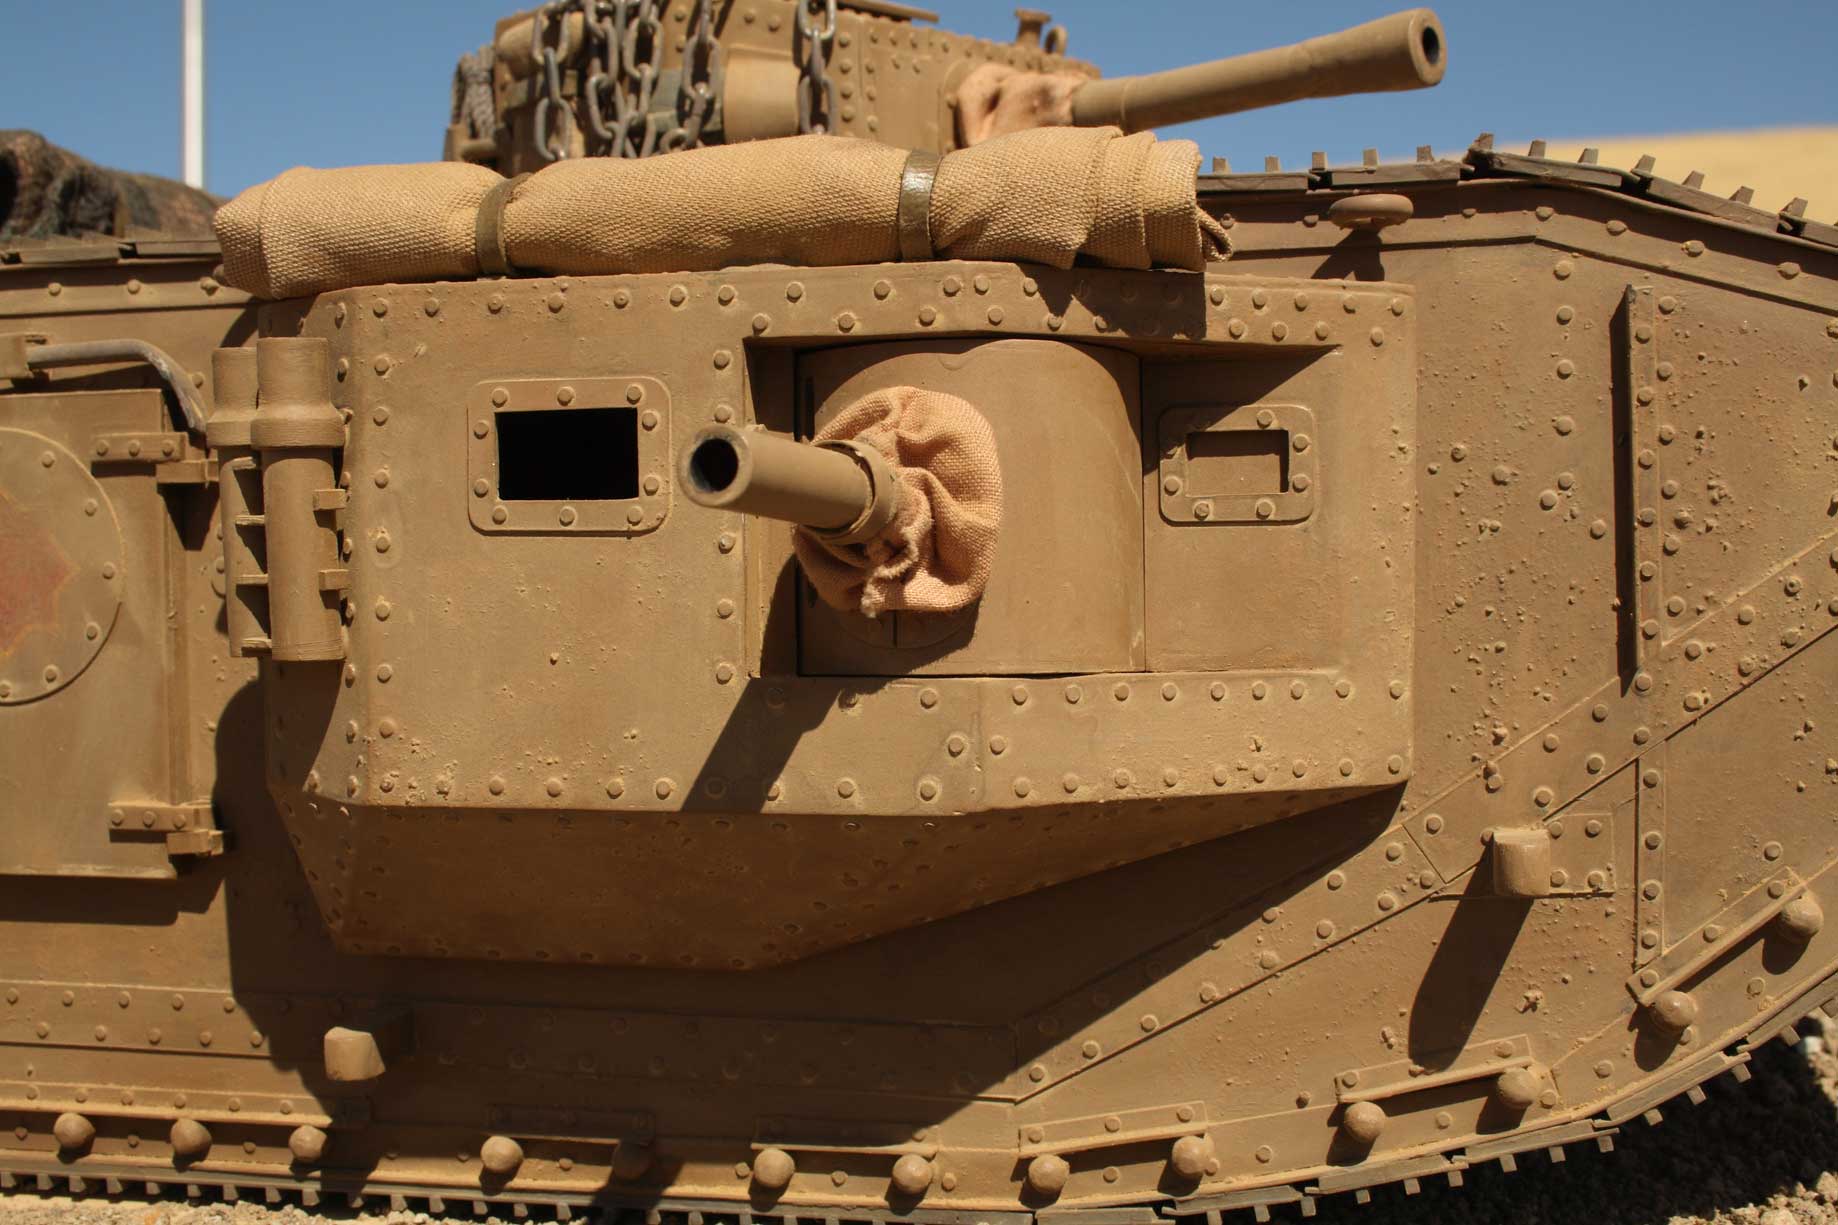
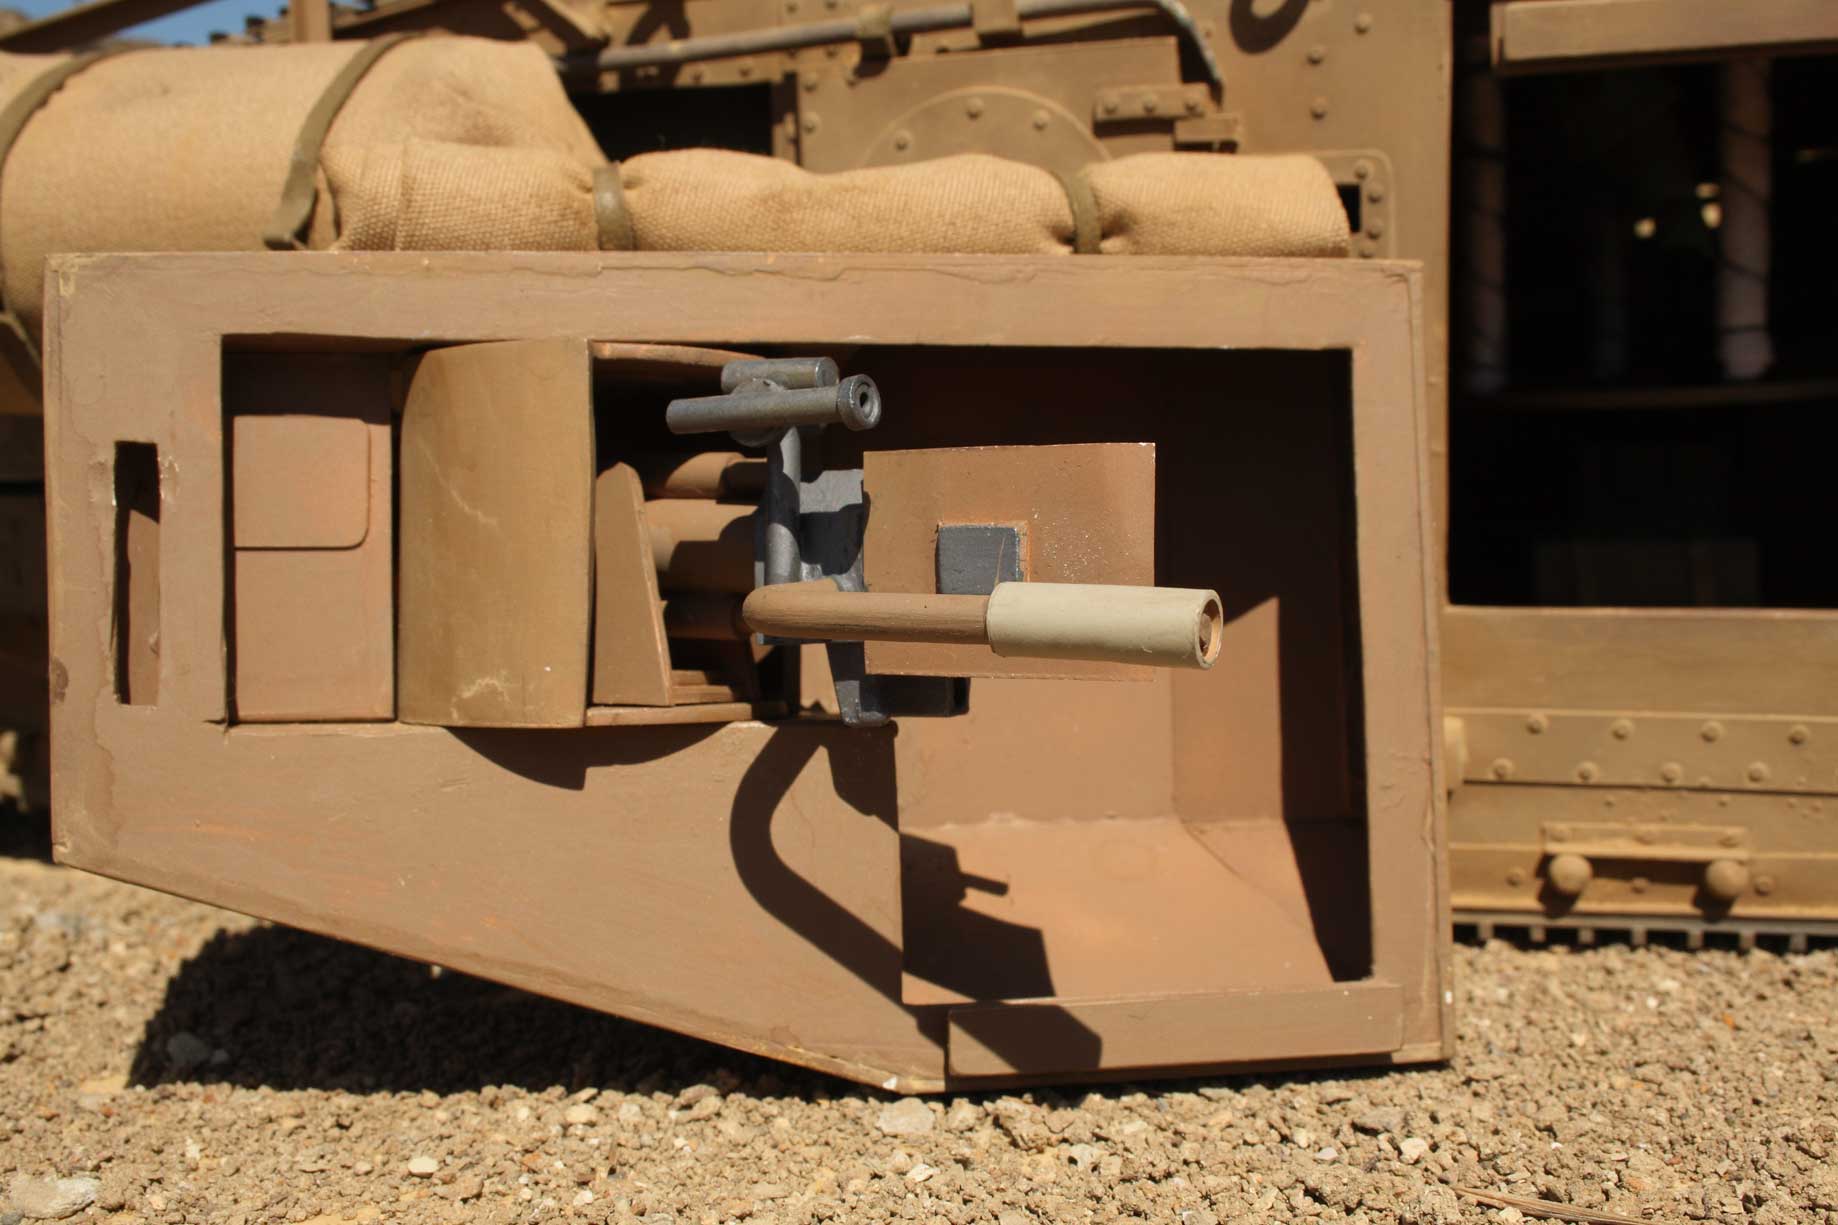

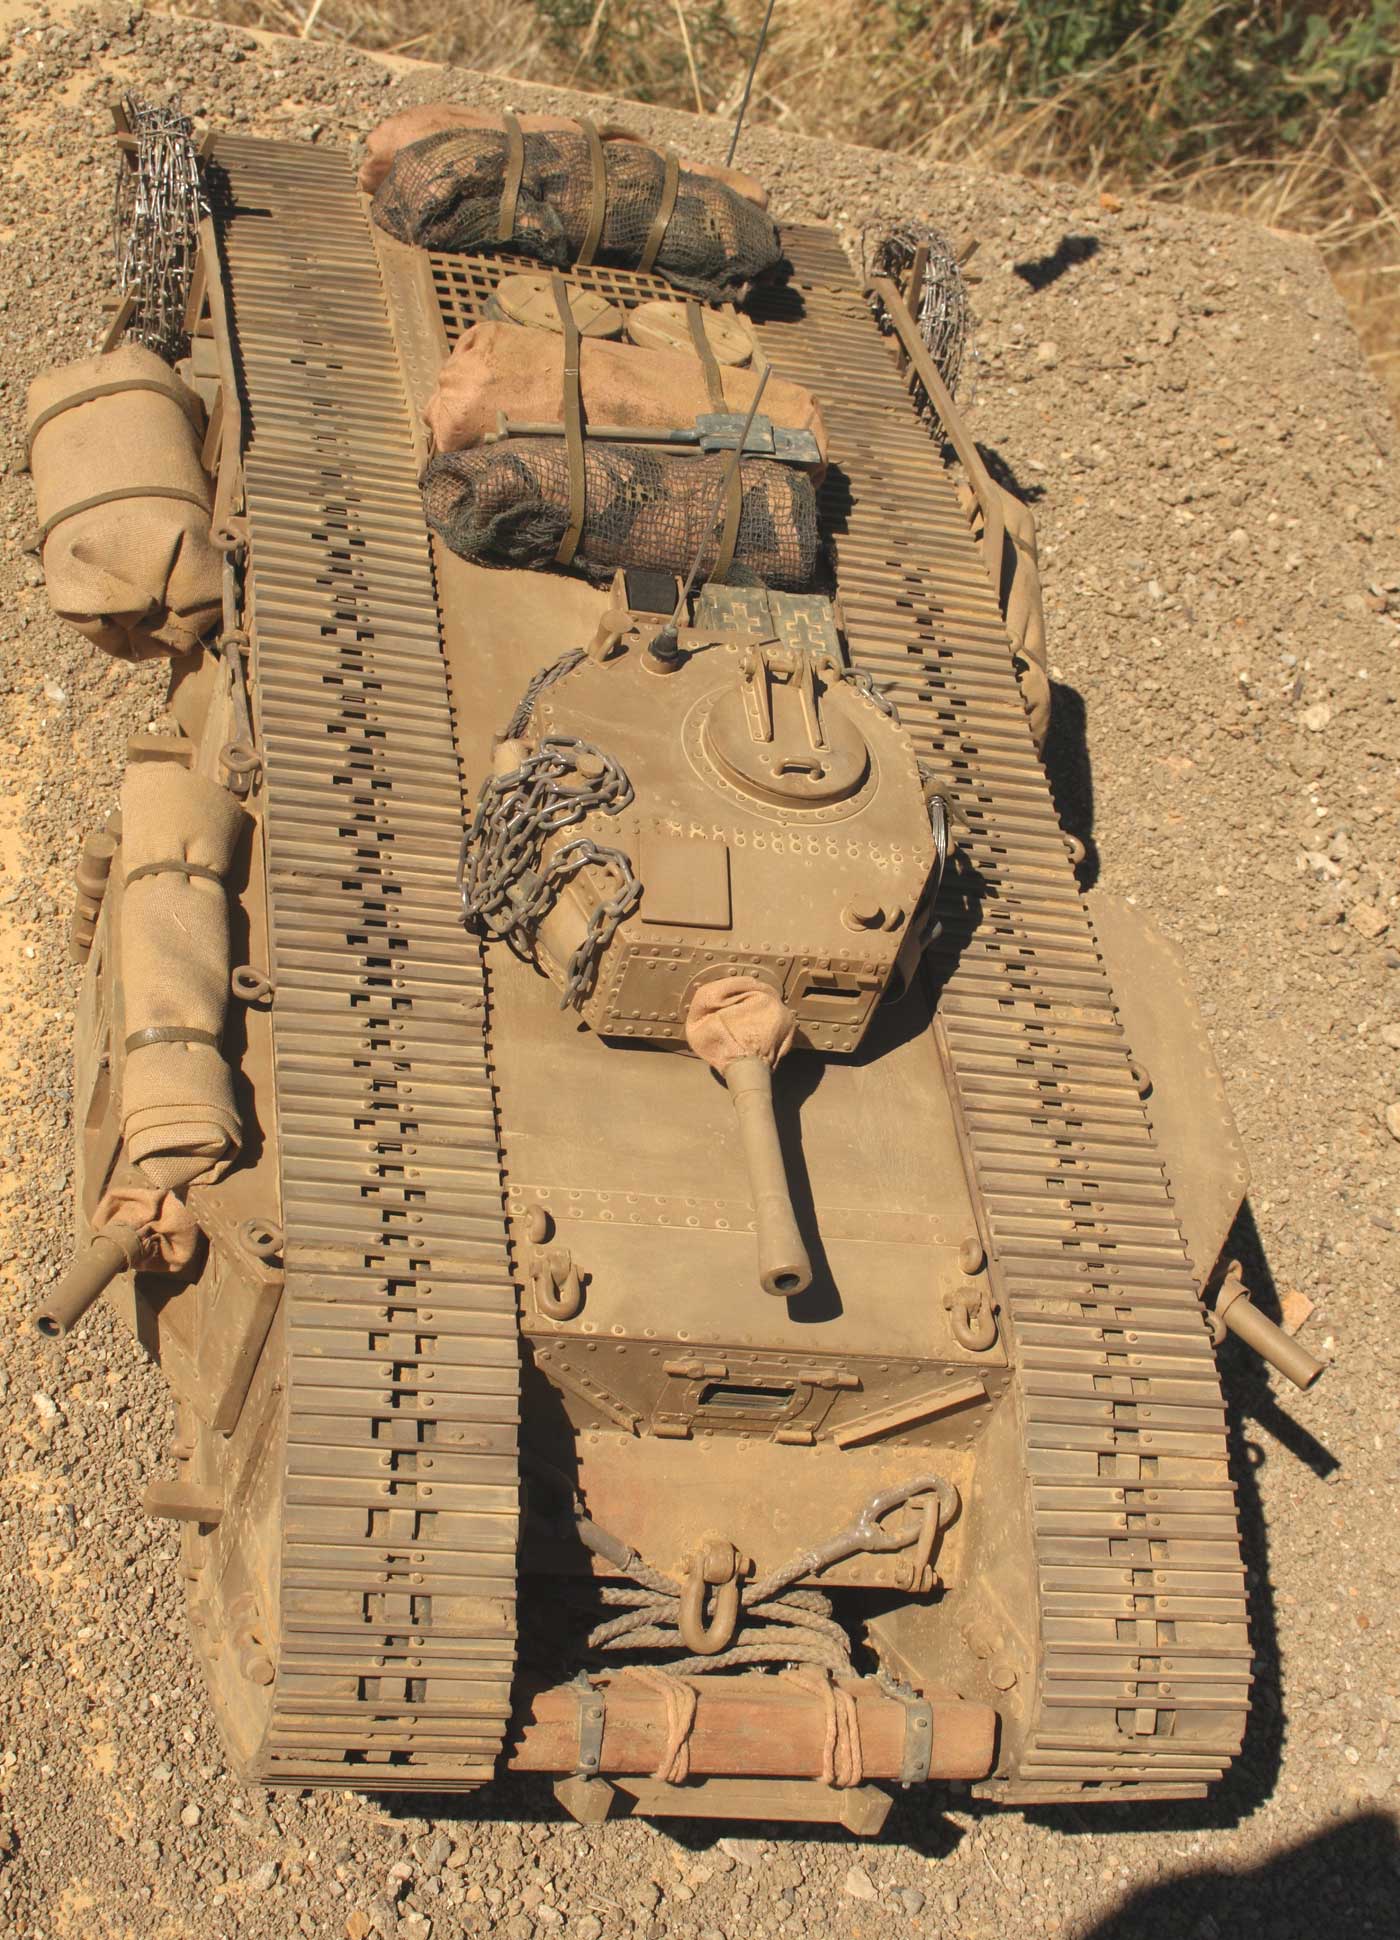
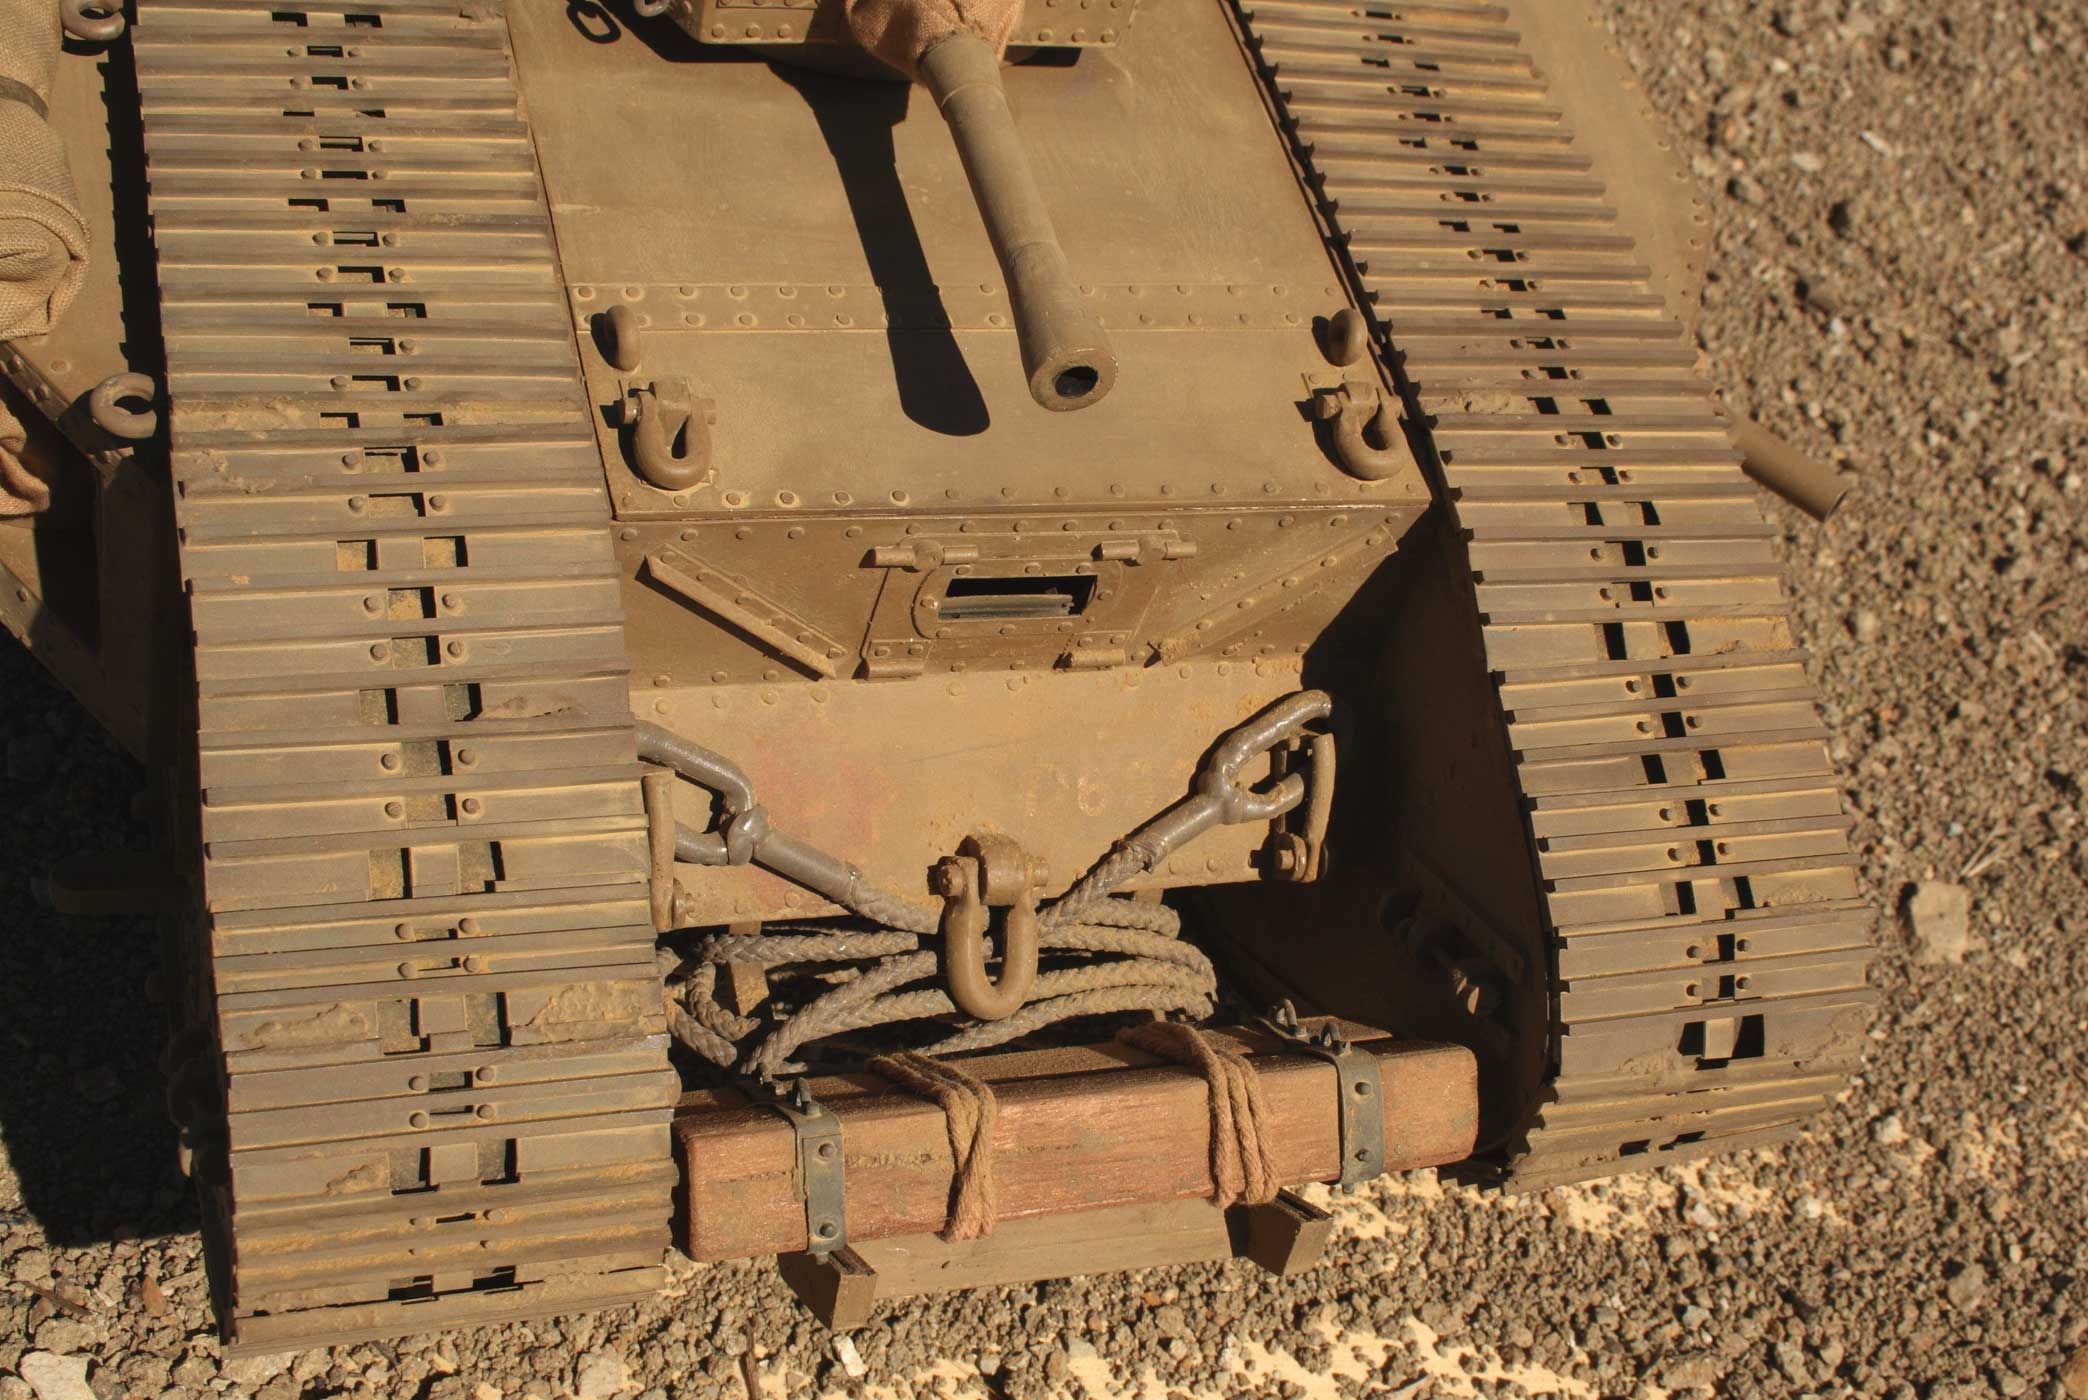
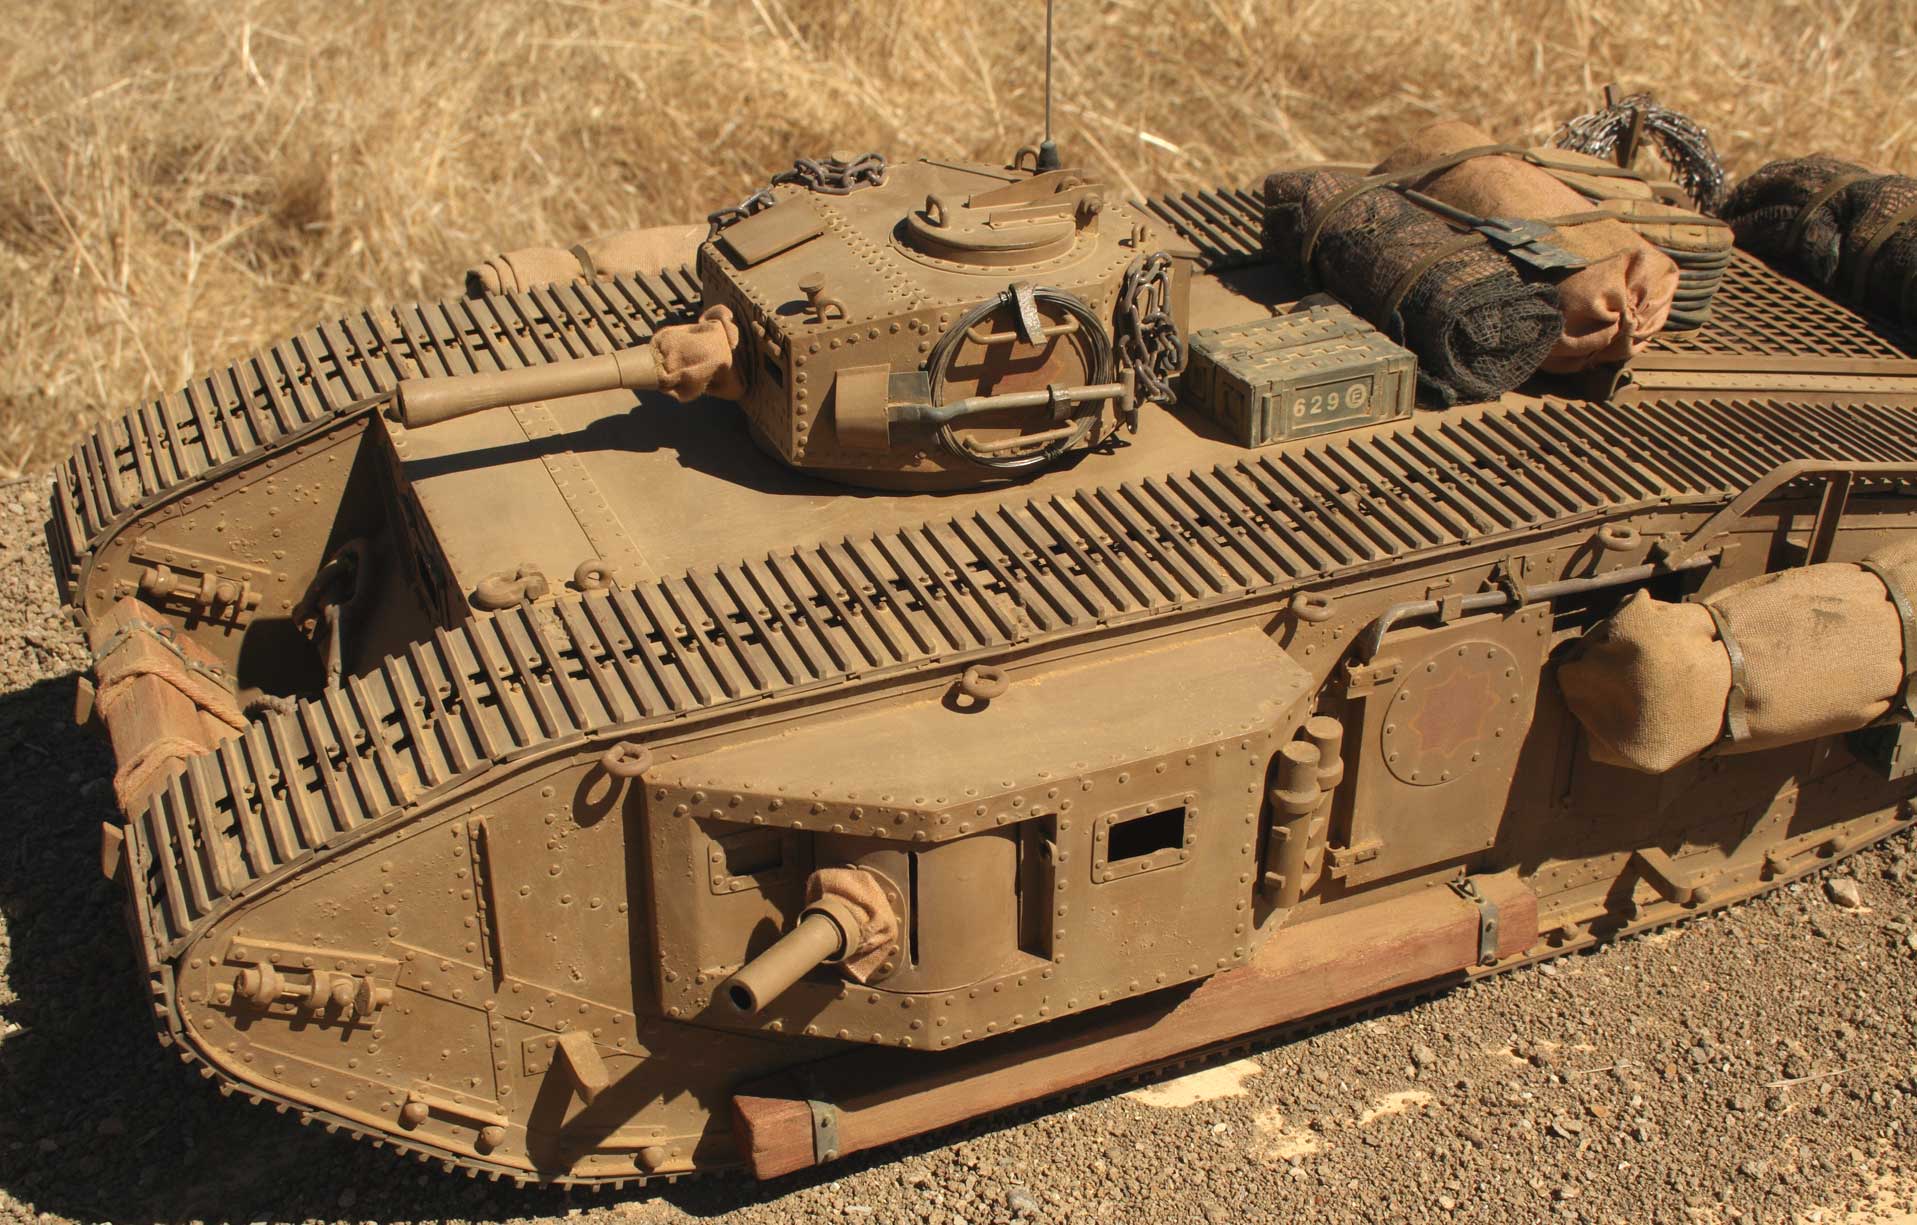
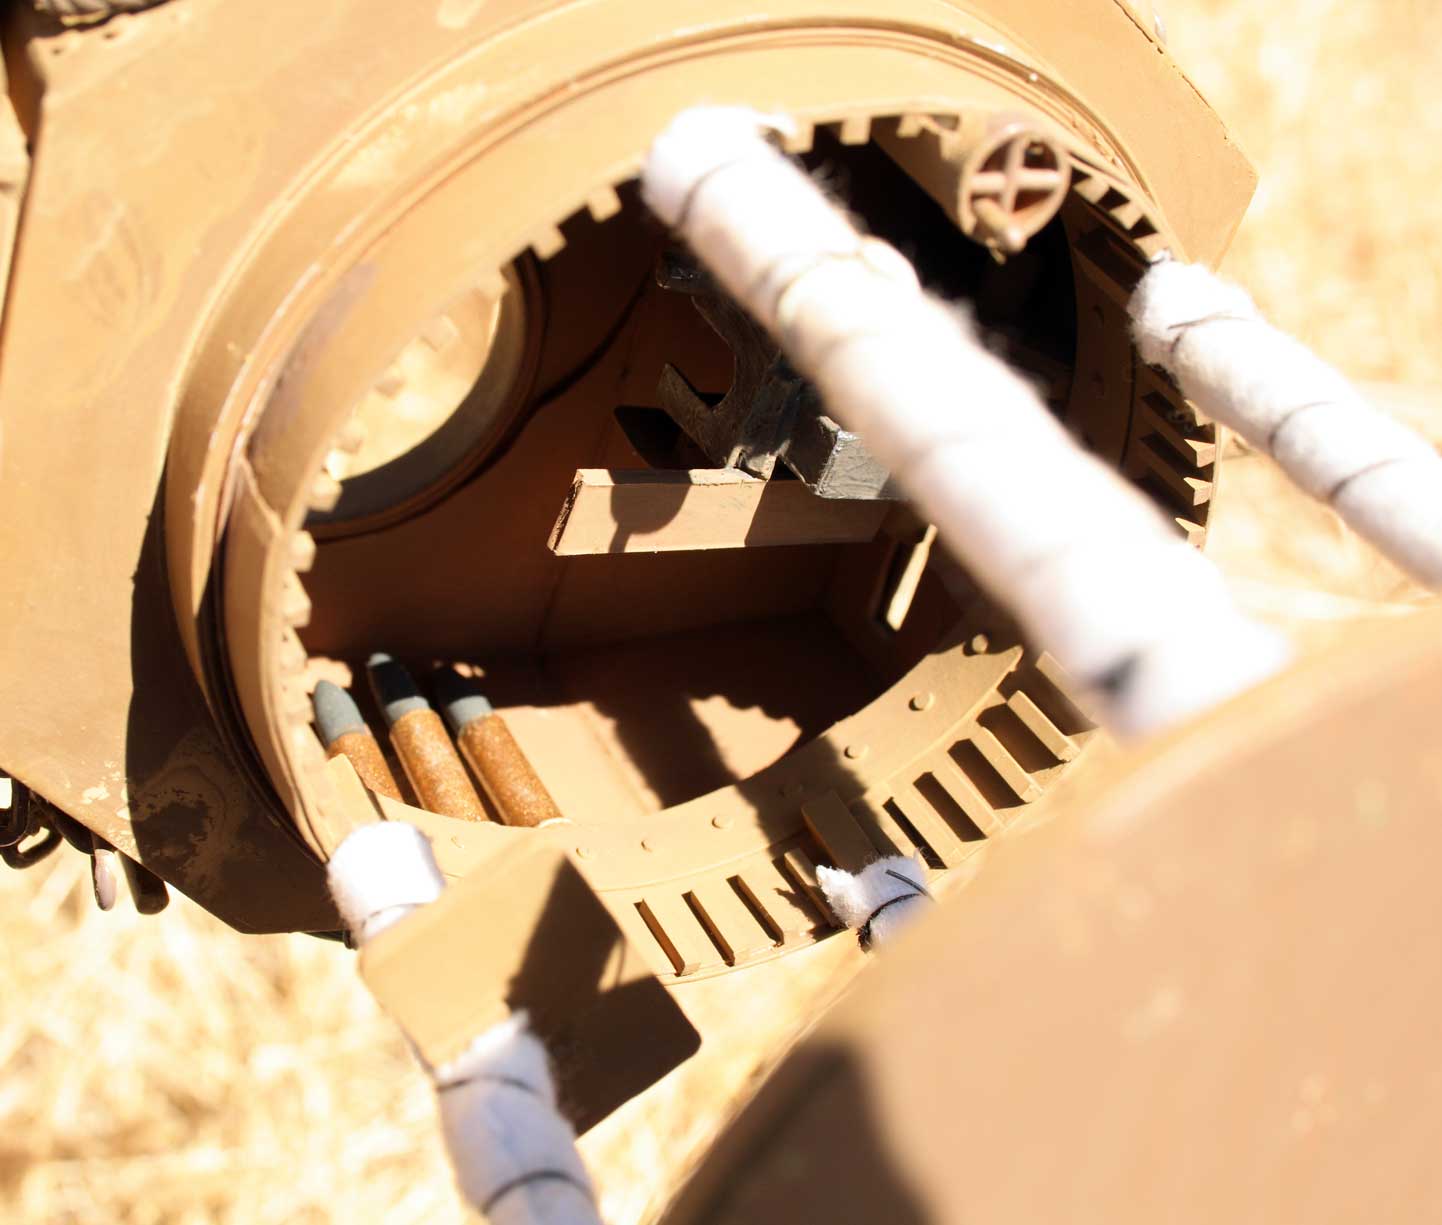
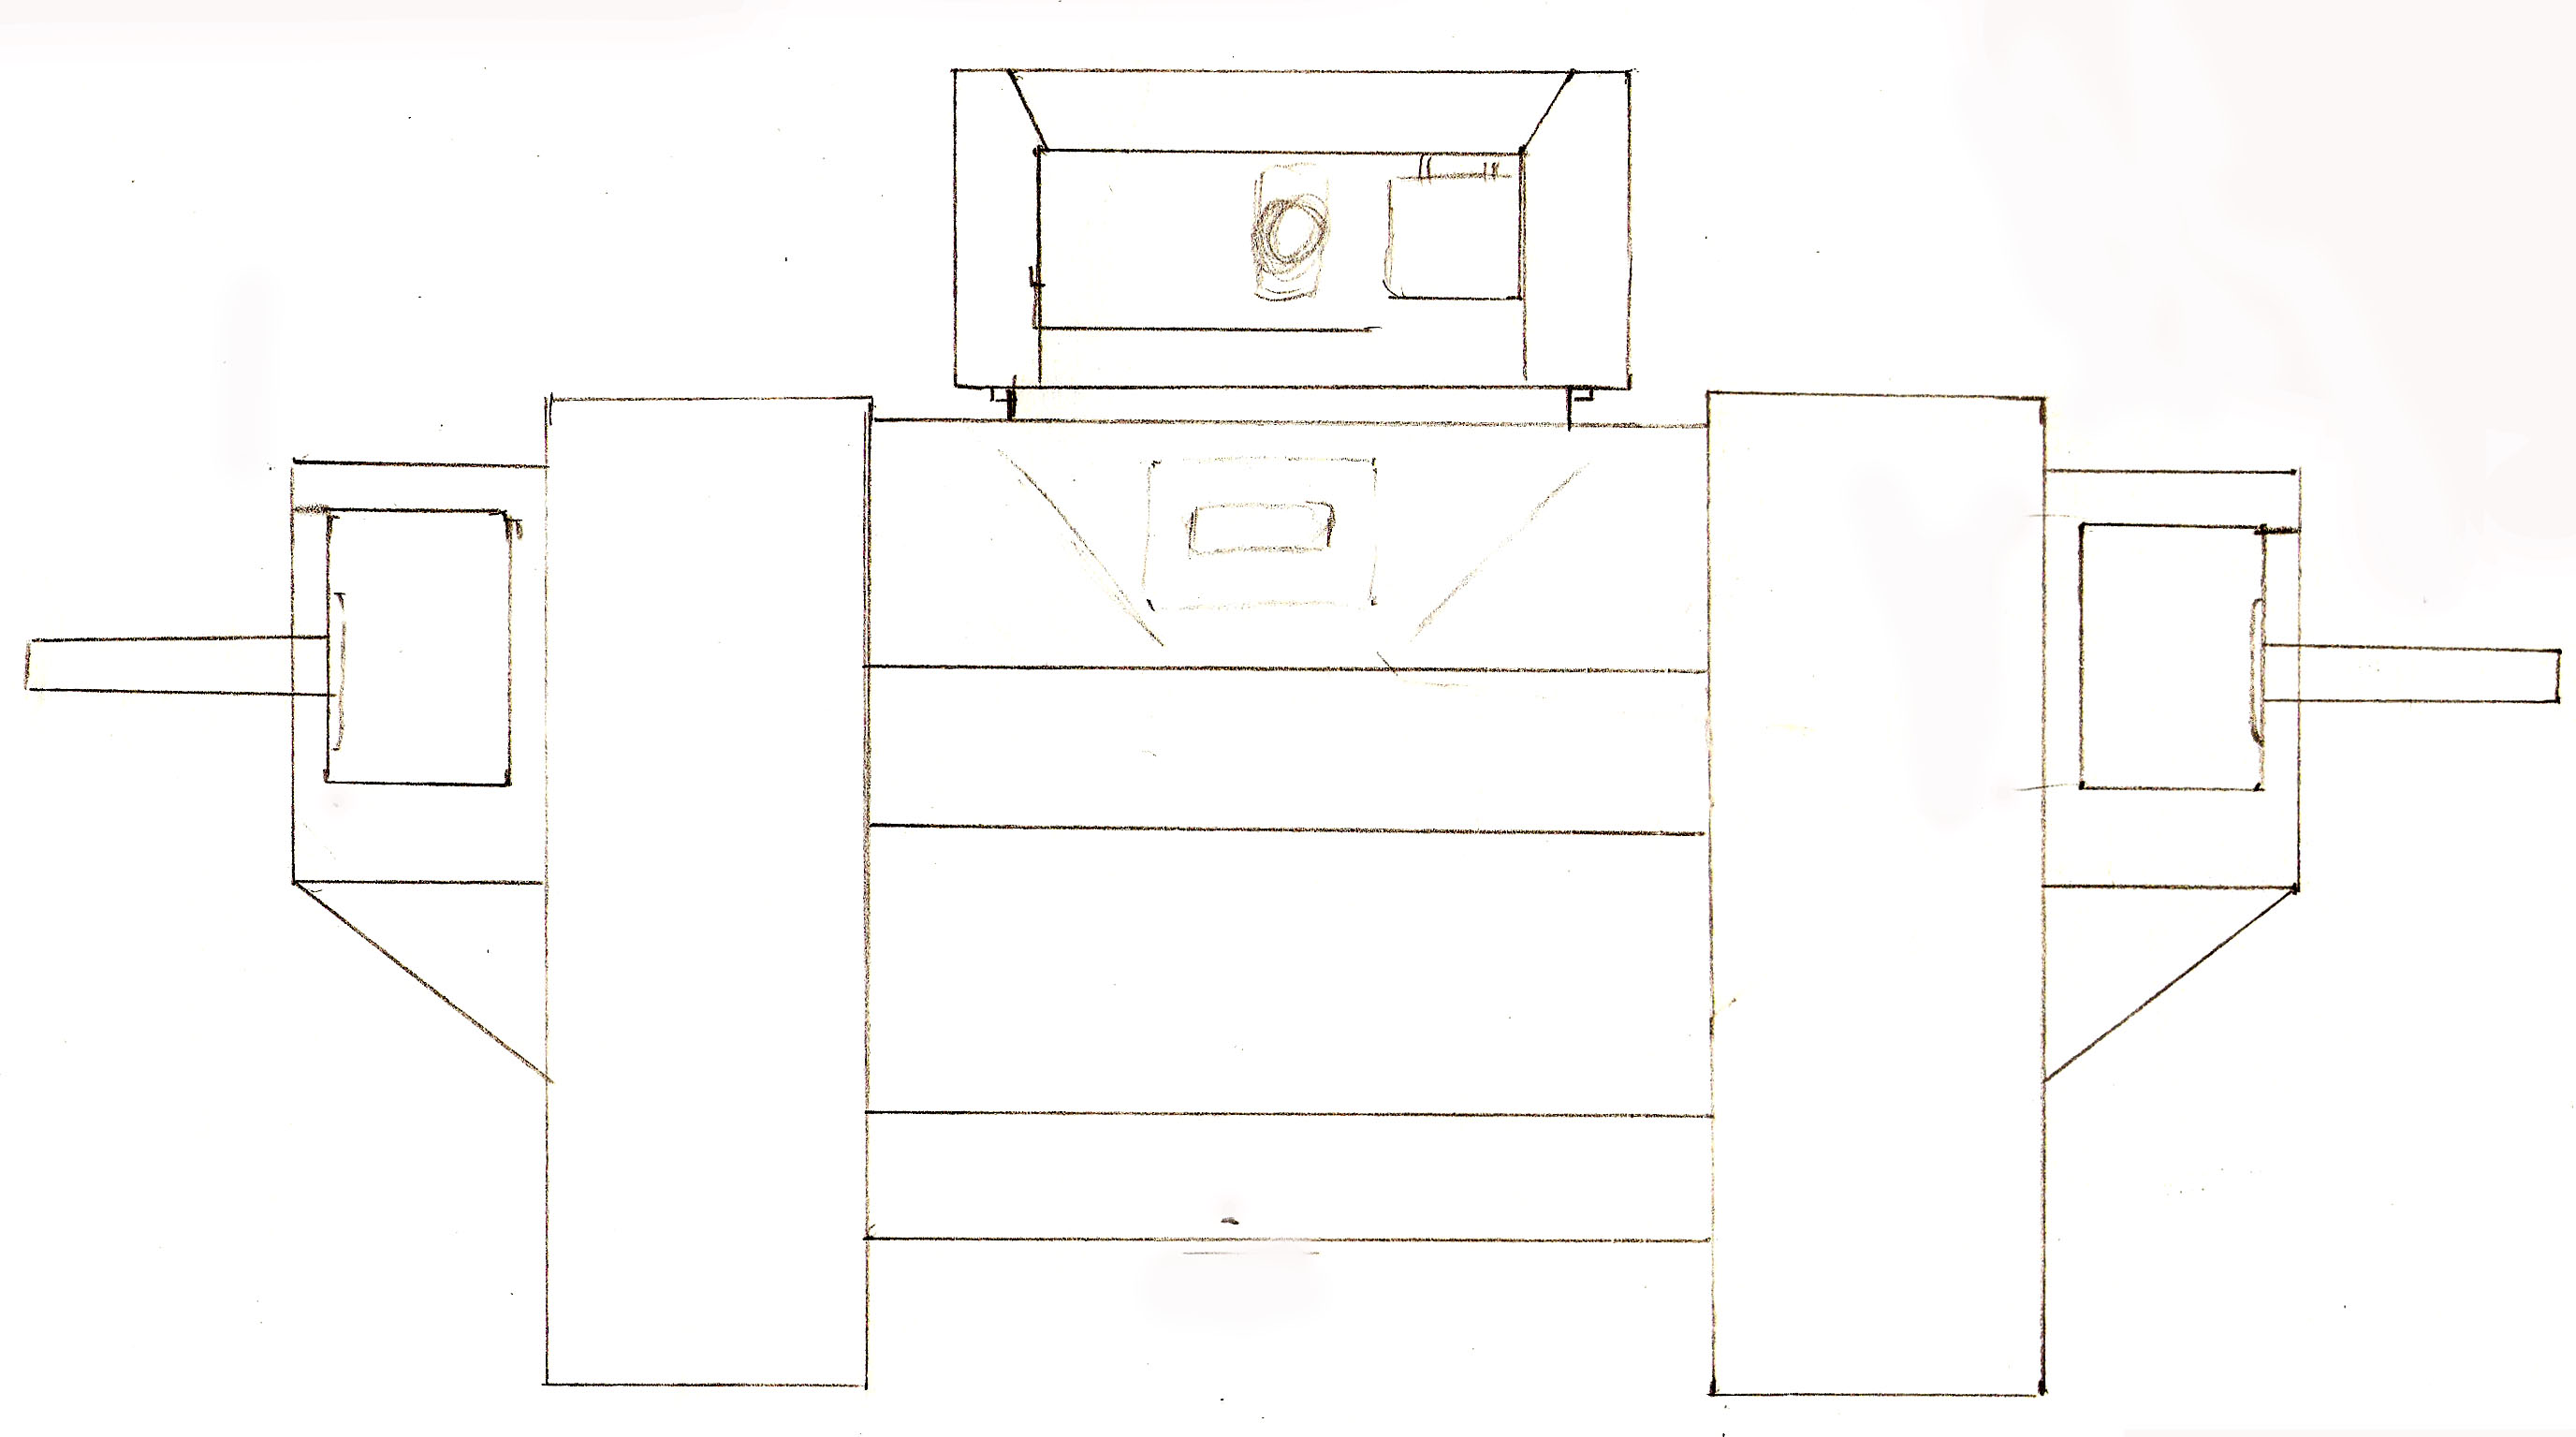
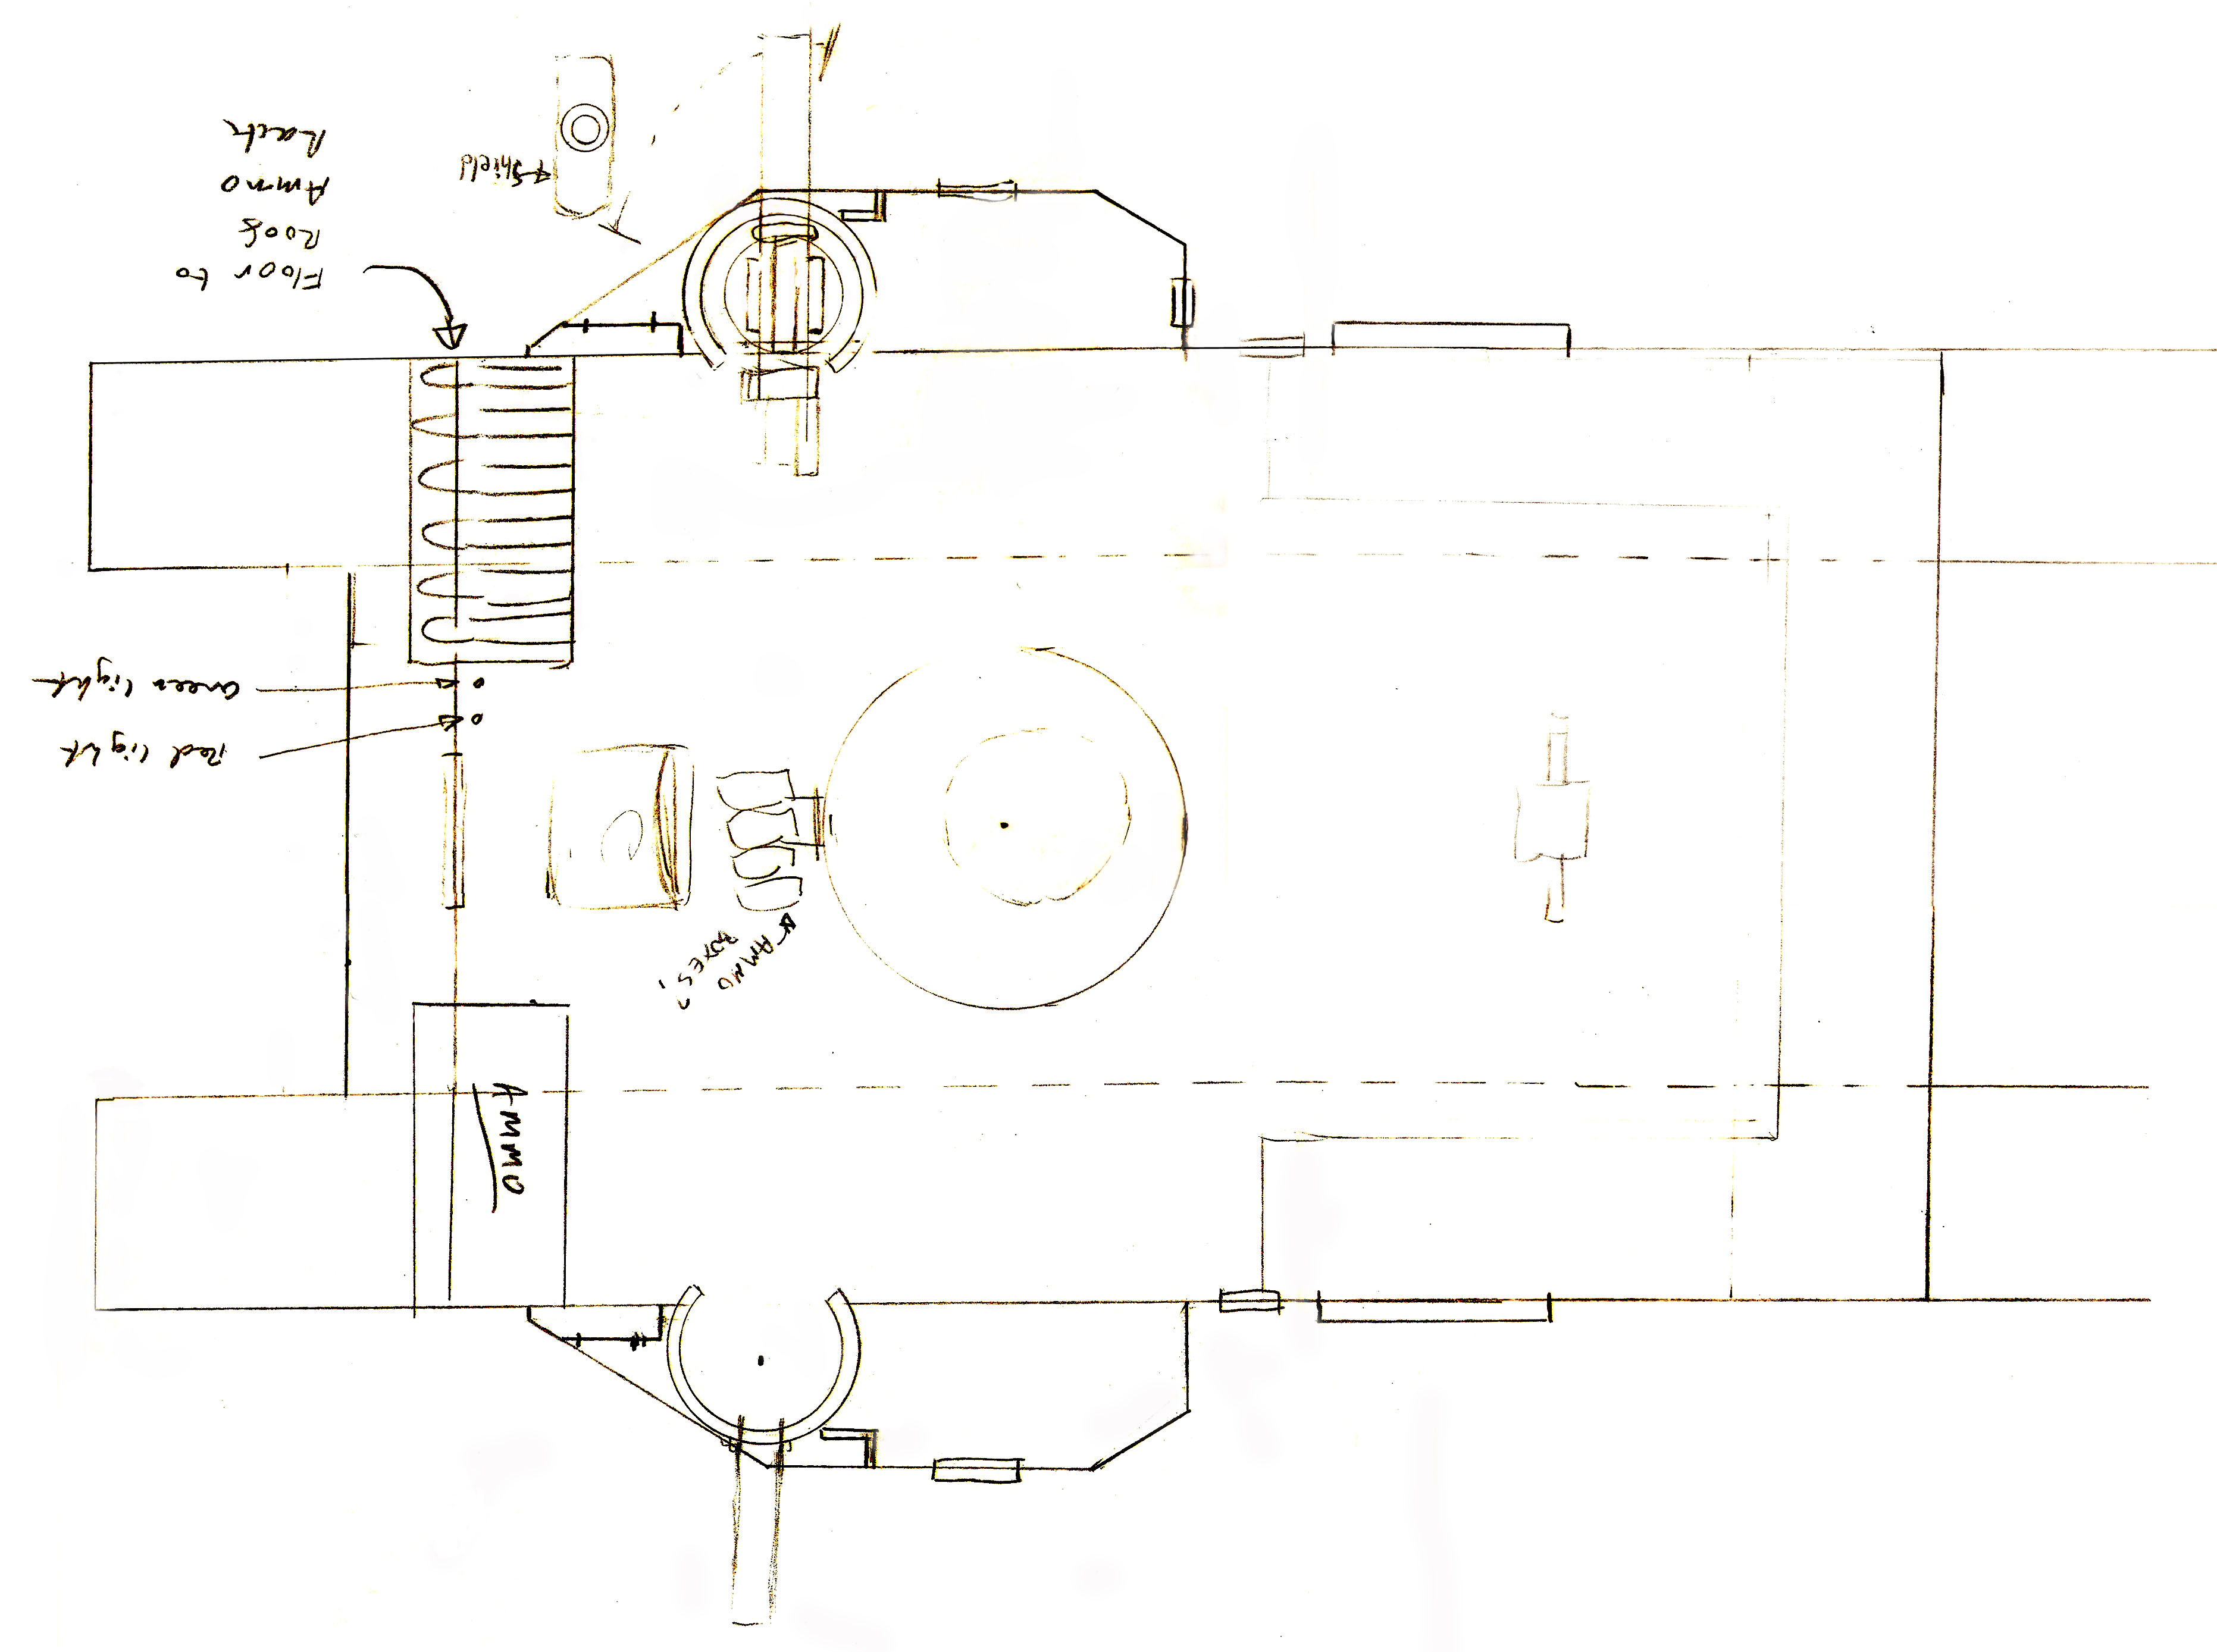
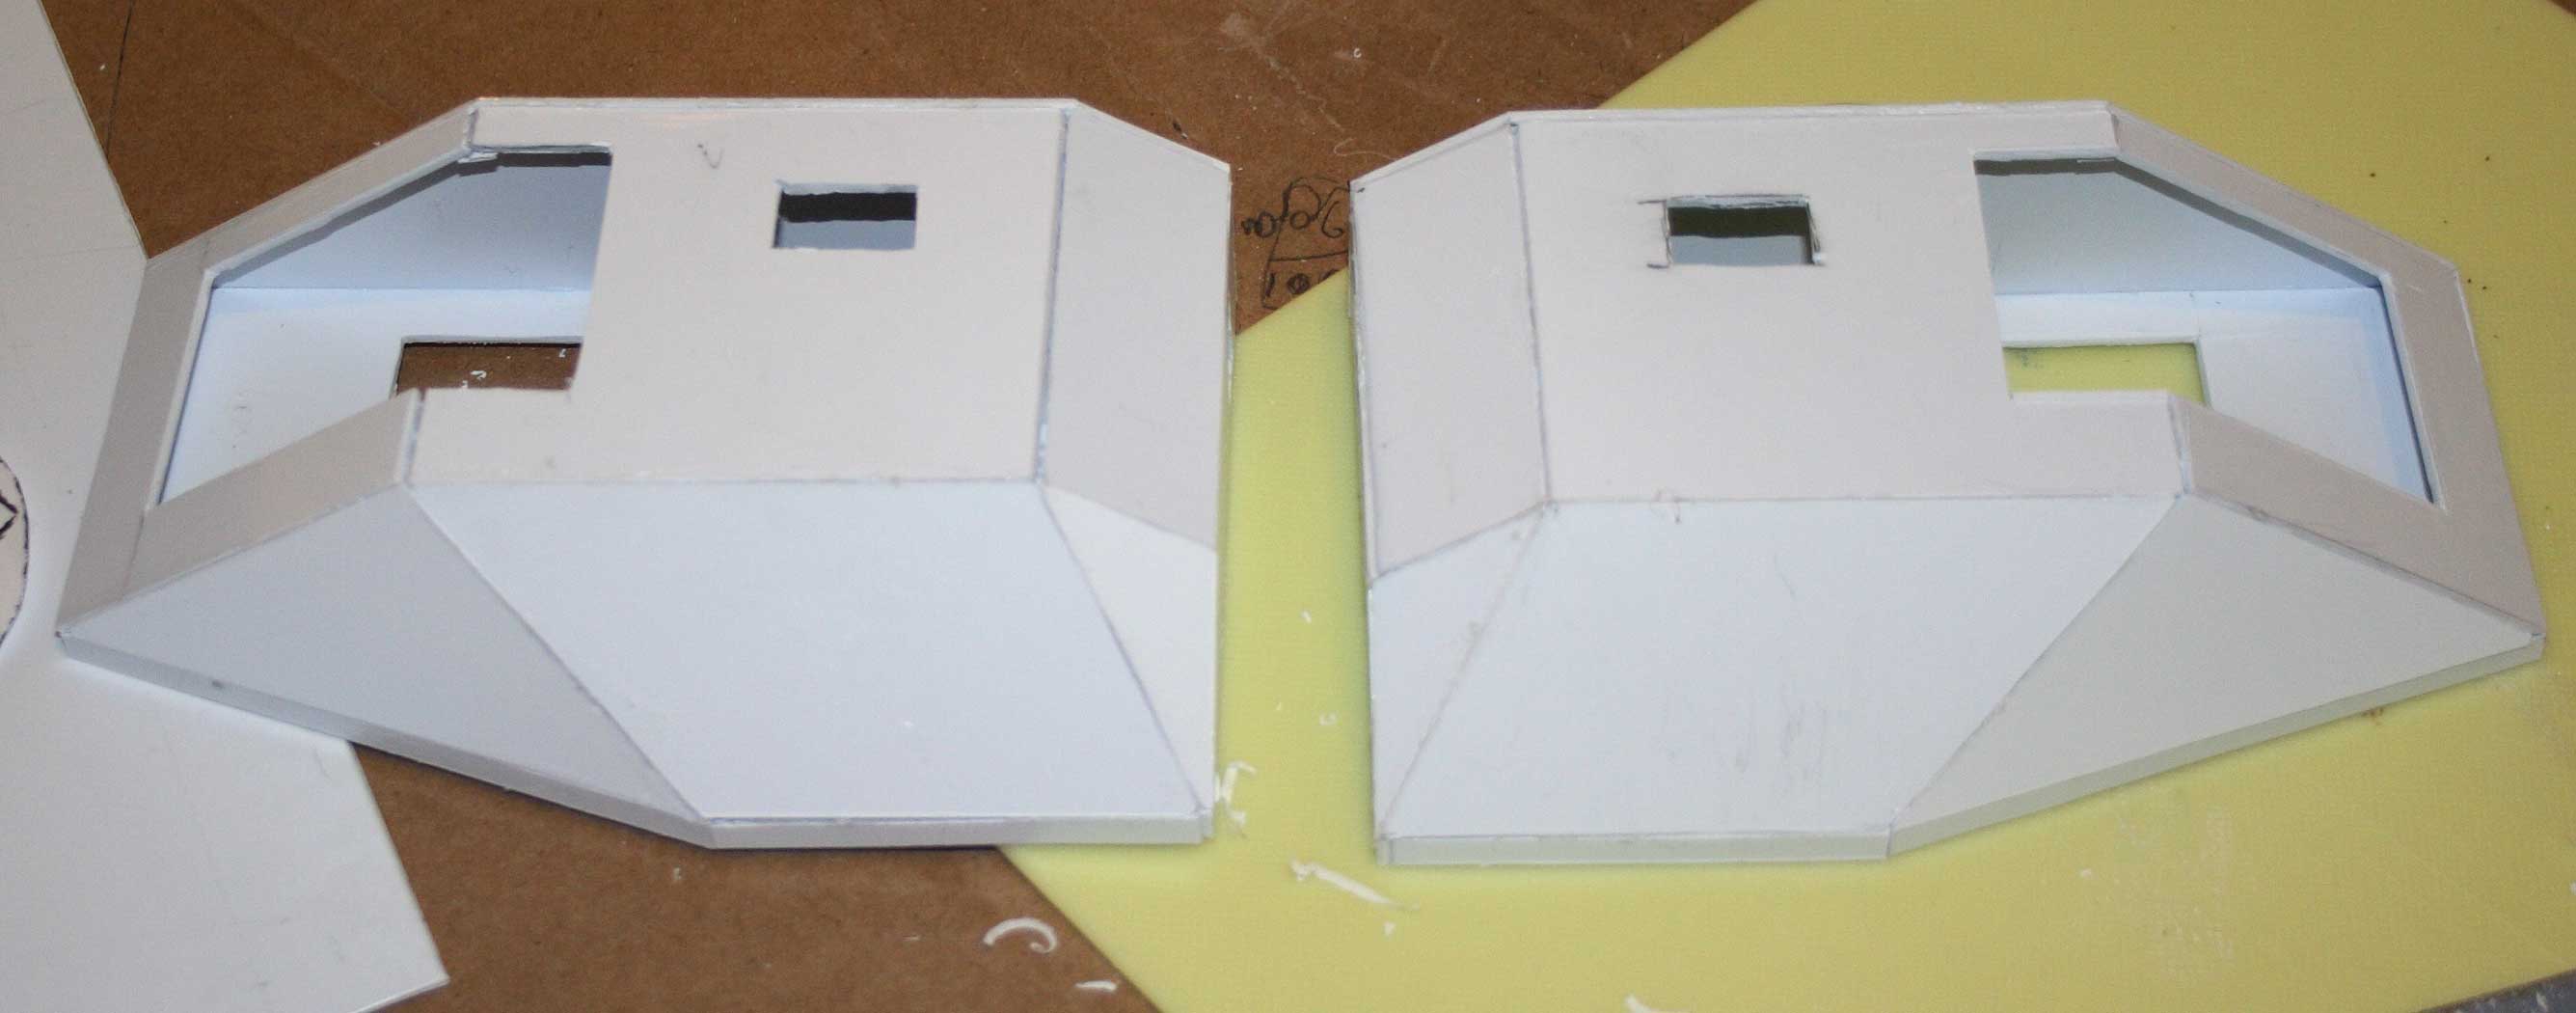
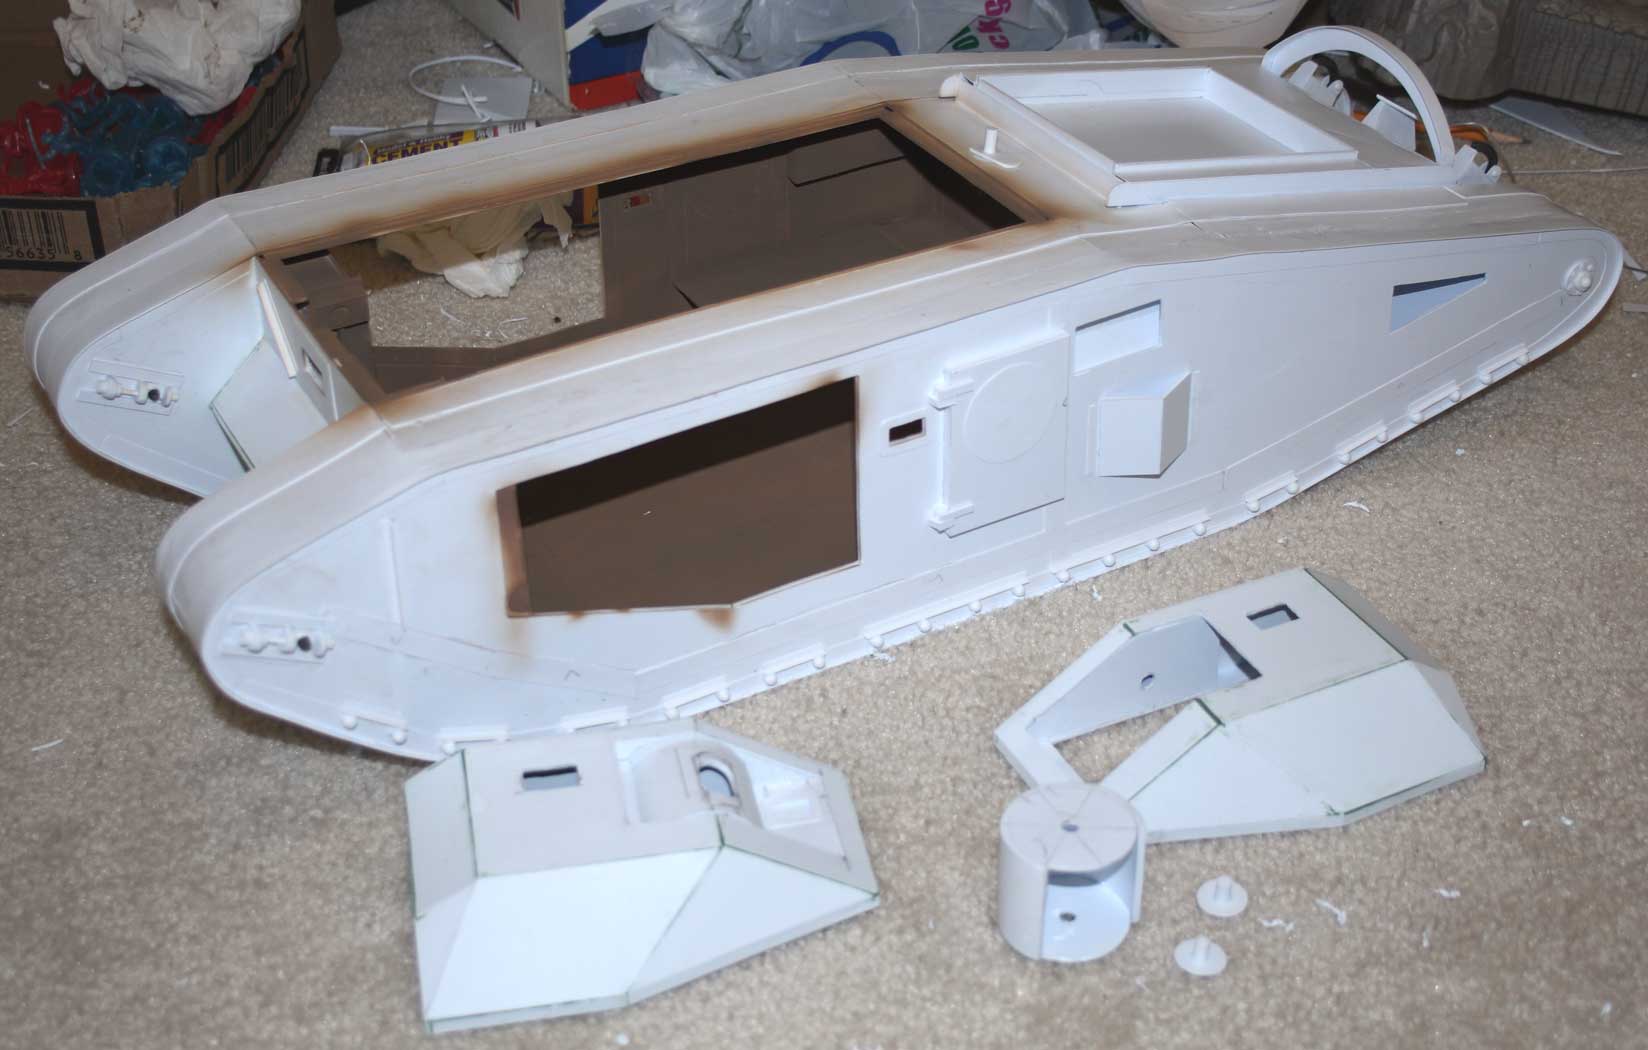
Features: Opening Turret hatch; movable guns in turret and side sponsons; removable gun sponson on the right side (facing front) to give access to the interior. Last 2 pictures on the right show interior 6 pounder gun breech details. These were designed to be "Hasbro toy" accurate rather than exactly historically accurate for a naval 6 pounder.

![]()
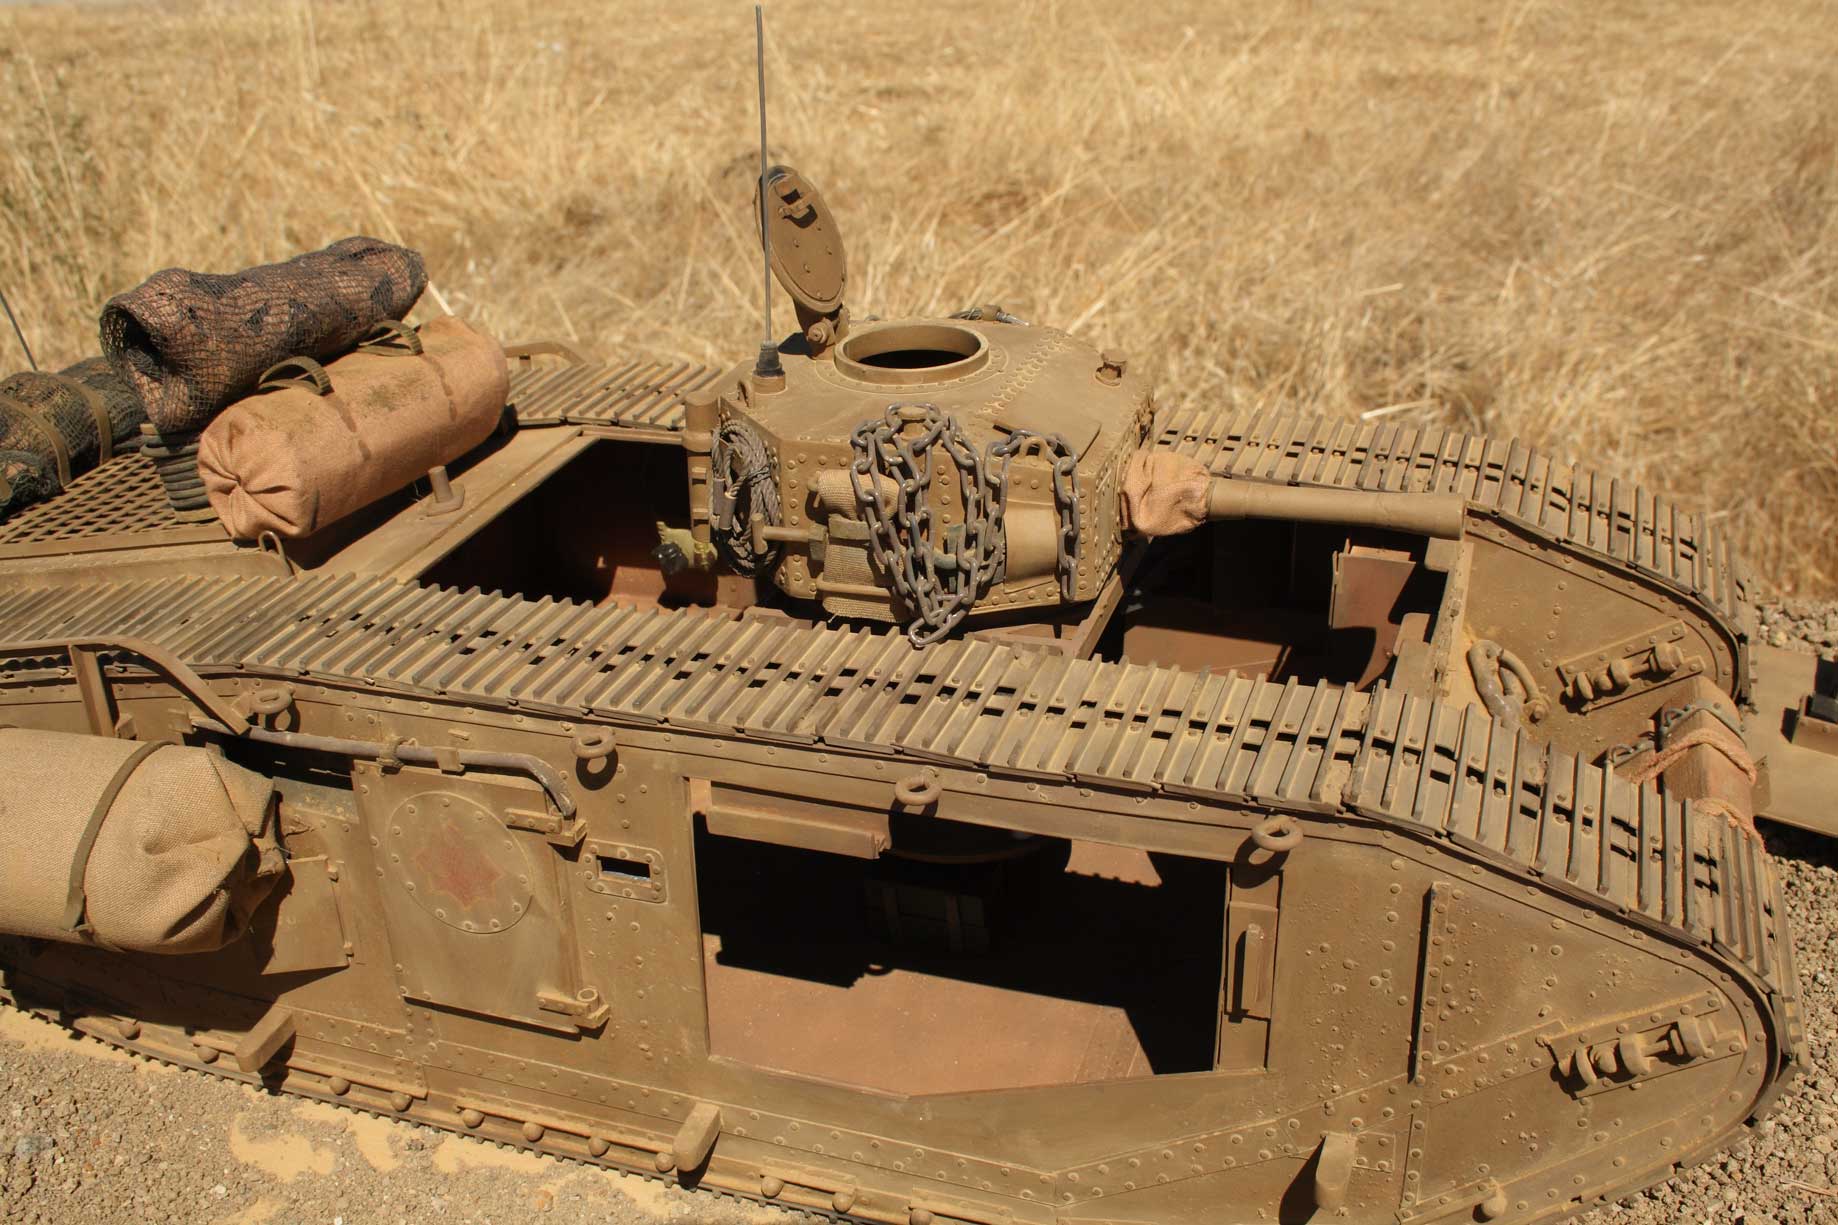
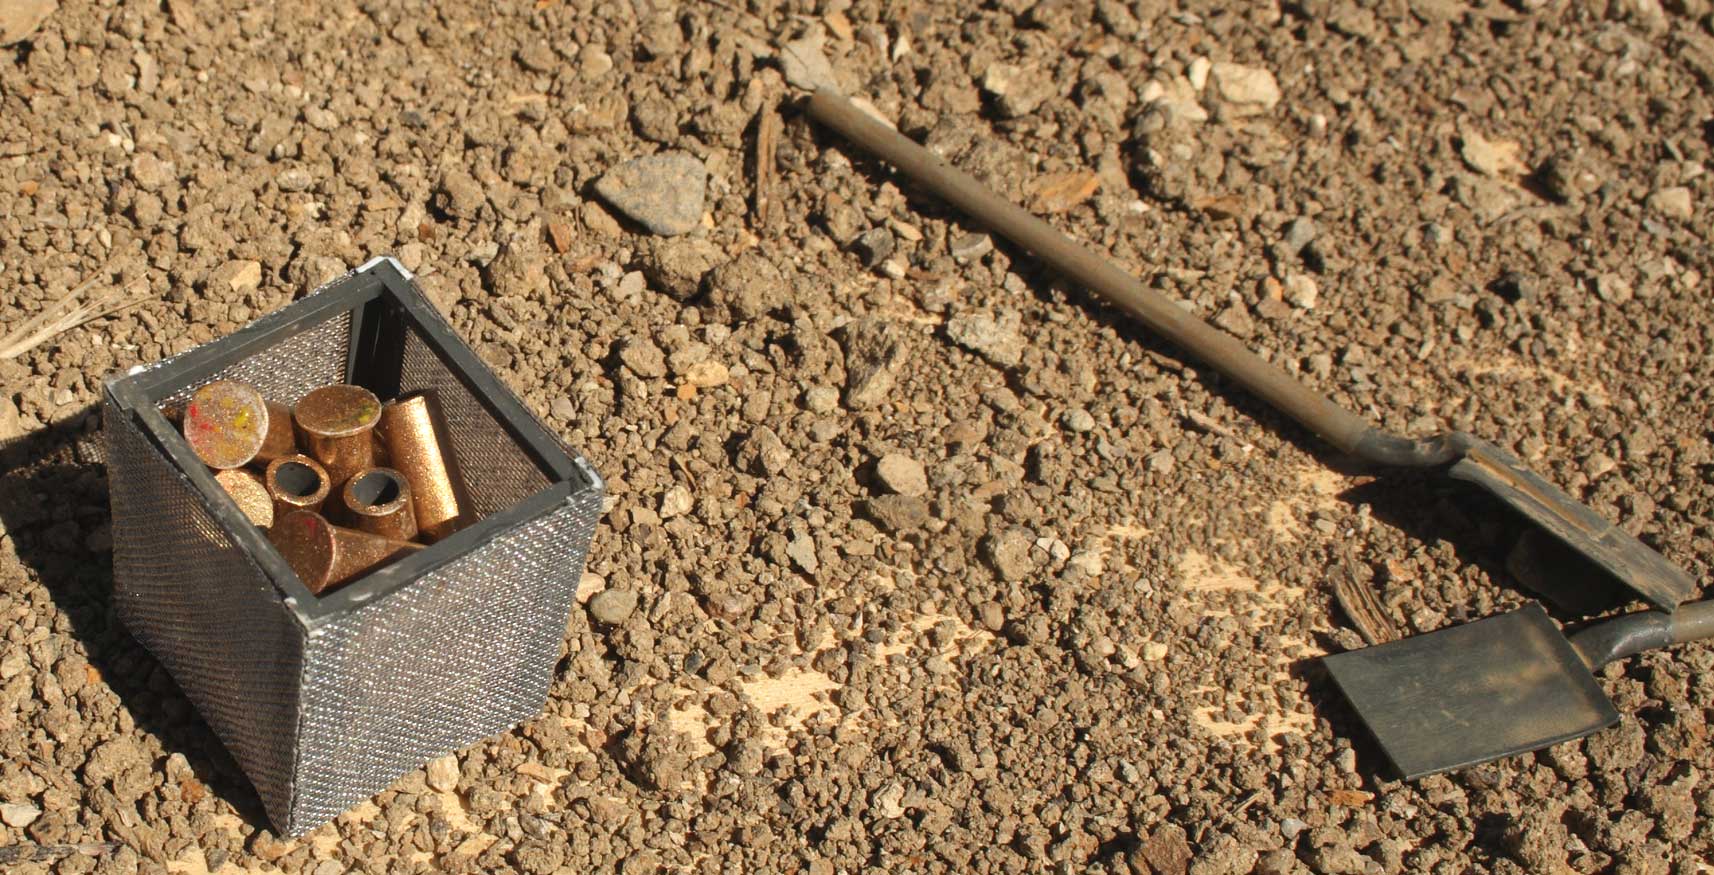
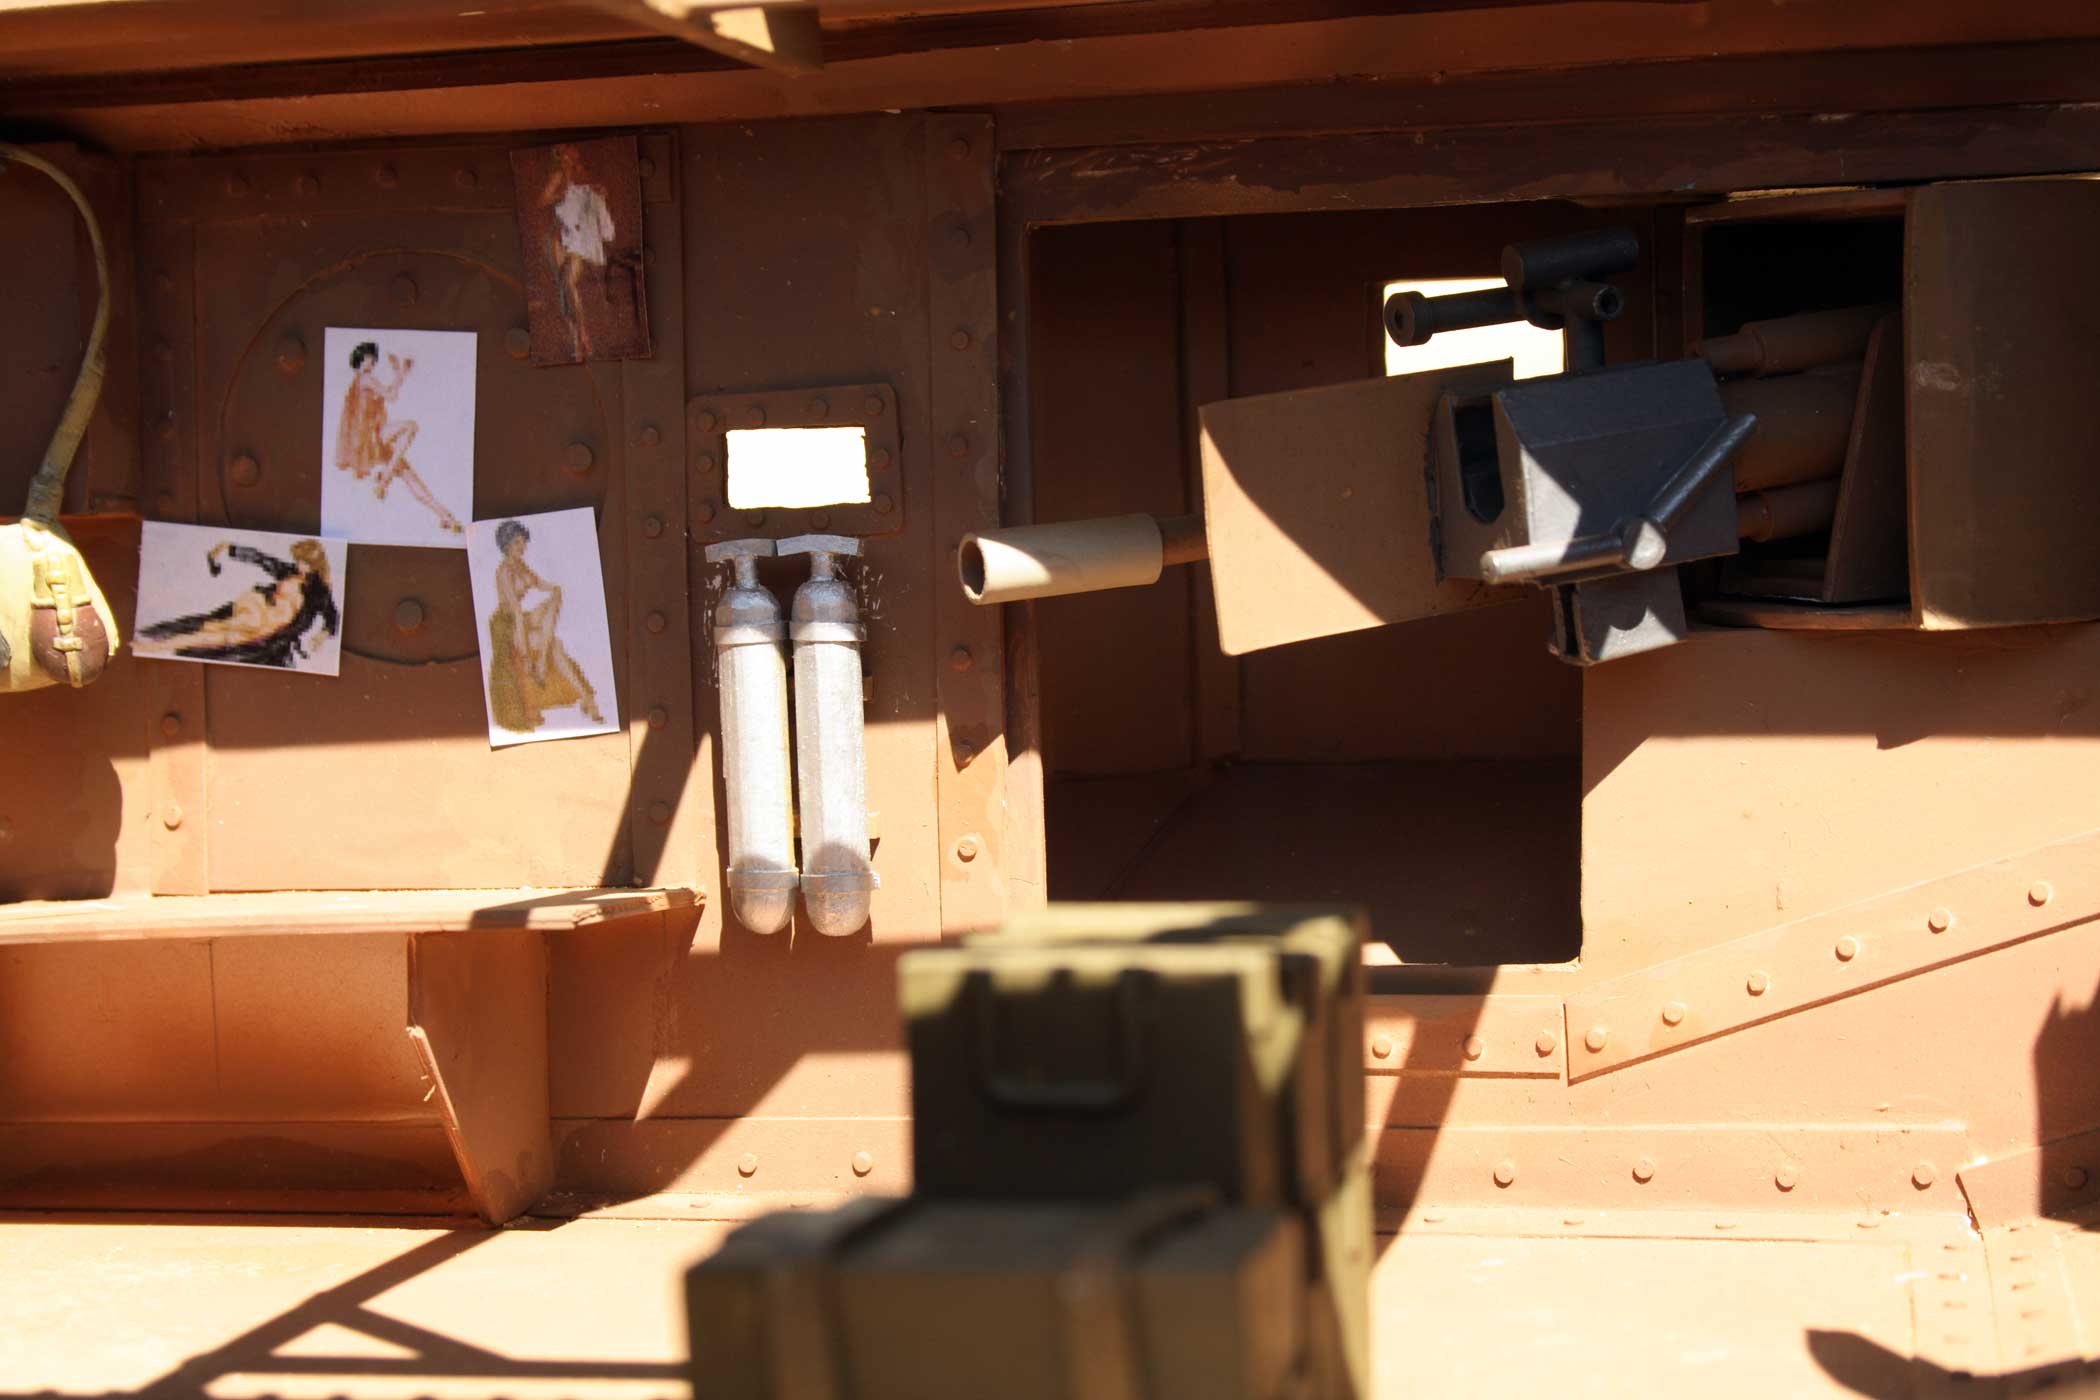

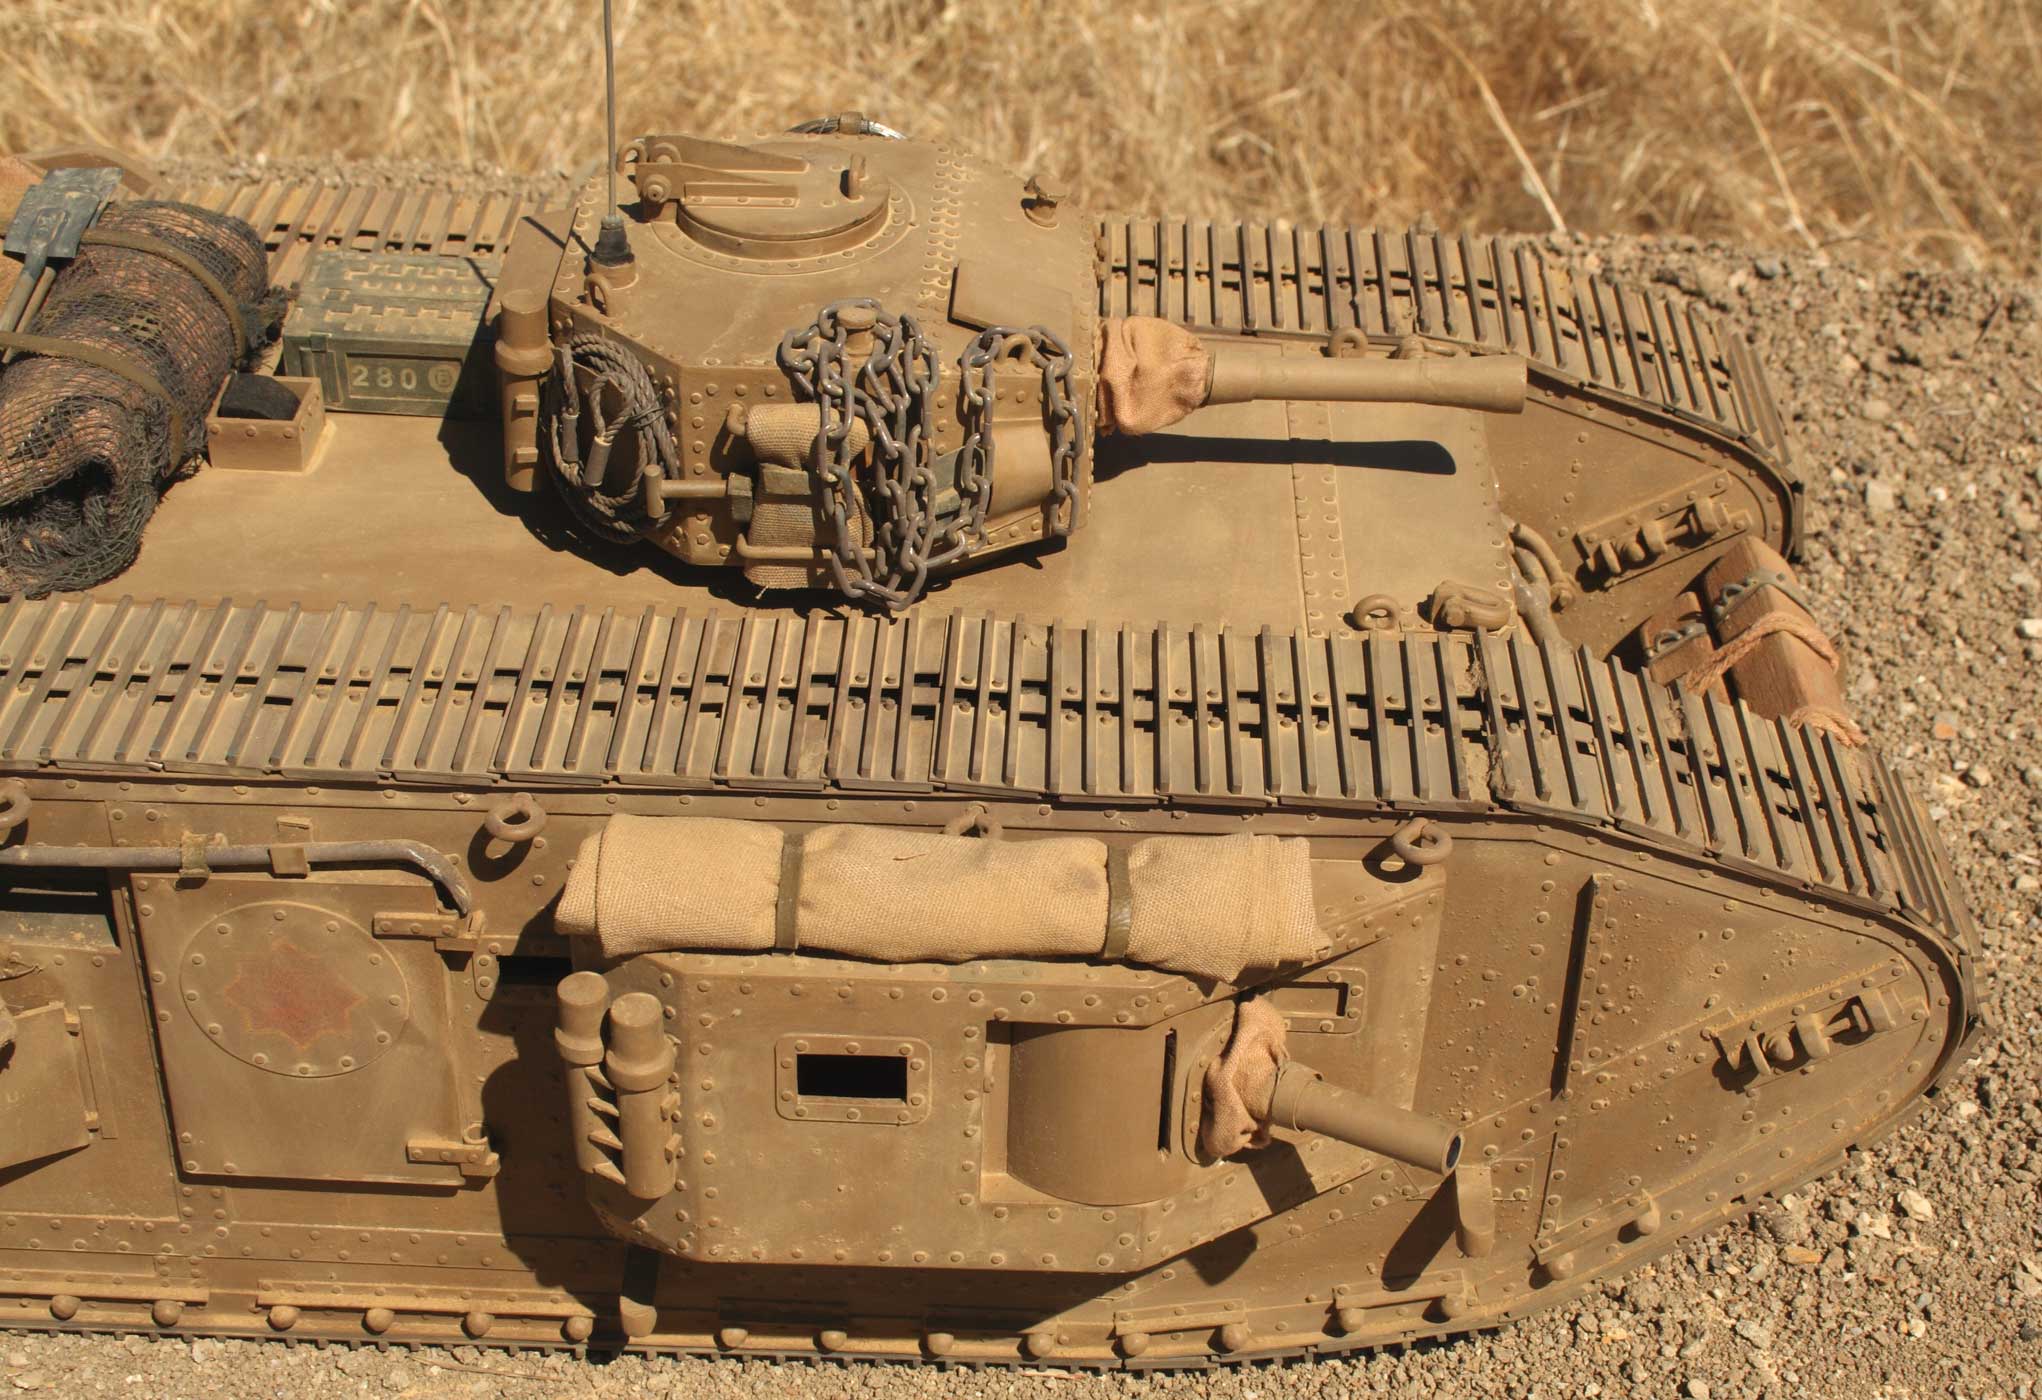
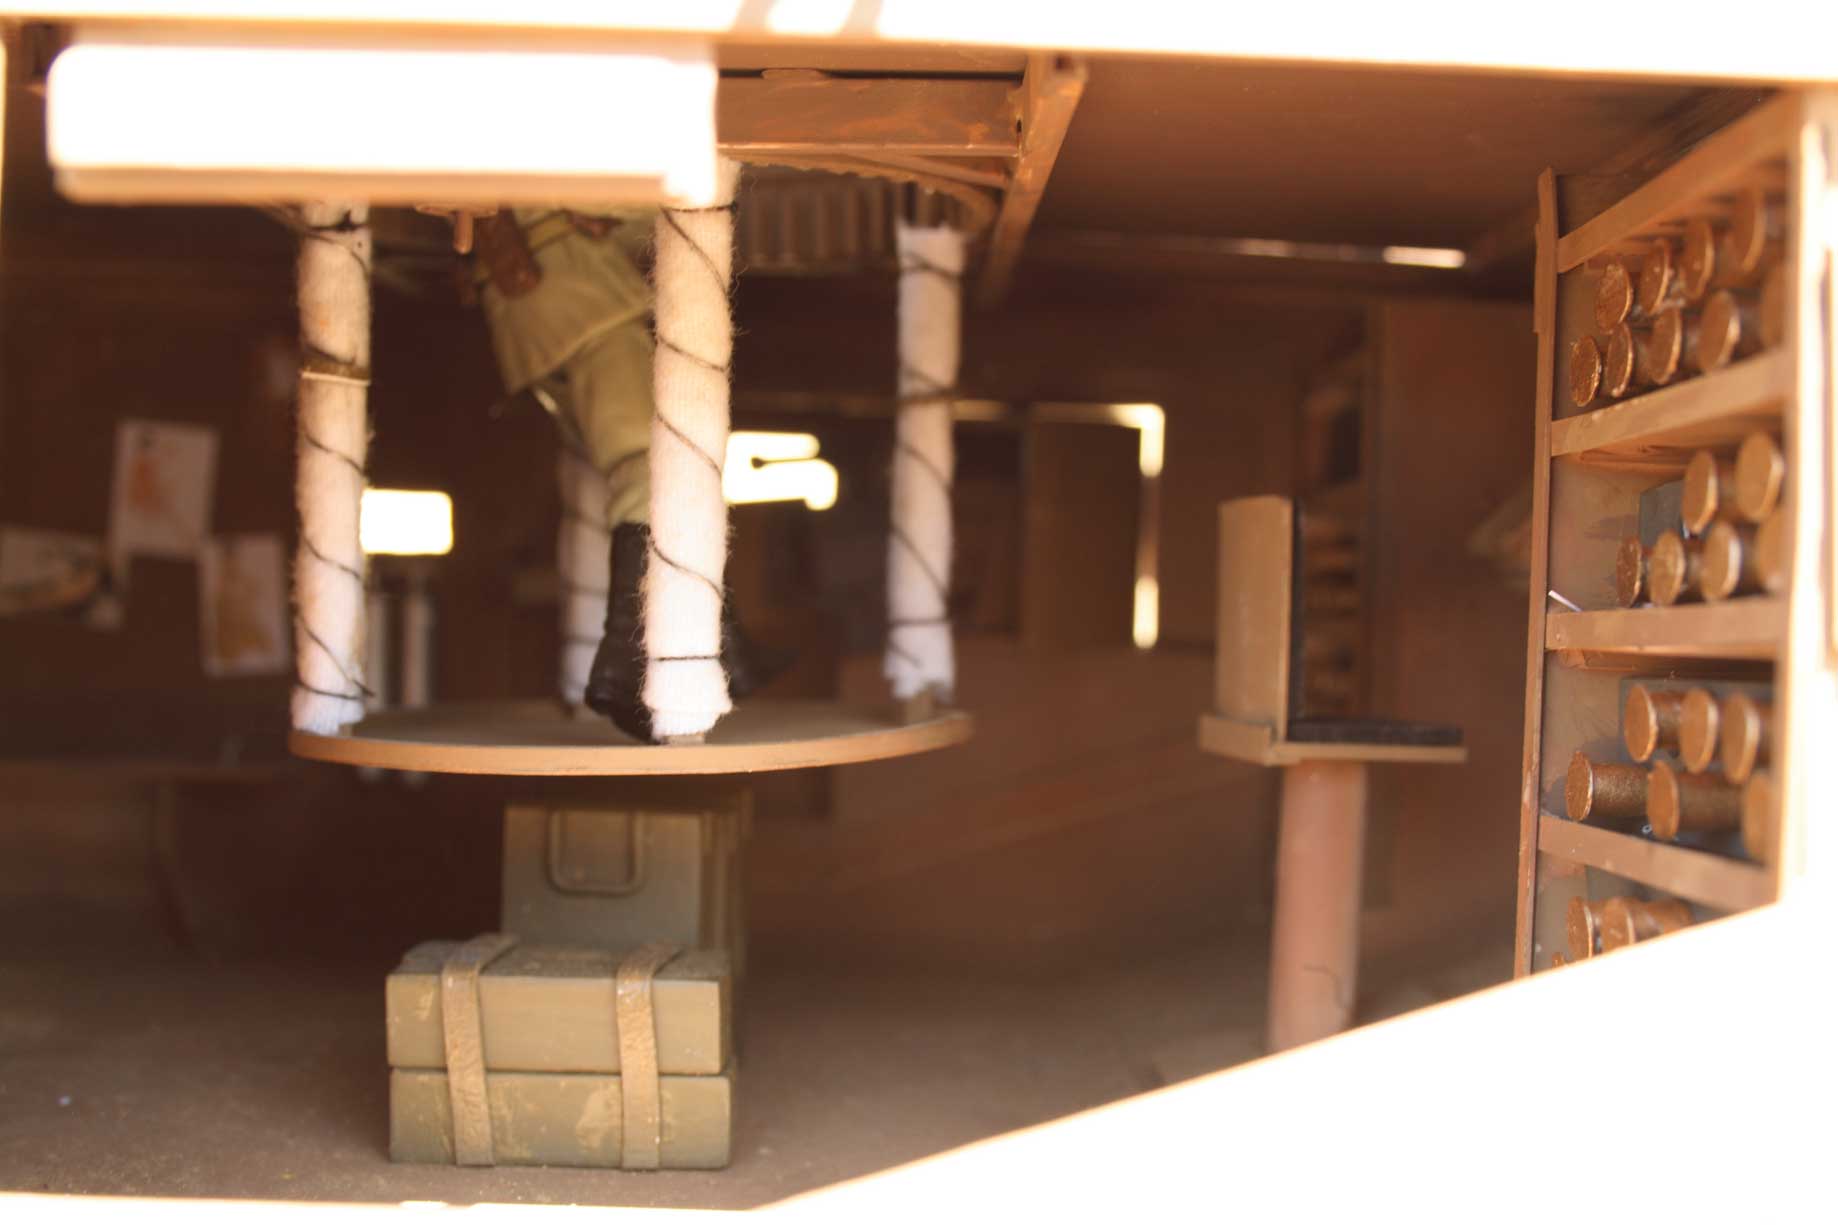
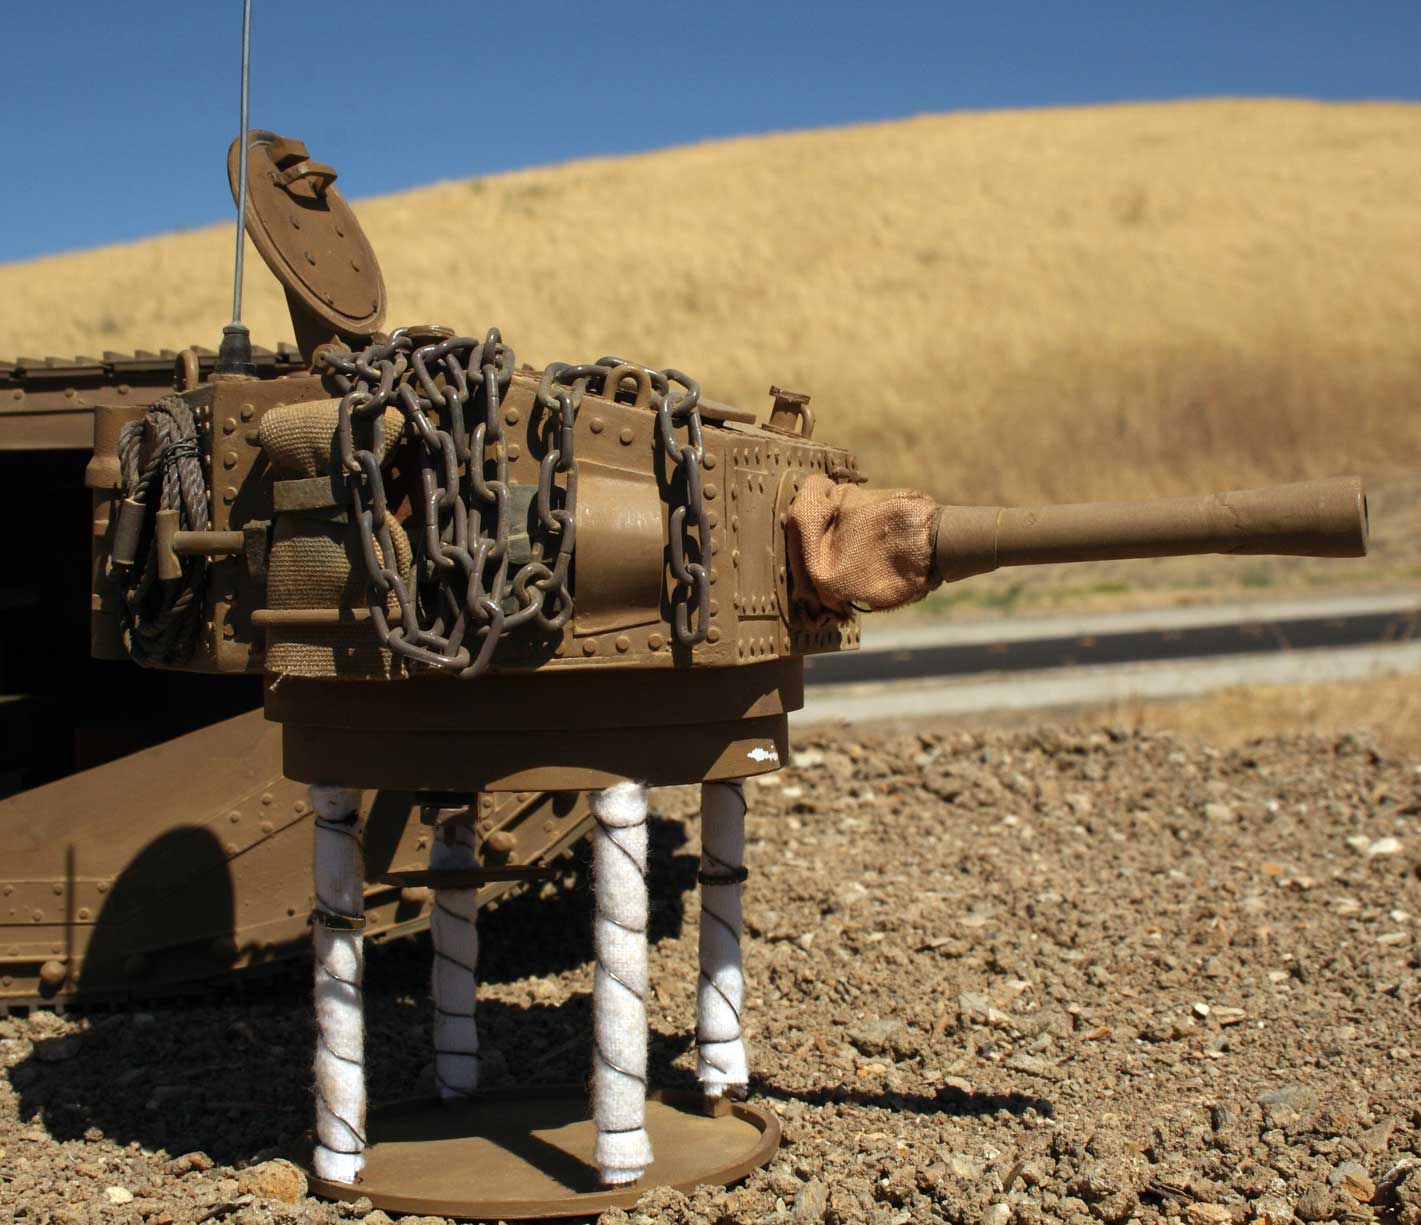
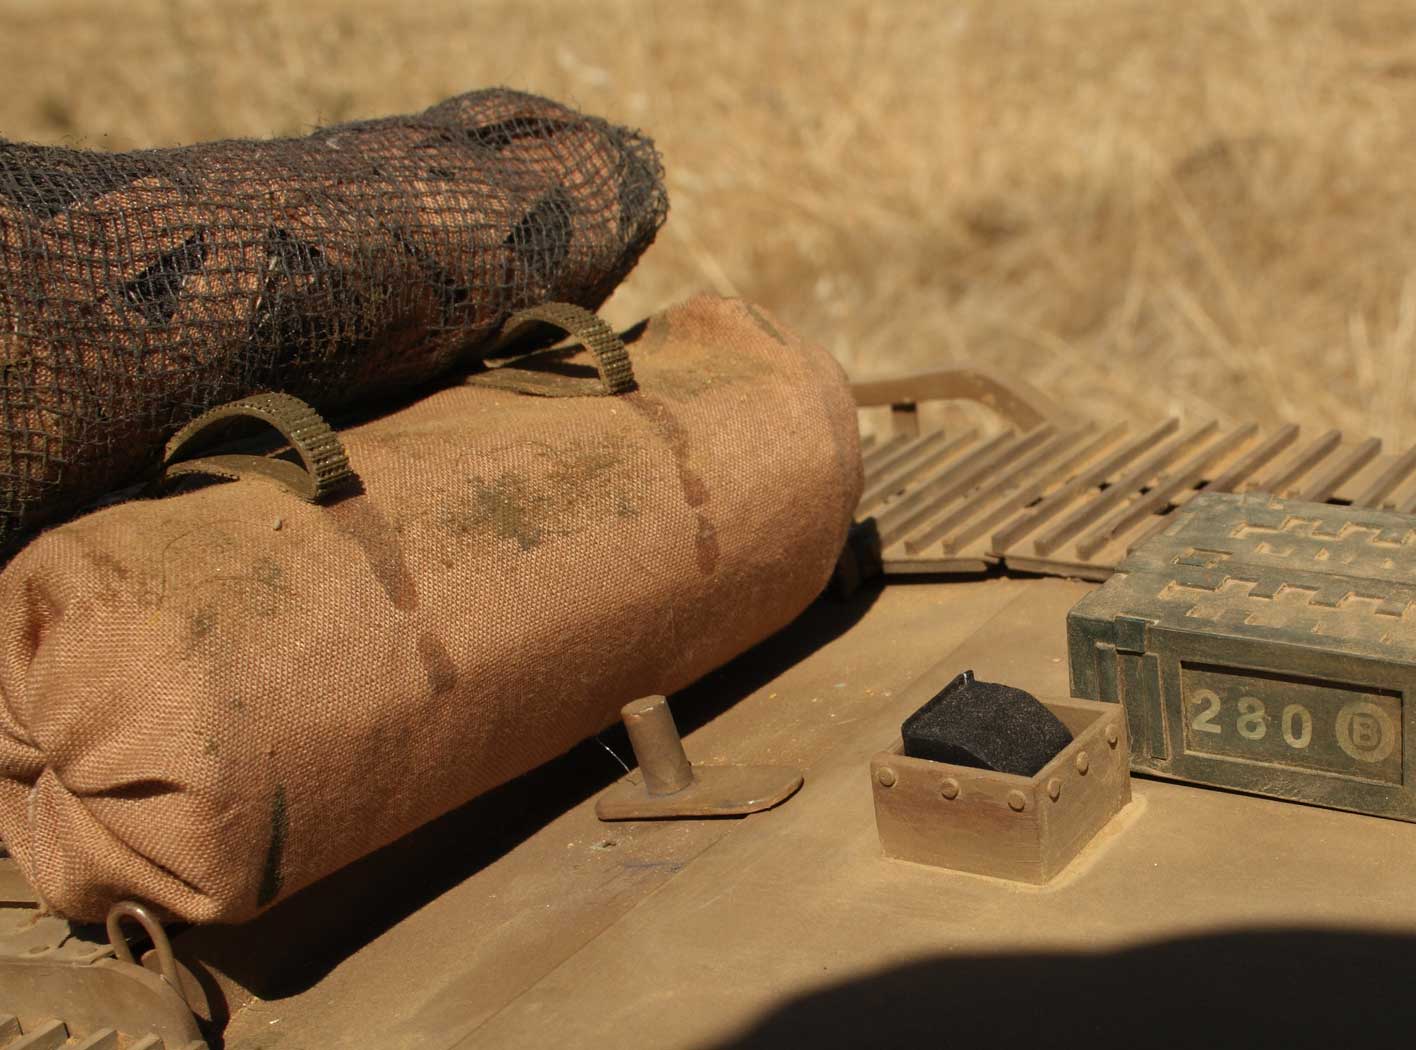
Features: Entire turret and basket lift out: View up into turret shows some details including ready rounds for the turret 6 pounder gun: The camouflage net lifts up to reveal a swivel catch which enables the top to be removed: View with the top off reveals a frame which can support the turret even when the top is removed to allow interior access (Note the spent shell casings on the floor): View of basket to hold spent shell casings and shovels: Interior view through right sponson opening showing some interior details including ammunition crates stored under the turret, left sponson gun breech, fire extinguishers and pin-up pictures! Last picture on right shows a view through the top of the right side including more pin-ups and Brody's hat.
![]()
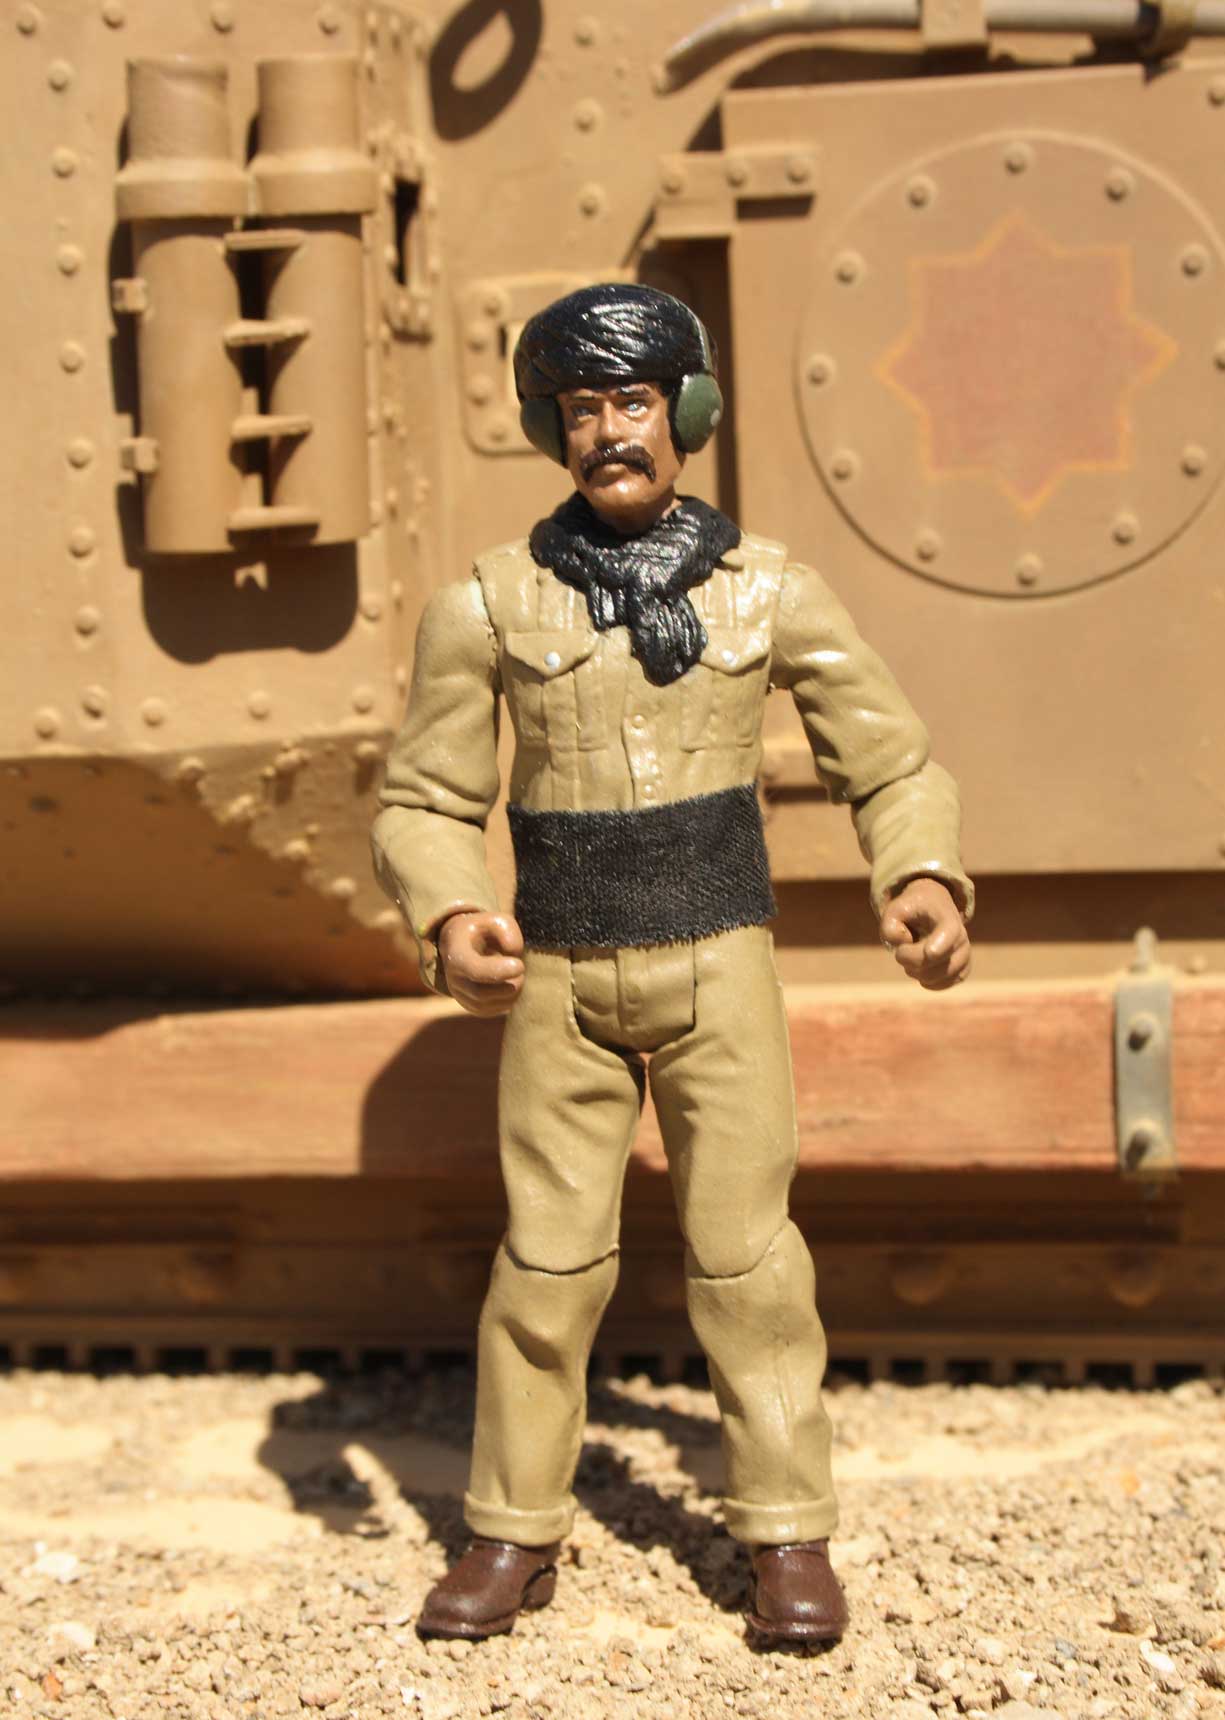
Hatay tank gunner. I tried wrapping a cloth turban but couldn't get good results, so the only cloth piece is the waist band so that the leg movements are not restricted.
![]()
![]()
Hatay tank driver. As you can see the driver is clutching the tank steering levers in his hands as I haven't attached them to the tank yet. (Getting the right position to interact with the figure is important.) I'm assuming the thing hanging round his neck is a microphone of some sort since both he and the gunner are wearing headphones. The goggles were taken from a Tamiya 1:16 figure. Not quite the right shape but I was going nuts trying to figure out how to make nice goggles!

Fun time. This shows another feature: Changeable left sponson gun barrel!


Fun time. More interaction with figures. This model was designed to be a toy first, at least in concept.

Plans for the main construction. I don't know the exact size of the original but if the reported length of 36 feet is accurate then this model at 23 inches long would work out to a scale of 1:18.8. I.e. slightly less than 1/18 scale which seems just about right for the Hasbro figures. Detailing of the tank was done from photos and screen captures.
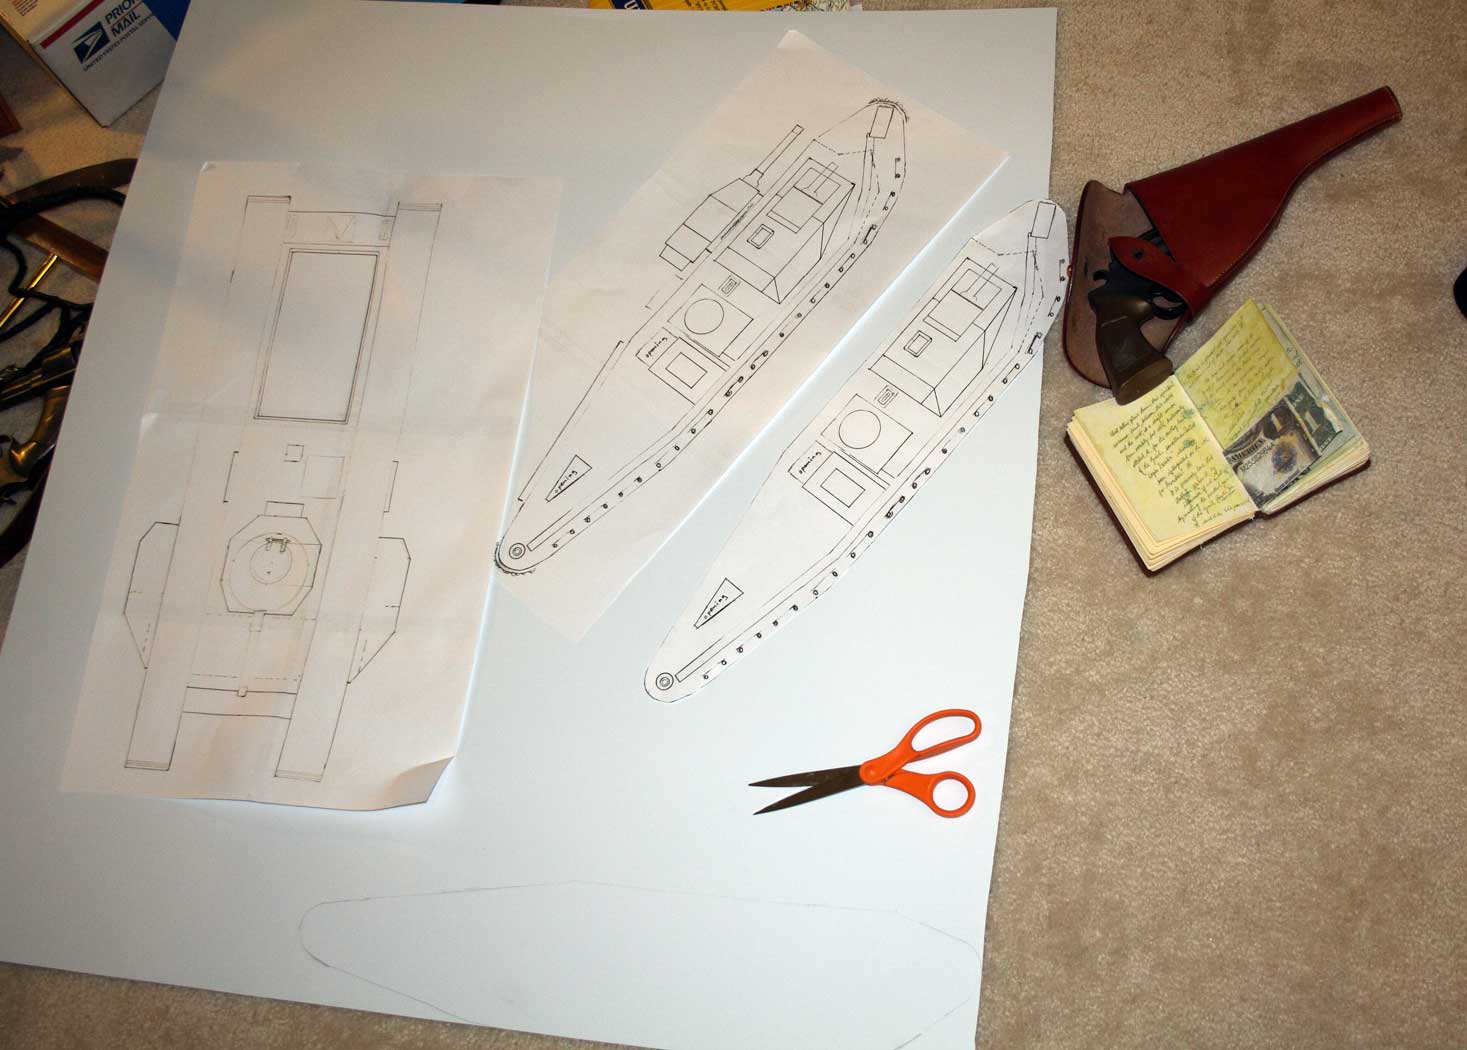


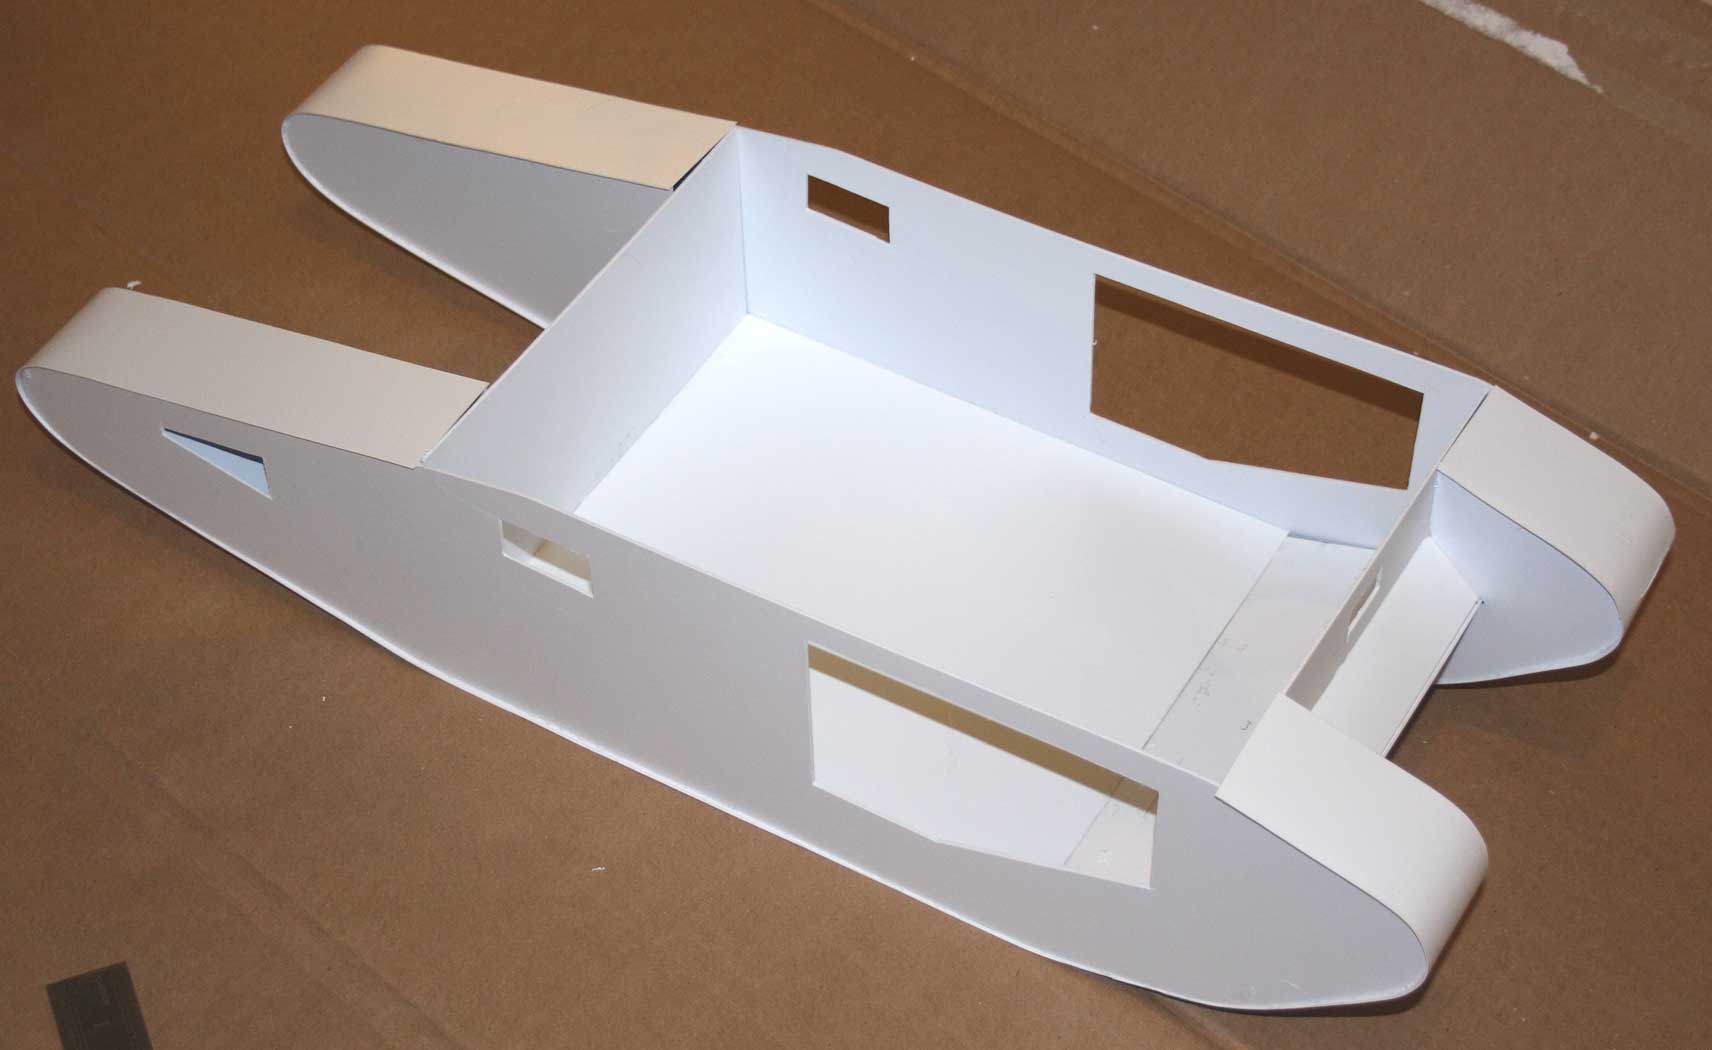
Some build pictures. To make sure action figures would fit inside and not make the tank over scale I lowered the floor slightly. The concept for the build was to be 'Hasbro toy' - a nicely detailed one, sure, but it had to have some 'play features'. I omitted some details from the interior, for example, to leave space for figures.


Evergreen tubes were used for the guns. Some angle strips were used also. Rivets were made using a hole punch purchased at a scrap book store and attached using liquid cement and a sharp craft knife blade. Where possible I tried to get the exact number of rivets as shown on the original. (Lots of screen captures from the movie were employed.) How to make the 'barbed wire' perplexed me for a long time till I found some plastic 'bird netting' in the garage. Carefully cutting one strand leaving small stubs each side gave the basic wire. A little silver paint, toned down with 'rust' and 'dirt' washes gave a nice effect without the danger of using real wire.
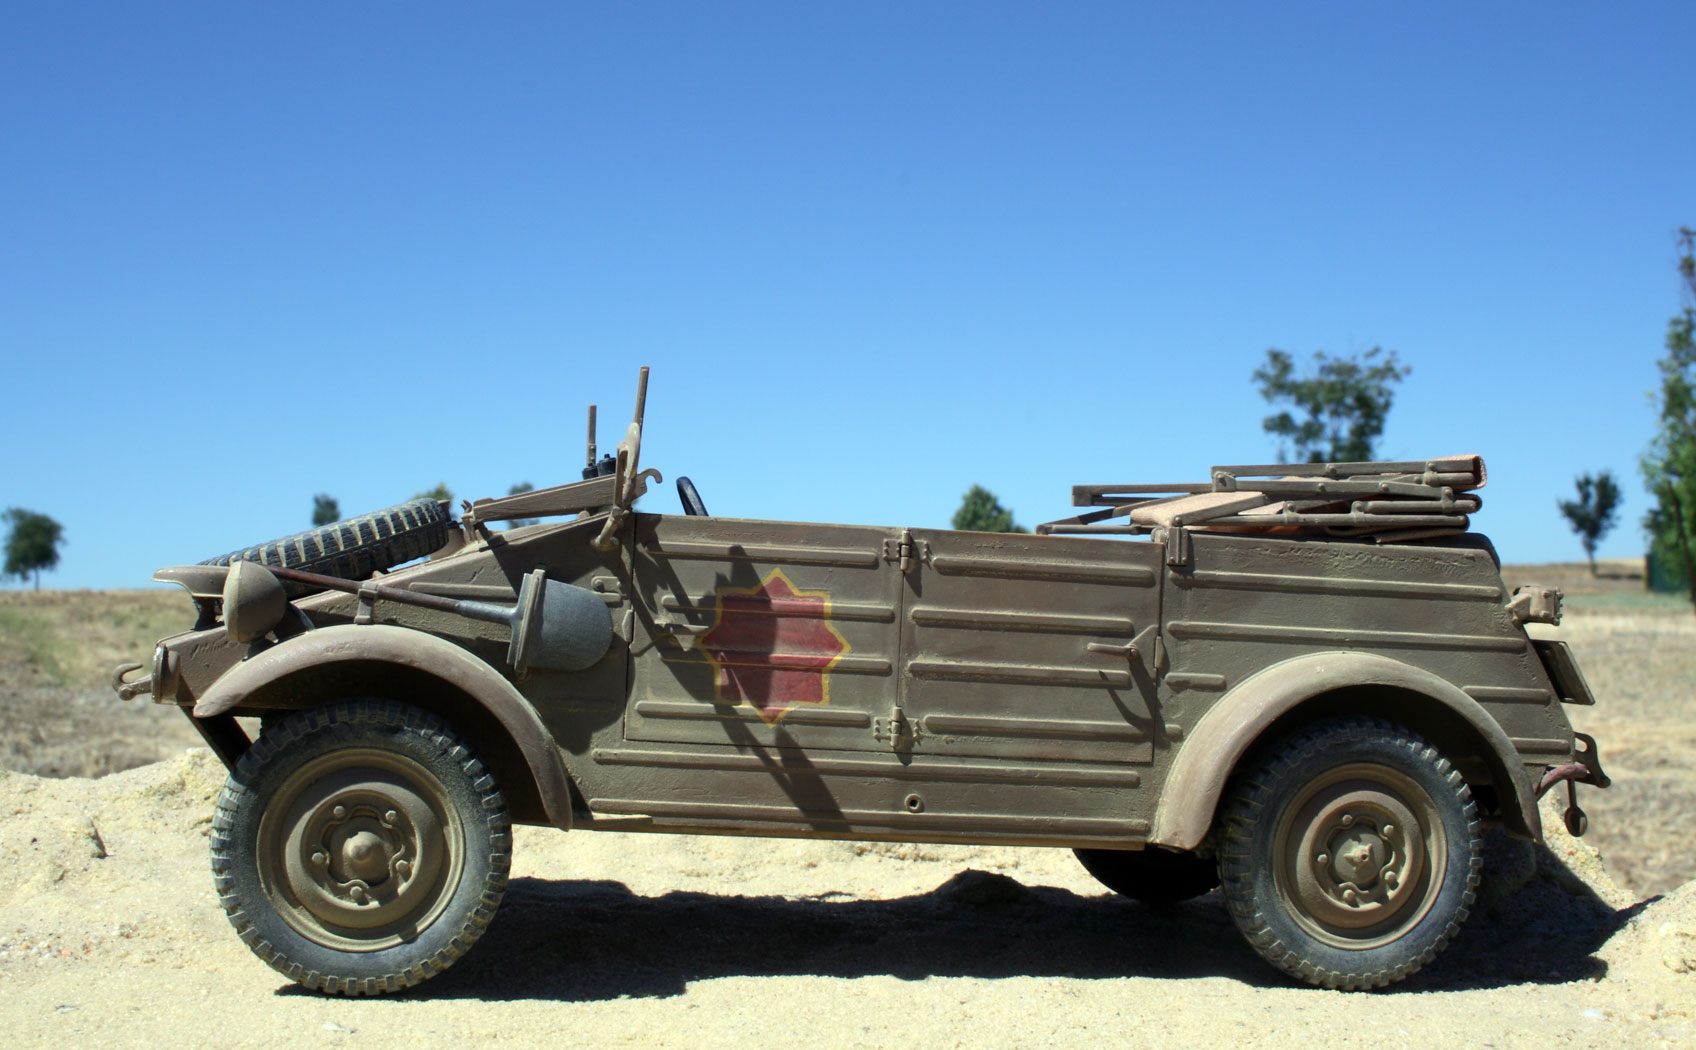
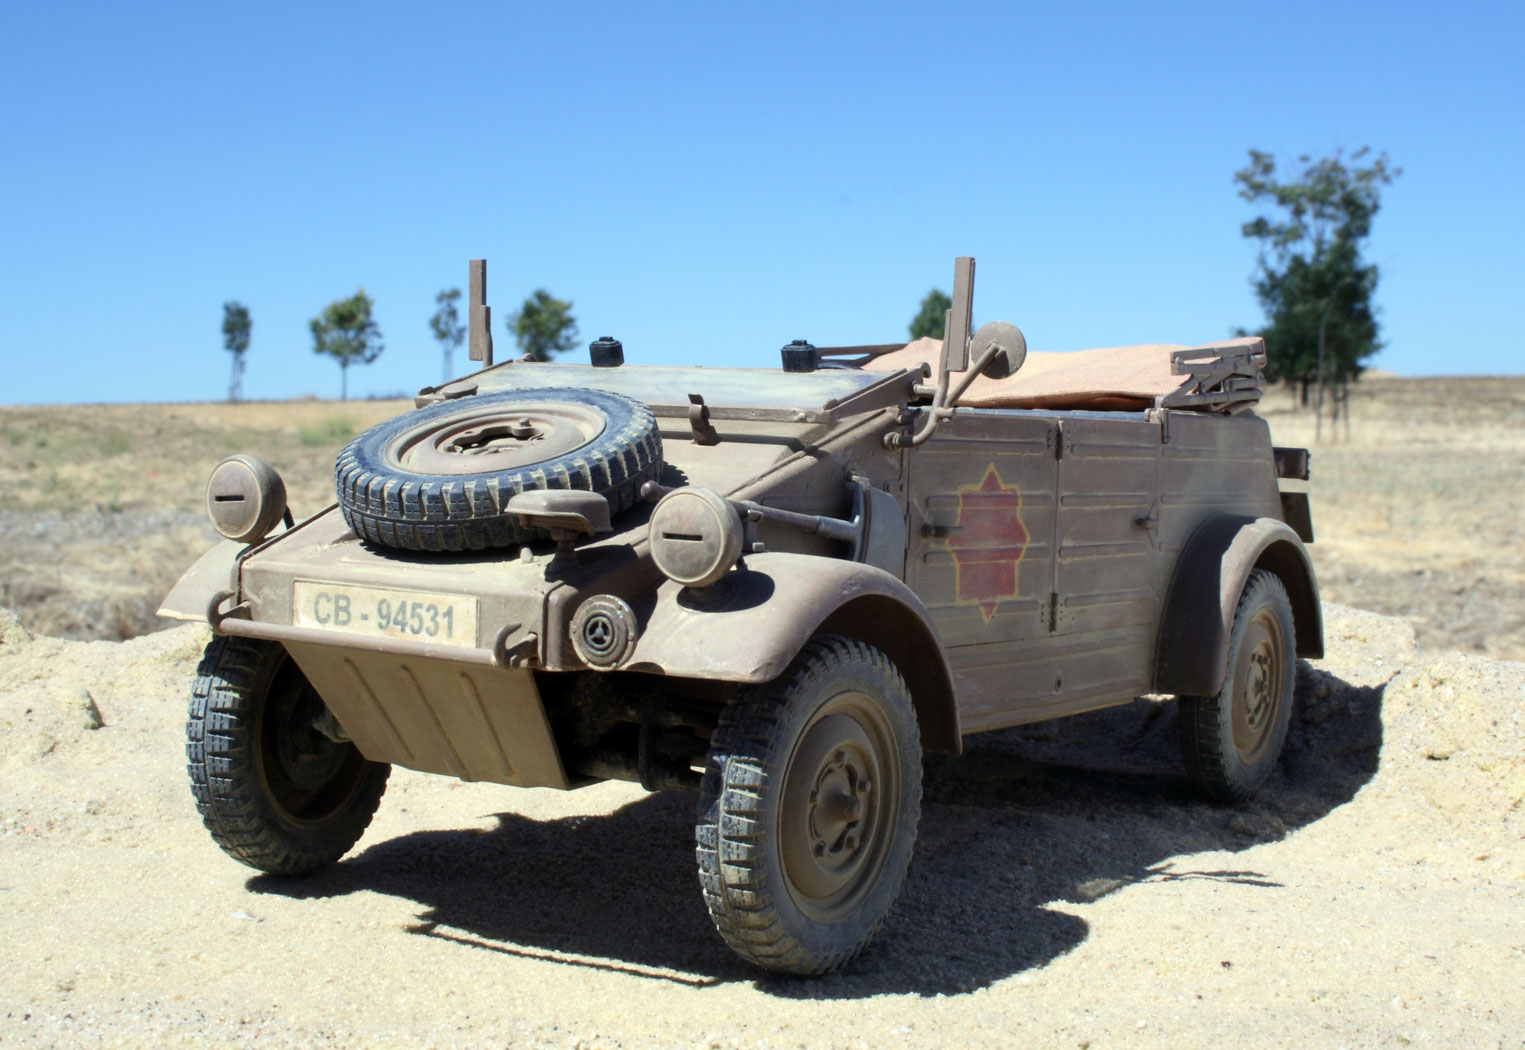

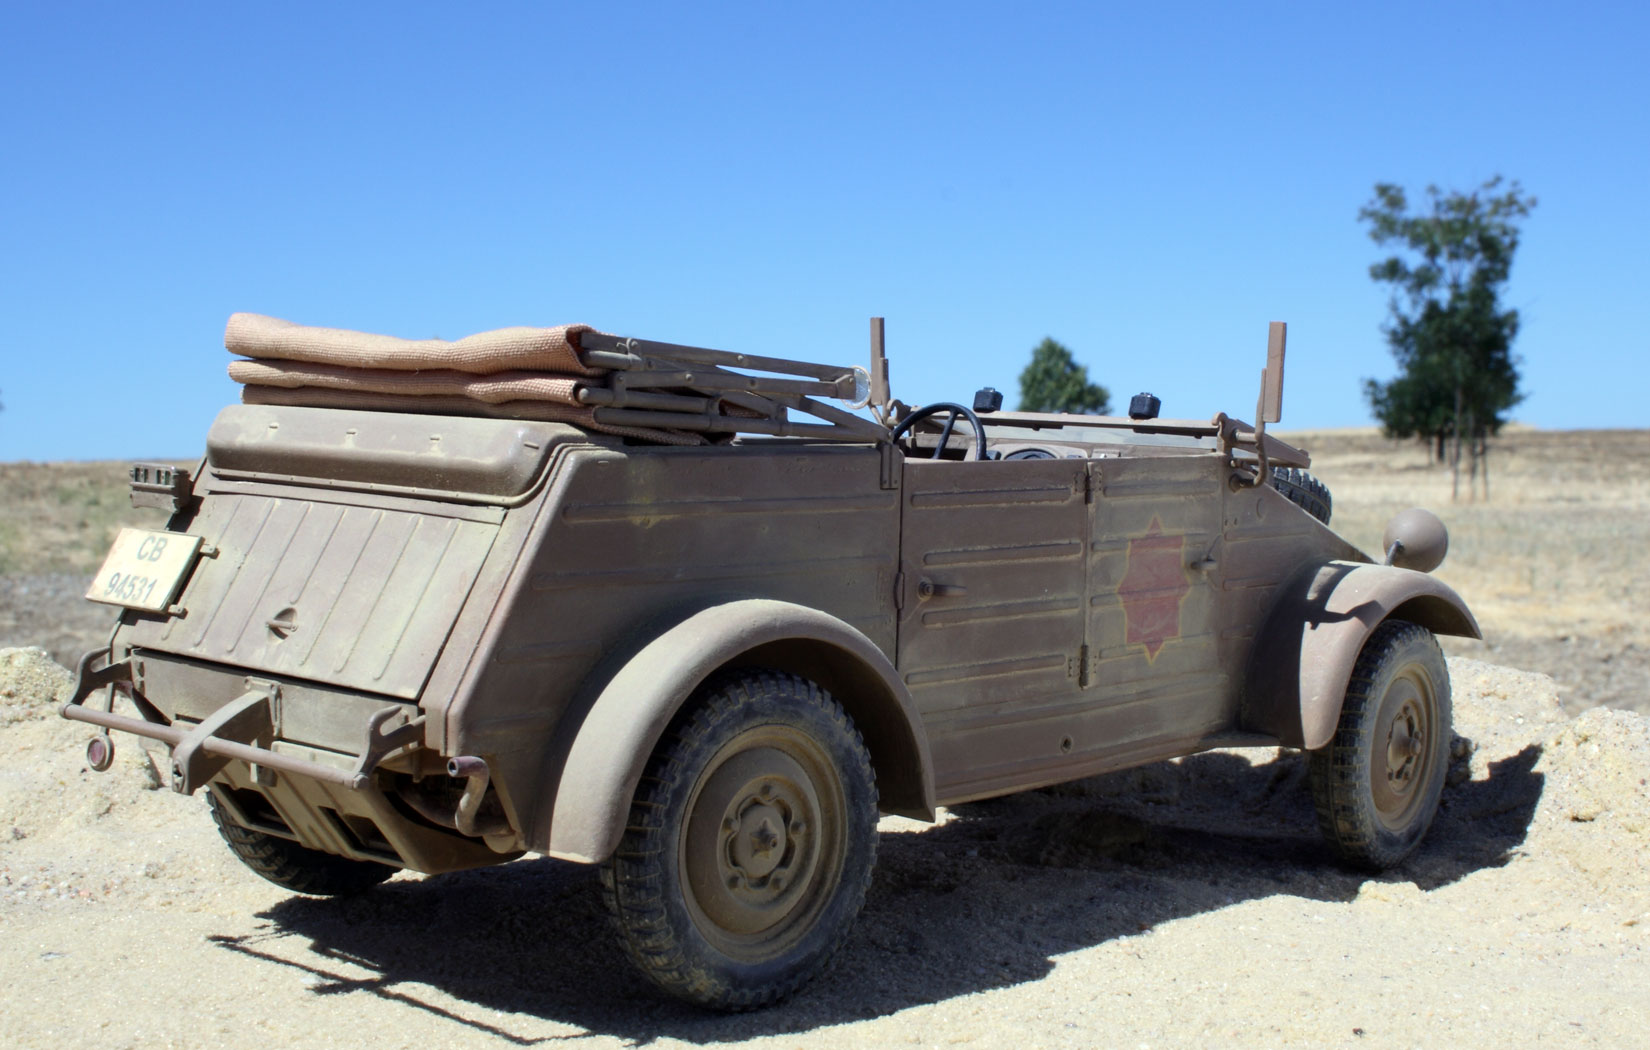
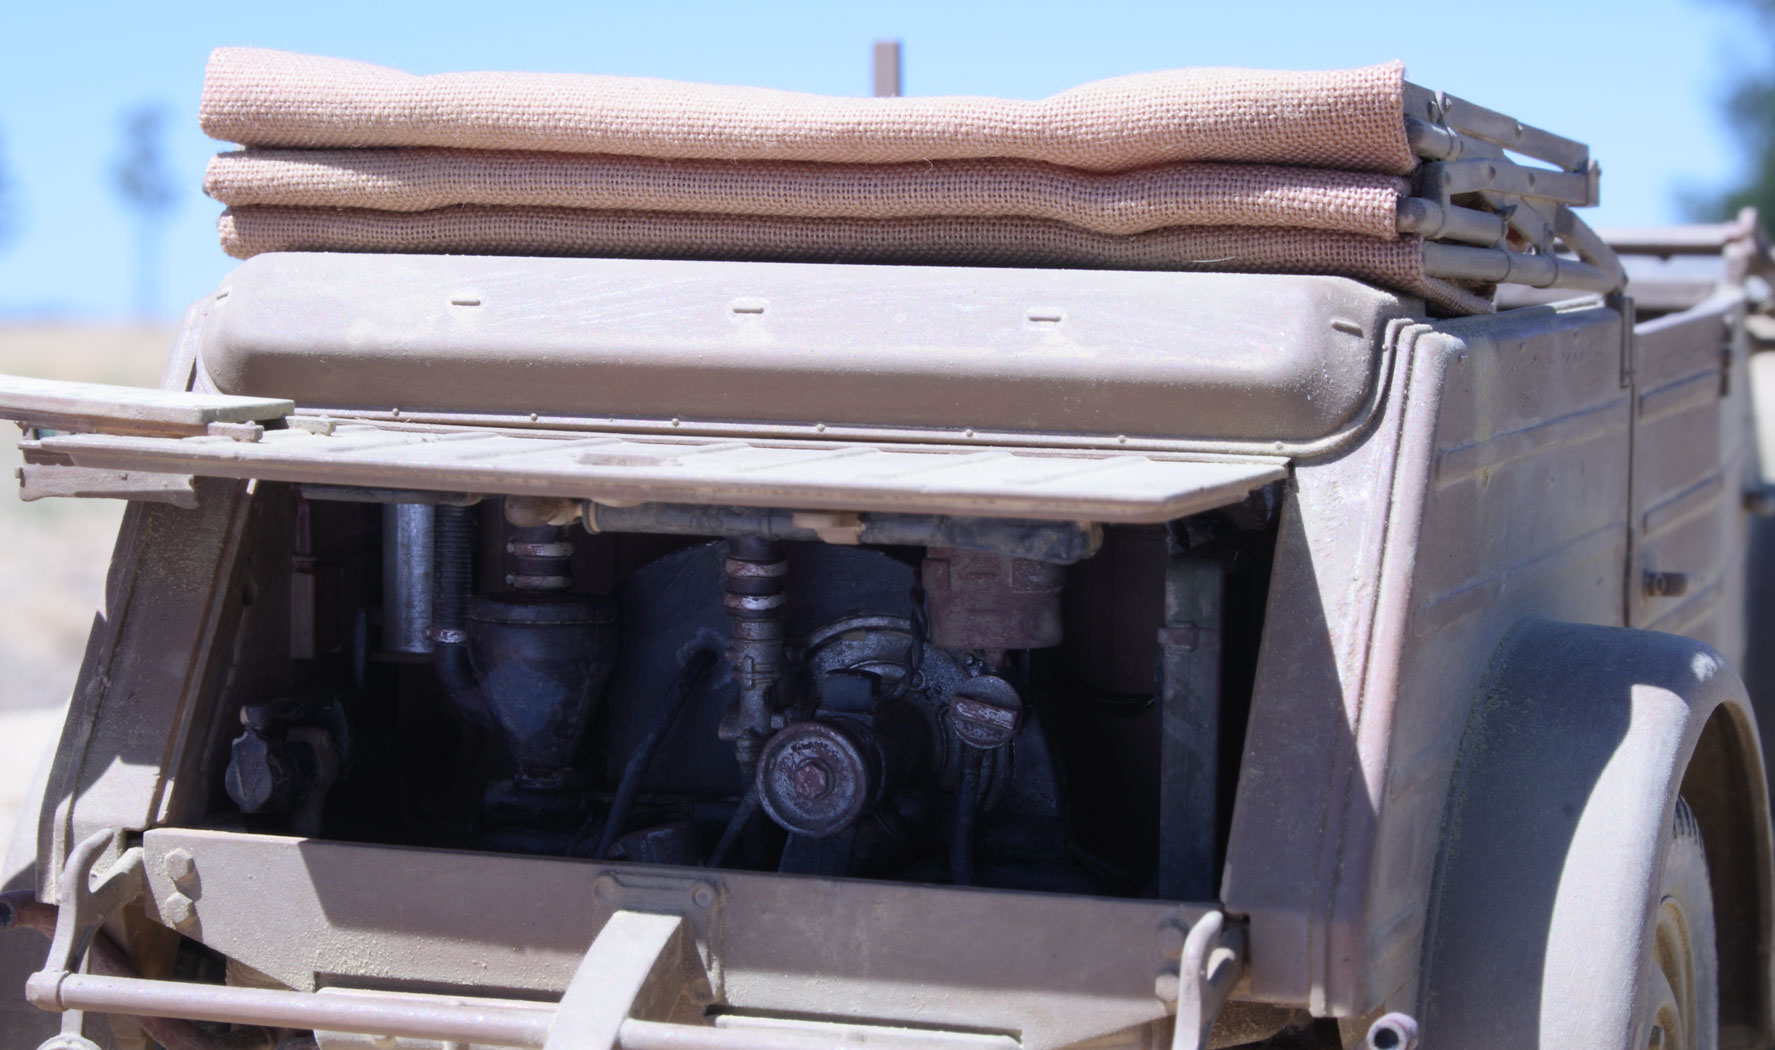

 Tamiya 1/16 scale Kubelwagen in Republic of Hatay markings. This was the briefly seen real VW Kubel from Last Crusade.


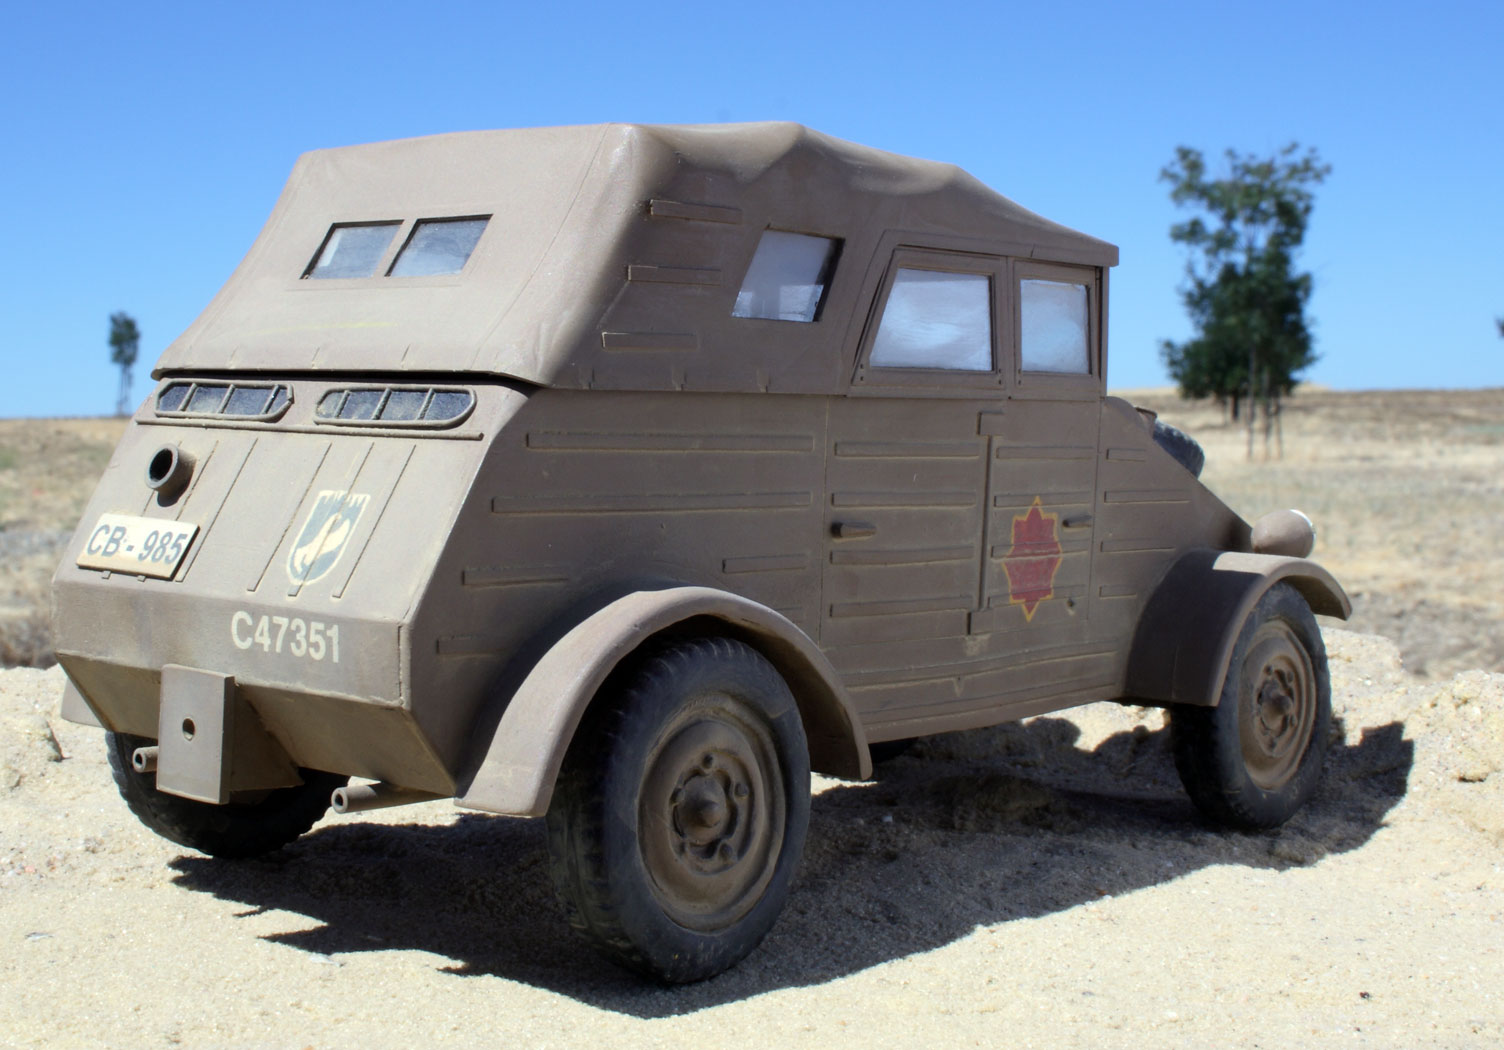
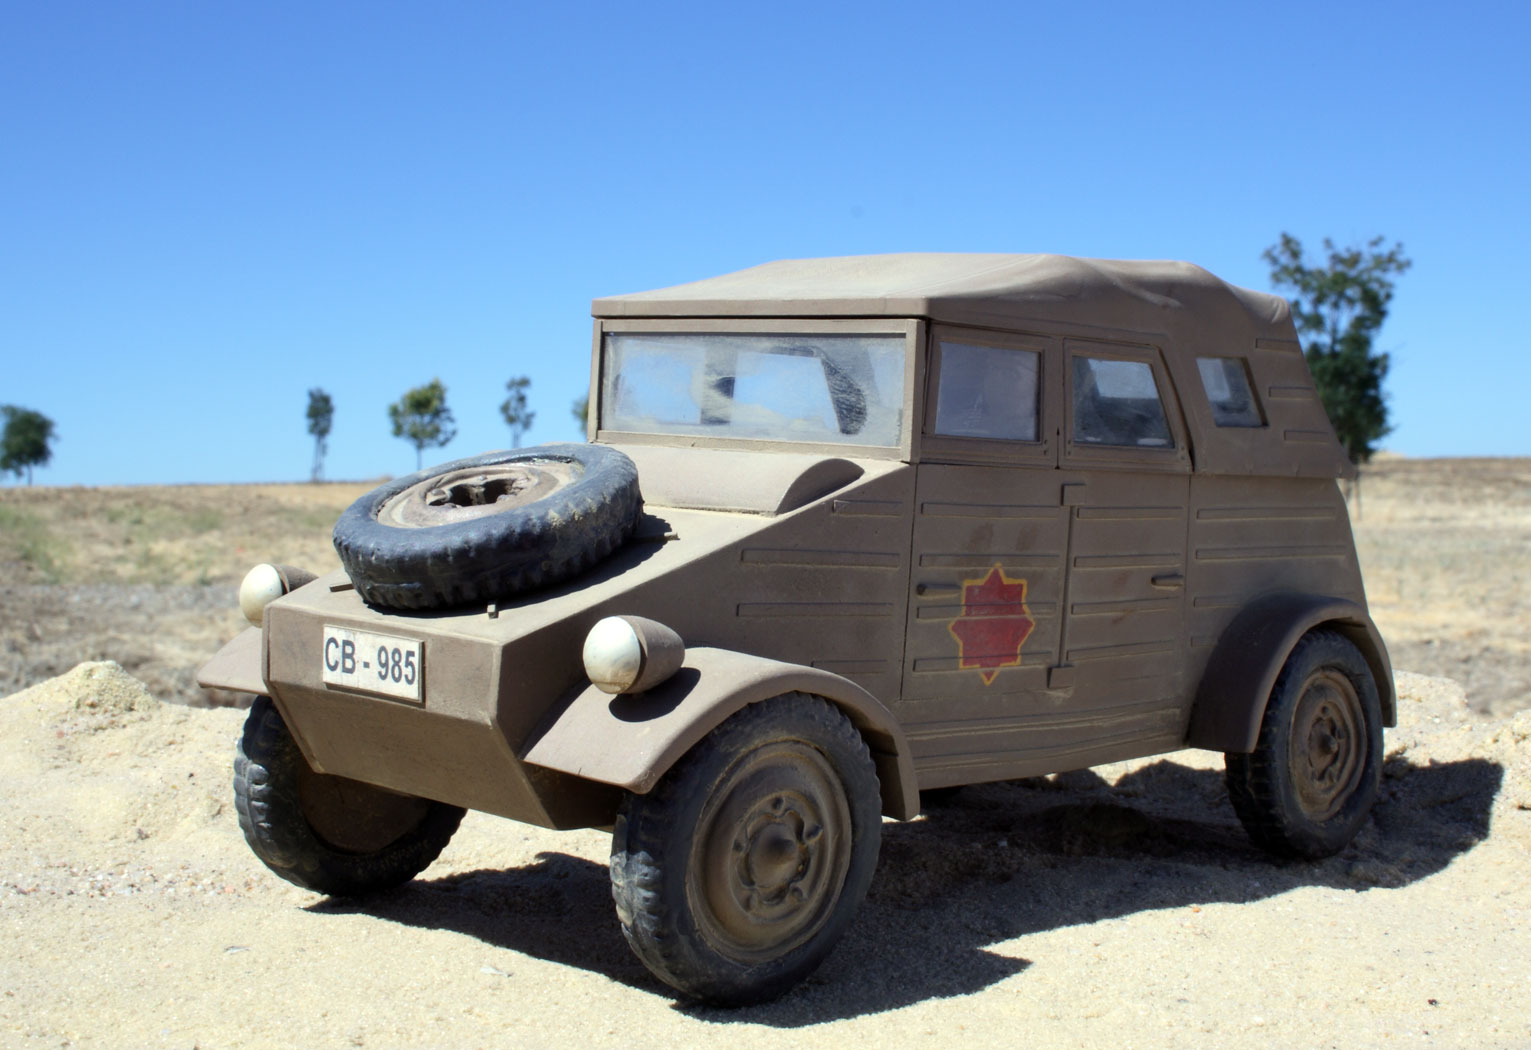 Scratch built 'fake' Kubelwagen that played a starring role in the tank chase! Reportedly based on a Citroen, this made-for-the-movie Kubel was destroyed by the tank.
 A lot of plastic card...
![]()
PAINTING TIPS for a dusty, dirty vehicle
1. Use matt paint. You want a dry, dusty look.
![]()


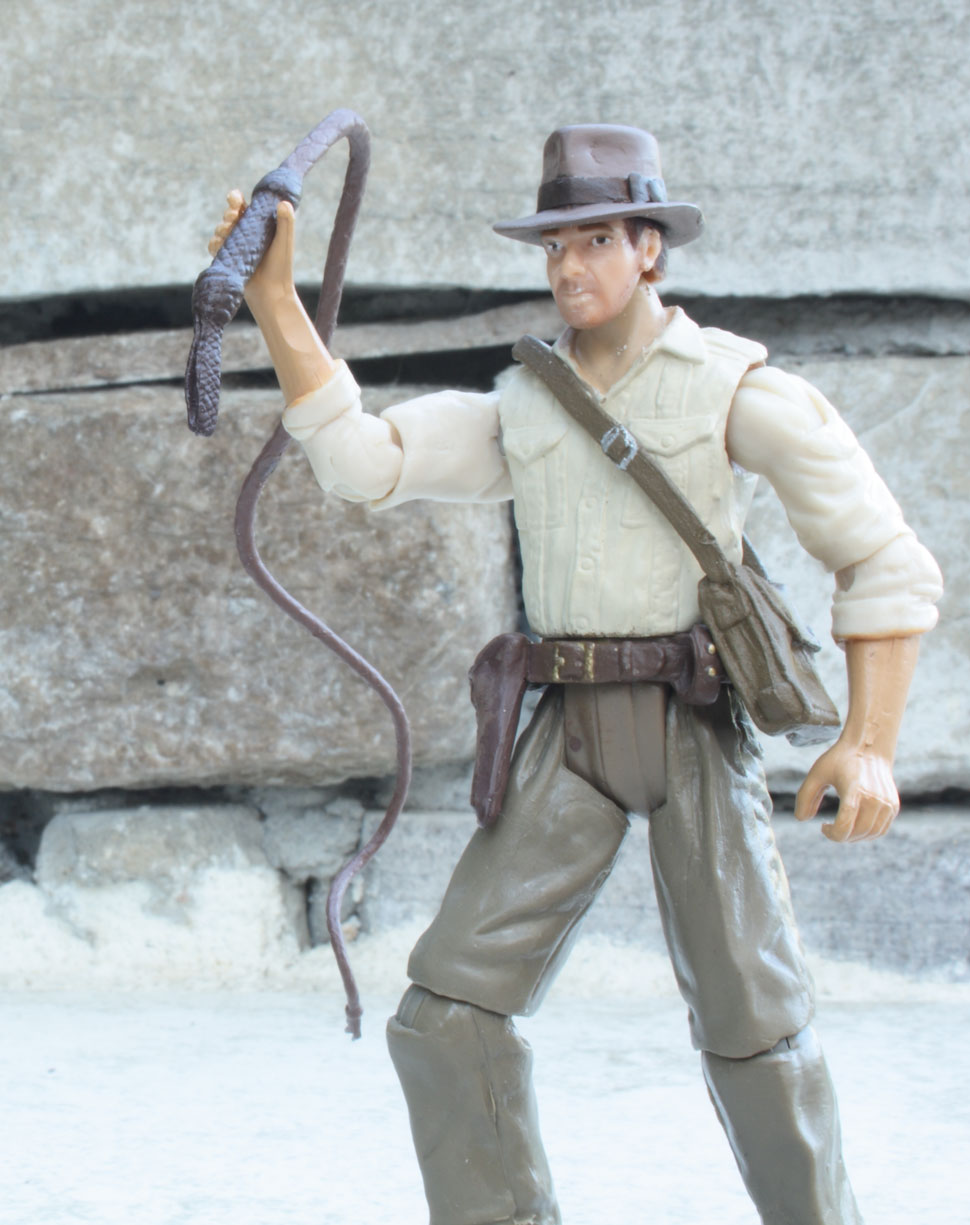 Cairo Indy with a re-built hat. I like the whipping action Indy as a toy (that whipping action is pretty good as long as the whip is glued to his hands) but this one has a better 'look'.
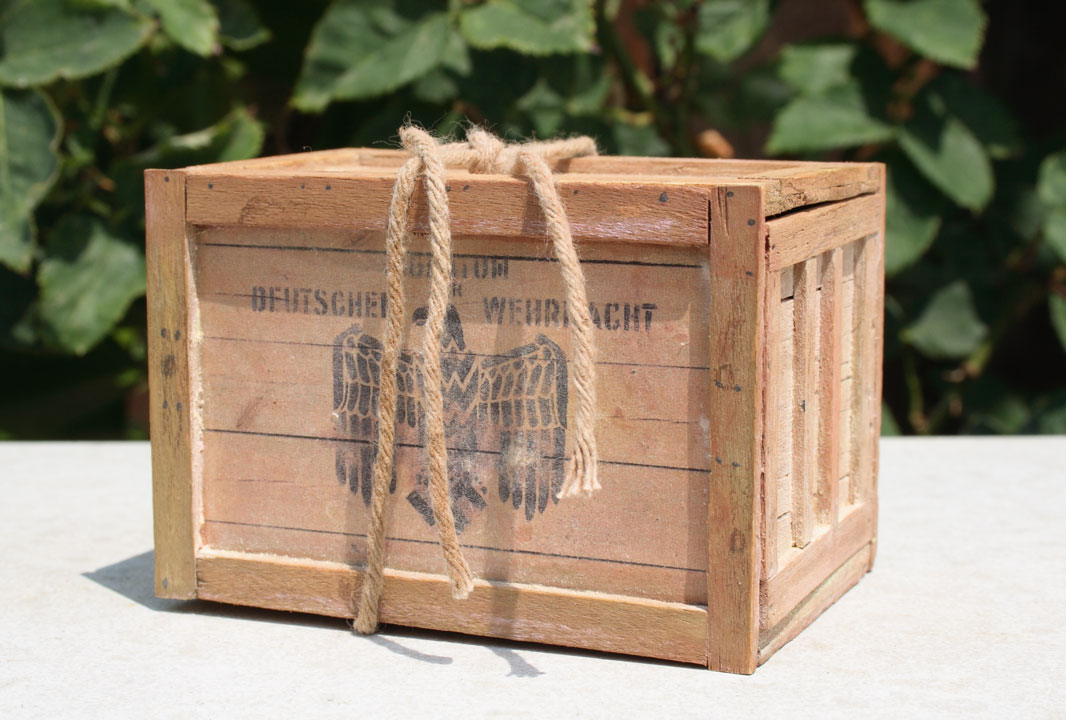
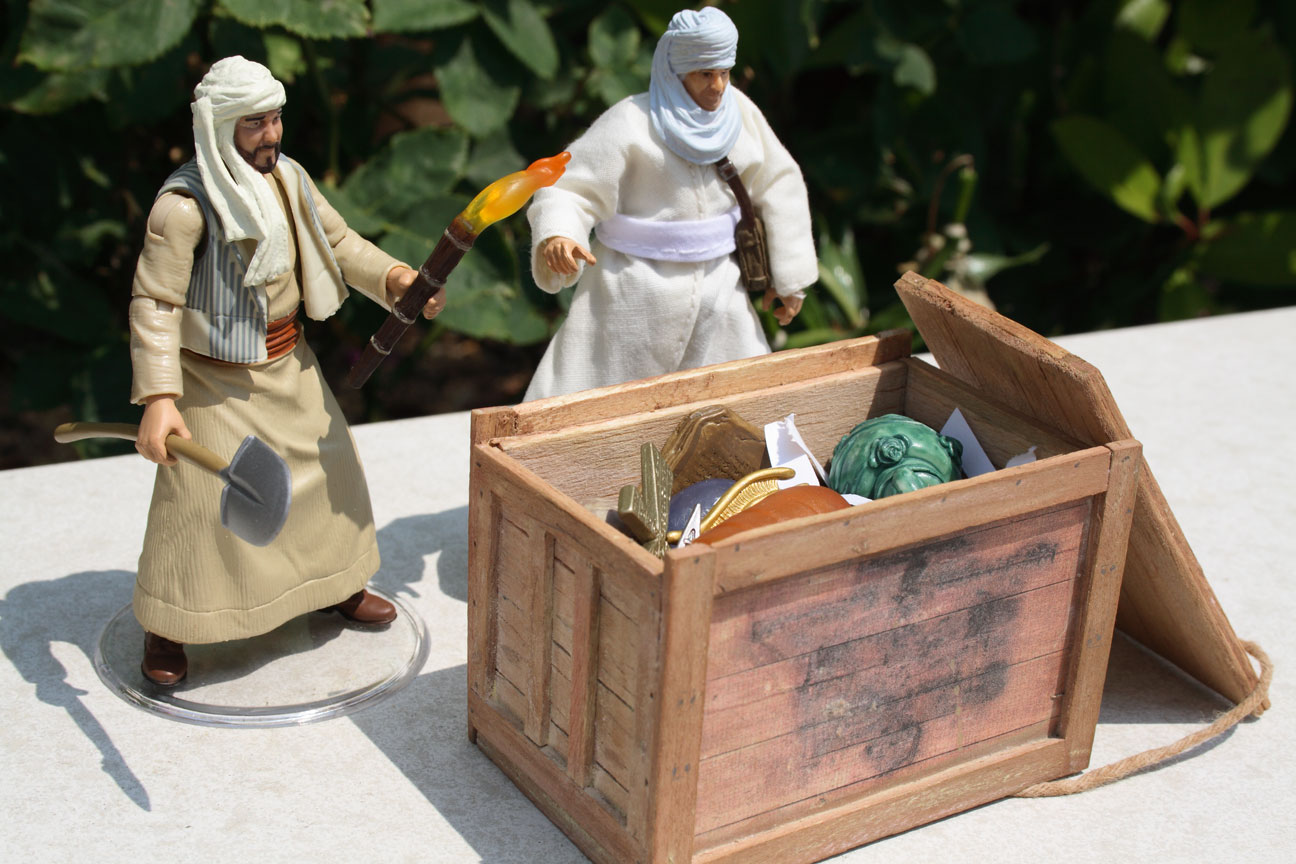 My first version of the Ark crate. Wouldn't you know it turned out too small for the Ark?

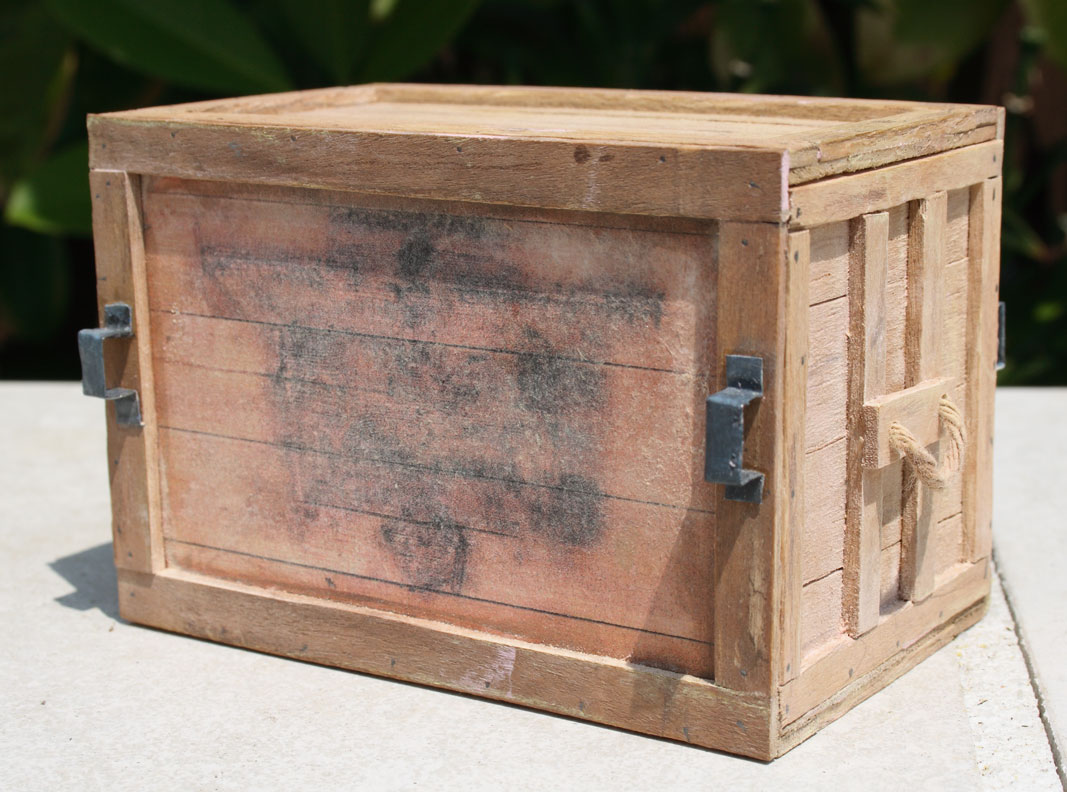
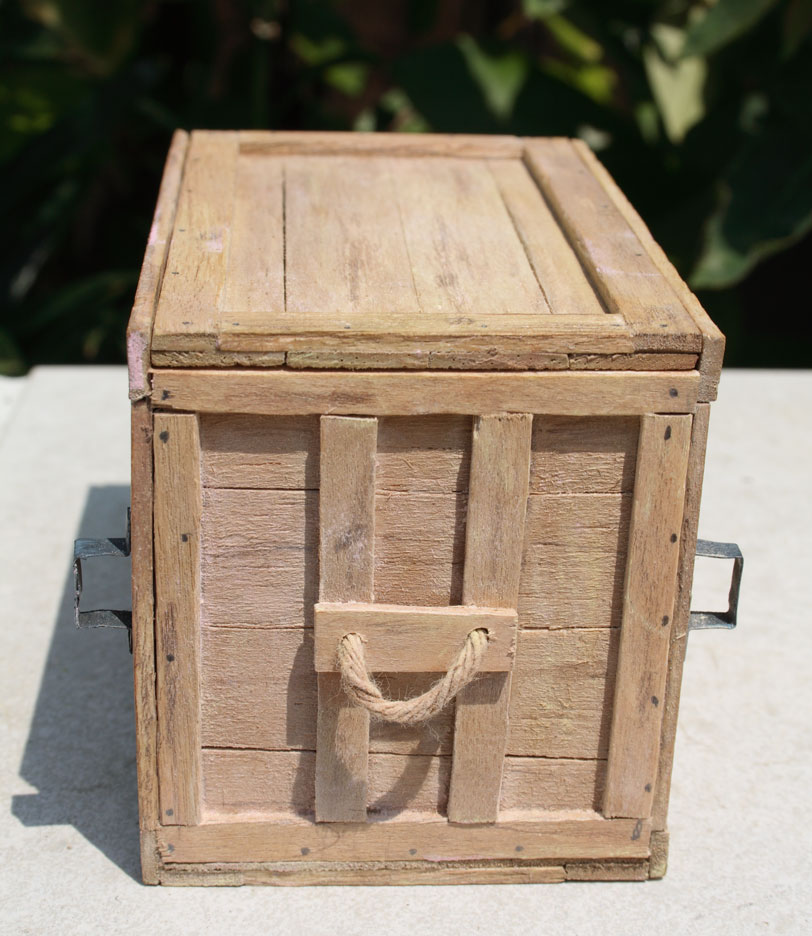

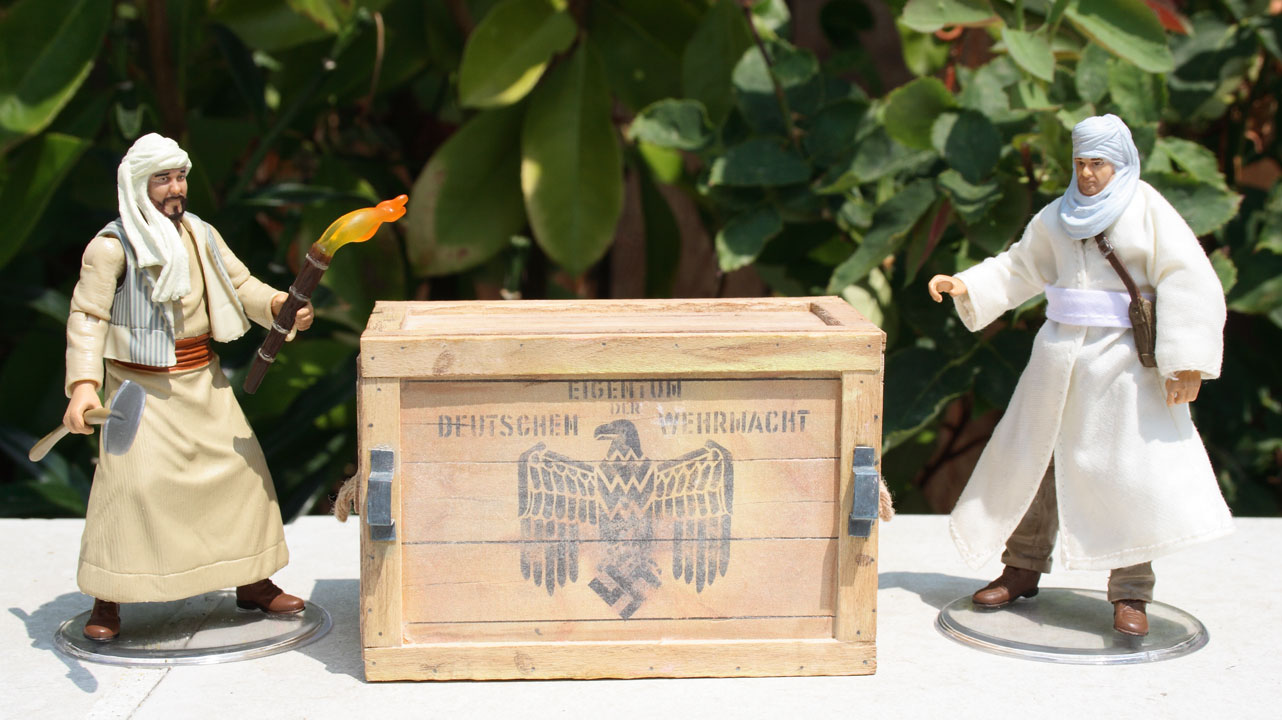
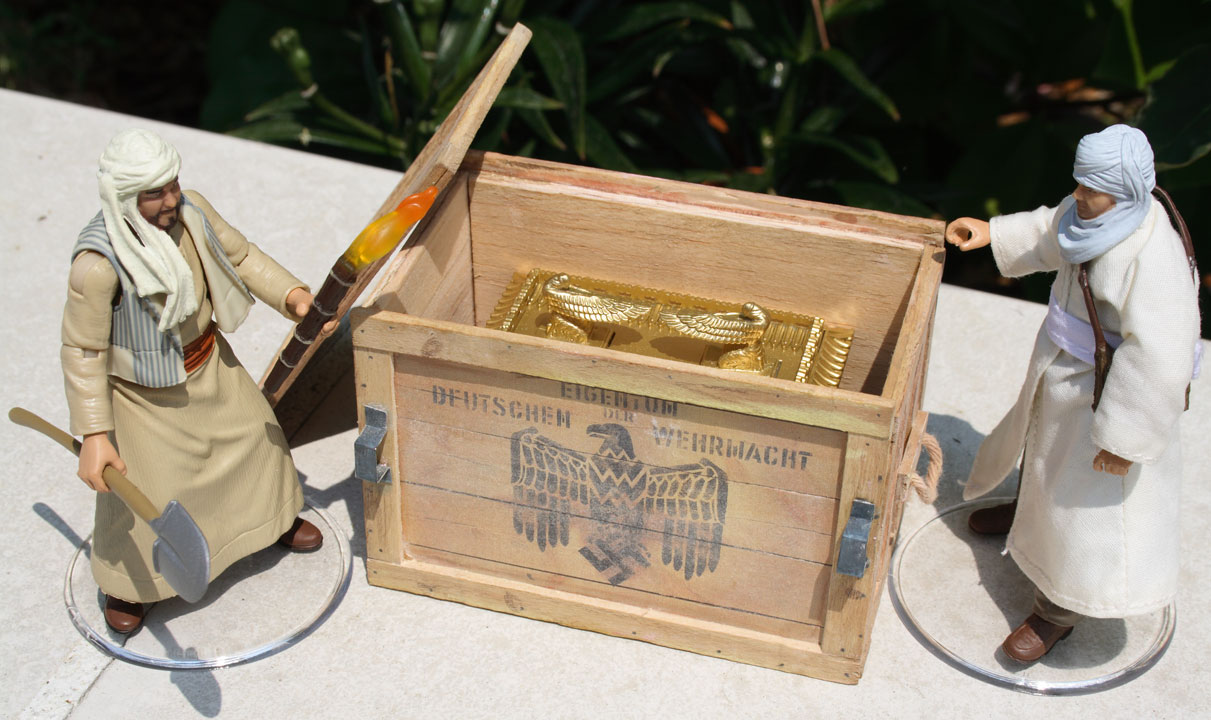
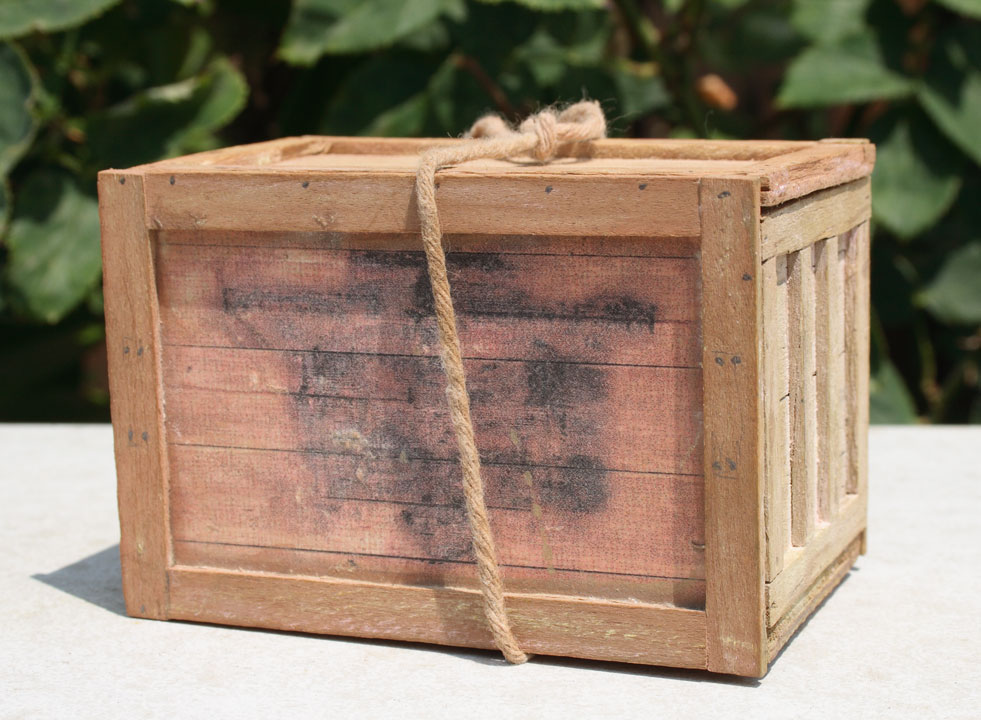
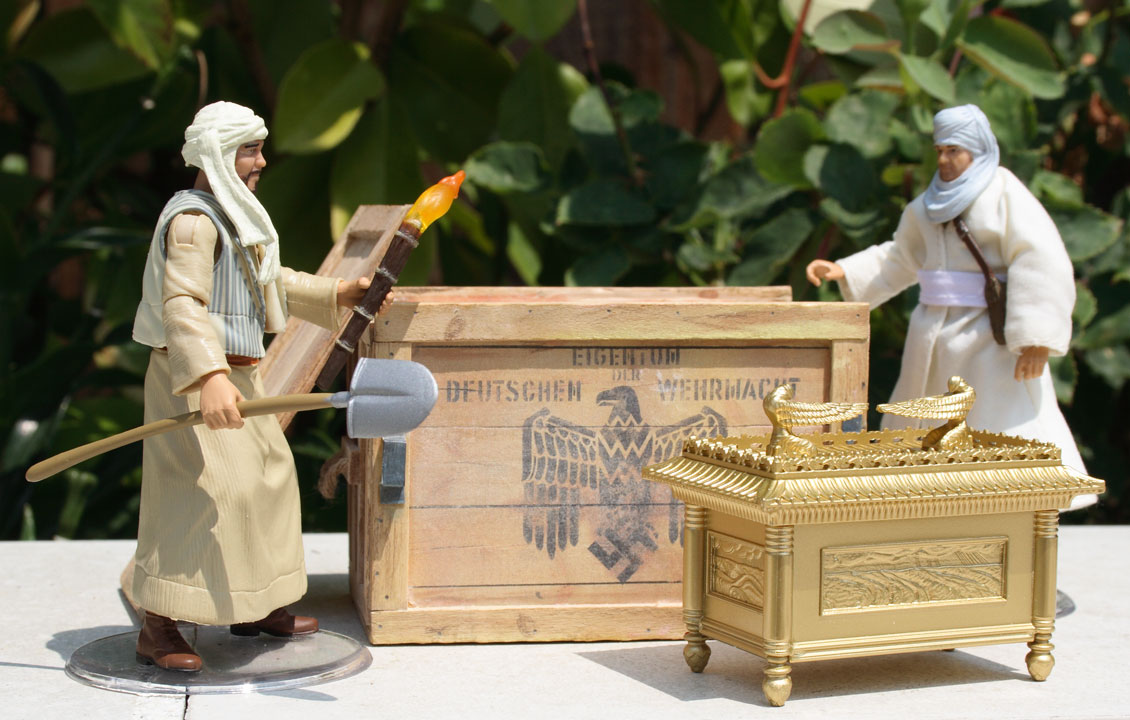 Ark crate version 2. Ark fits just fine, but now the crate is oversized for the truck! Hmm. I guess Hasbro scaled down the truck.
![]()
![]()
![]() The scrawny German mechanic. Carry a big wrench!
The scrawny German mechanic. Carry a big wrench!
![]()
![]()
![]()
![]()
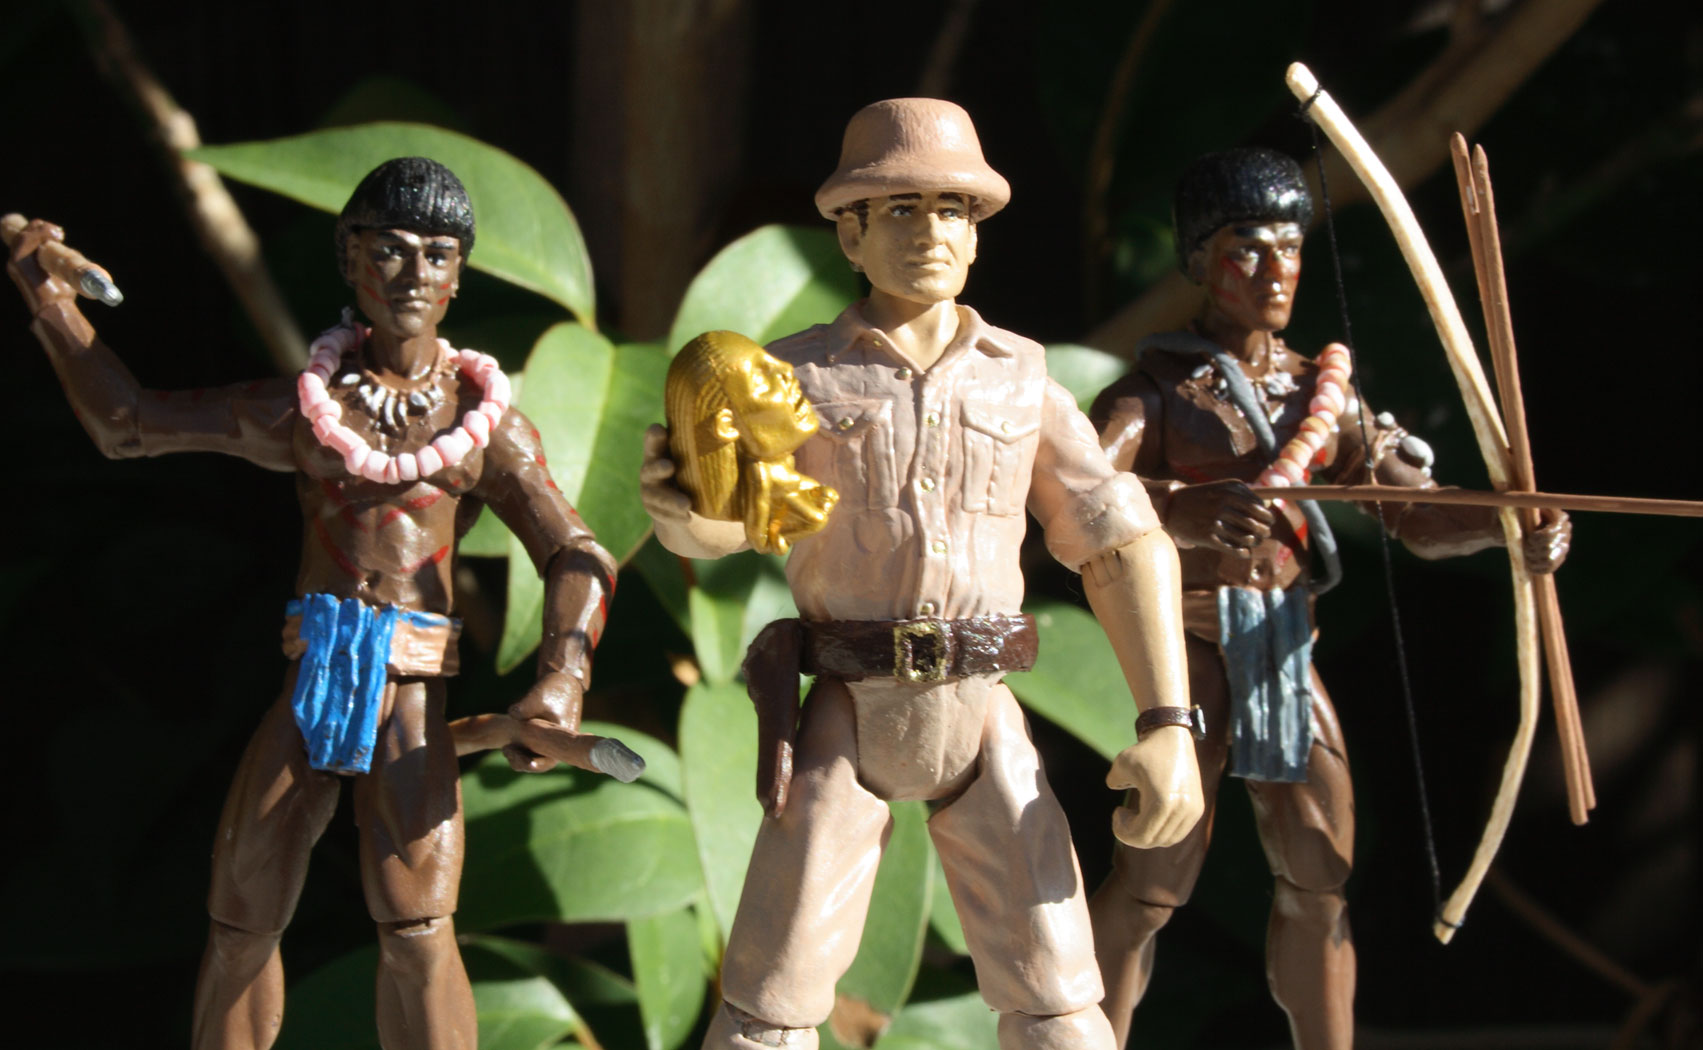 Rene Belloq in jungle setting with Hovitos warriors.
![]()

![]()
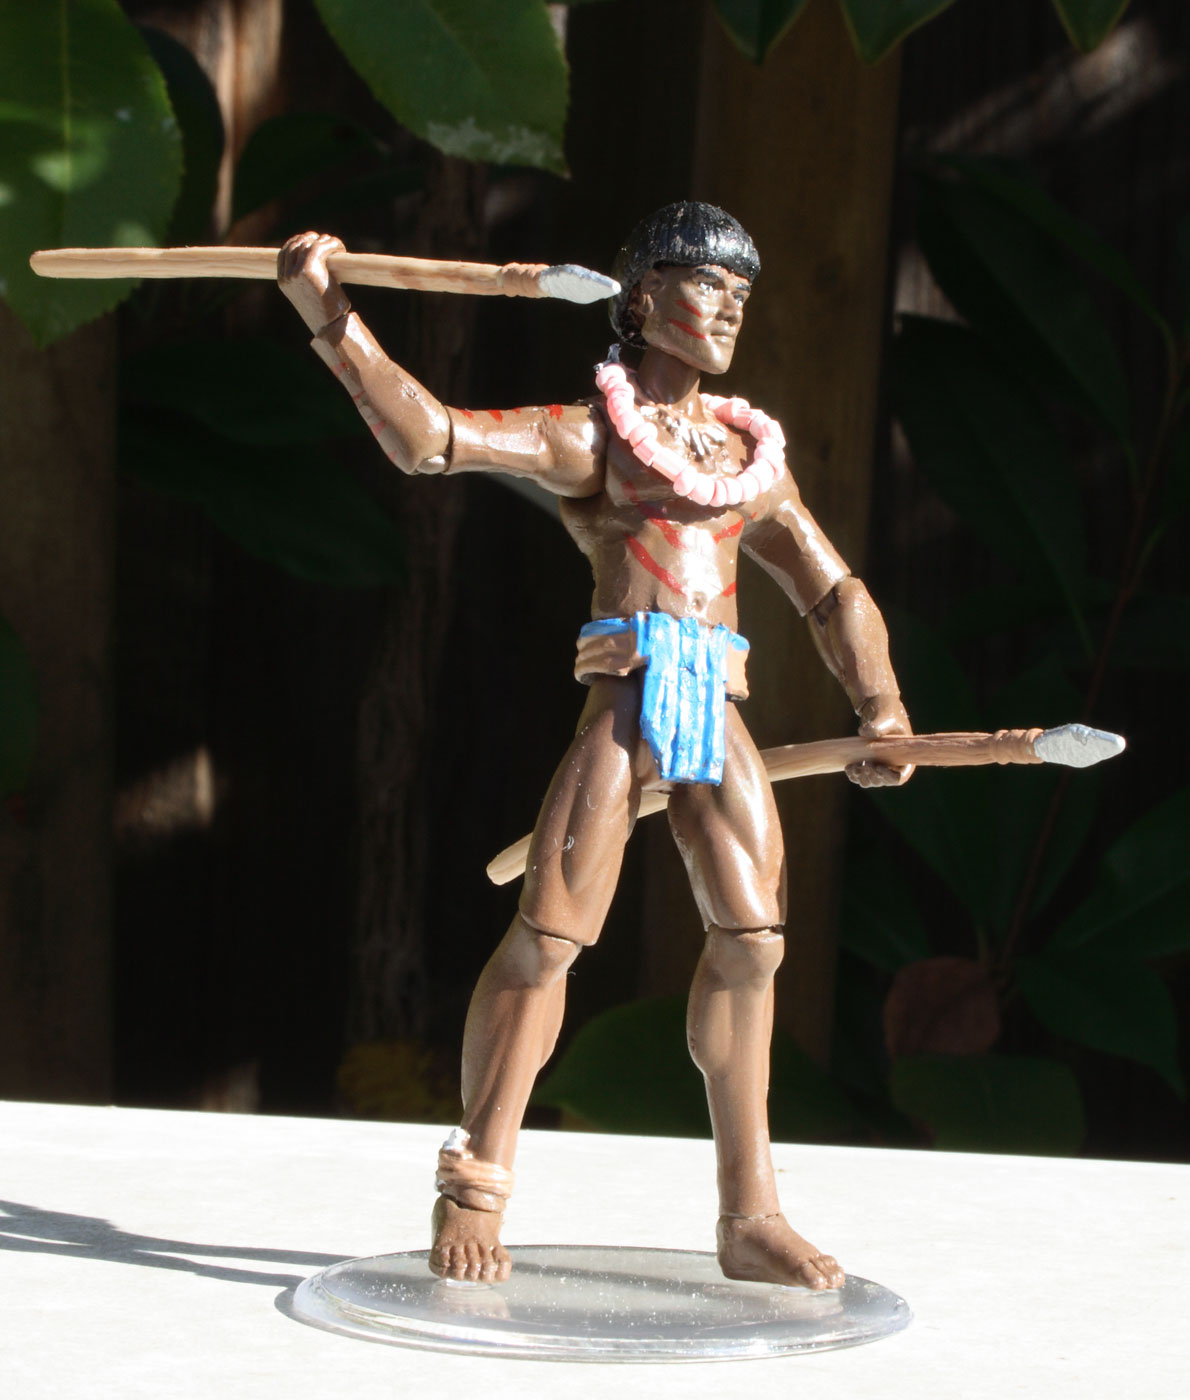
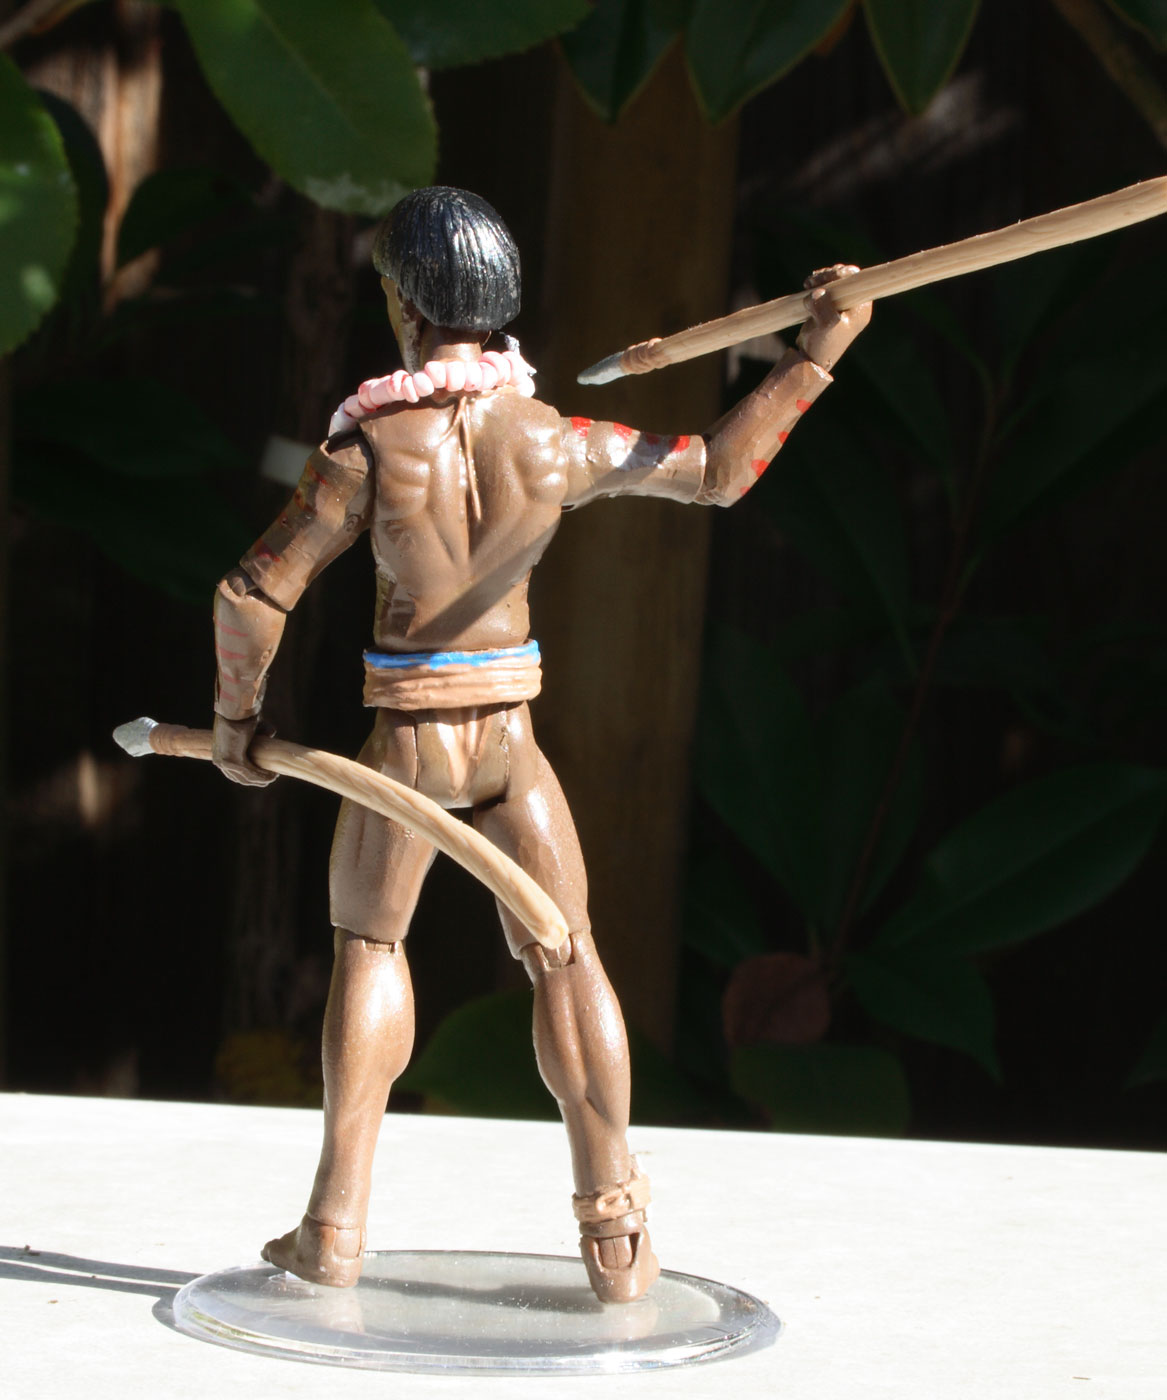
![]() Custom Hovitos warriors. Spears are from Wicket the Ewok (and number 2 is bent!). Bow is custom.
Custom Hovitos warriors. Spears are from Wicket the Ewok (and number 2 is bent!). Bow is custom.
![]() Indy as teacher from Raiders
Indy as teacher from Raiders
![]() Indy as teacher from Crystal skull.
Indy as teacher from Crystal skull.
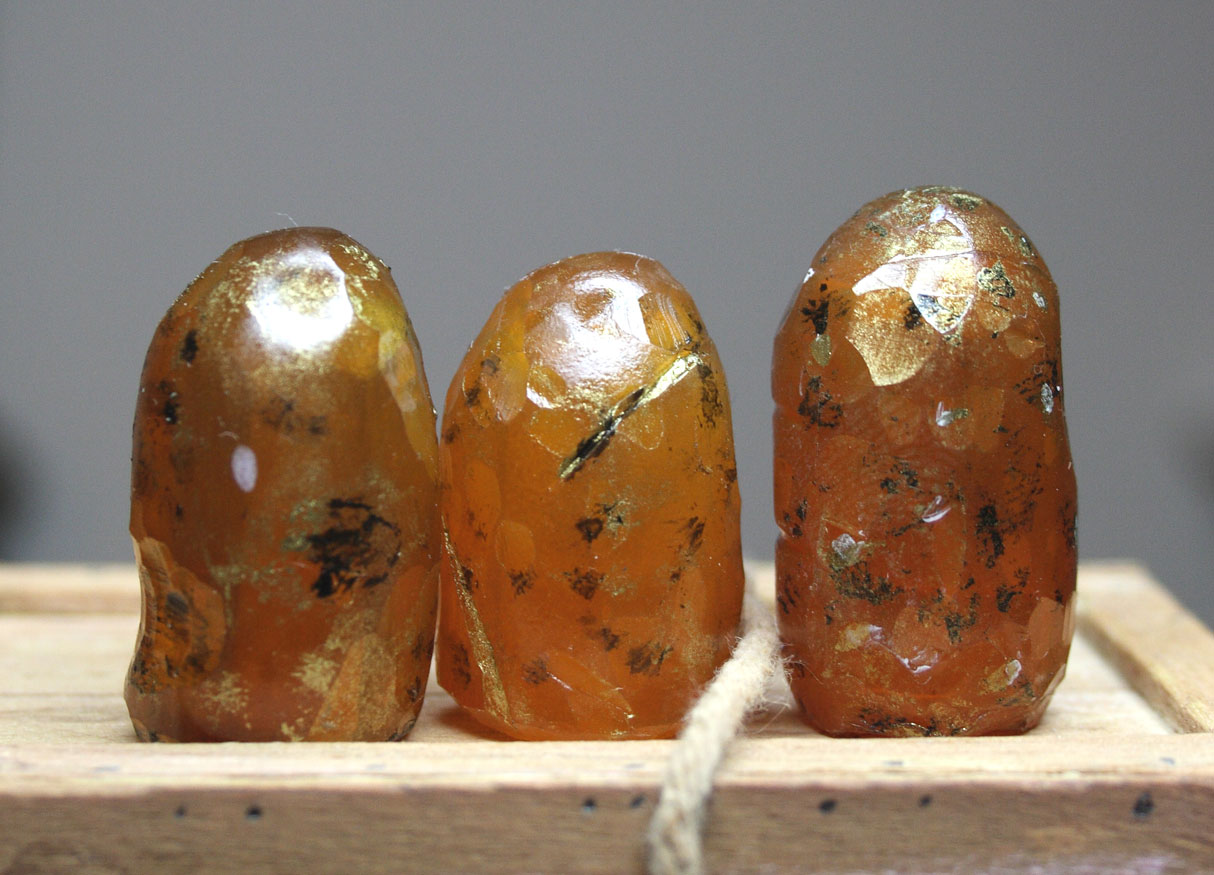
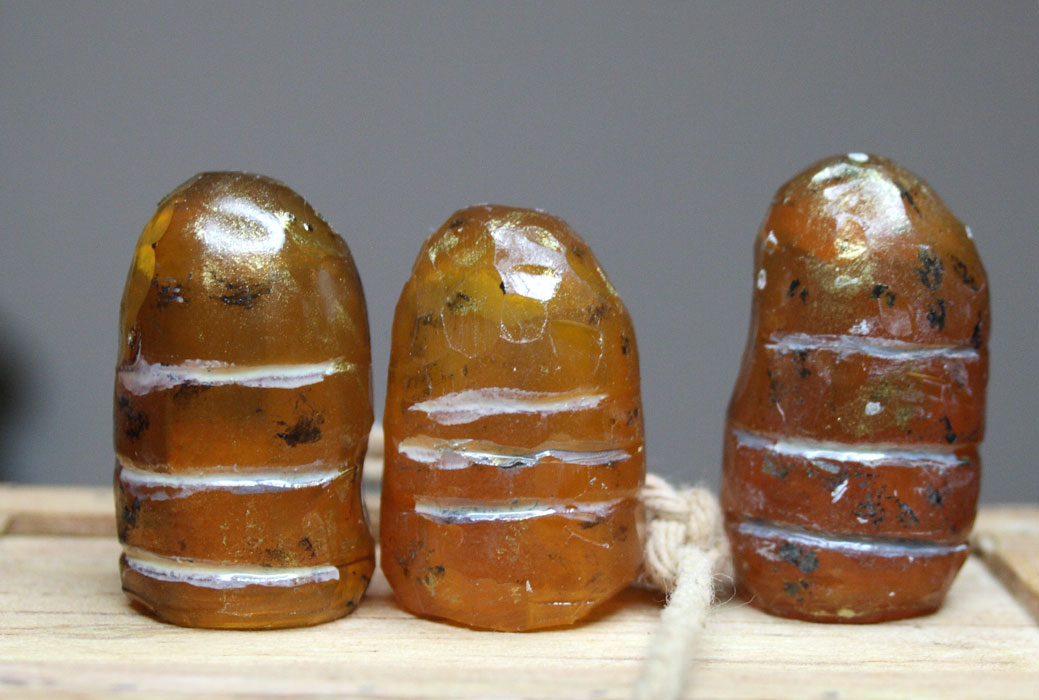
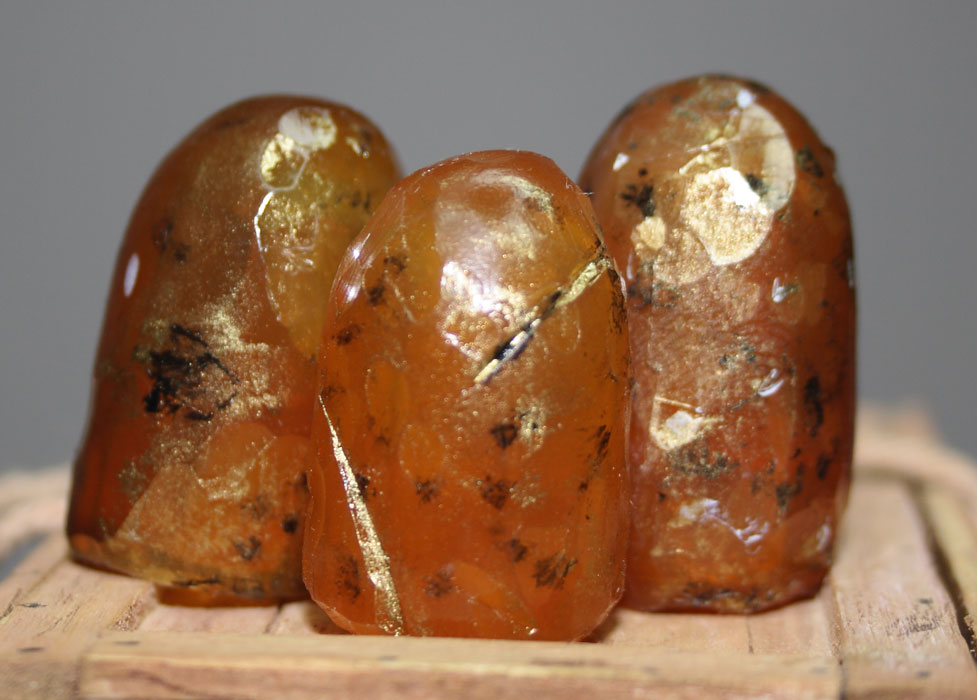 Customized Sankara stones. I cut down 3 Hasbro stones (the ones that came with the German soldier) and tried to paint them to match the picture in the book "Best of the Lucasfilm Archives".
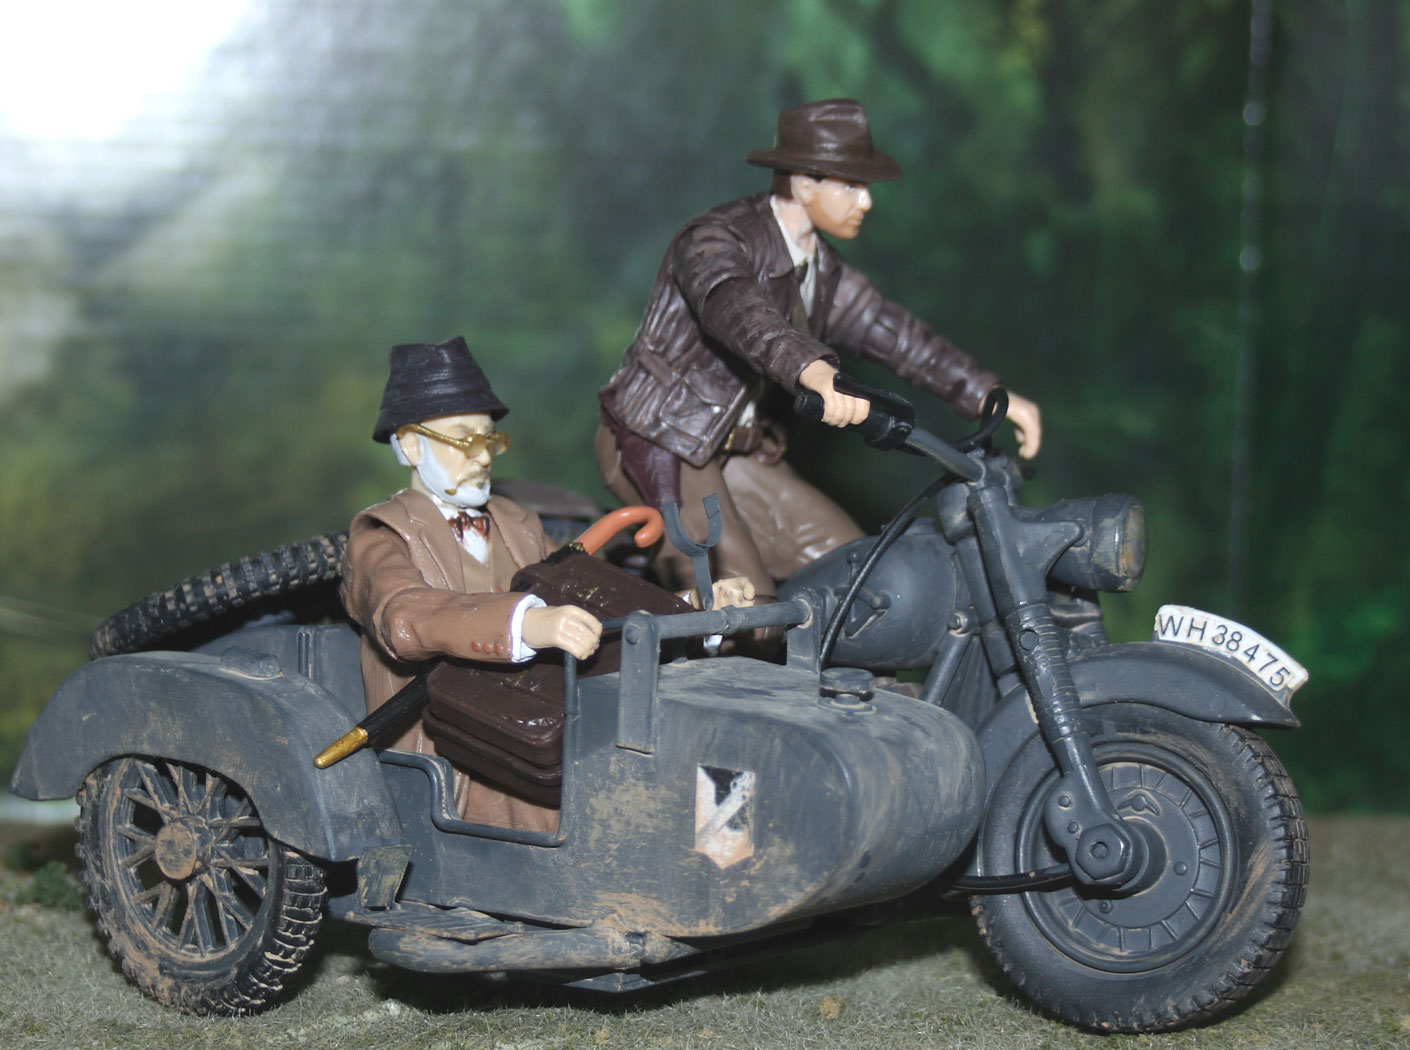

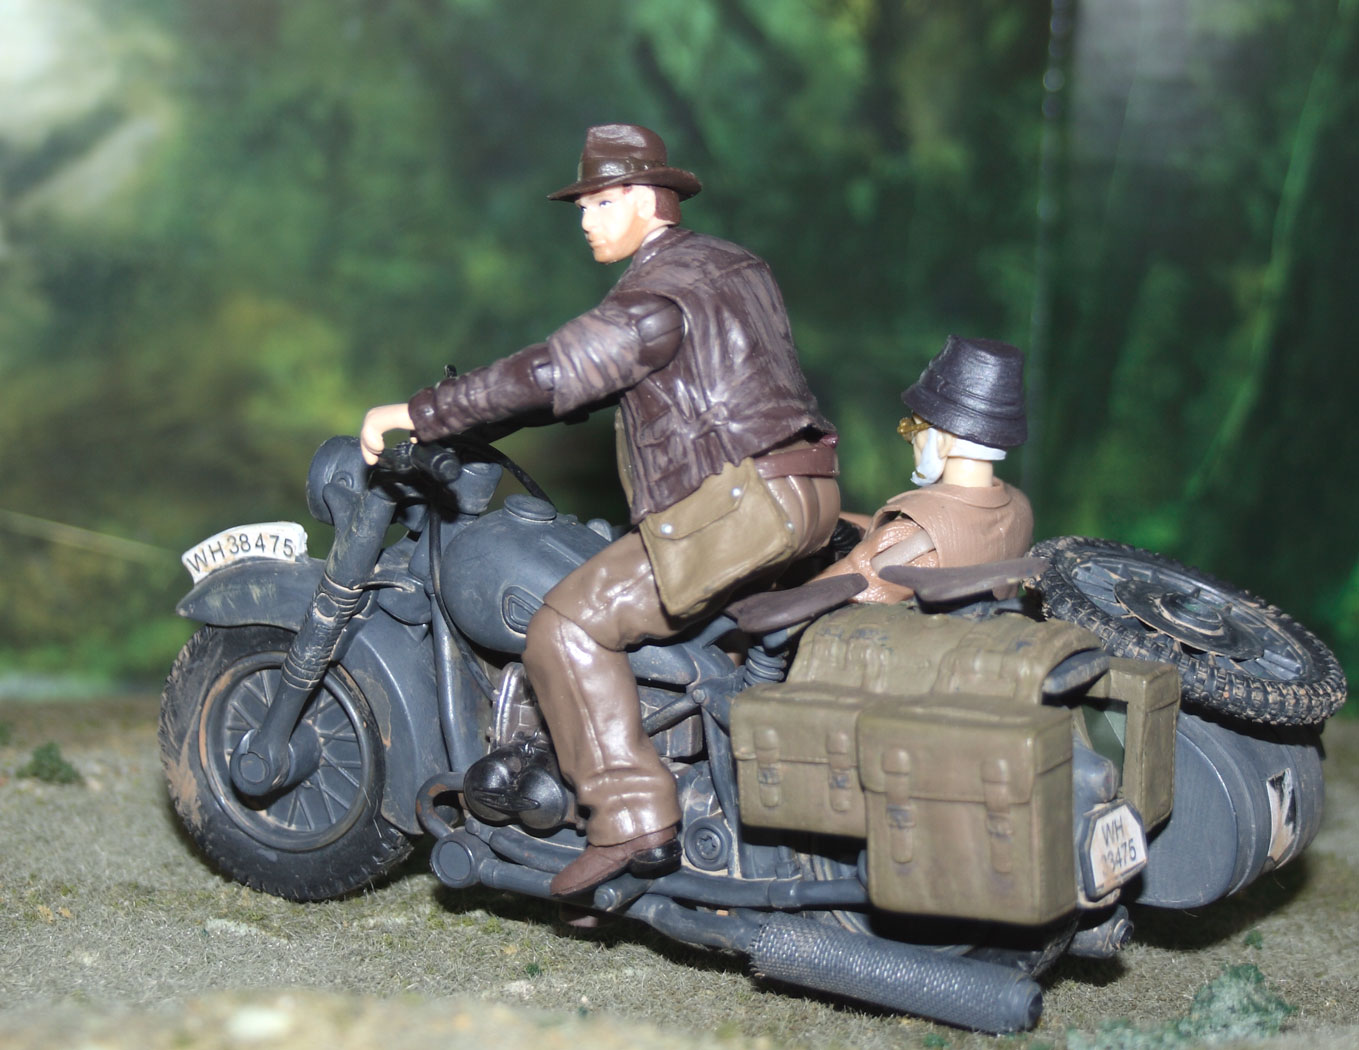 Classic Indy and Henry on motorbike and sidecar from Last Crusade.
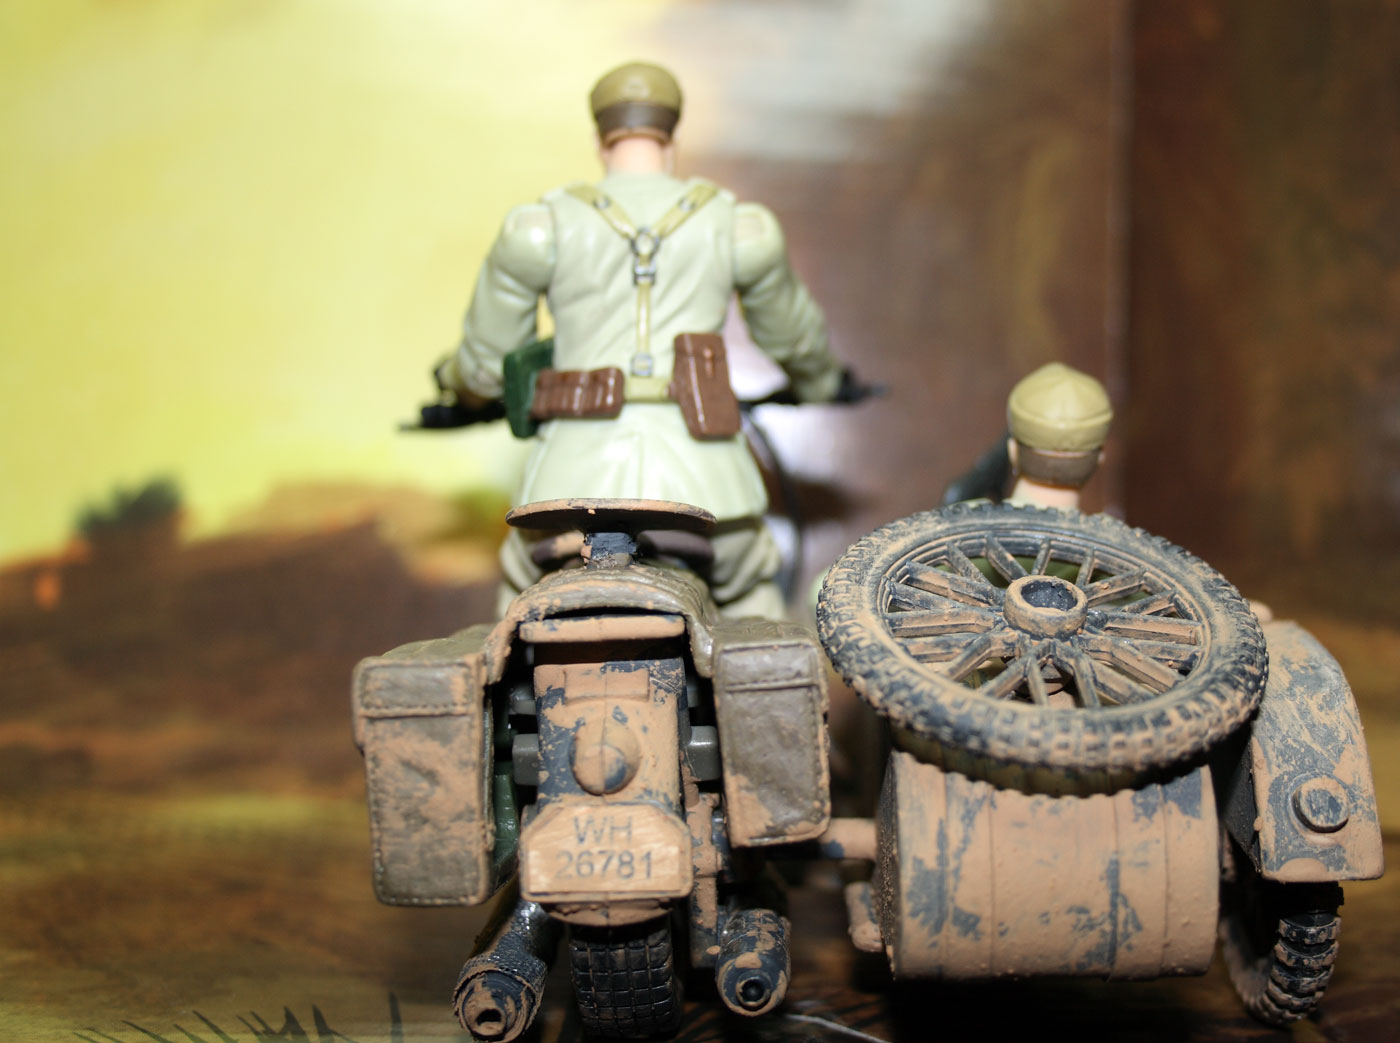
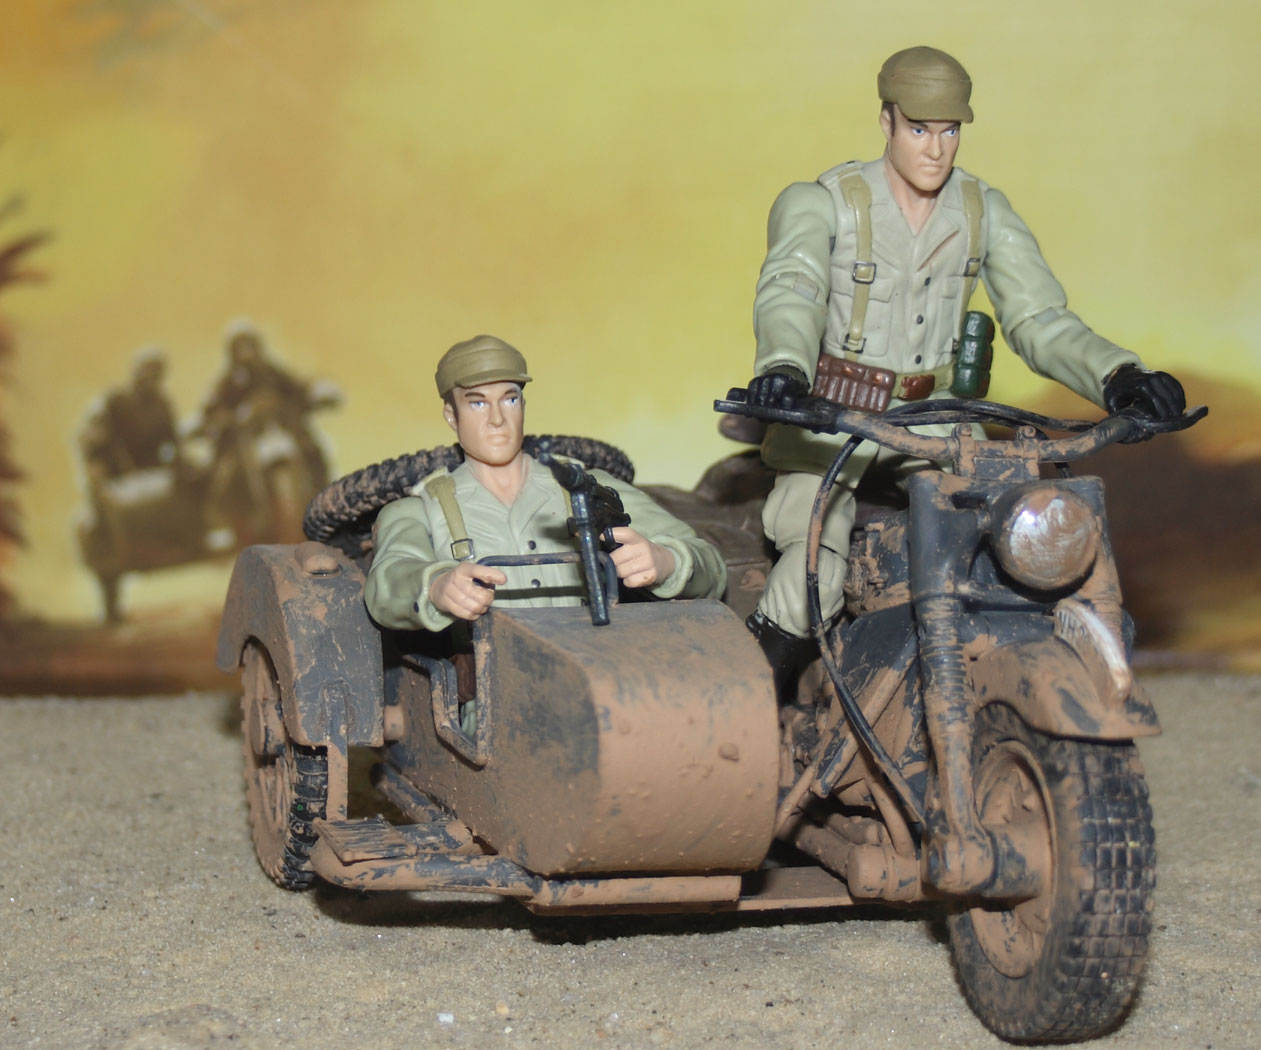
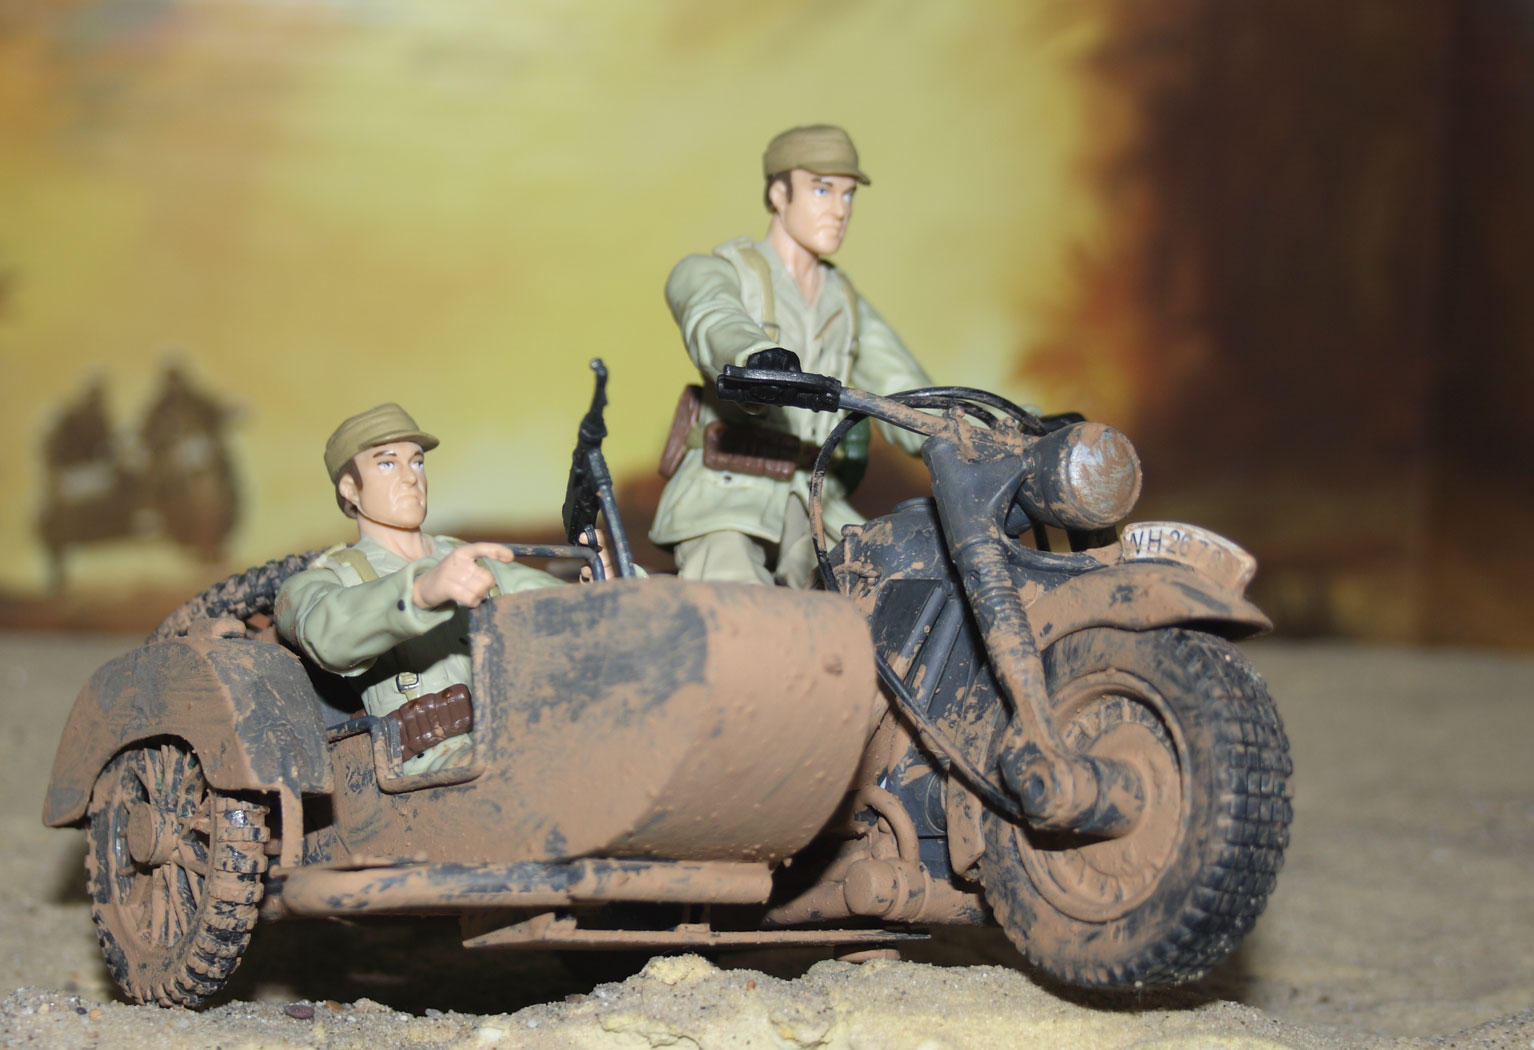
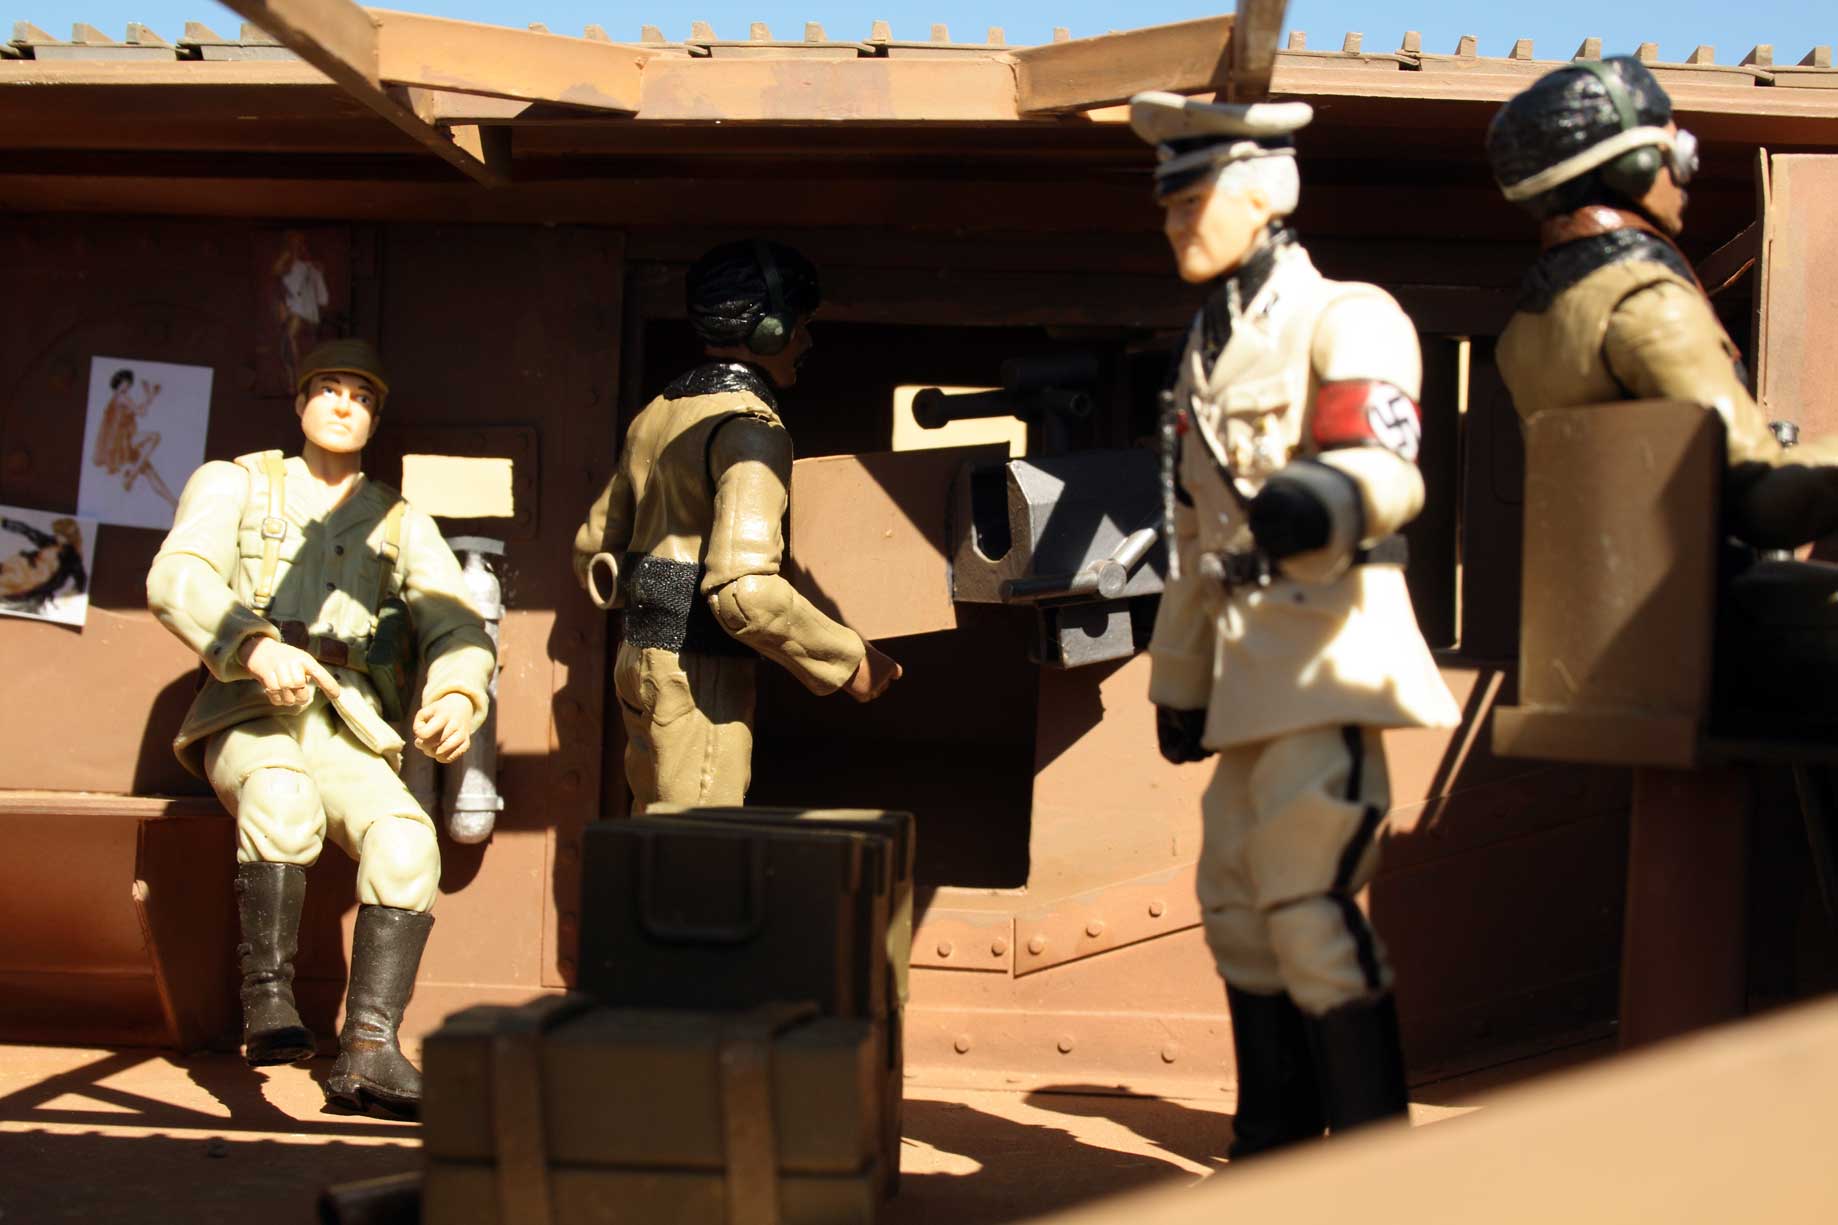
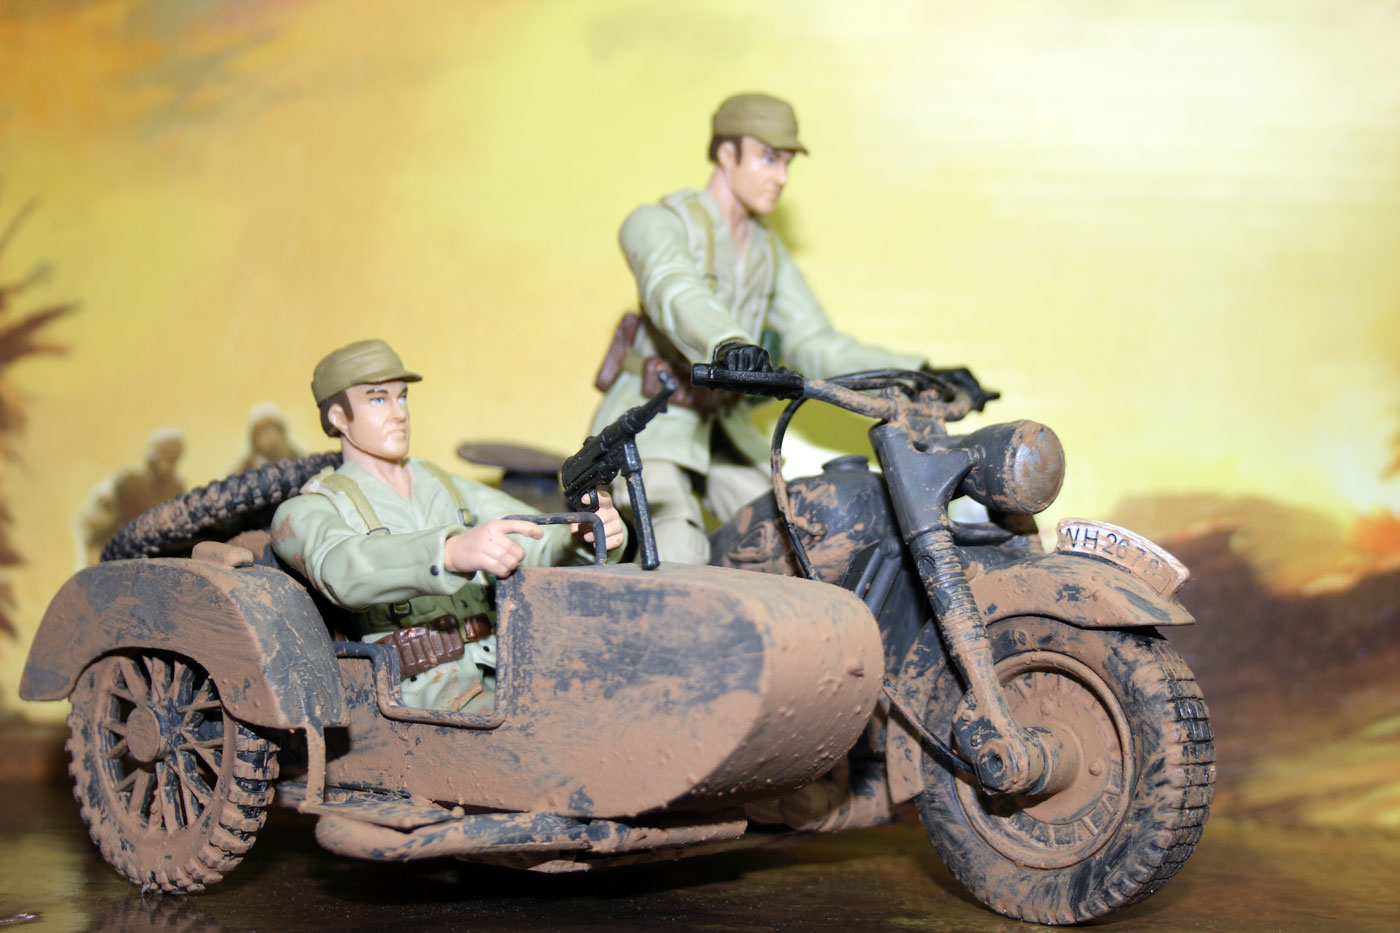
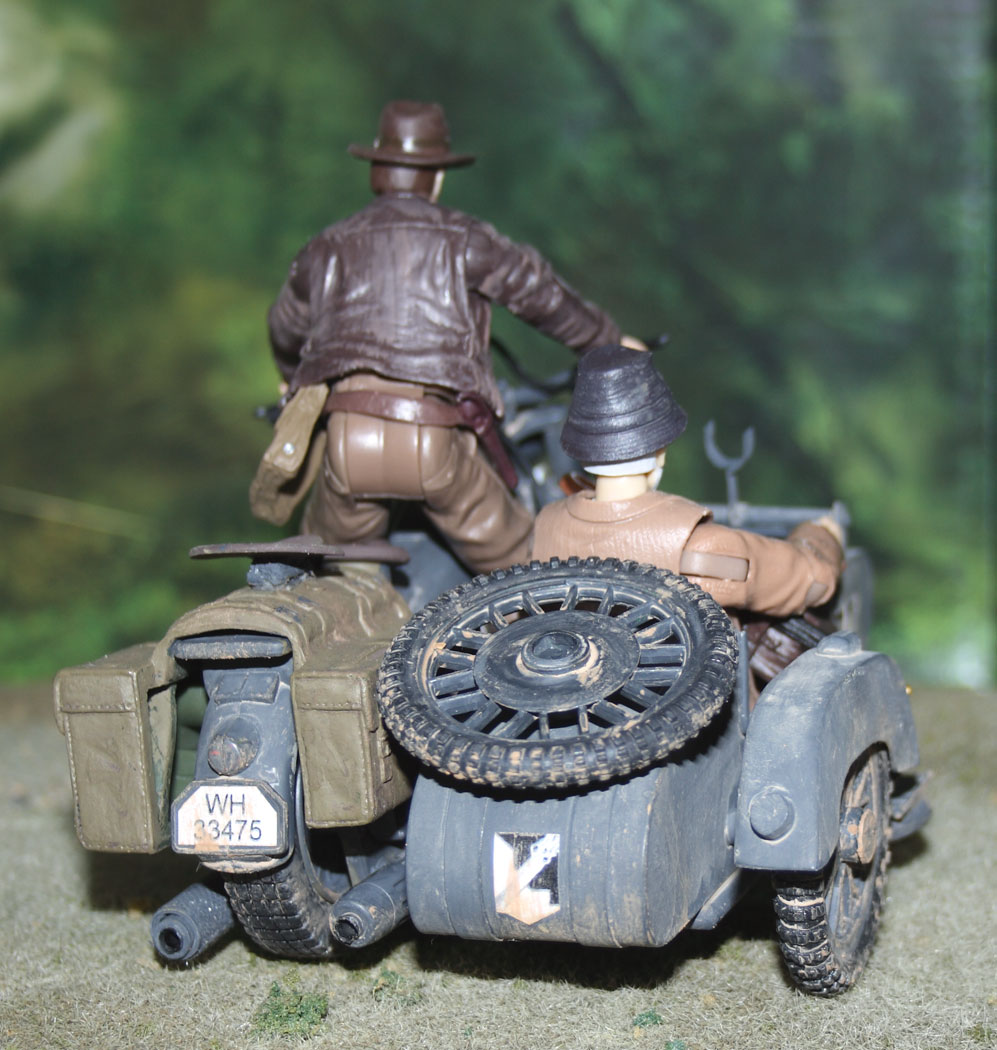
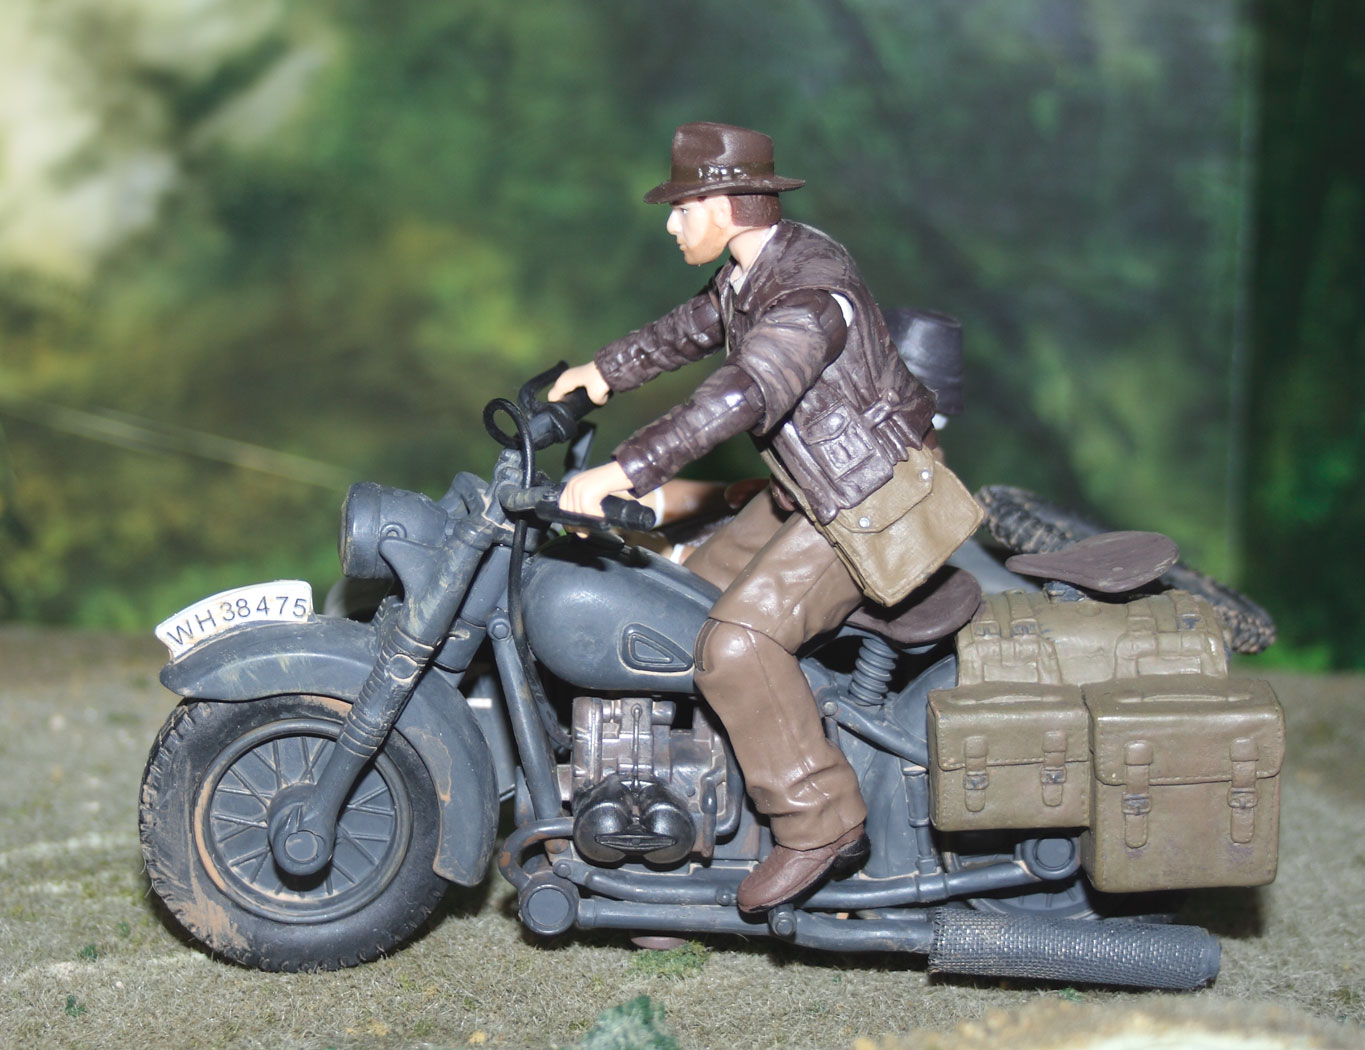
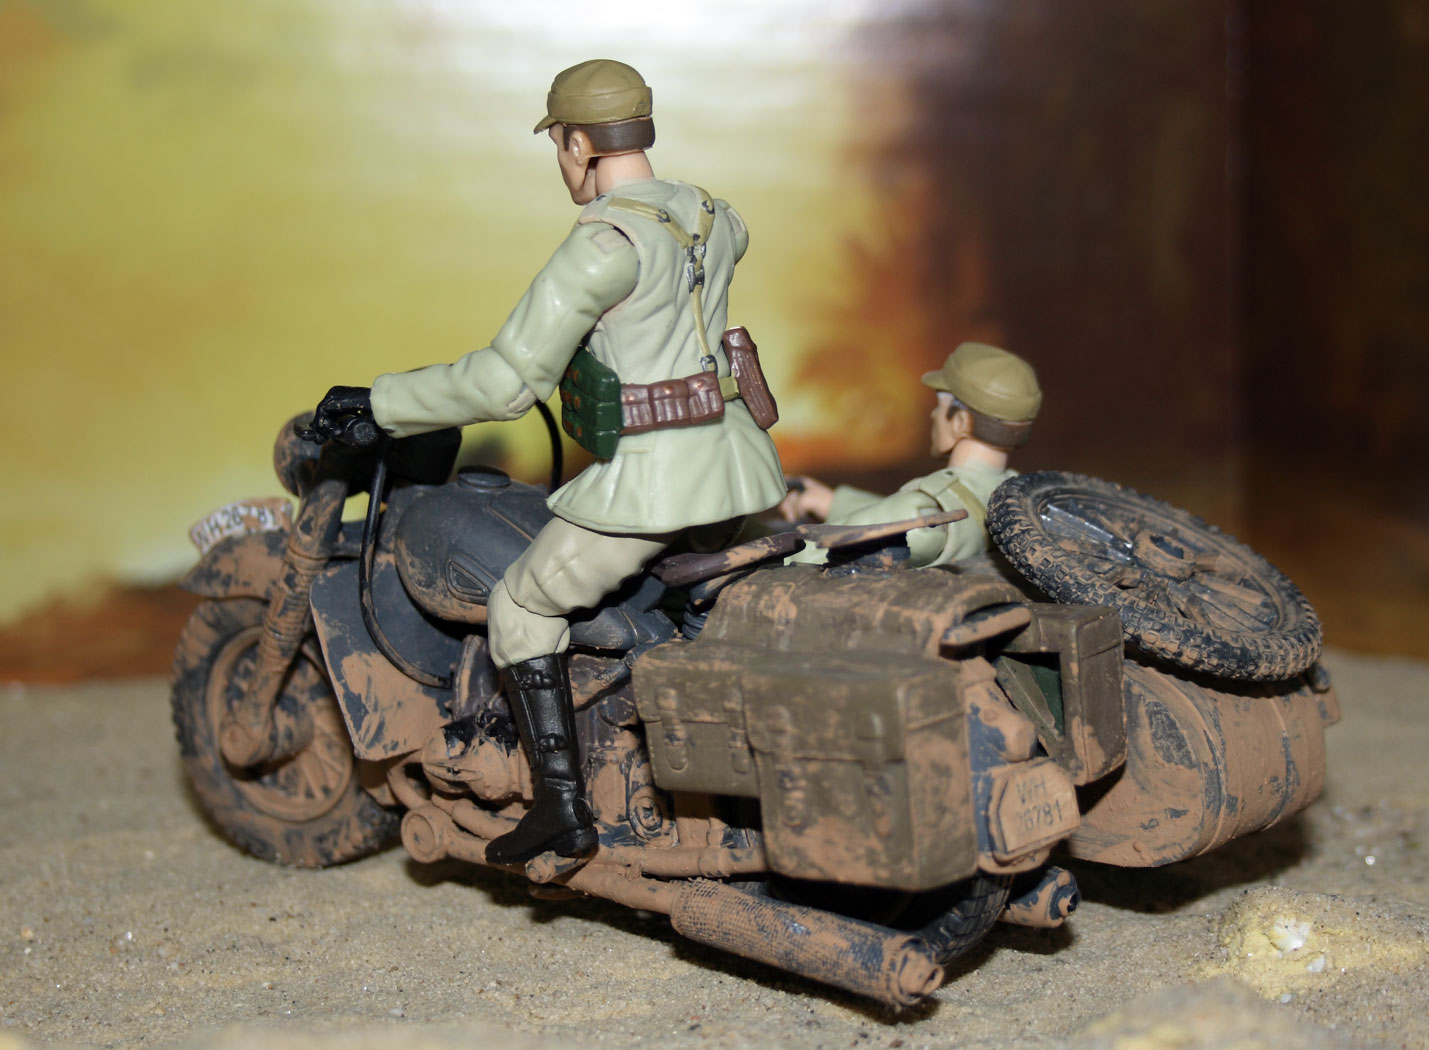 German soldiers on motorcycle with sidecar from the truck chase on Raiders of the Lost Ark.


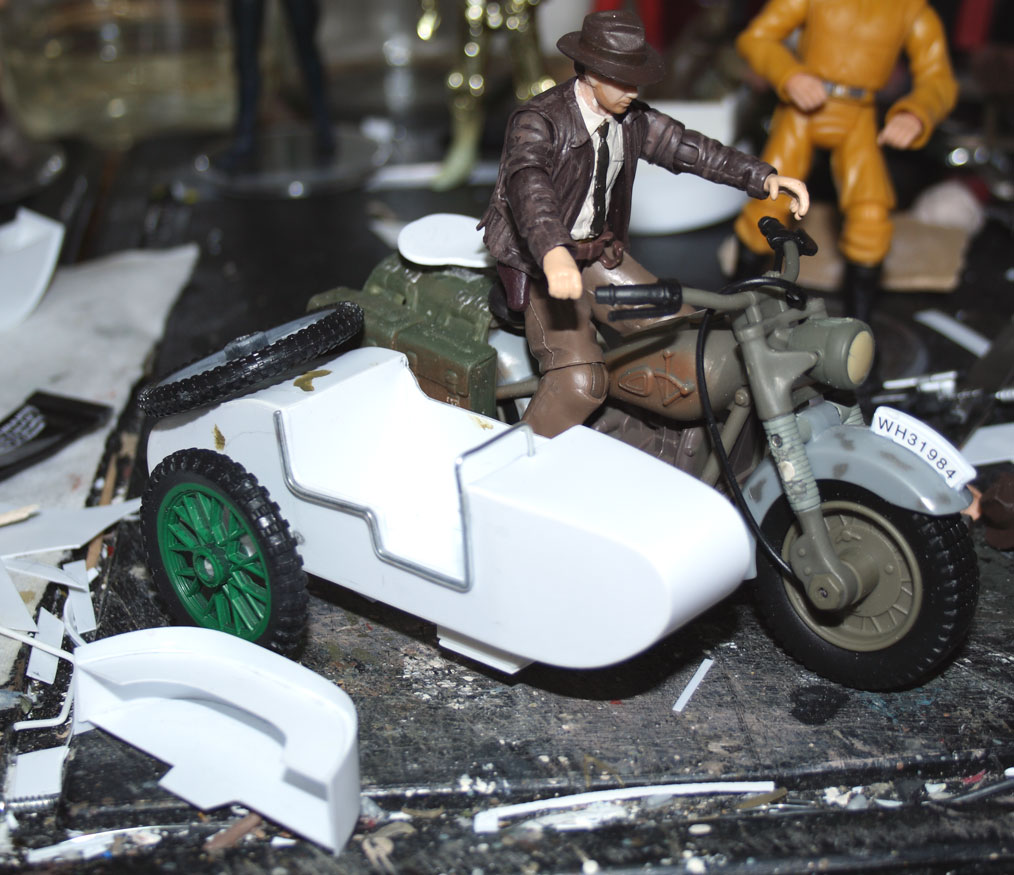
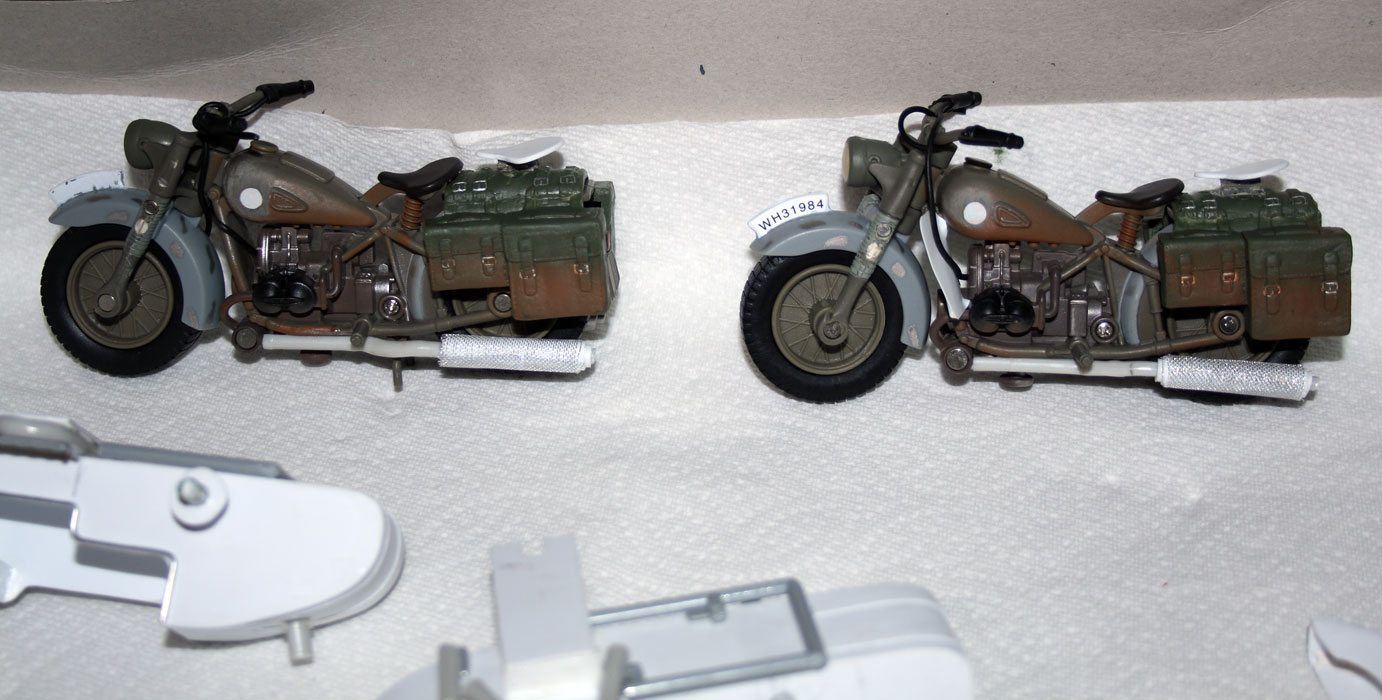
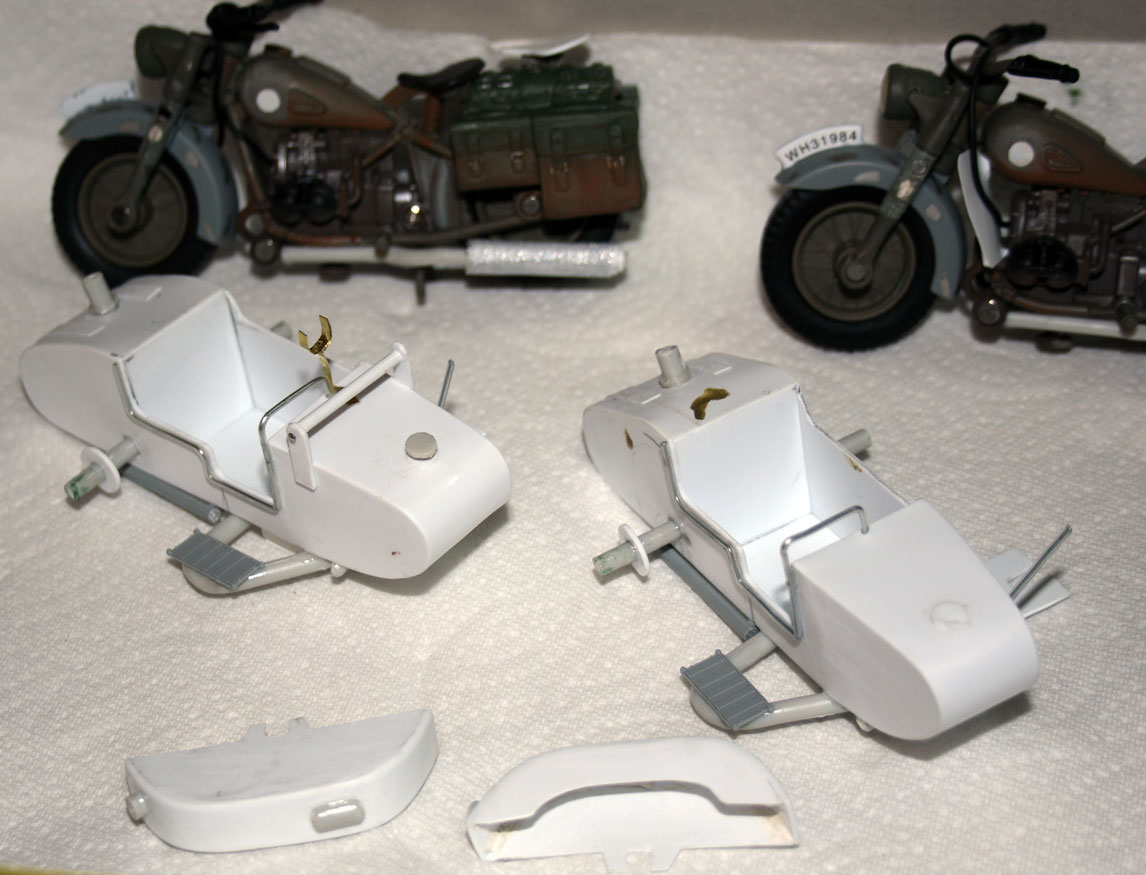
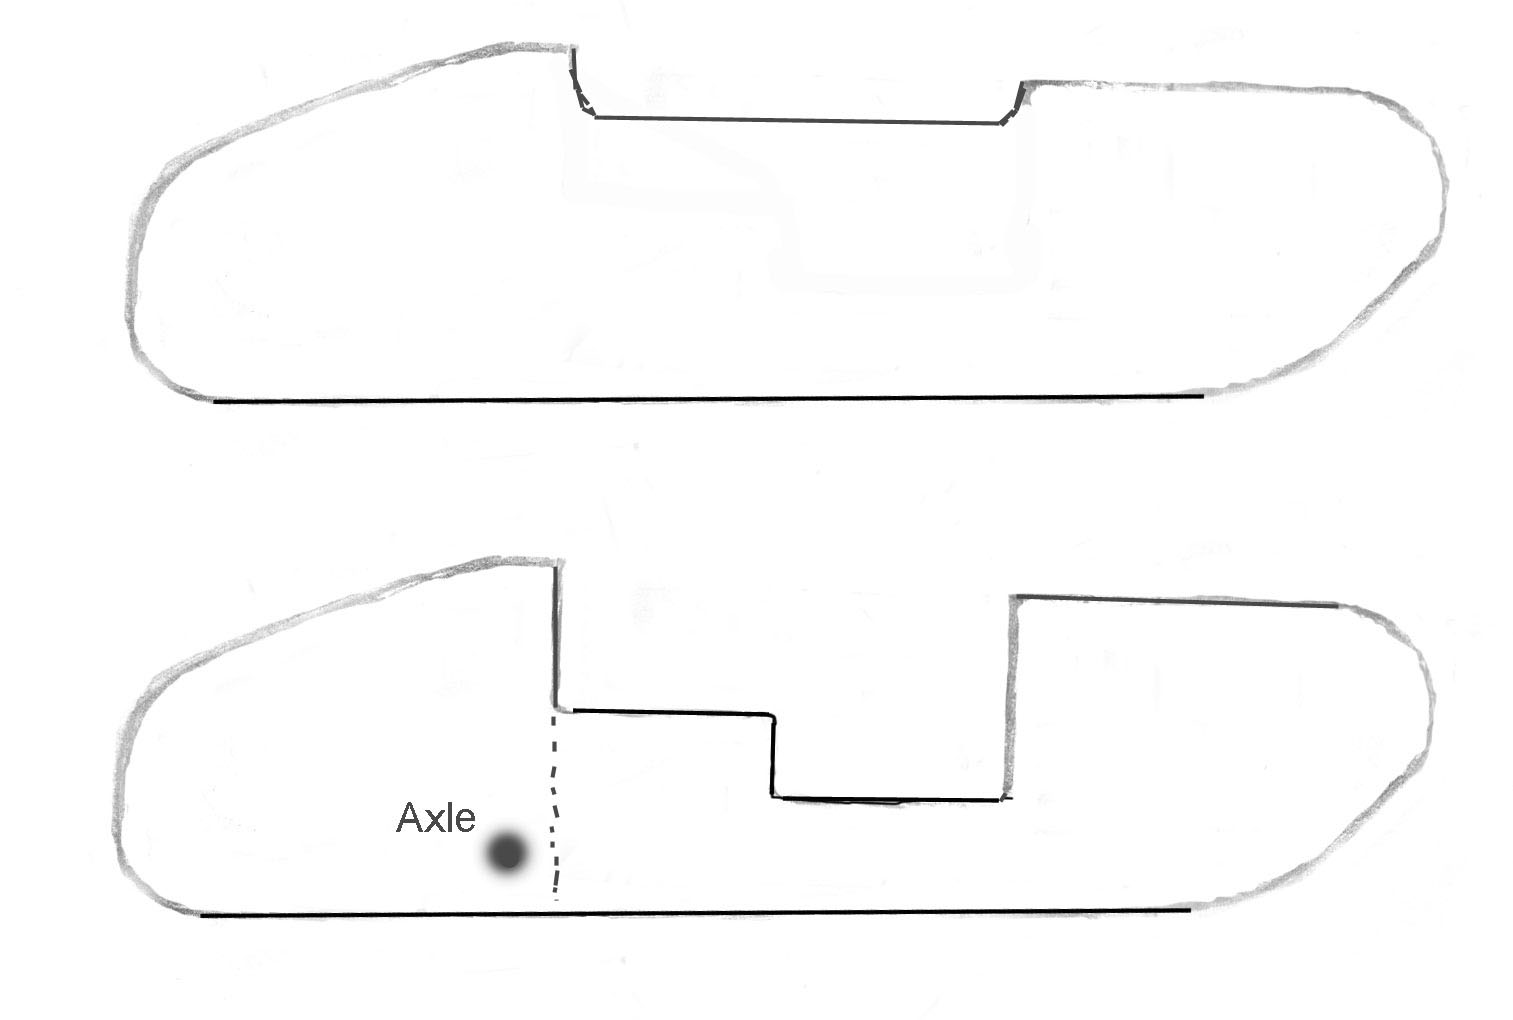
 Sidecar construction. Constructed out of plastic card, sprue, some wire and brass strip, and even a part of Dragon Panther! Wheels from Walmart dirt (cheap) bike! On the second picture you can see how I put a slot in a piece of plastic card designed to fit the peg on the bottom of the Hasbro bike. A thick piece of sprue (the grey rod) goes right through the sidecar just behind the 'seatback', and not only acts as an axle for the wheel but on the other side slots into the hole in the side of the Hasbro bike. If you have the Hasbro bike you will know what I mean! In the finished pictures the sidecar simply slides into place - no glue required! The bikes themselves also received some attention. The obvious being the removal of the 'tarps'. I also filled the hole in the side of the gas tank, added the second seat (a piece of plastic card) and the second exhaust pipe (a piece of sprue, wrapped with plastic card and covered with mesh for the muffler). The Egypt version has knee shields also. And of course they were painted that dark German grey. To cap it off I printed correct licence numbers for the Austria bike, and that shield-like symbol which was based on a screen capture. I made up a licence plate for the Egypt version. You can't see it in the film, so unless there is a behind-the-scenes picture, my fictional plate will have to do! These were printed on stickers, not decals, just like a Hasbro toy!
 Useful number plates and badges
![]()
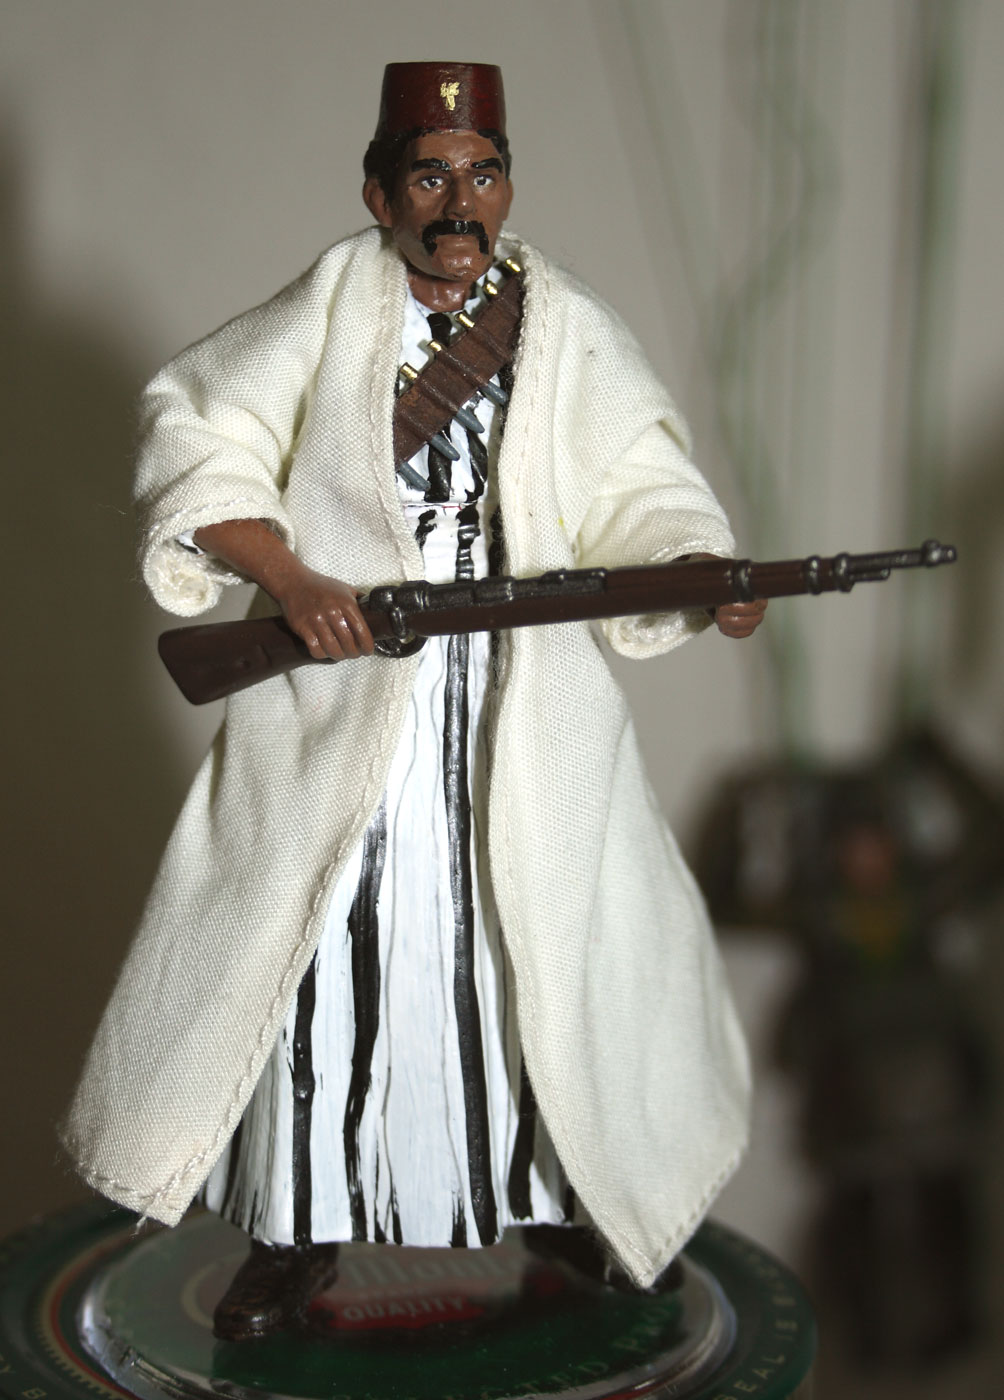
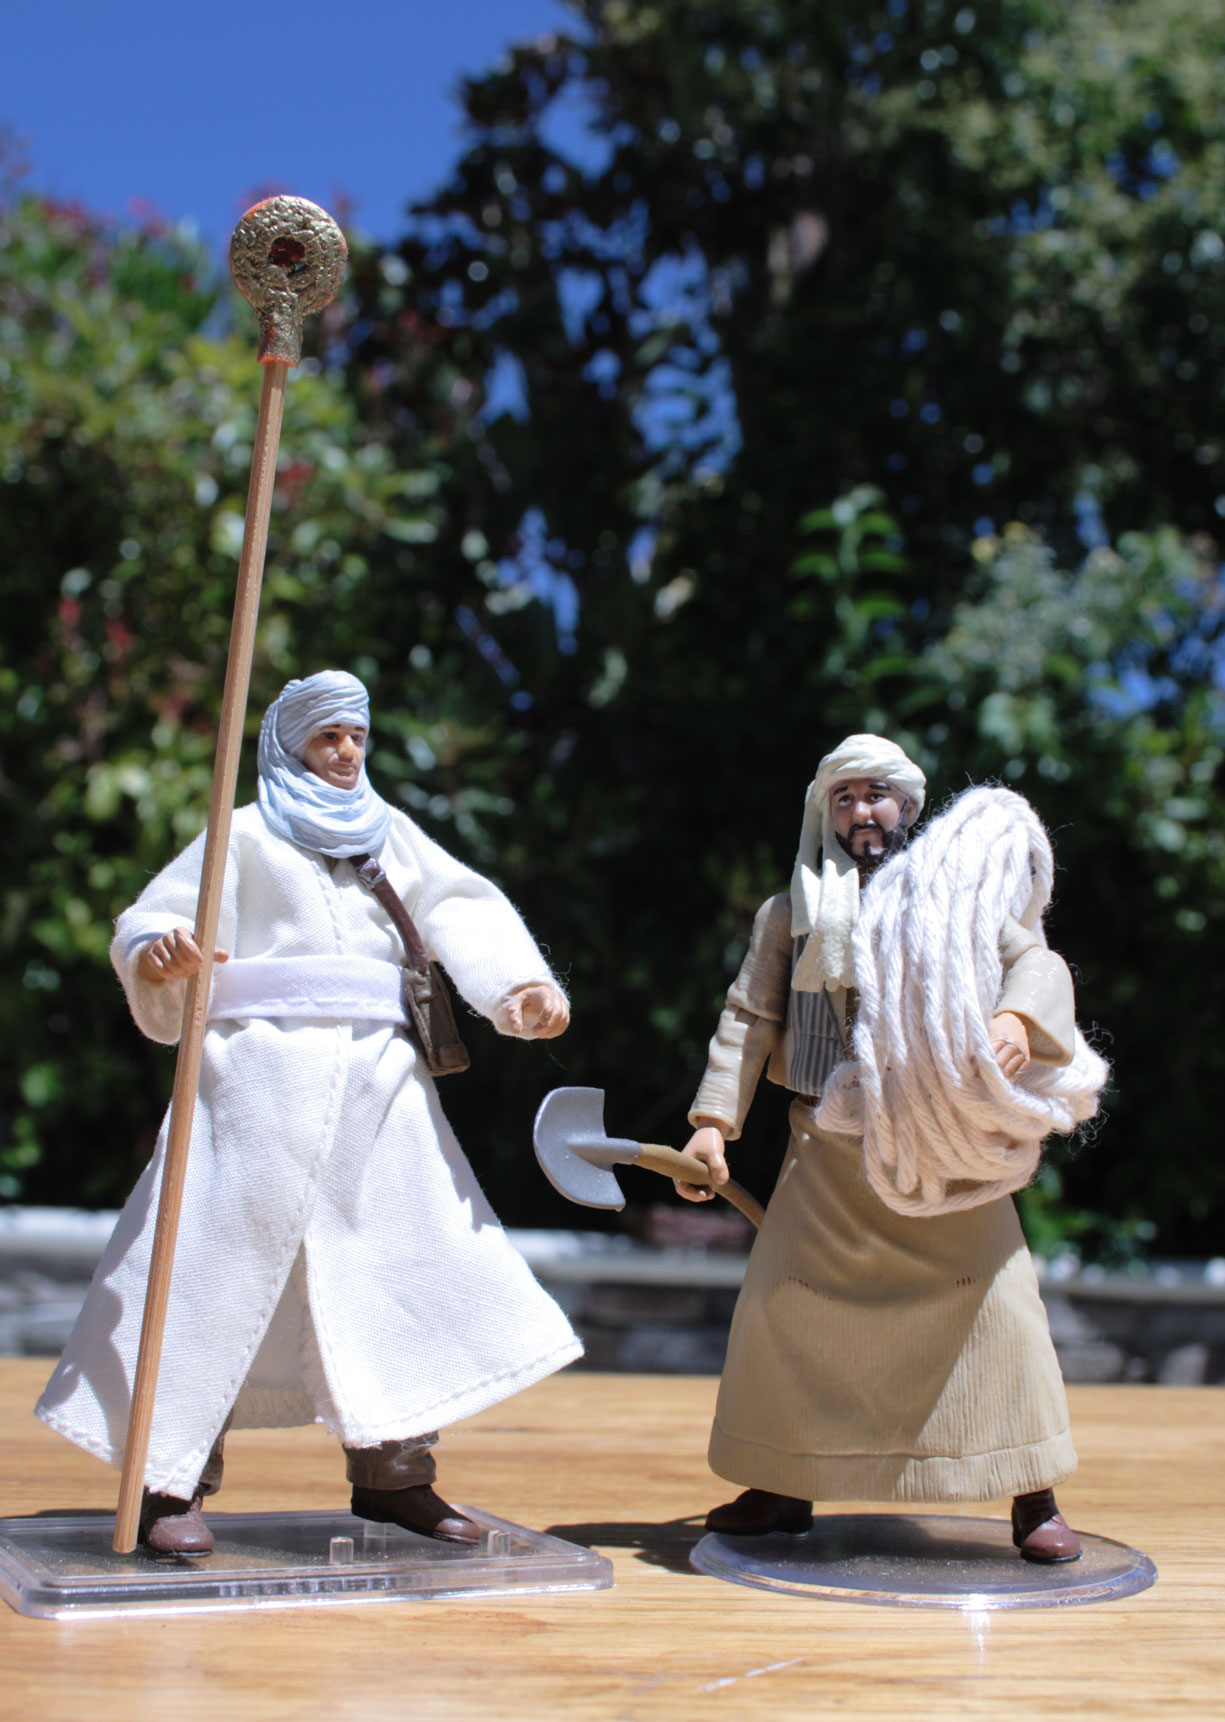
![]() Kazim and the Brothers of the Cruciform Sword in Hatay. These look pretty good, although I found it impossible to hand-paint neat stripes! Oh well, I'm after "action figure", not perfection. Actually now I see all 3 I'm disappointed that I can't pose them actually firing. I might have to do a 4TH figure then...
Kazim and the Brothers of the Cruciform Sword in Hatay. These look pretty good, although I found it impossible to hand-paint neat stripes! Oh well, I'm after "action figure", not perfection. Actually now I see all 3 I'm disappointed that I can't pose them actually firing. I might have to do a 4TH figure then...
![]()
 Showing the Kazim head in construction. Cheap Walmart (The Corps) soldier figure head, cut down and with hat and hair sculpted out of epoxy putty. On the side view you can see how the head has to be cut, and then a hole drilled to take the neck. The black Cairo swordsman robes with their first coat of paint.
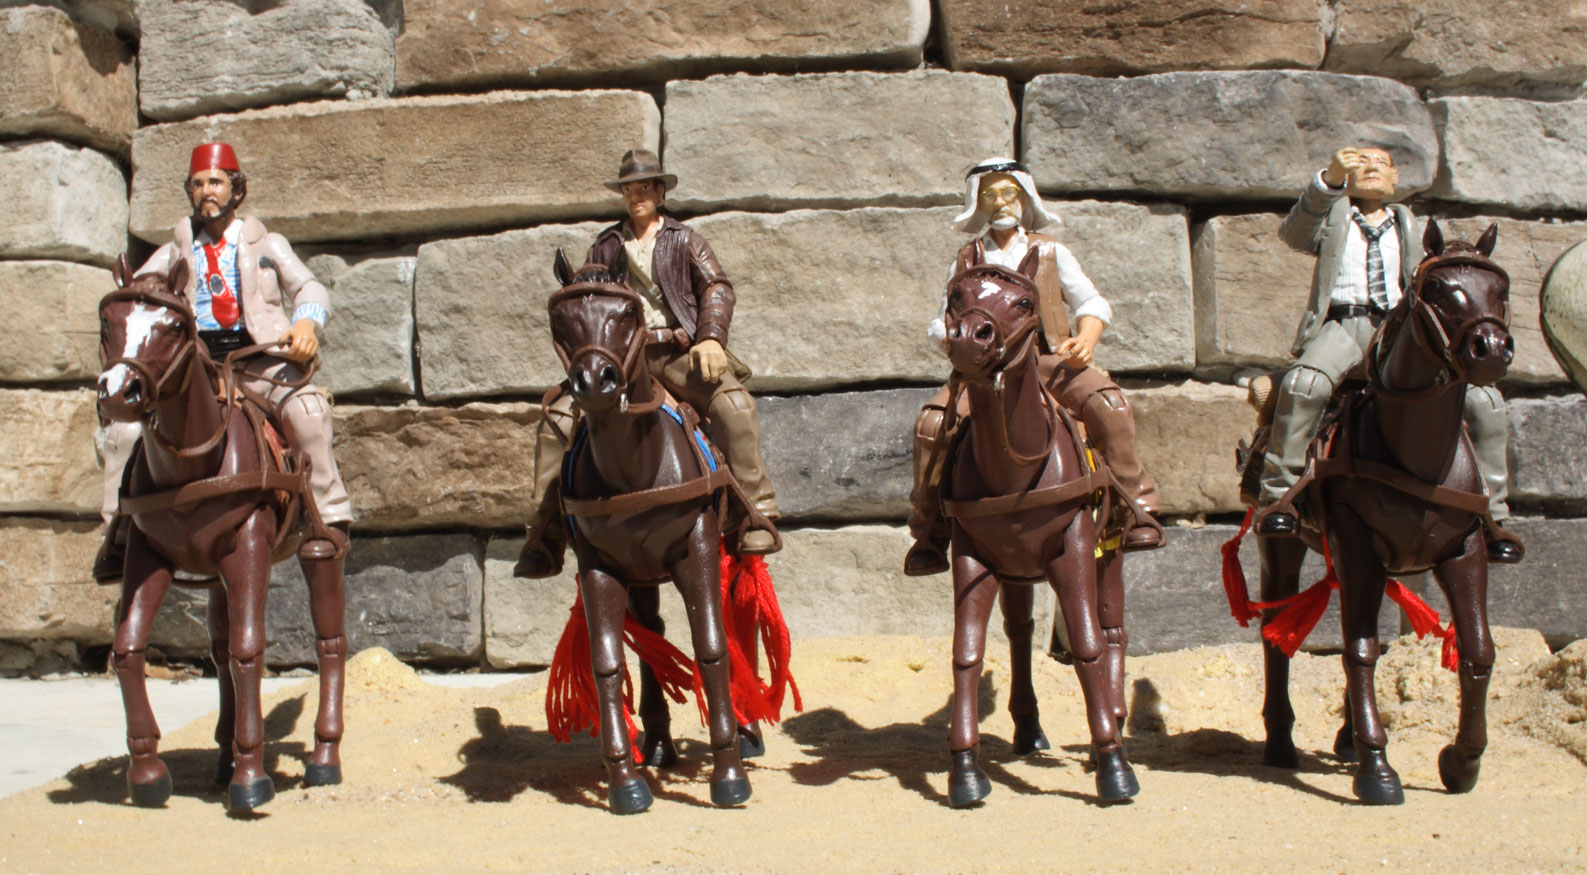
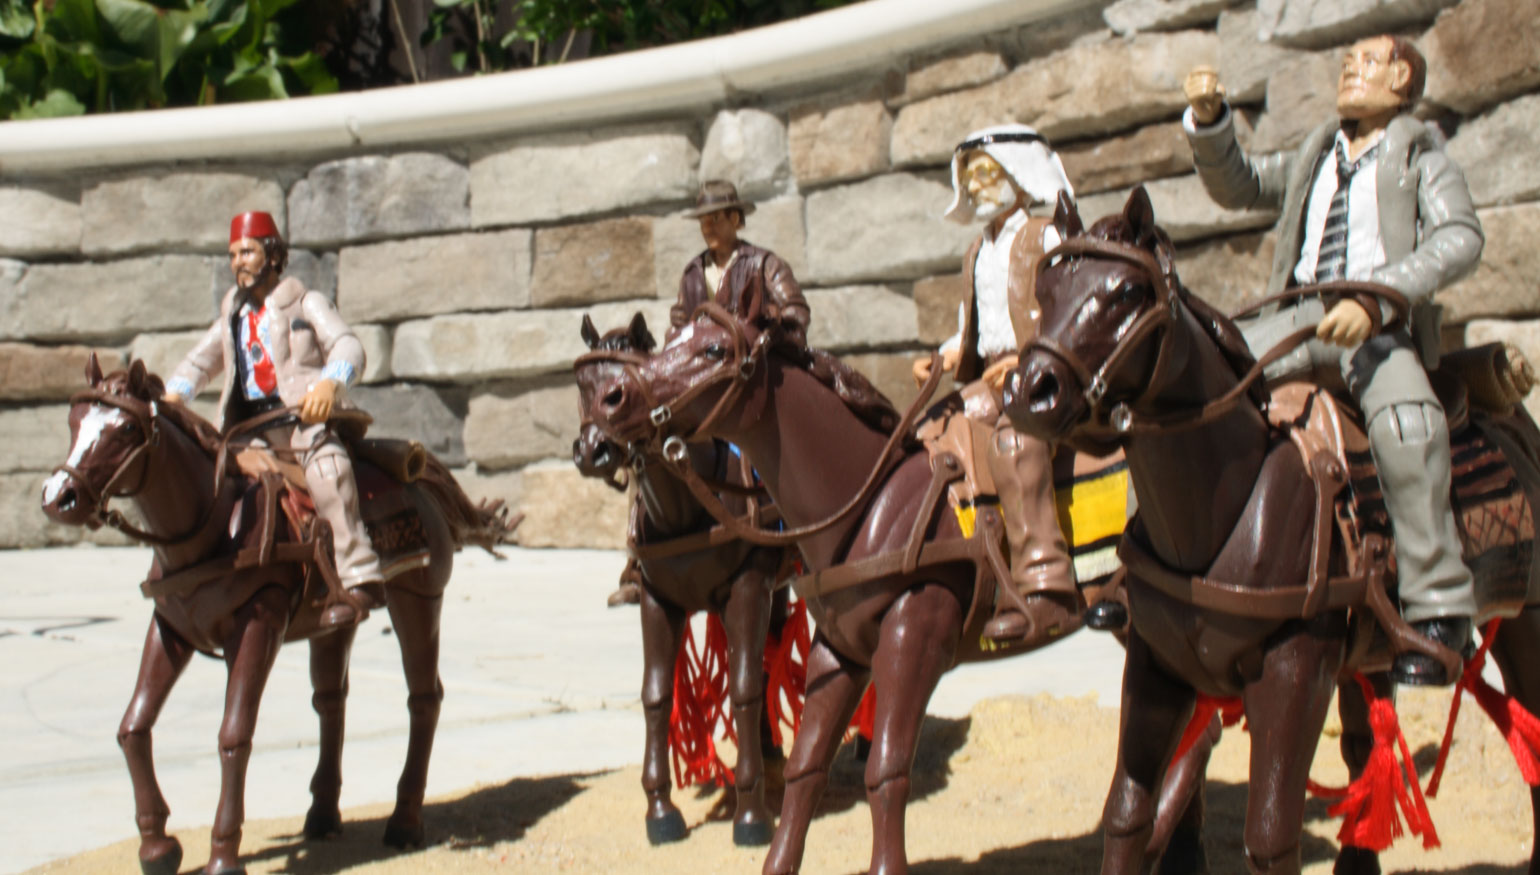
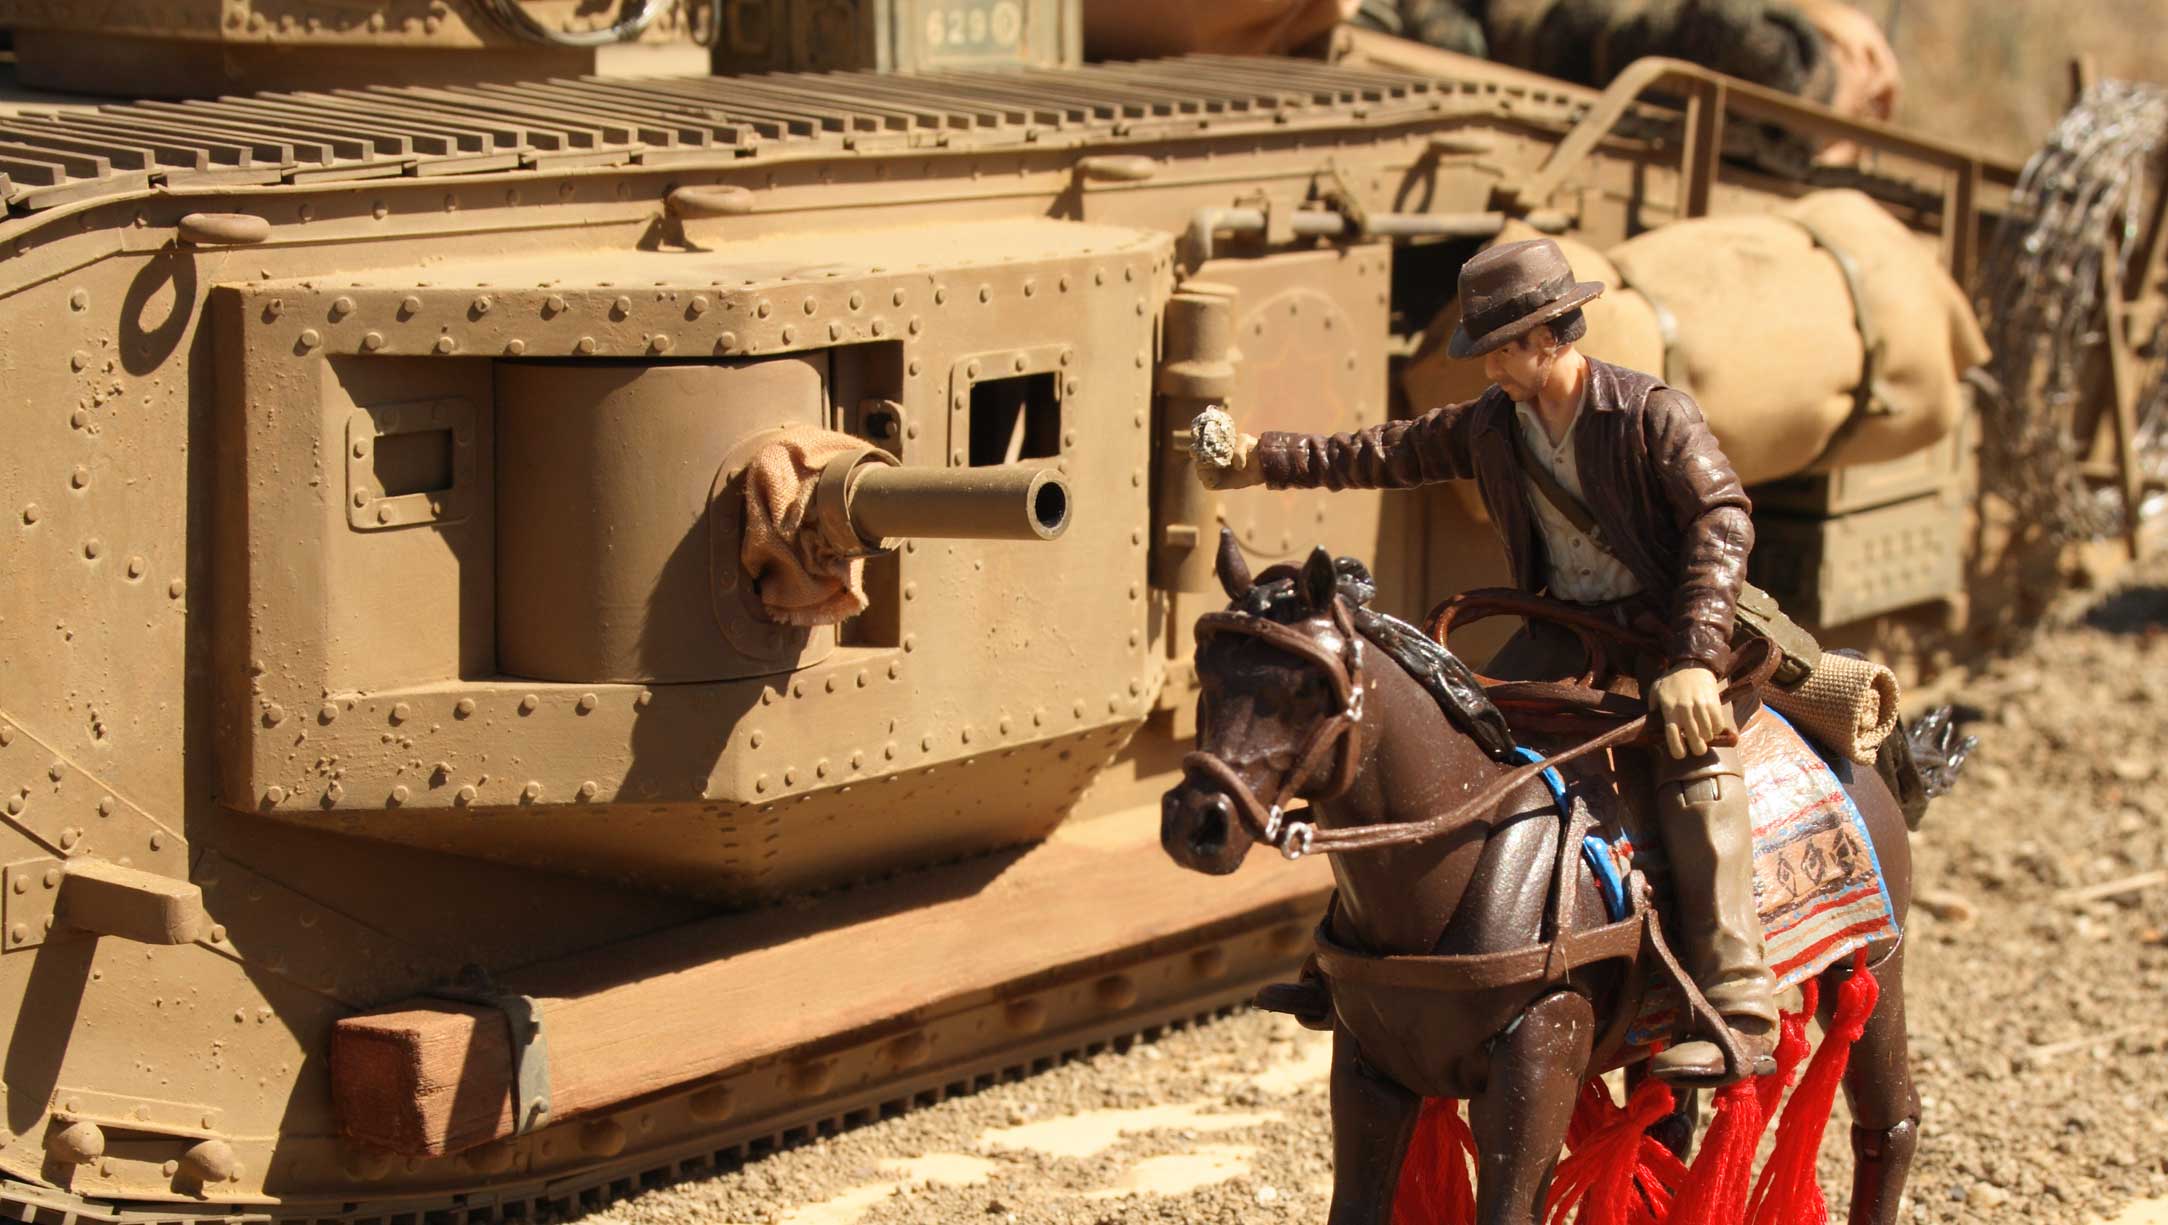
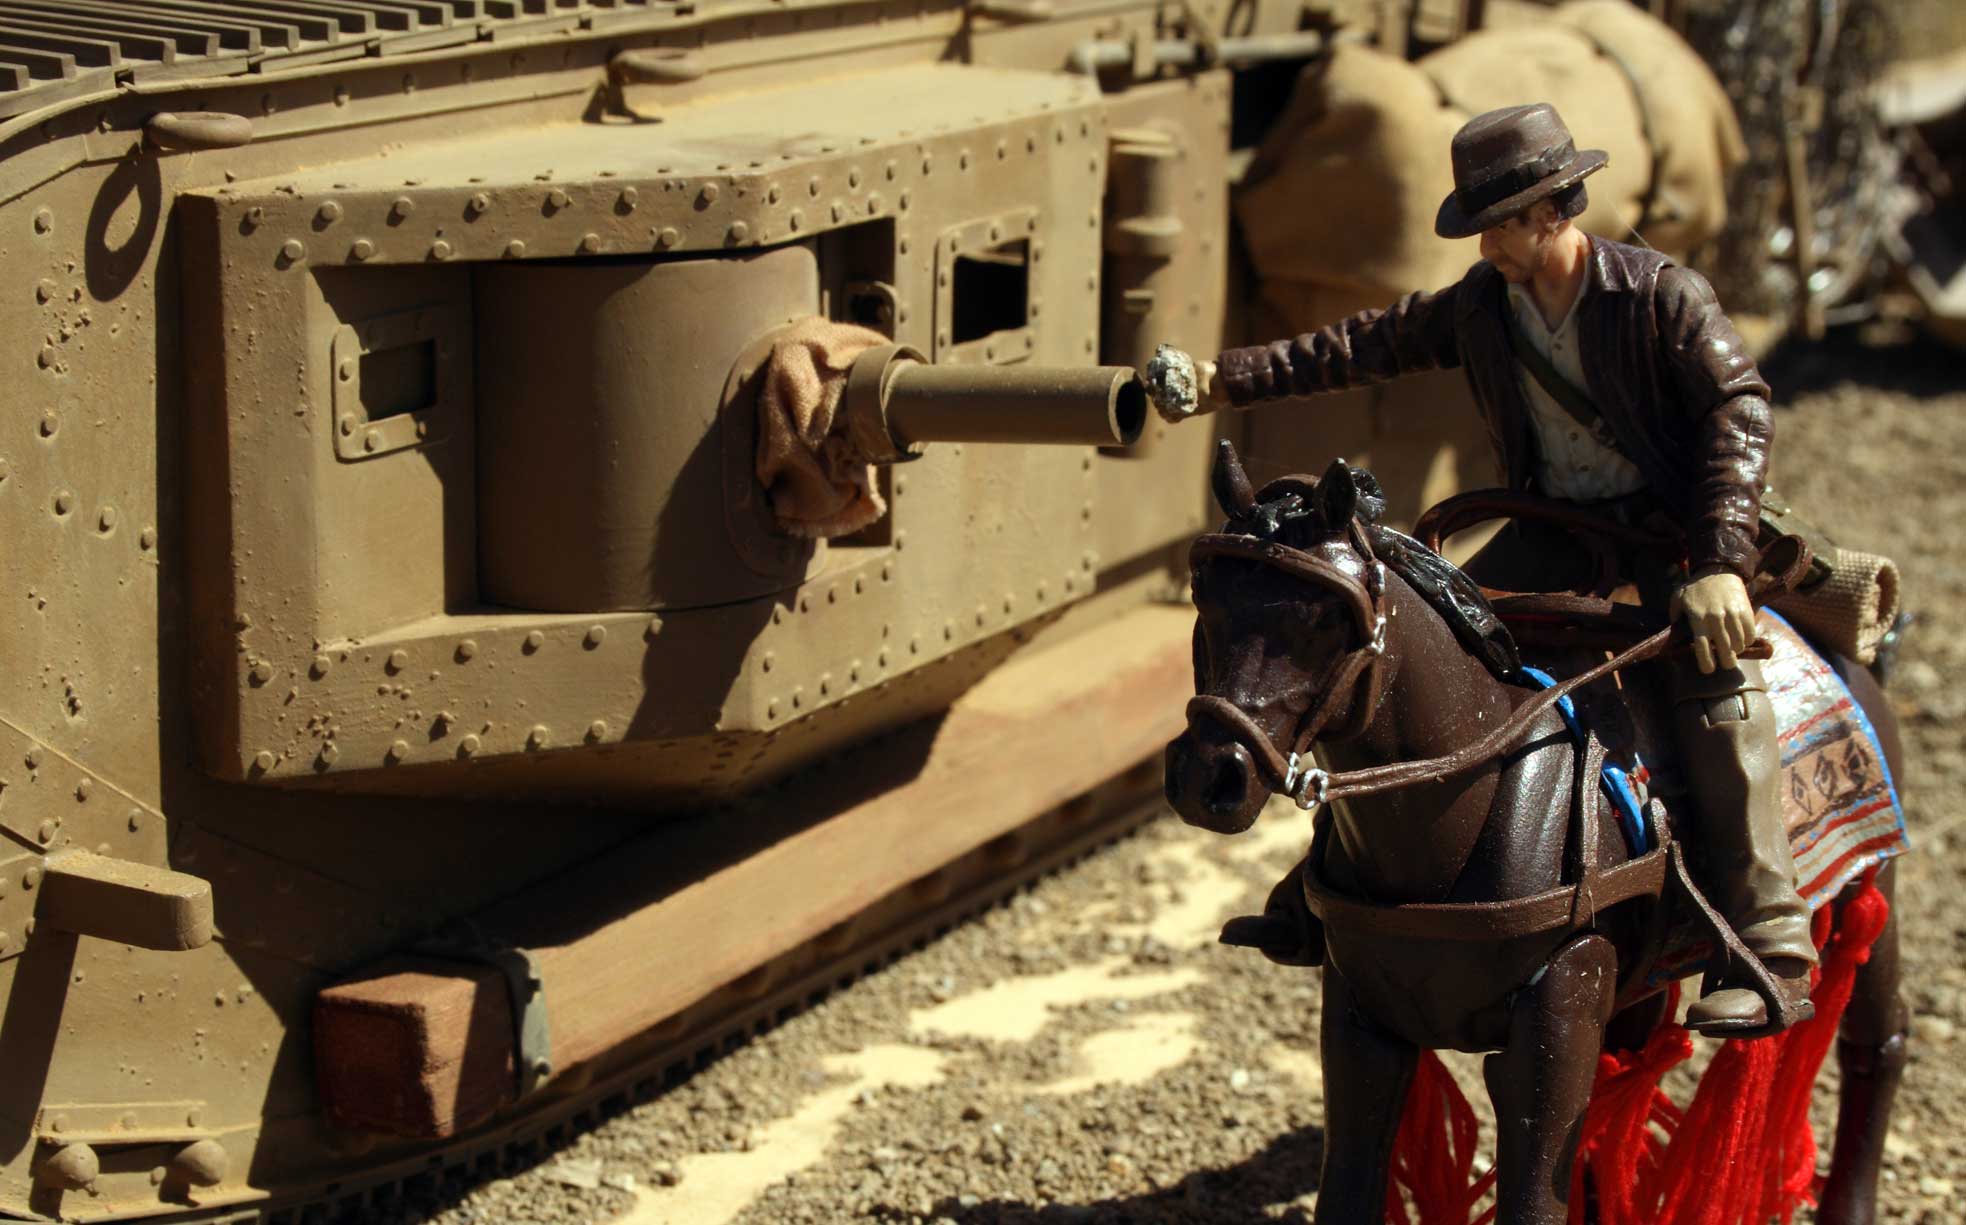
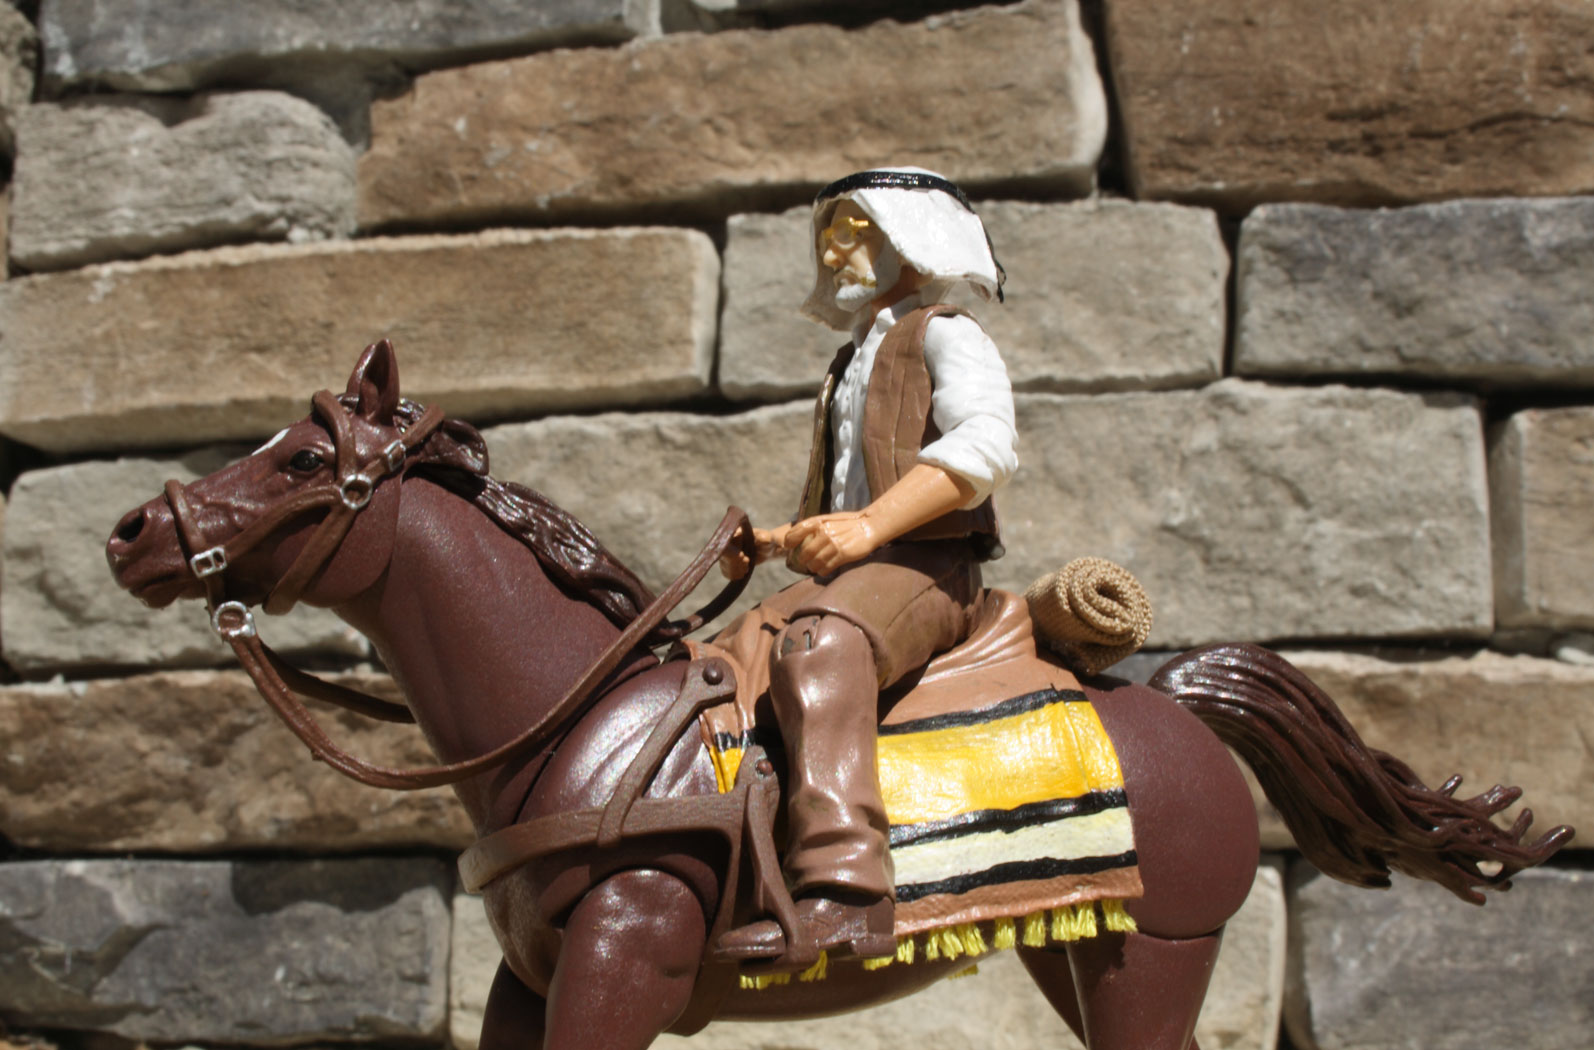
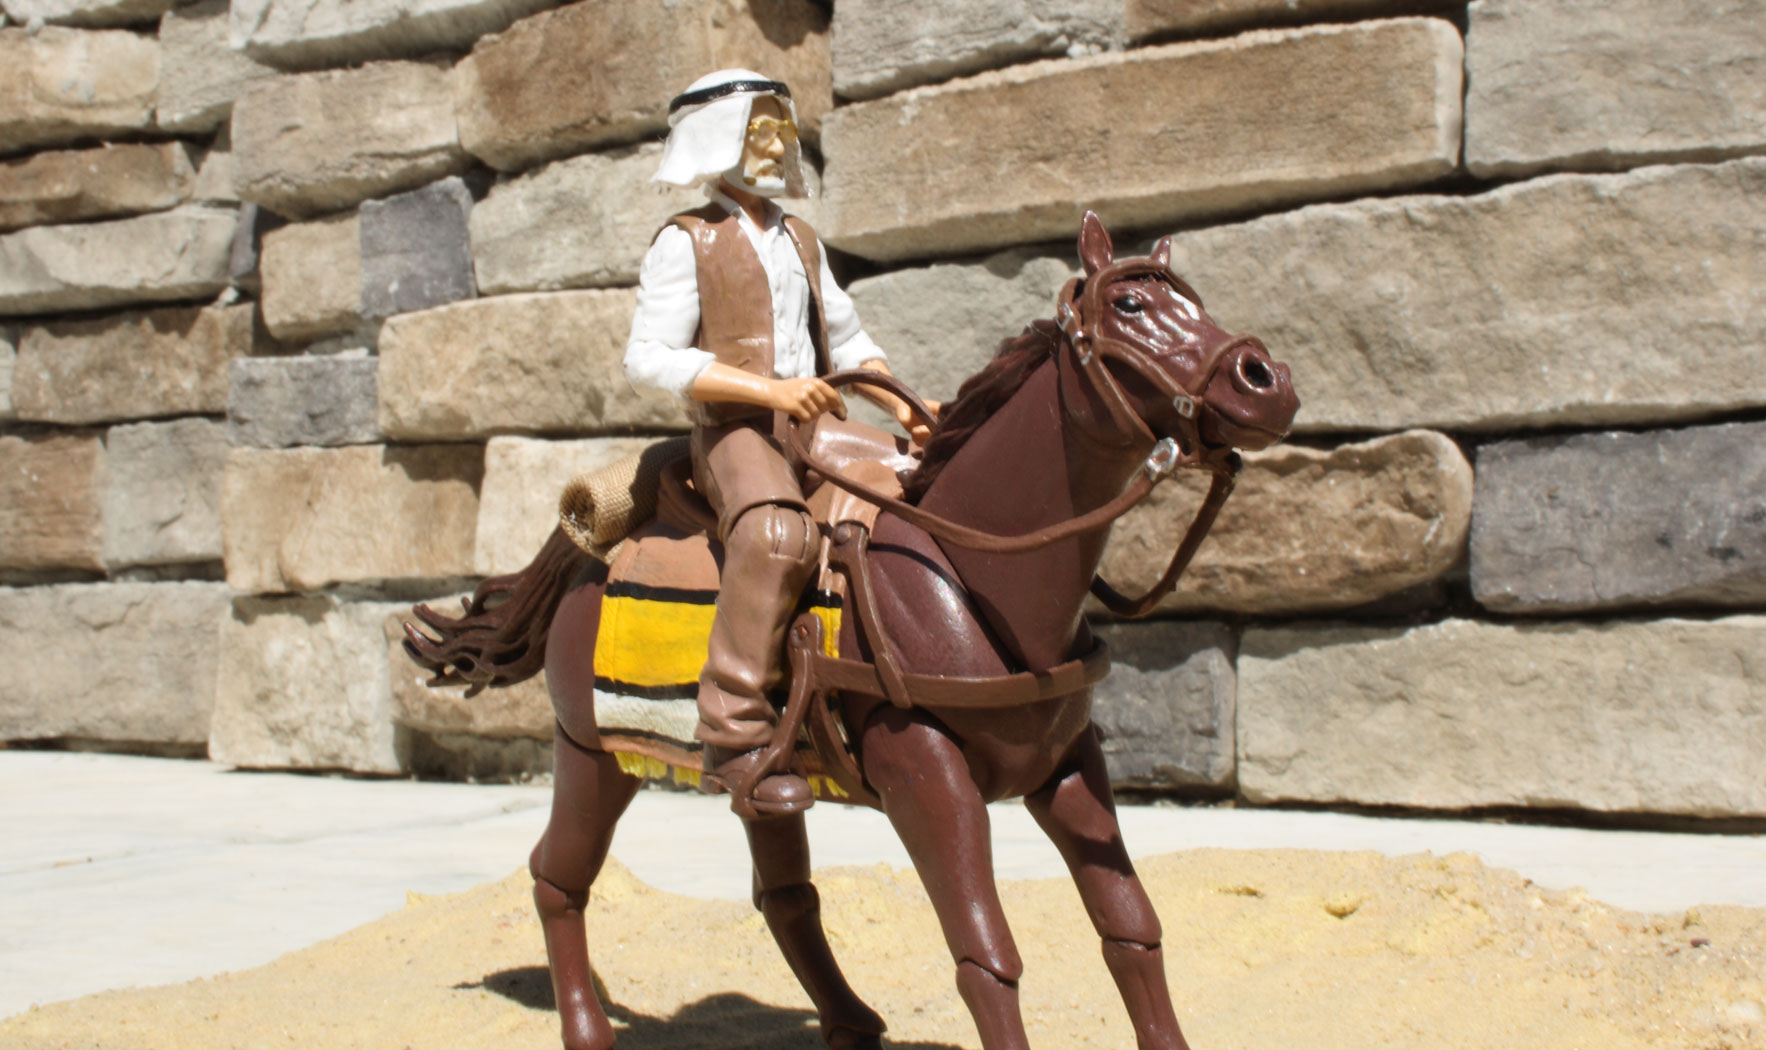
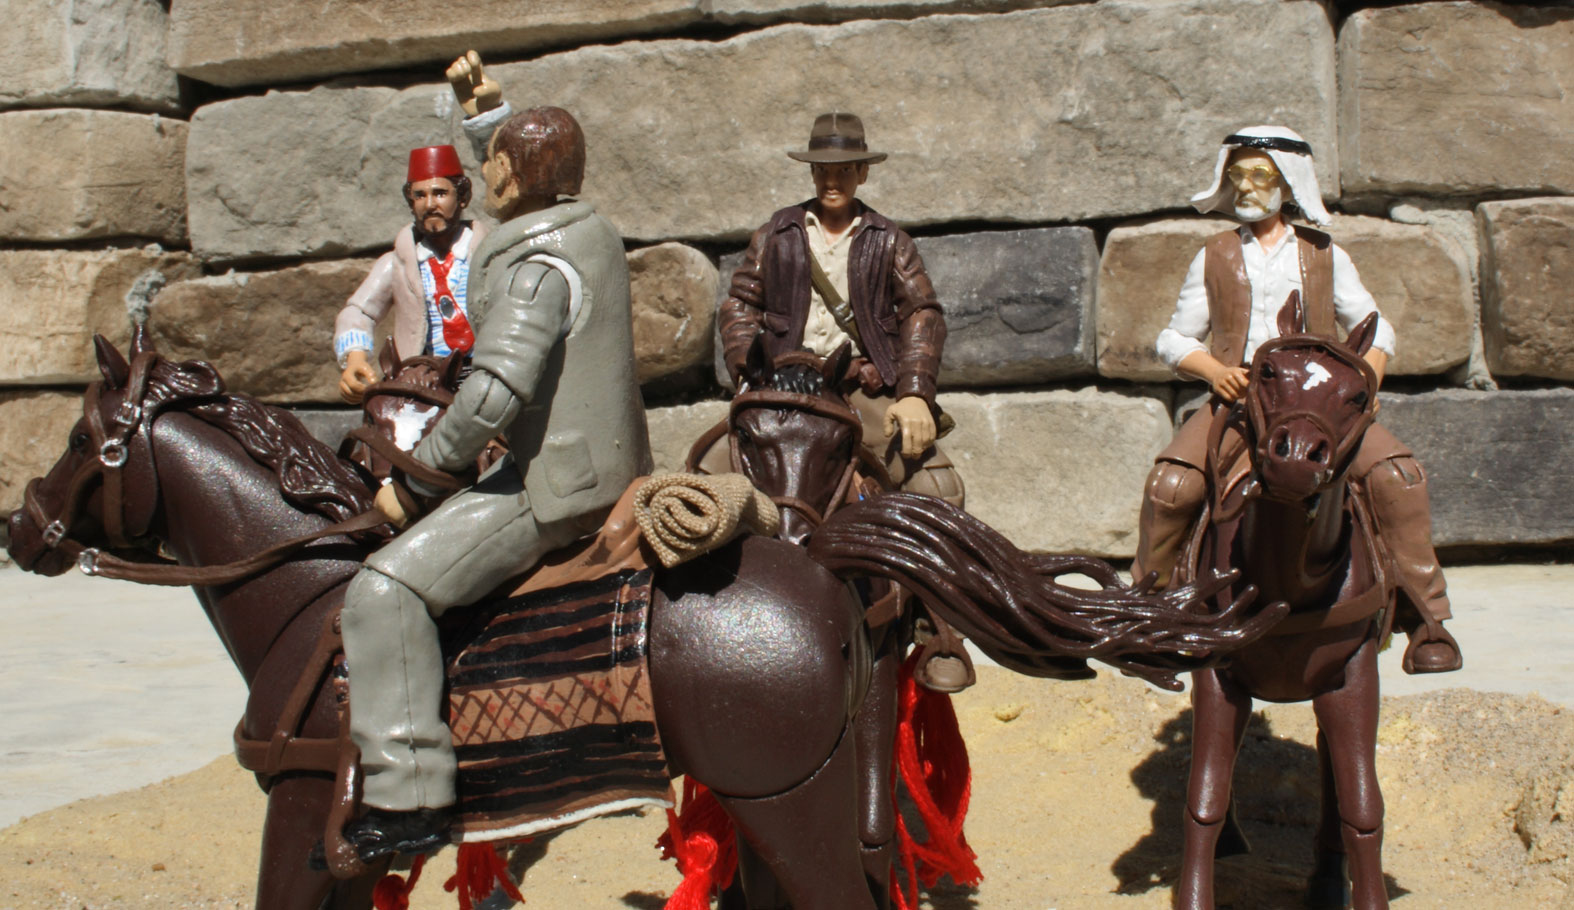 The four horsemen of Indiana Jones and the Last Crusade.
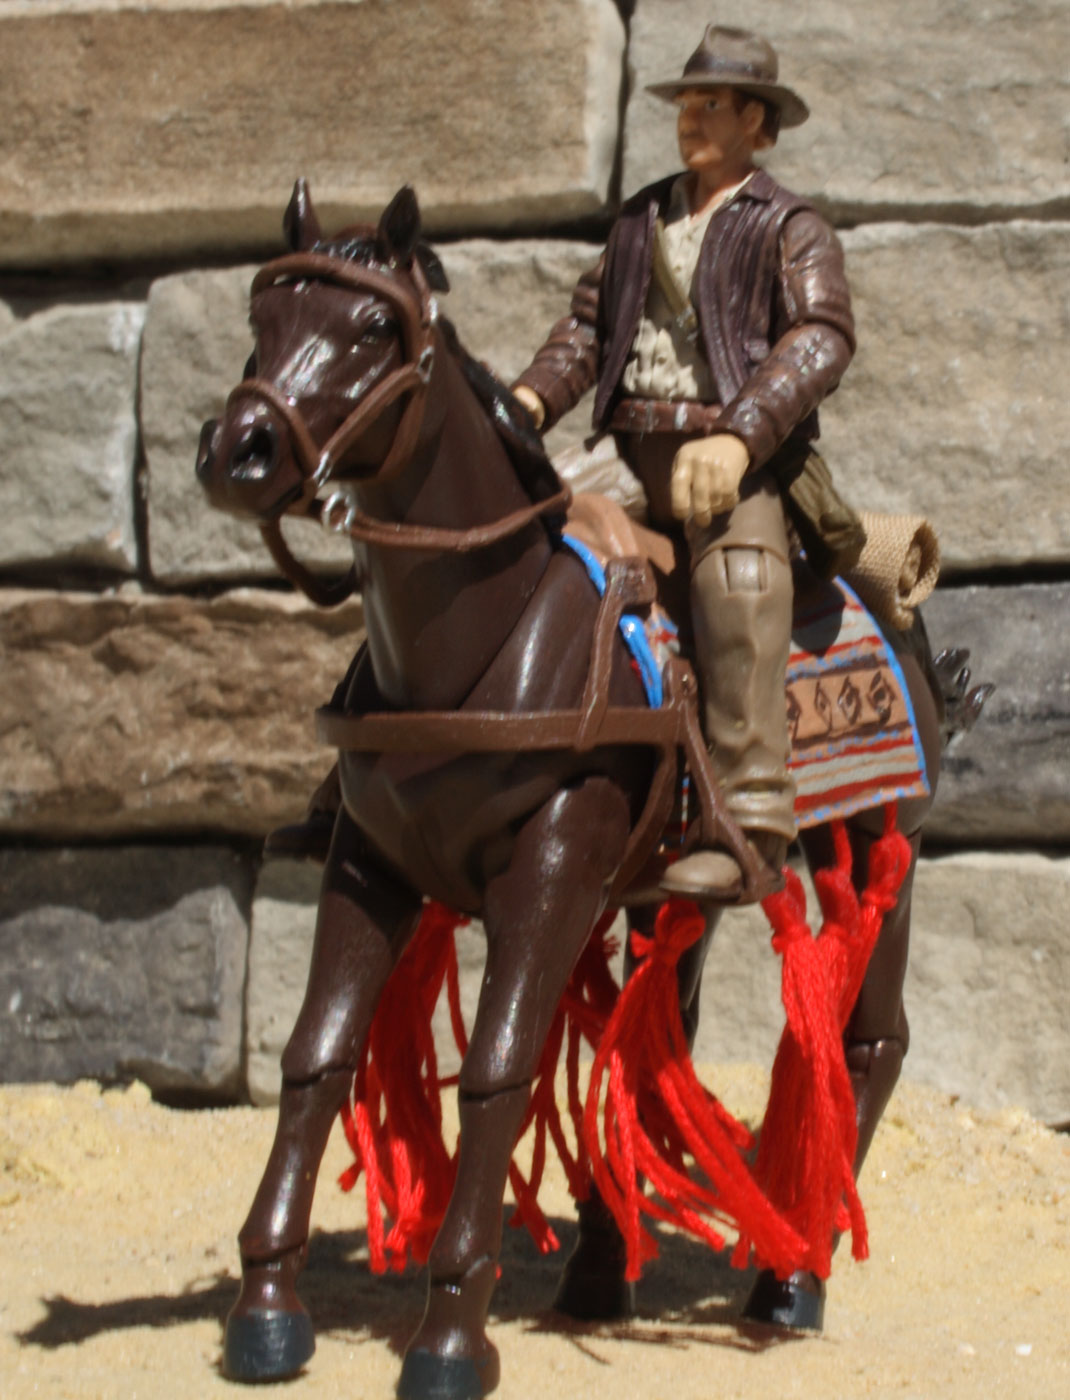
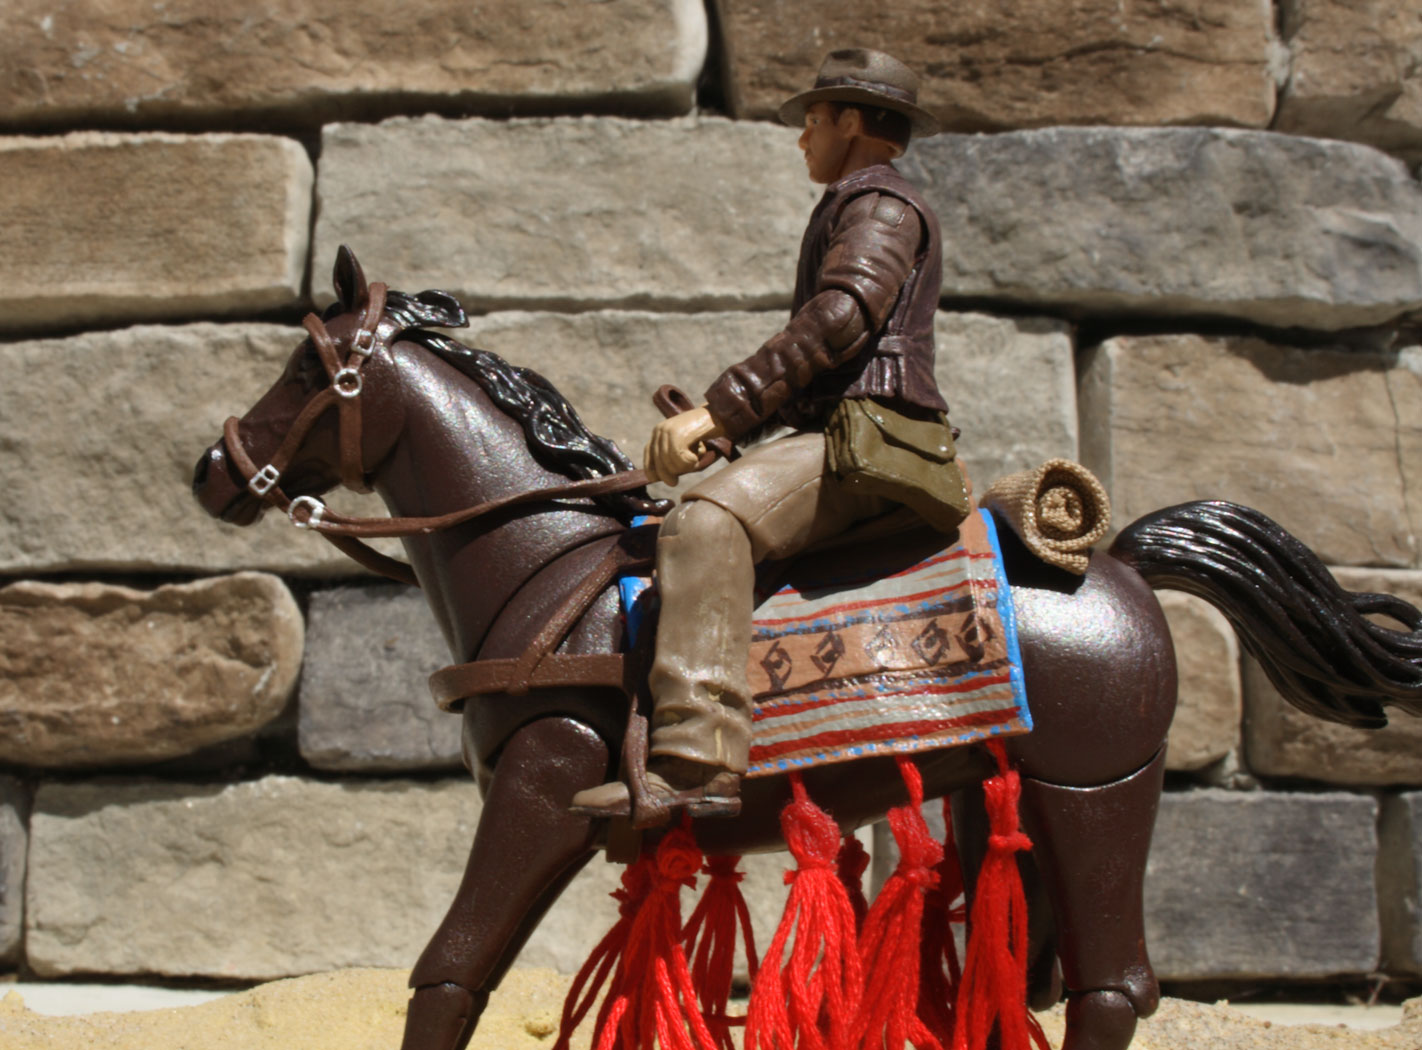
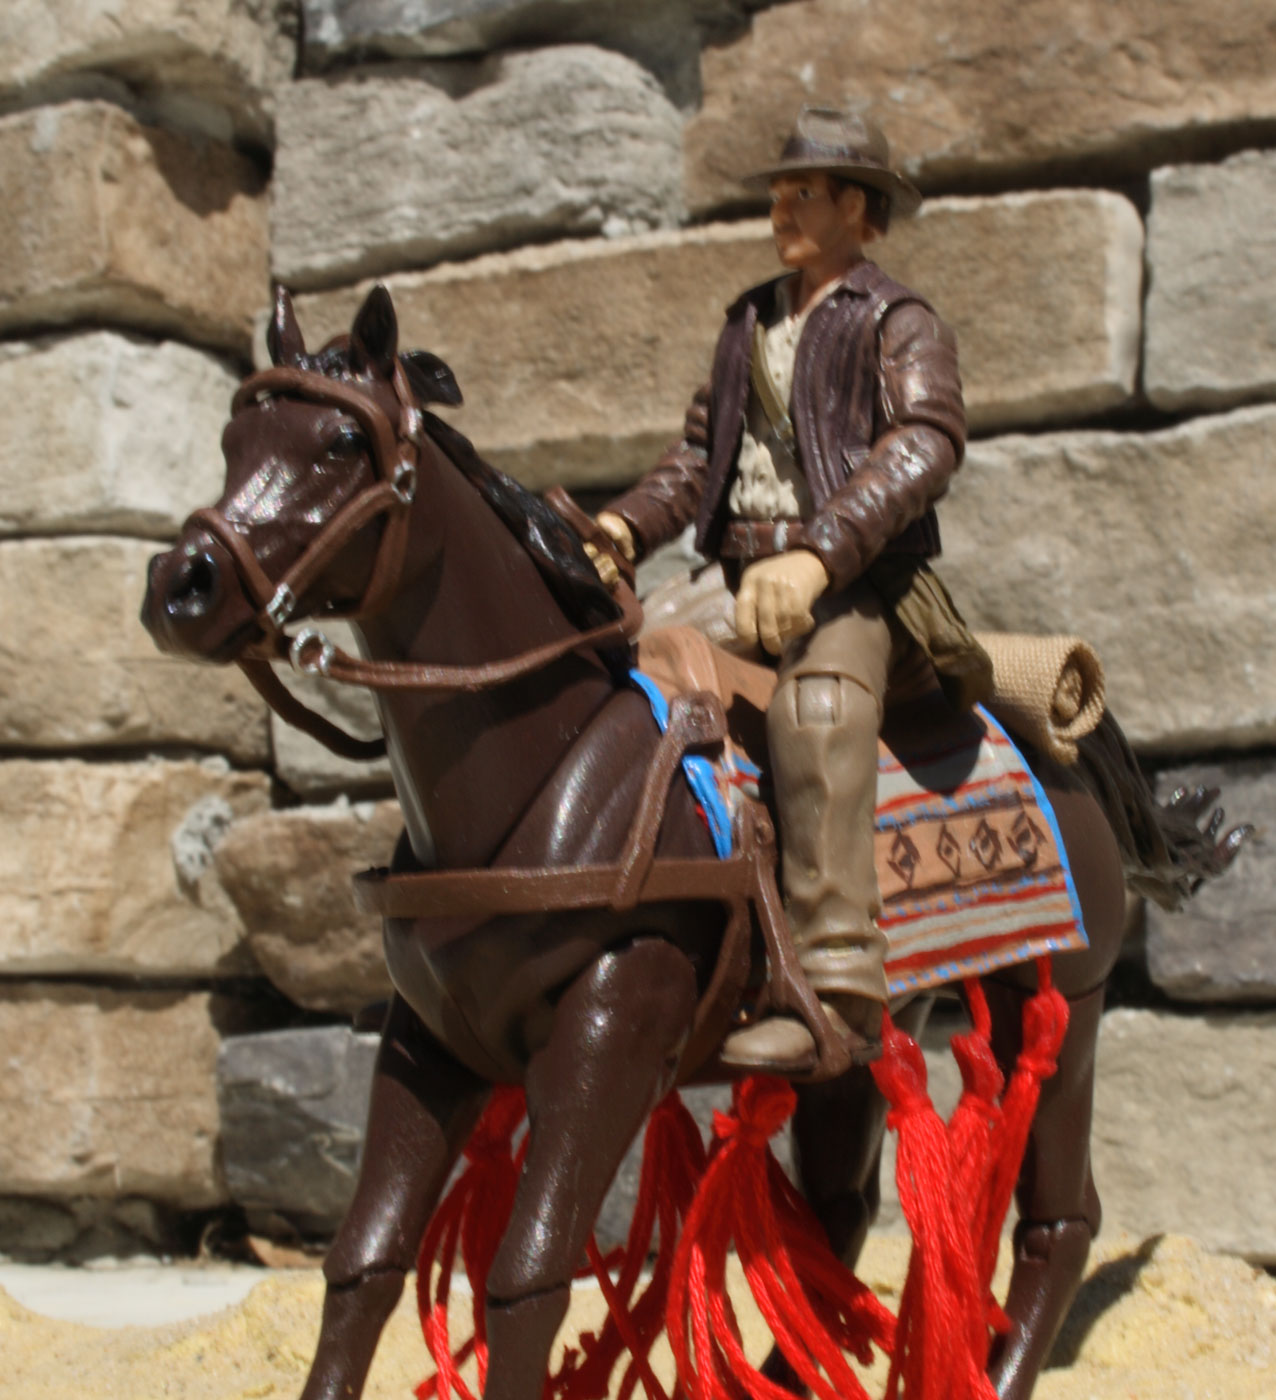 Standard Indy figure but the horse gets the royal tassel treatment.
 Dr. Henry Jones Sr.
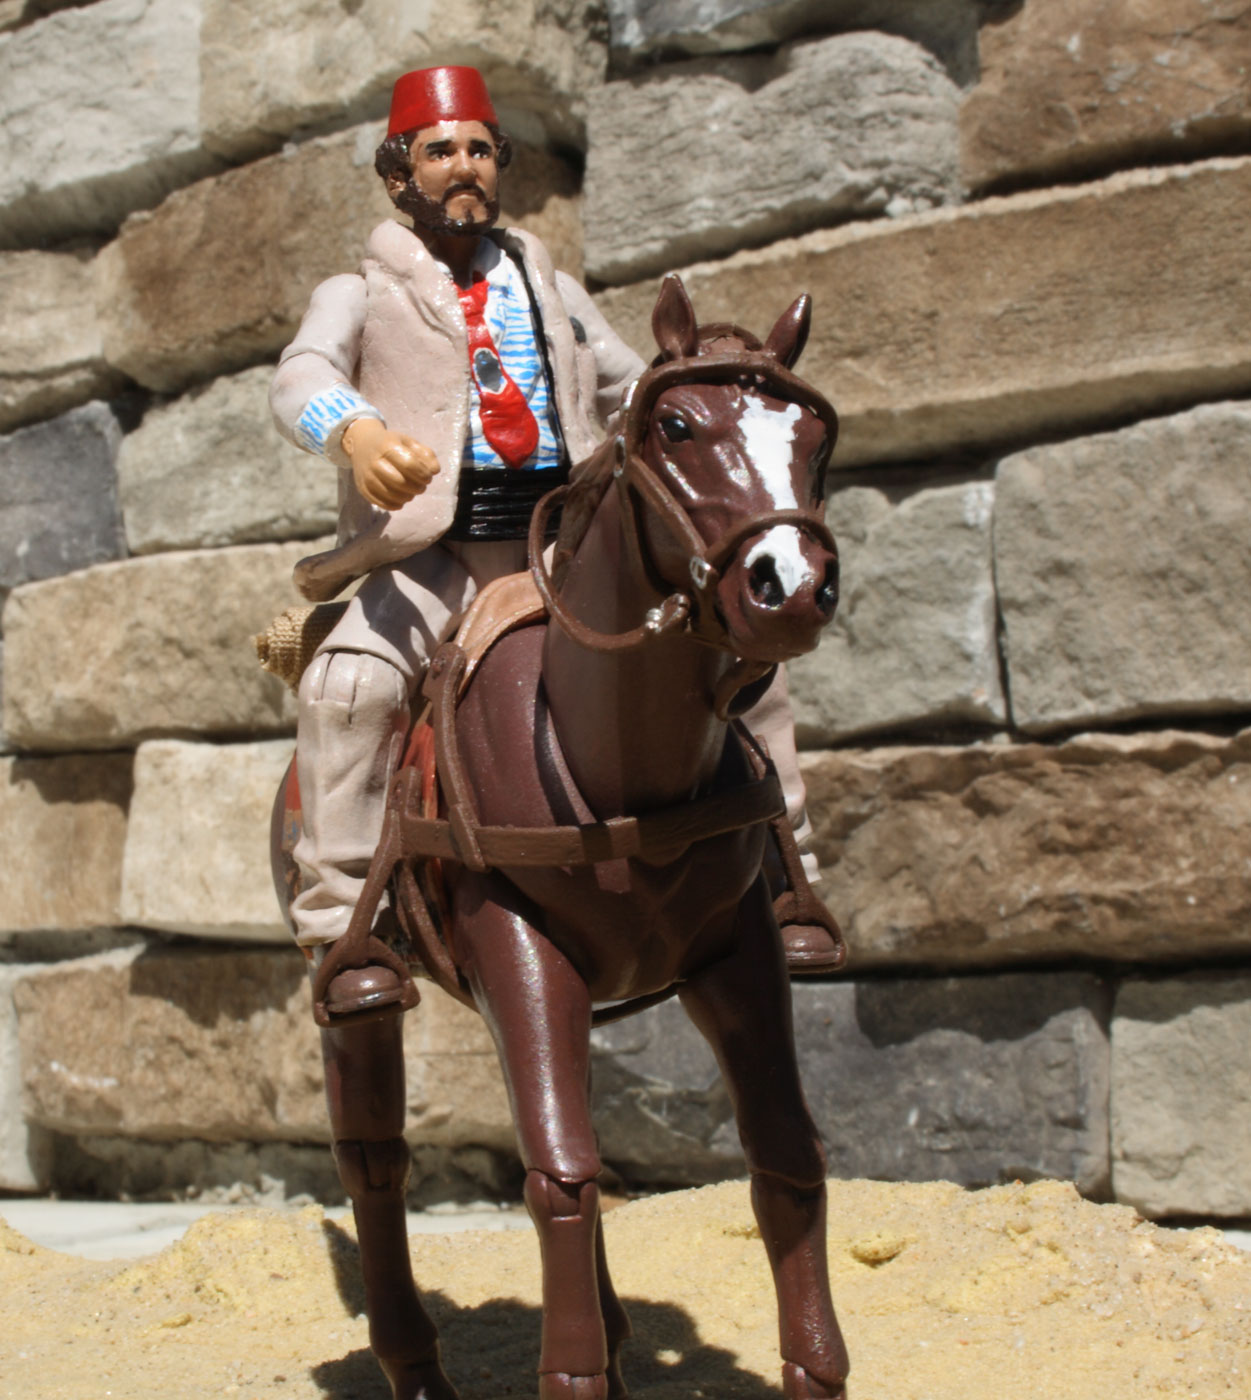
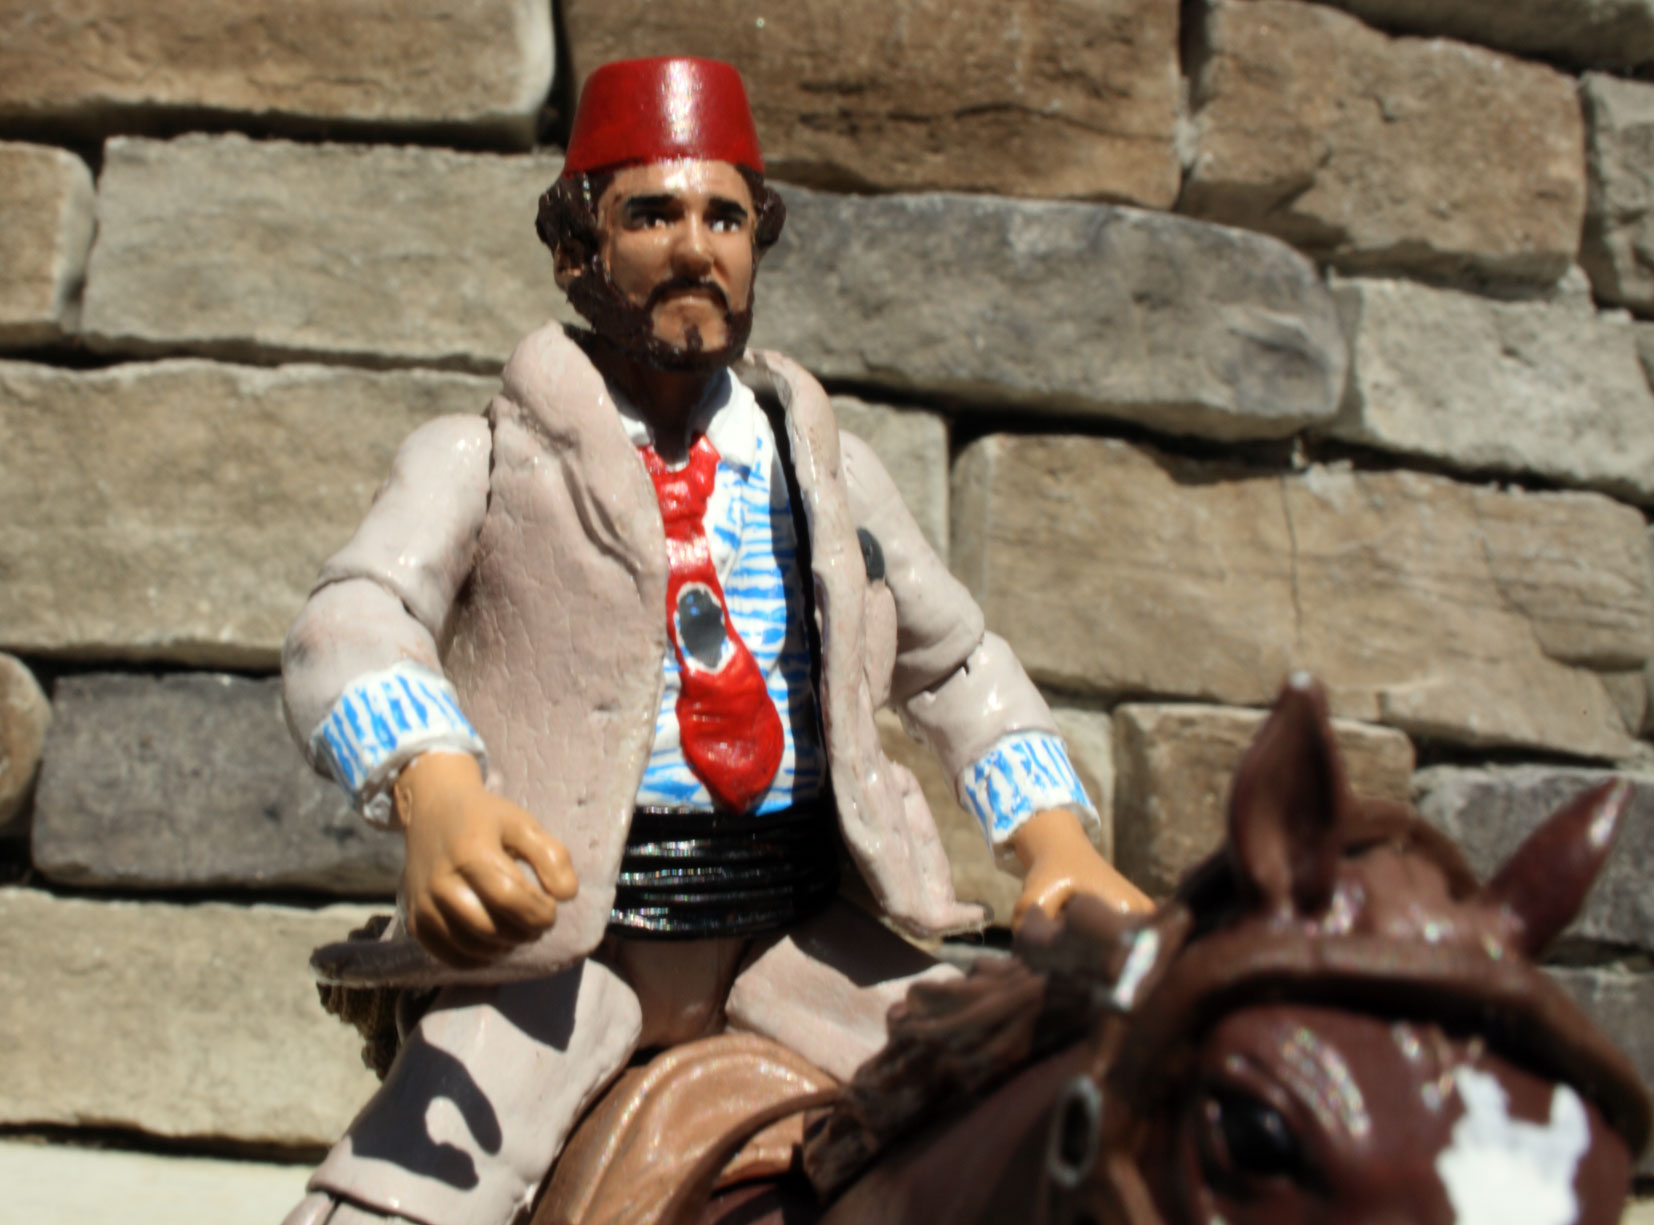
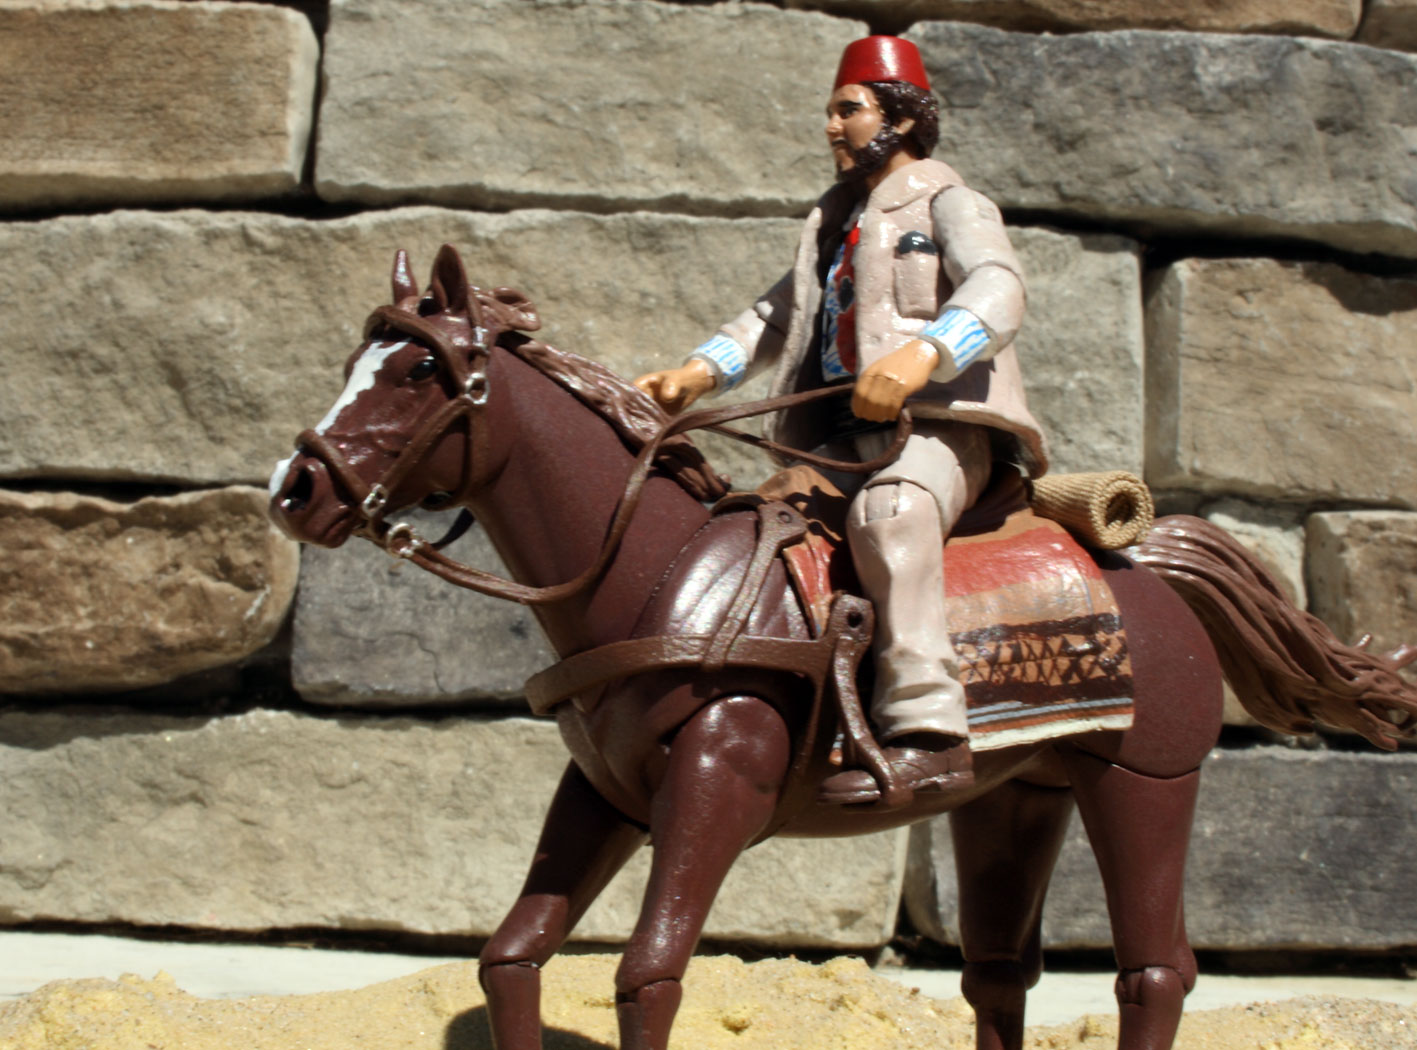 Sallah on horse, Last Crusade.
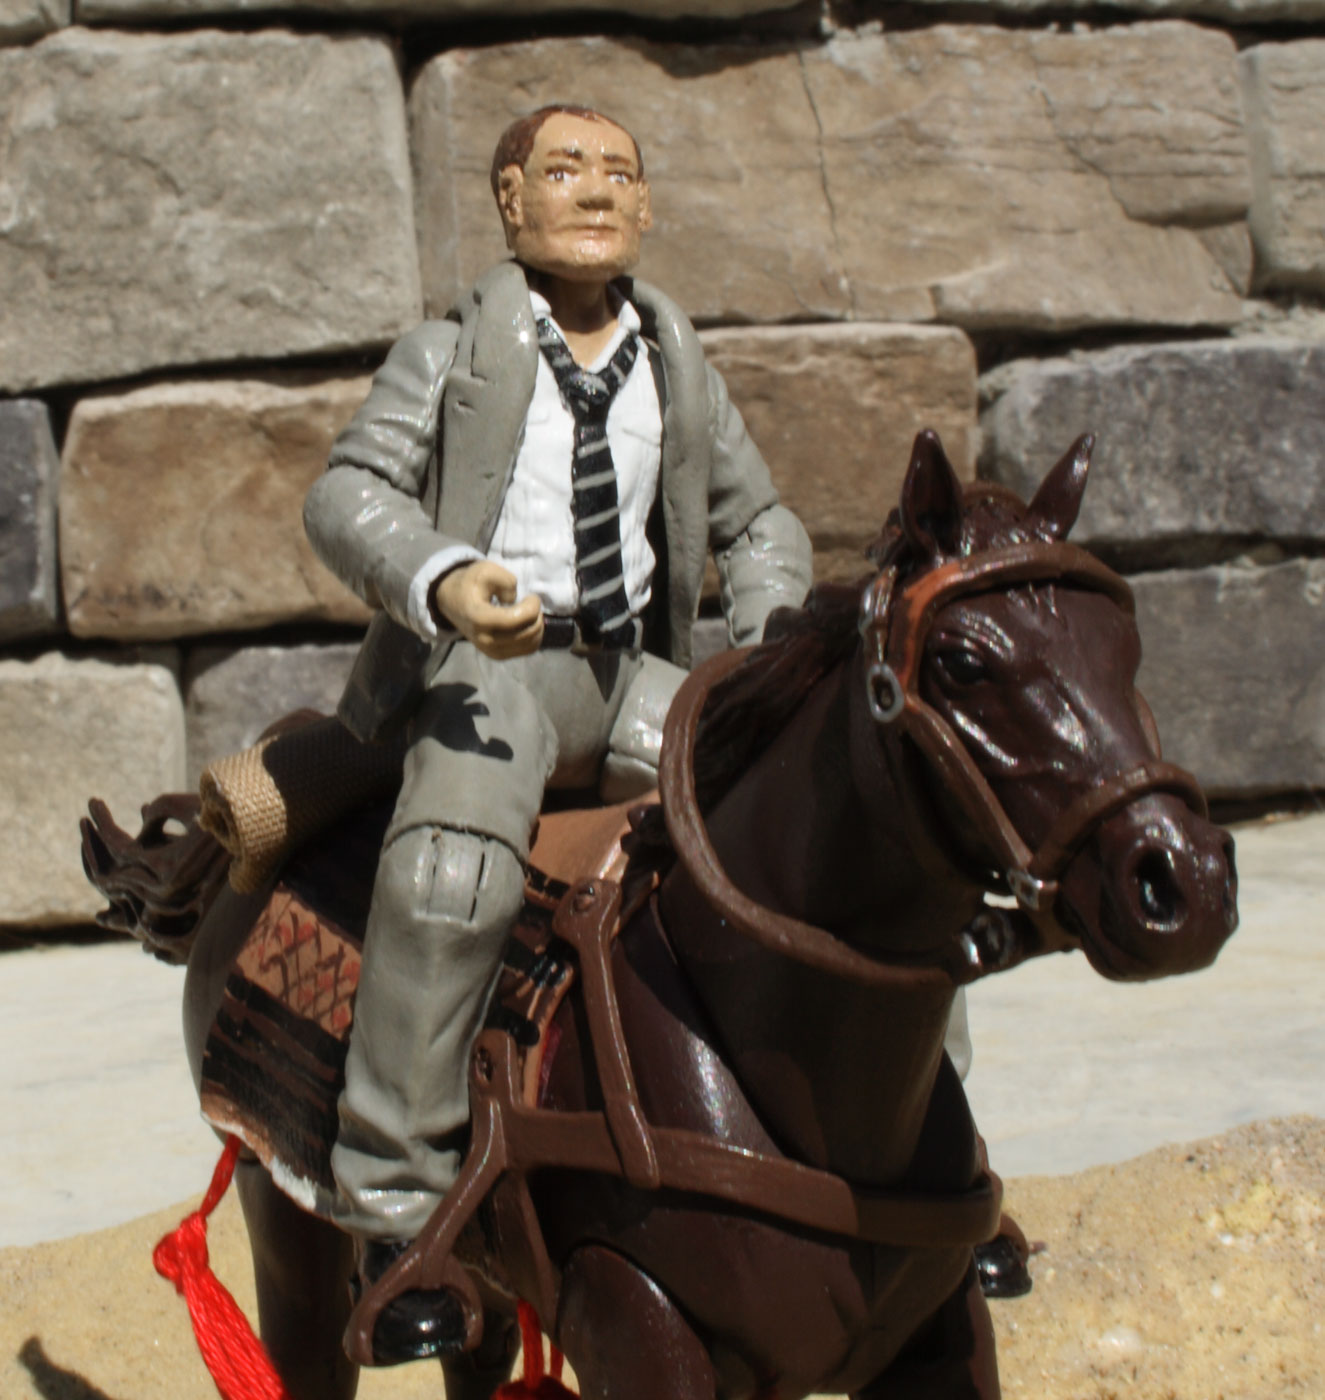
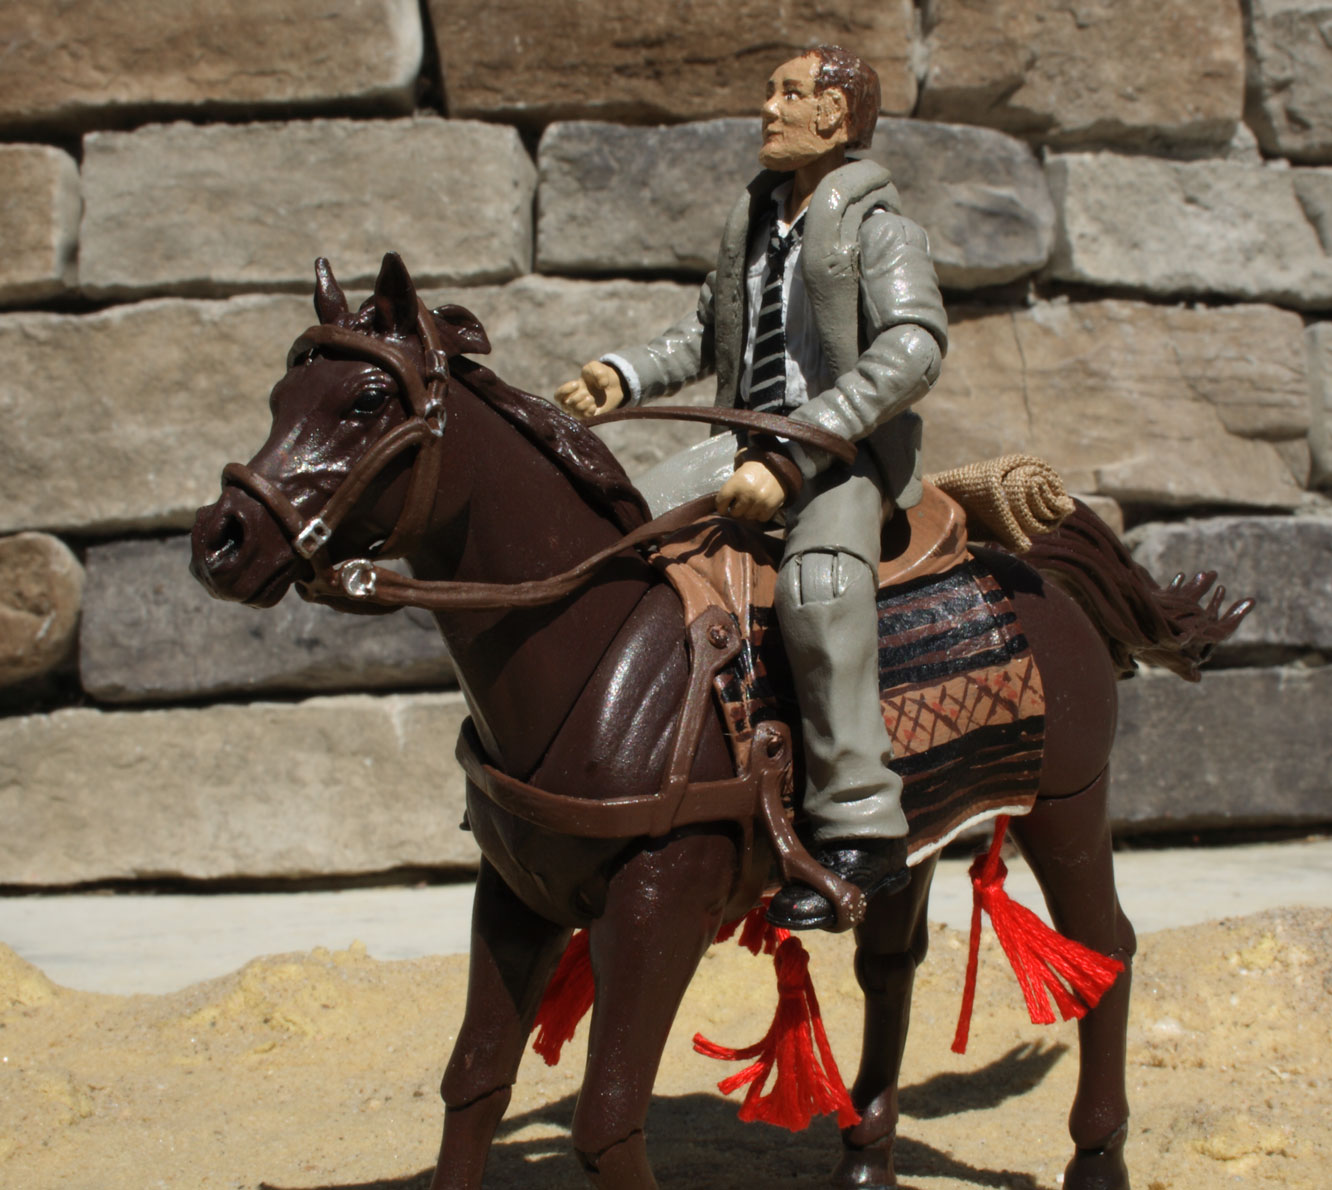
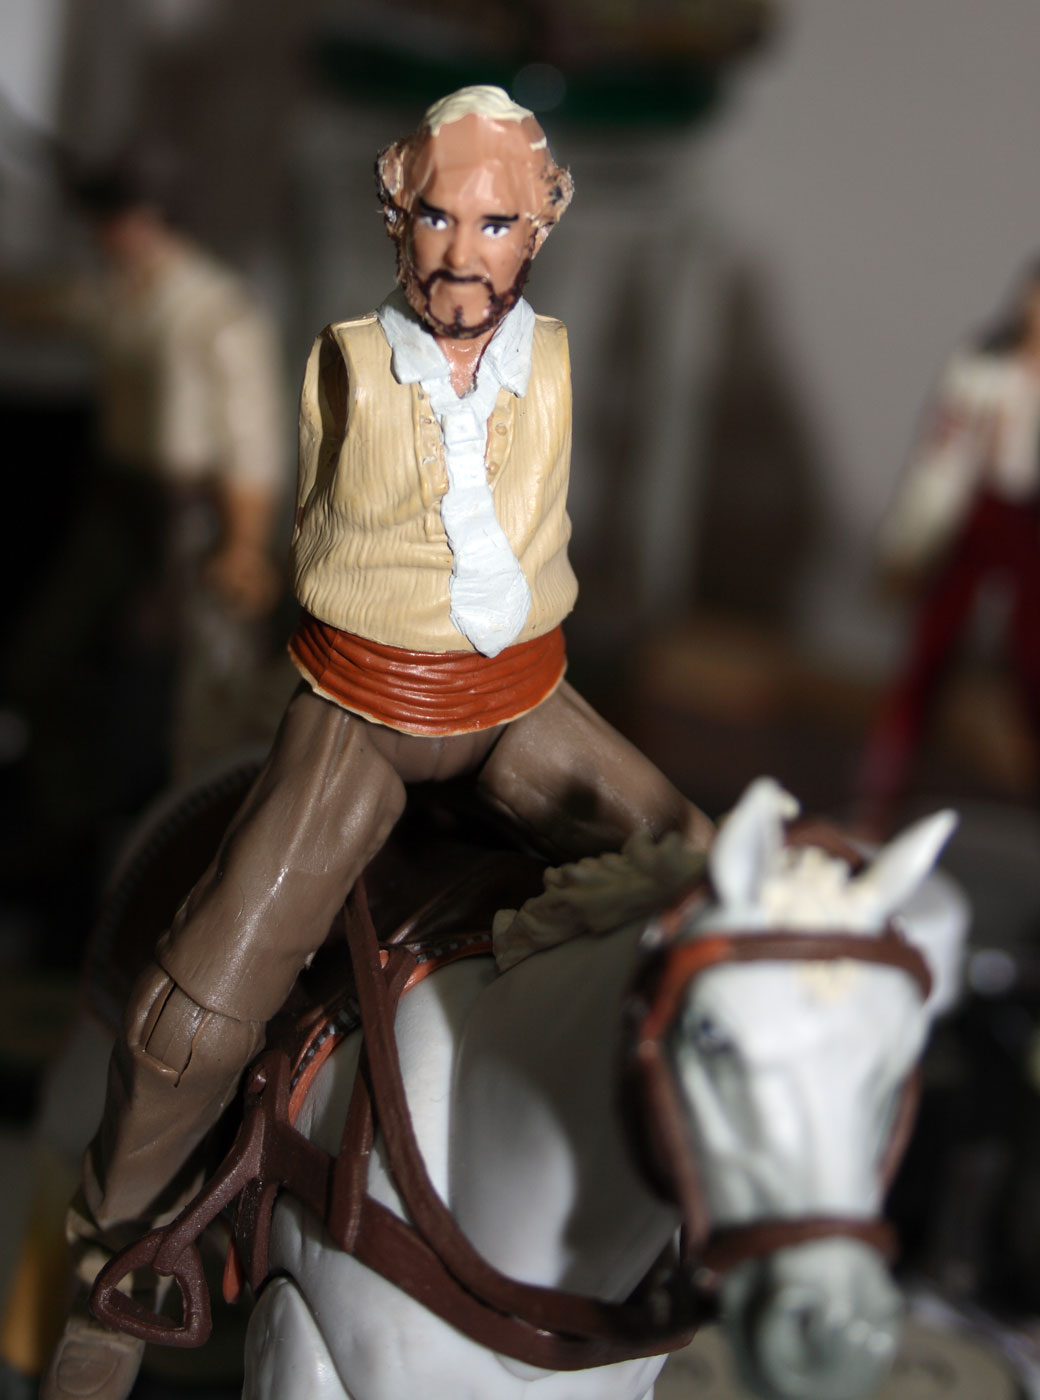
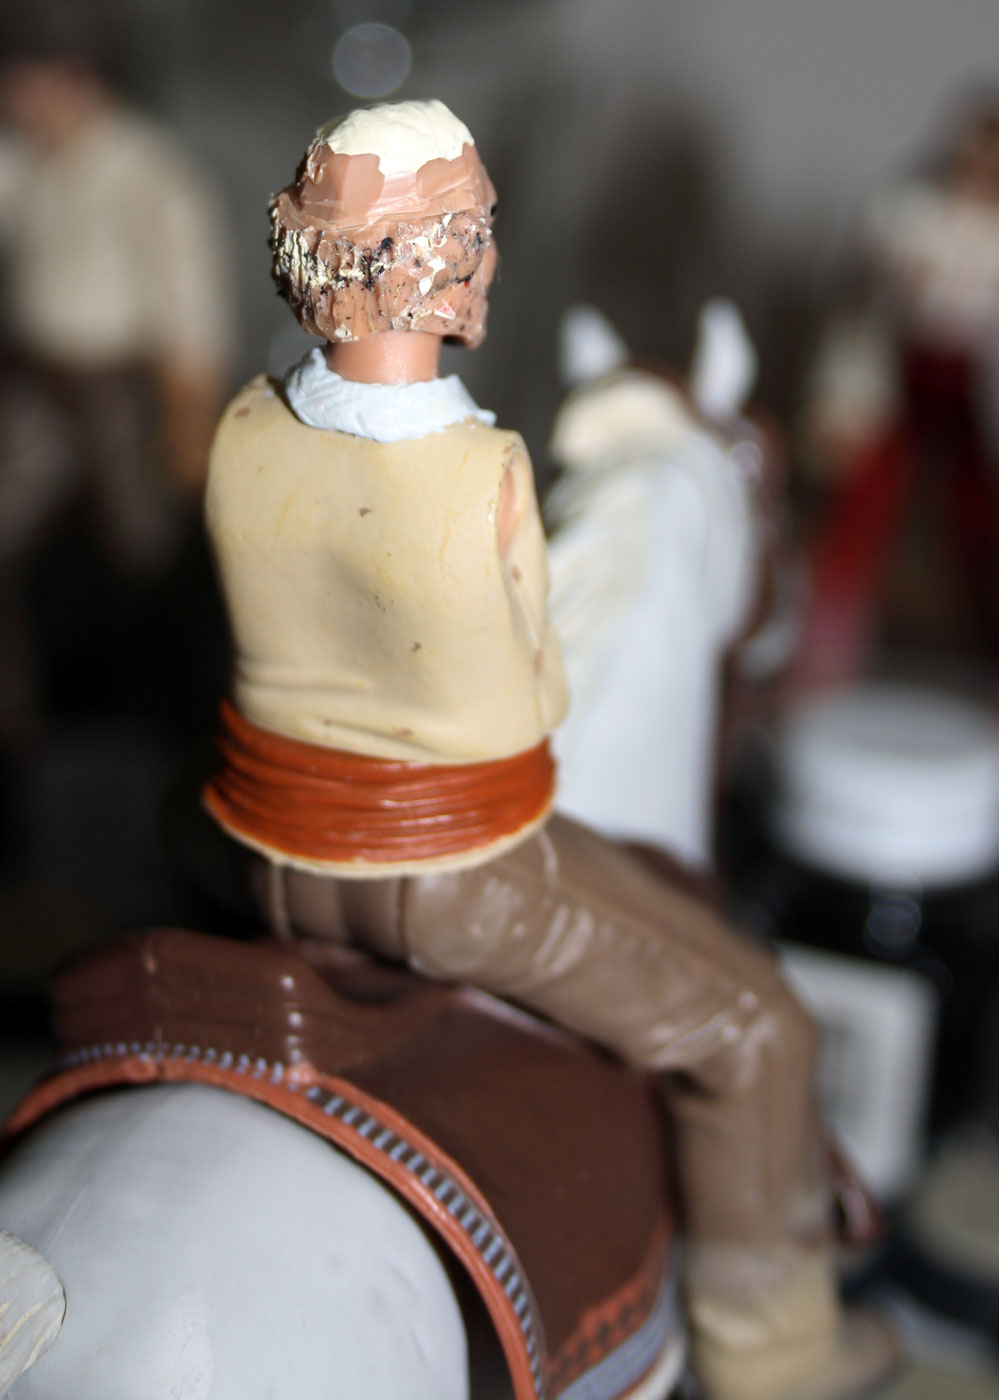
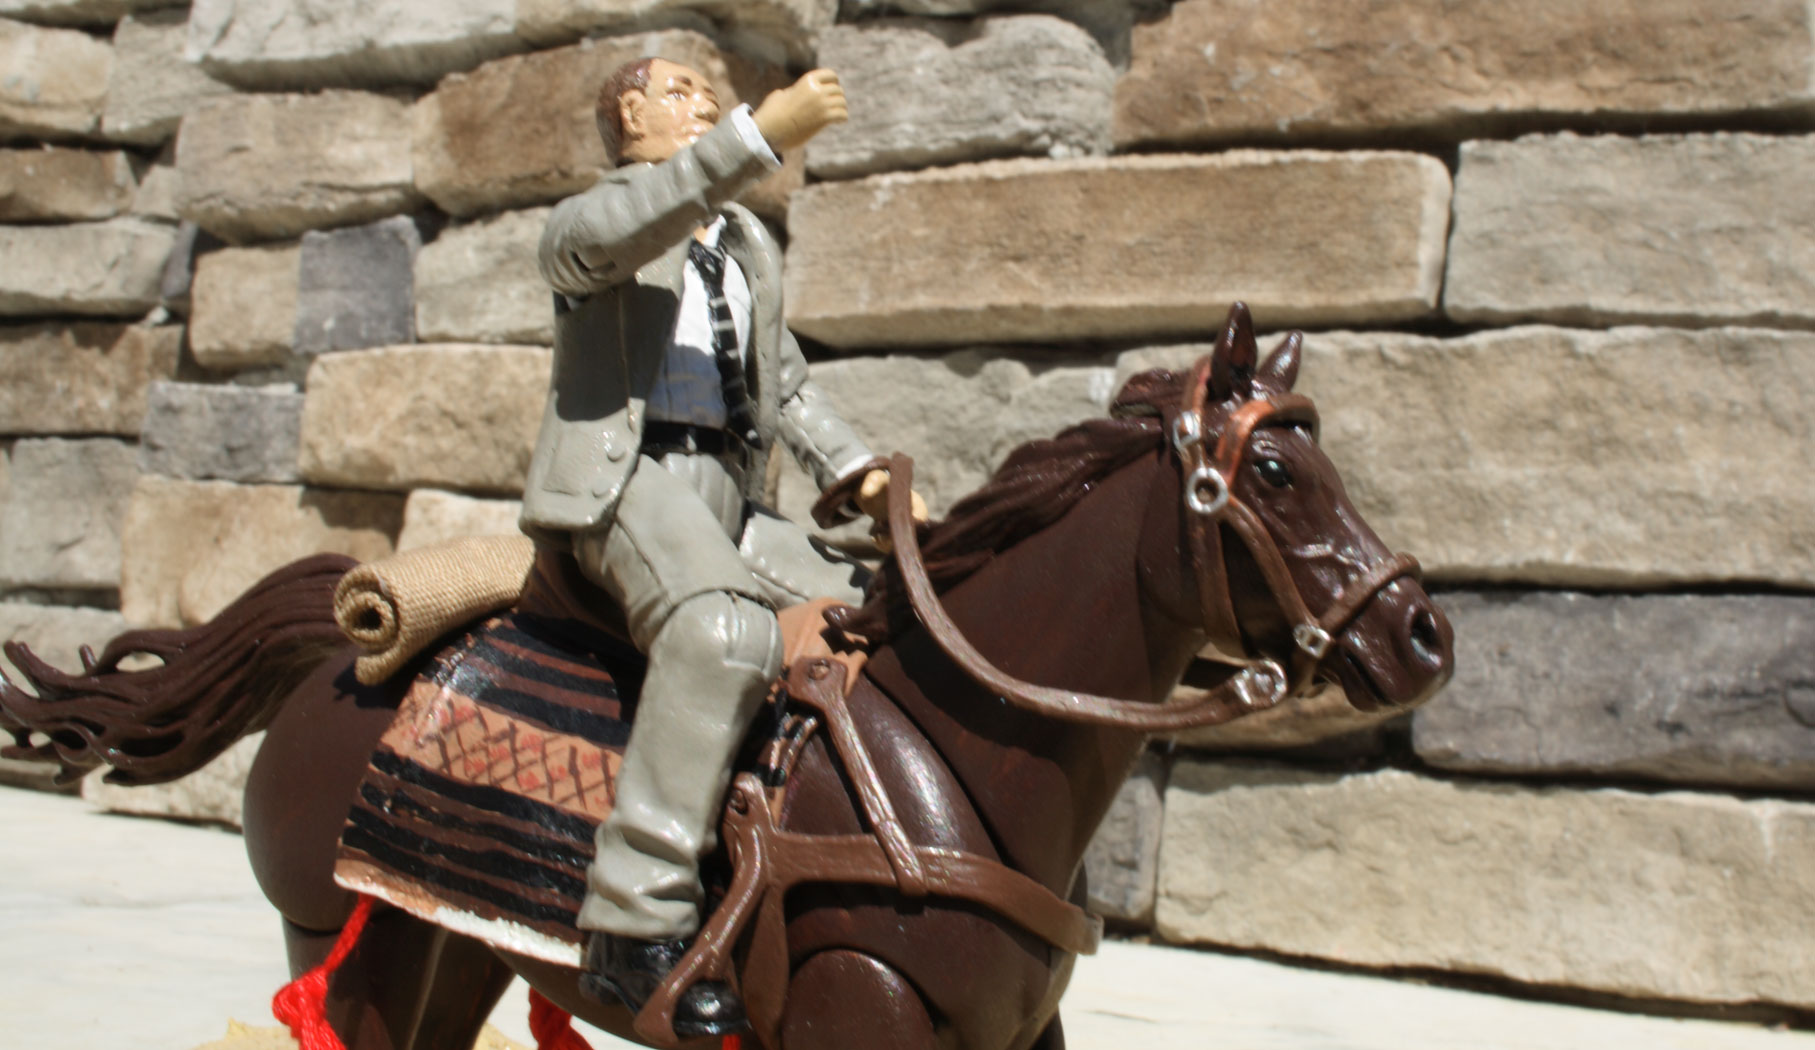 Marcus Brody on horse, Last Crusade.
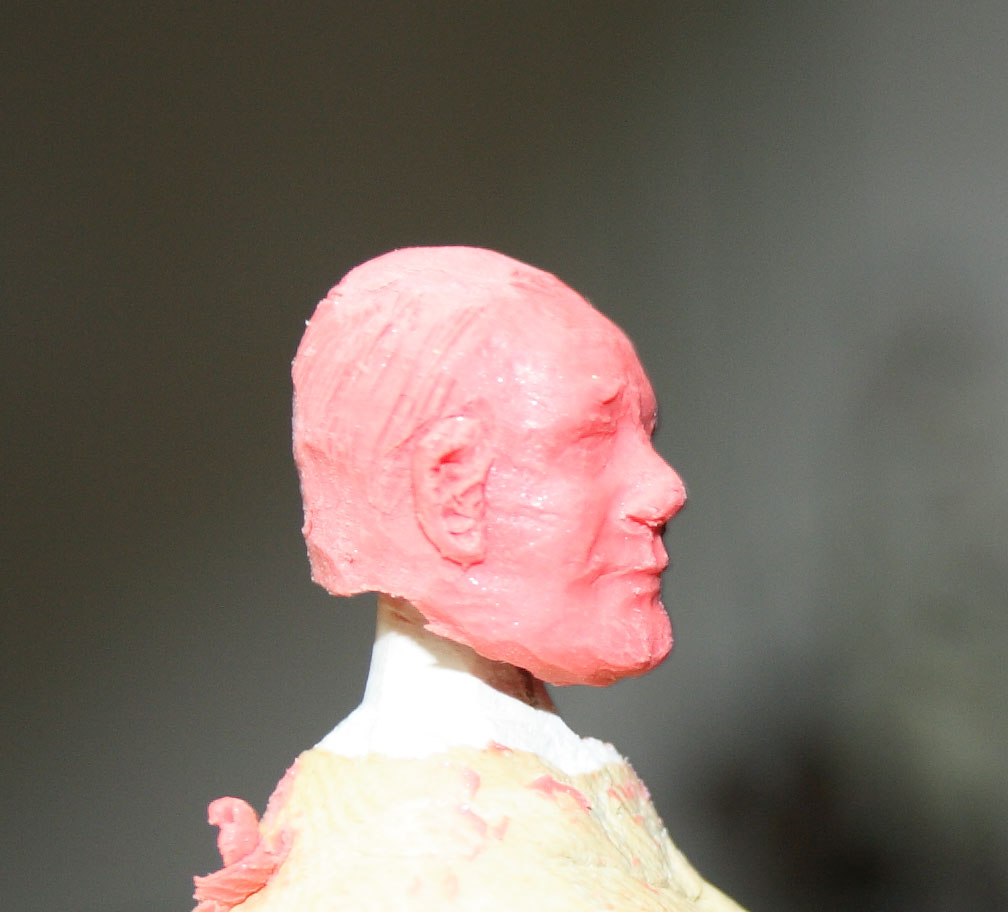 Building the Brody head. The face was cast from a Star Wars Malliki figure. The rest was sculpted. The procedure, for those wanting the gory details, went like this. First I made a neck stand out of epoxy putty. Then I covered the neck with a thin layer of Super Sculpey and pock-marked the surface so the next layer would have something to fix to. This was then baked. Then I got my Star Wars Malliki figure, also known as a rancor keeper, and removed the head covering. Using a blob of epoxy putty, and a little baby oil brushed onto the face so the putty would not stick, I made a cast. The next stage was to cover the 'blank head' with more Super Sculpey and get a positive head cast from the negative mold. Then carefully sculpt the rest of the head and hair. Ears were made separately and glued on after baking. Trim, fix and paint!
![]() Sallah was a little more straightforward. Collar and tie from epoxy putty. Head trimmed with careful craft knife work. Hair and beard textured by using a hot wire. Fez from epoxy putty again. The jacket was made from Super Sculpey.
Sallah was a little more straightforward. Collar and tie from epoxy putty. Head trimmed with careful craft knife work. Hair and beard textured by using a hot wire. Fez from epoxy putty again. The jacket was made from Super Sculpey.

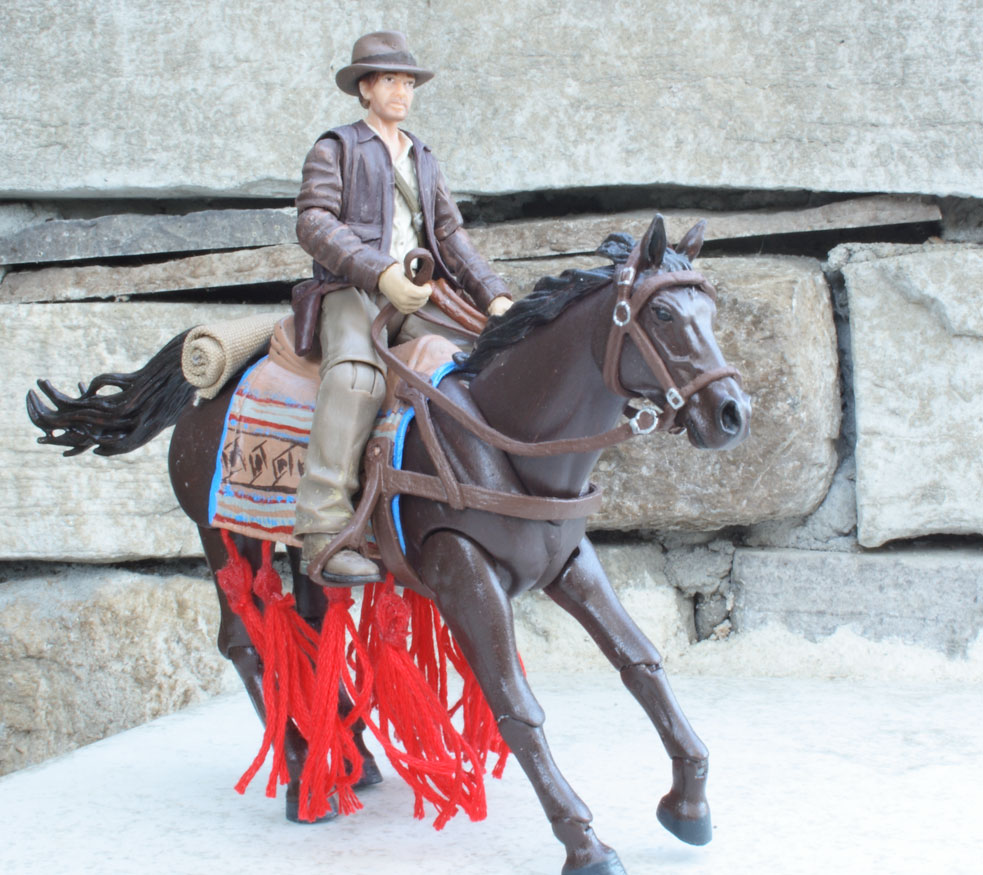 Horse man Indy with a re-built hat.
 I repainted Marion. Now I need to reduce the shine!
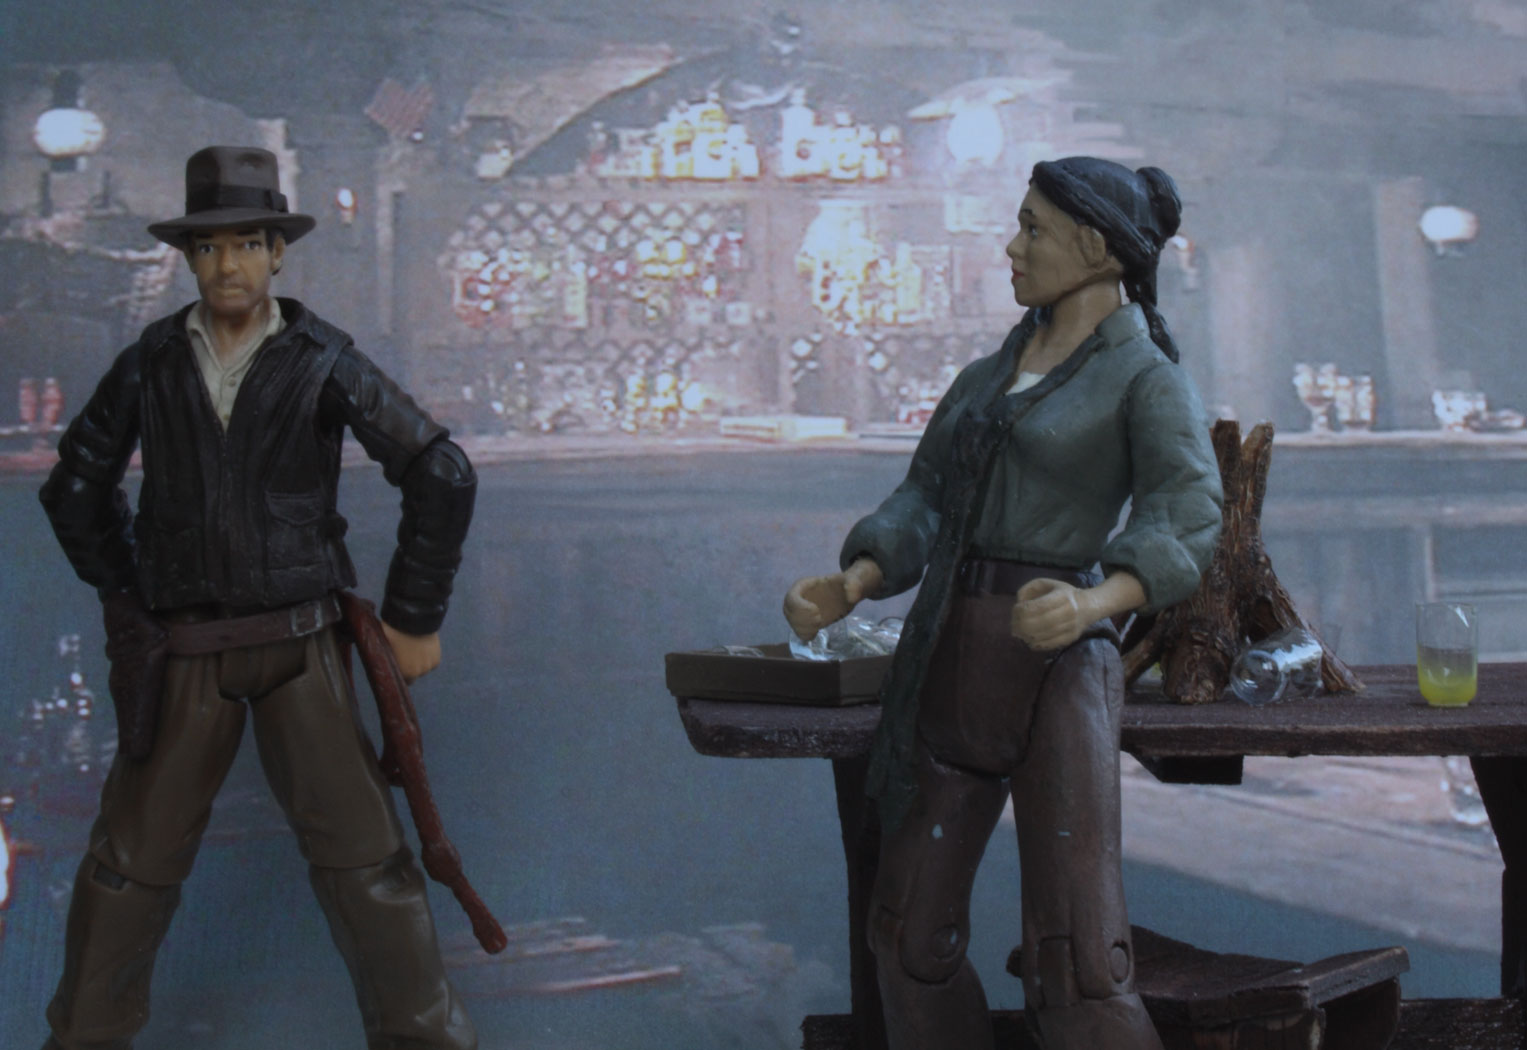
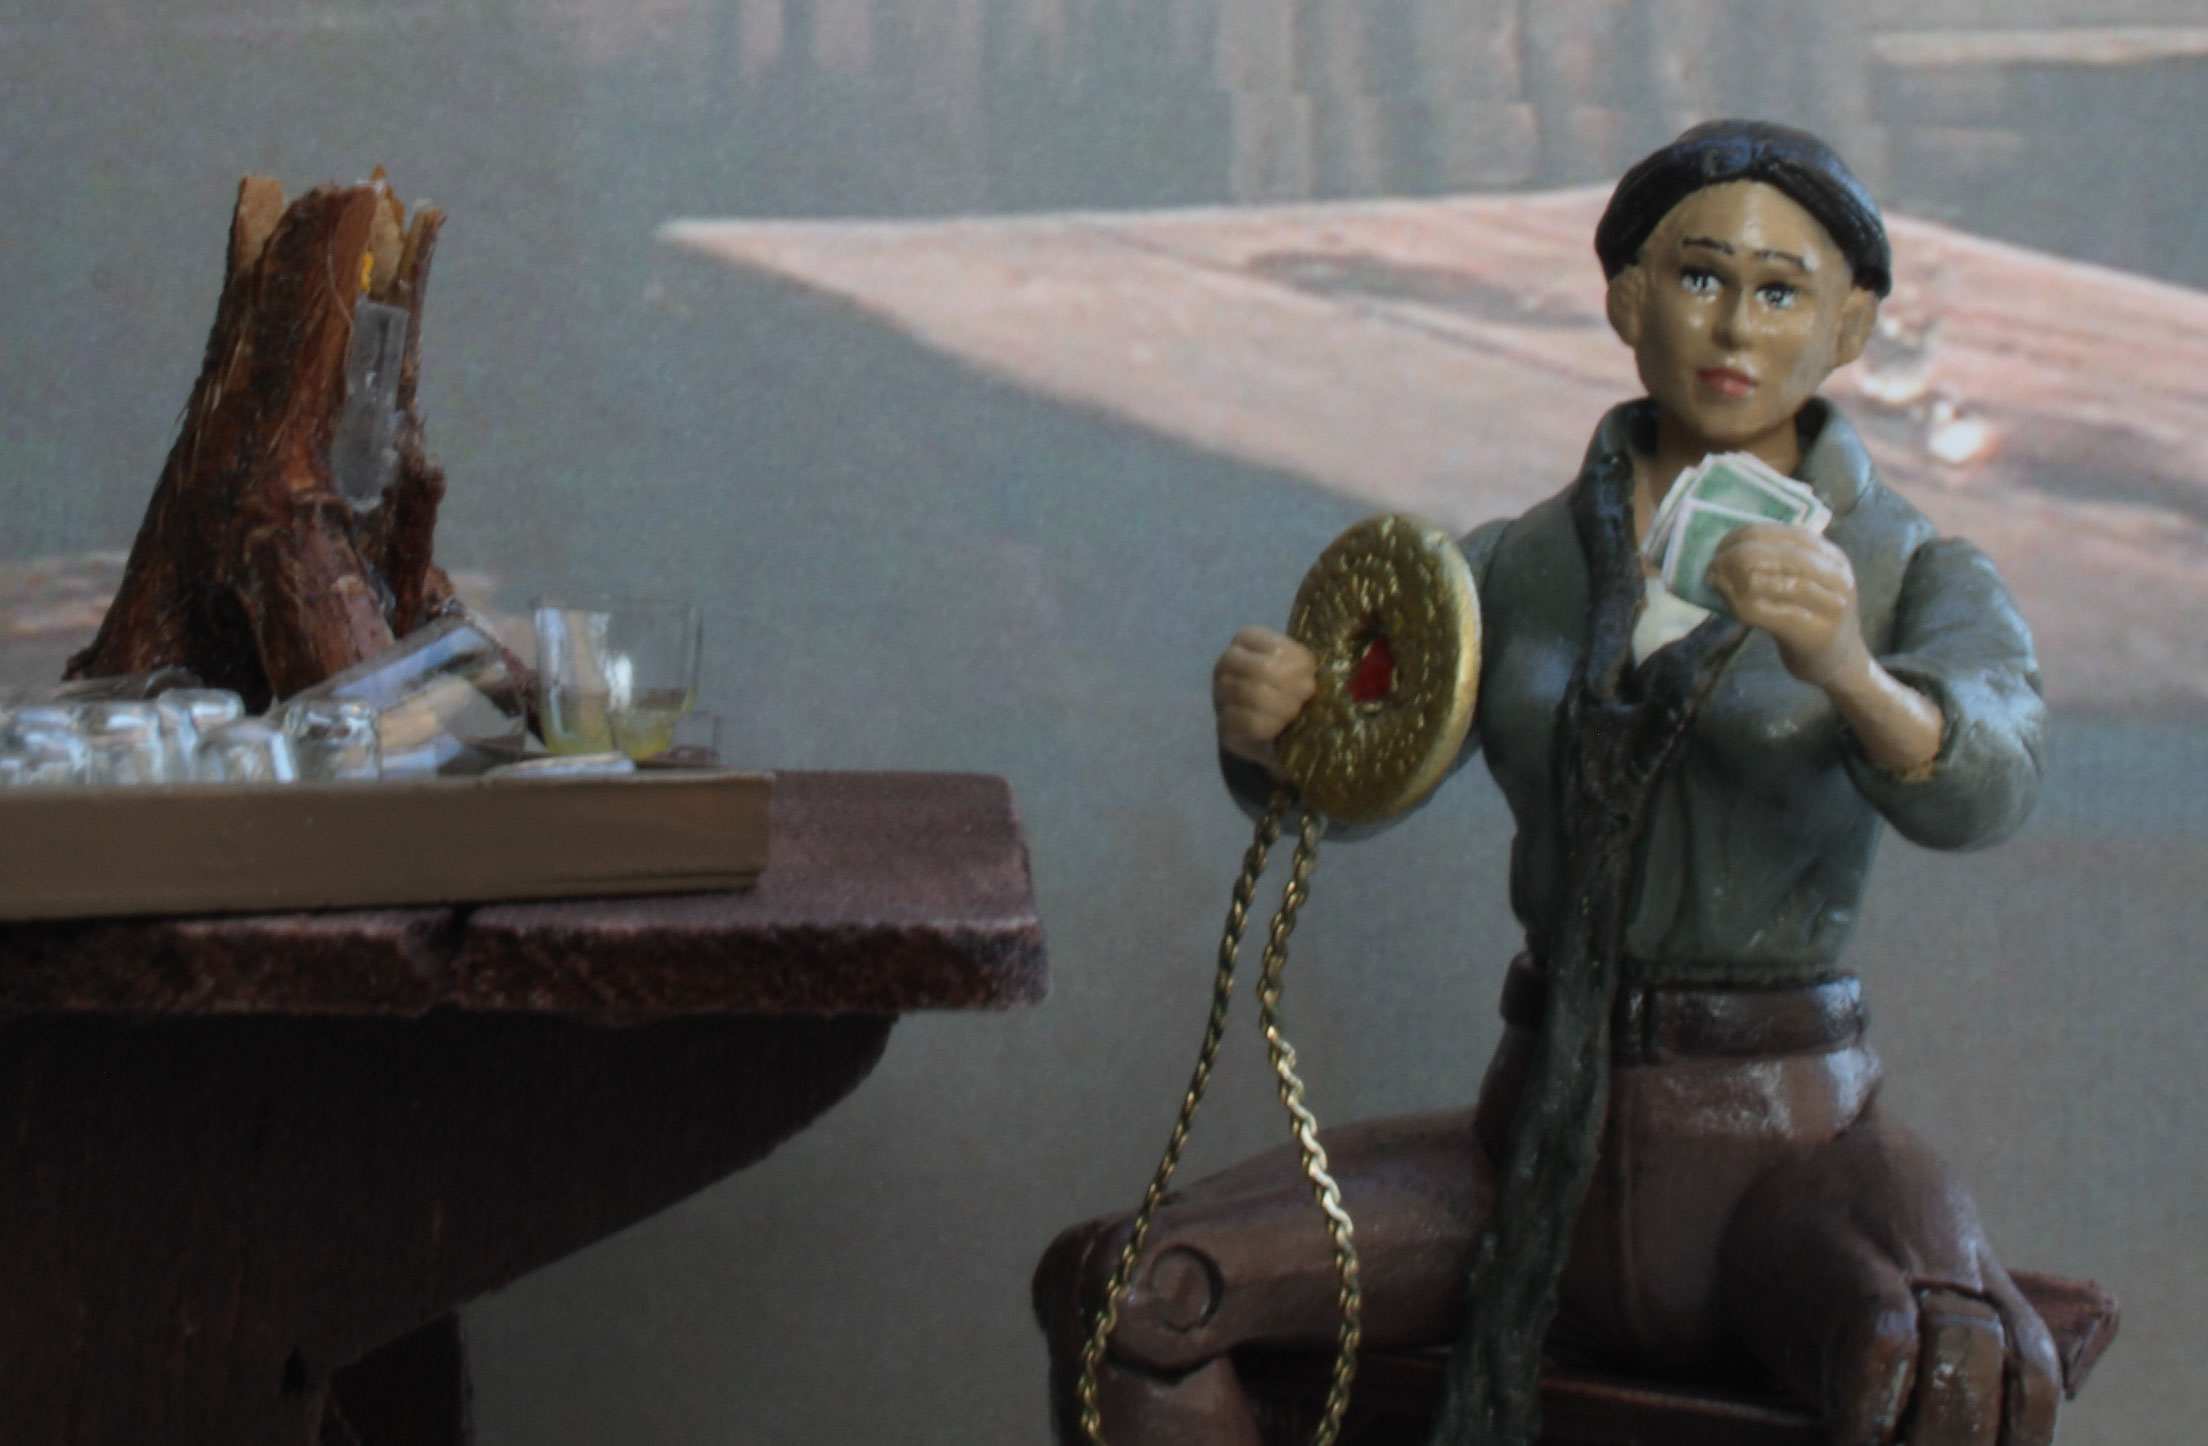
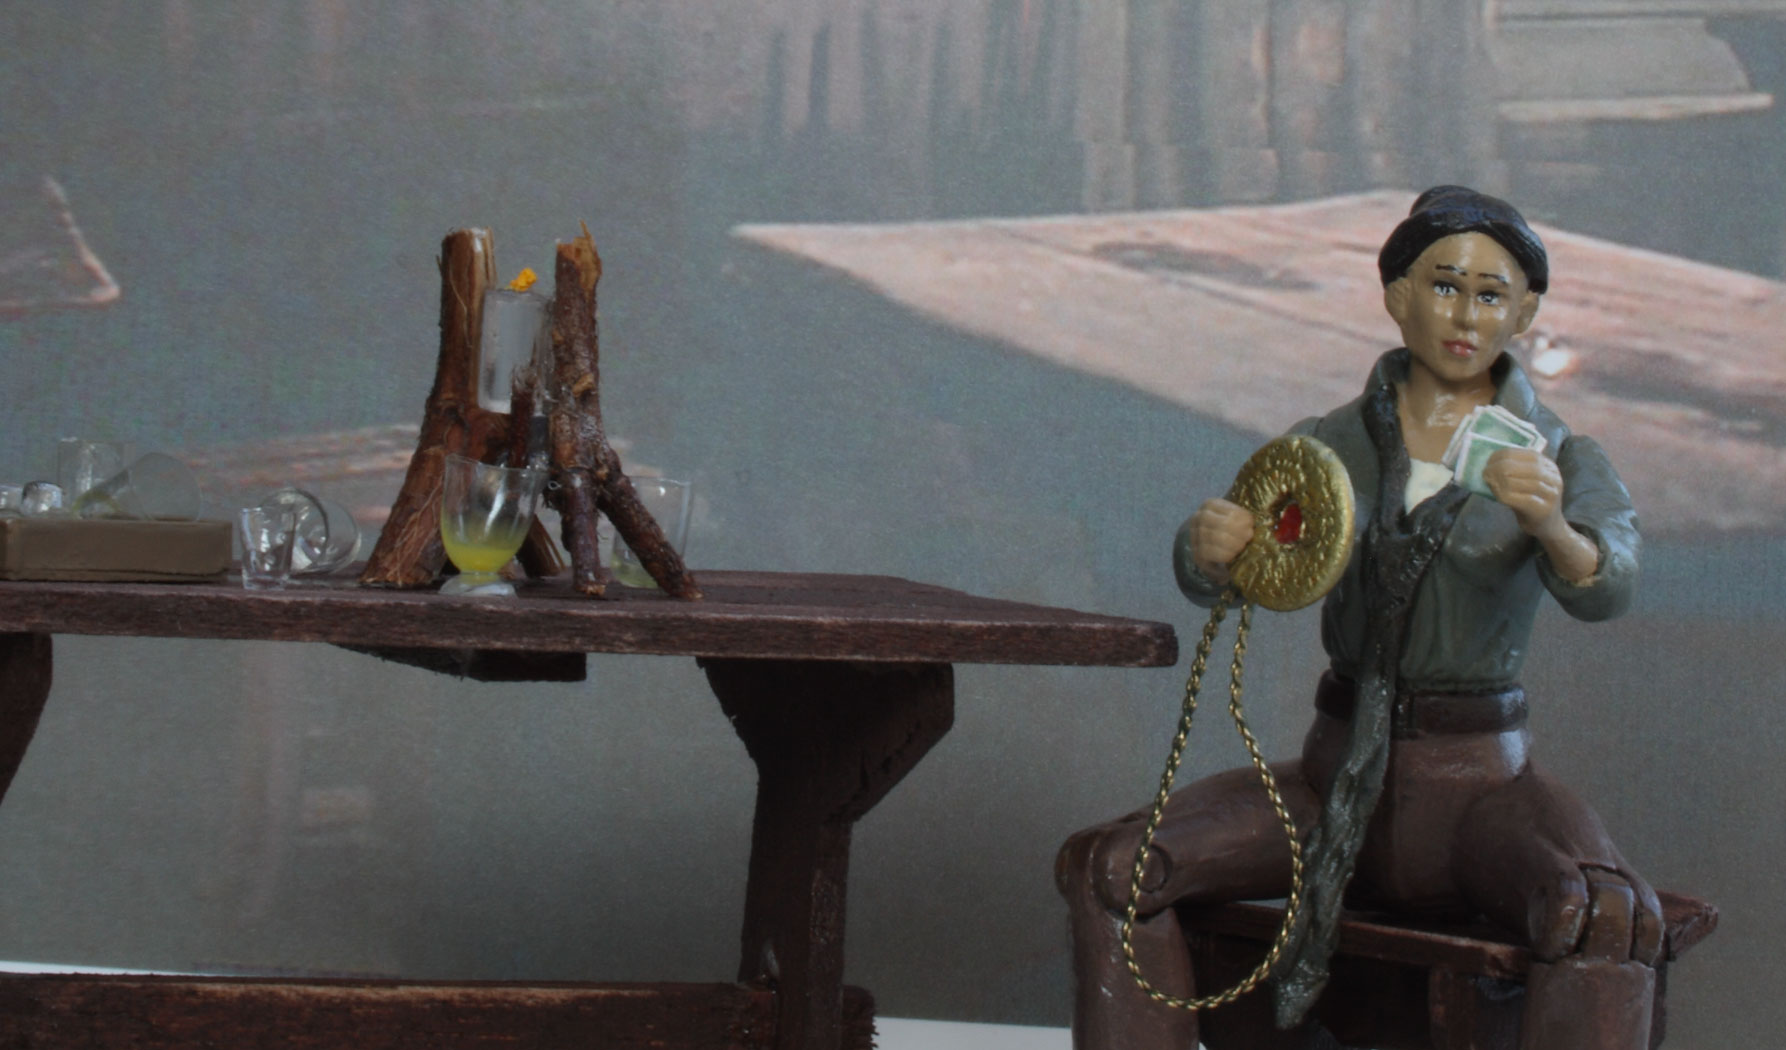
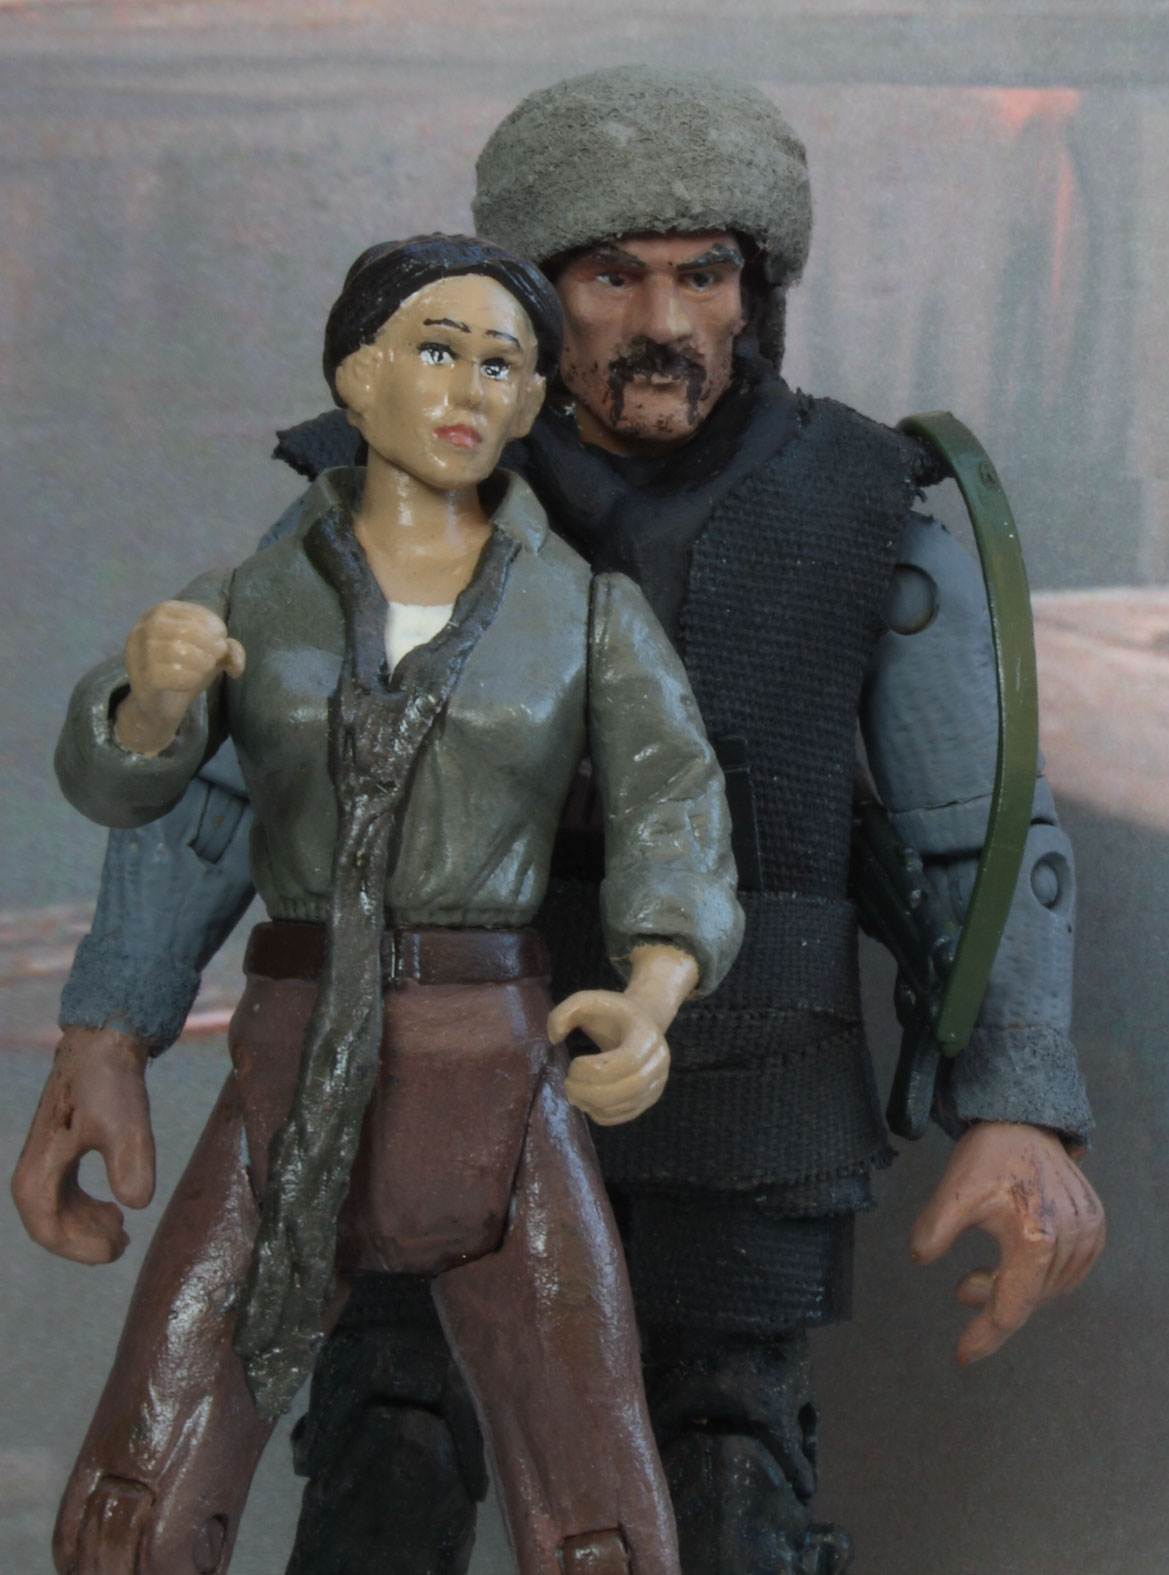
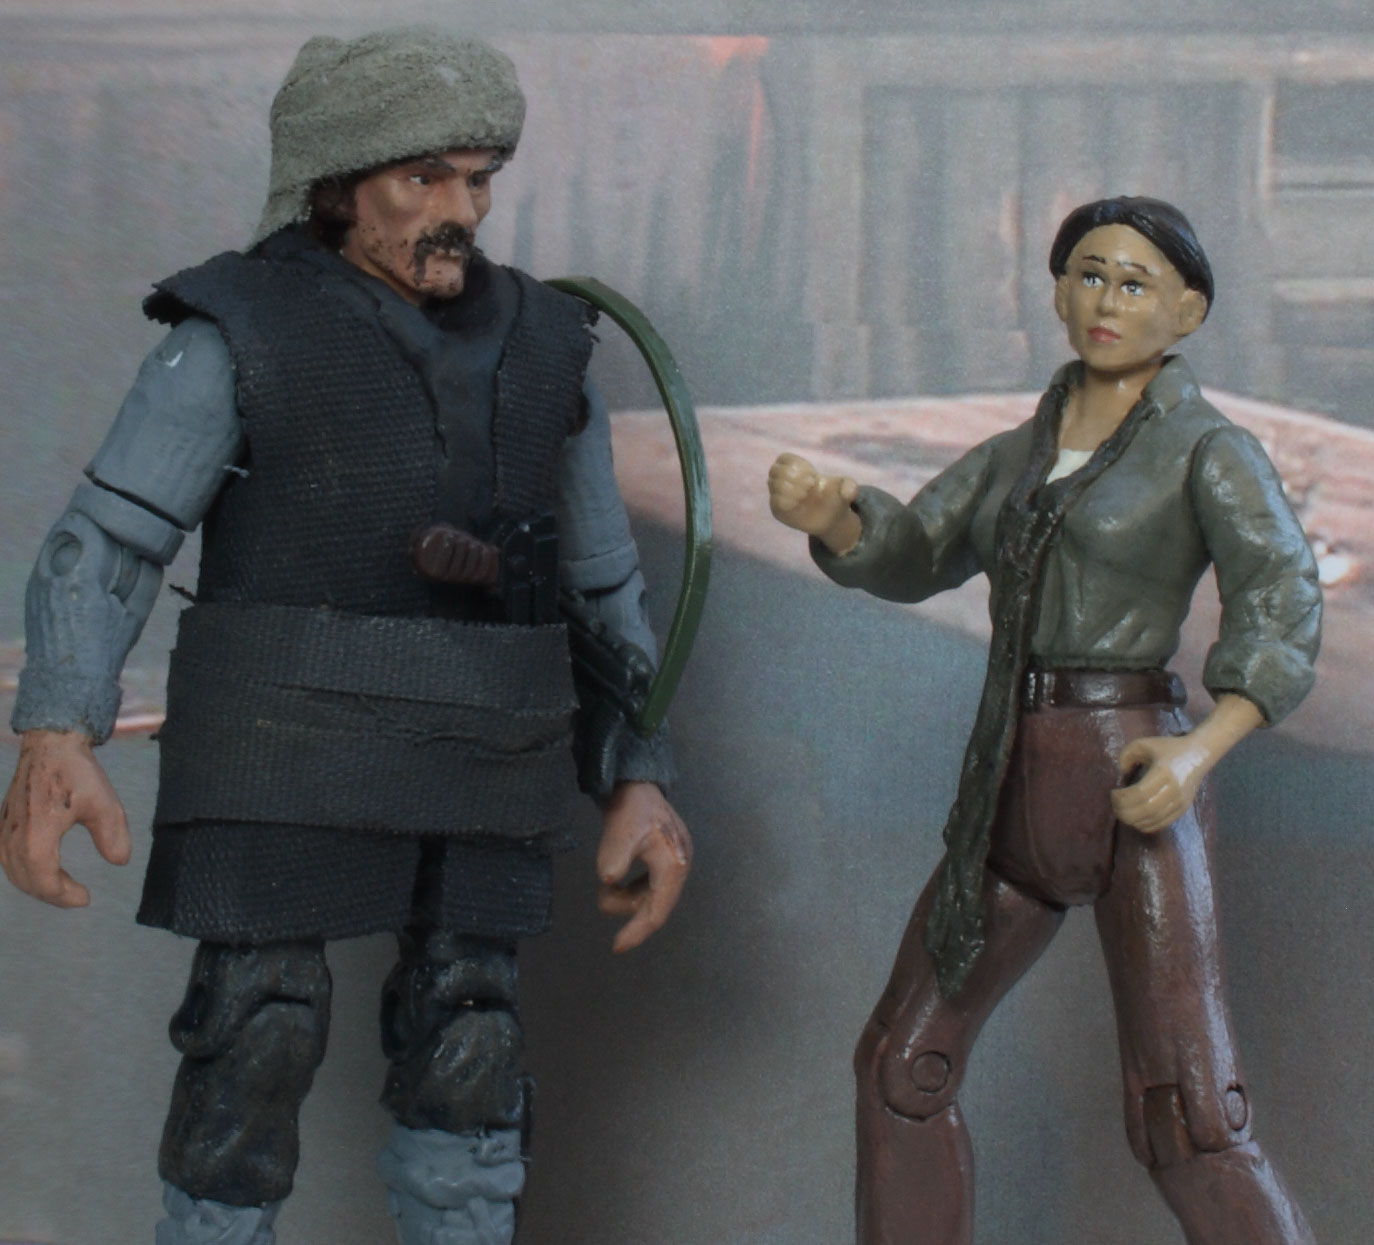
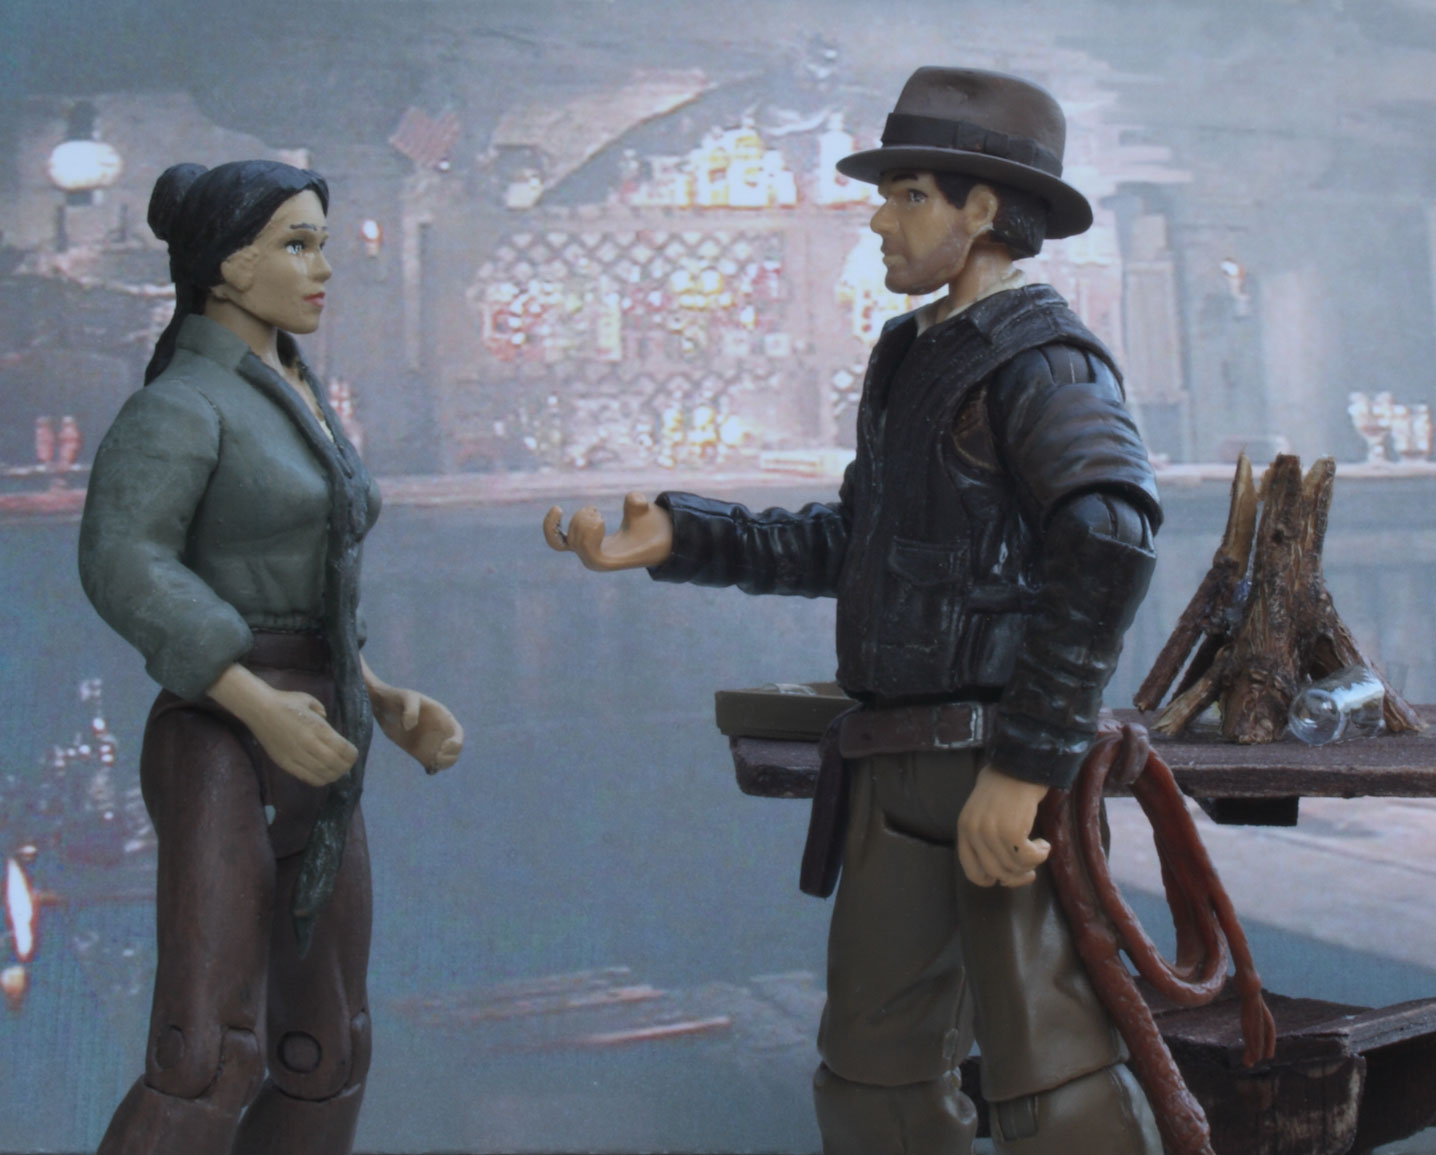 Marion (with less shine) and Indy in the Raven bar.
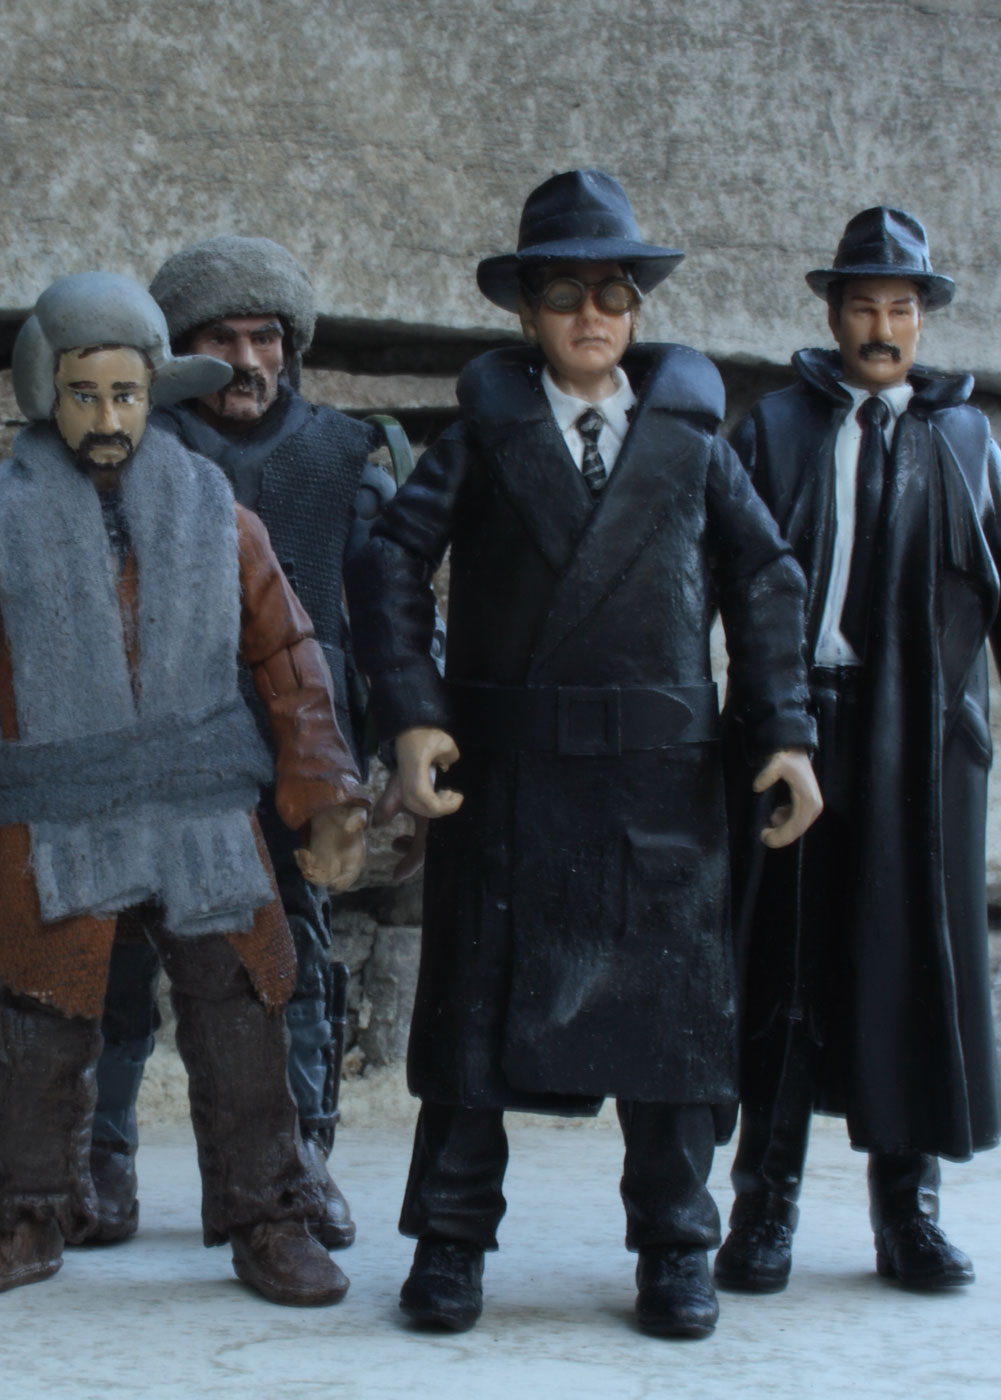
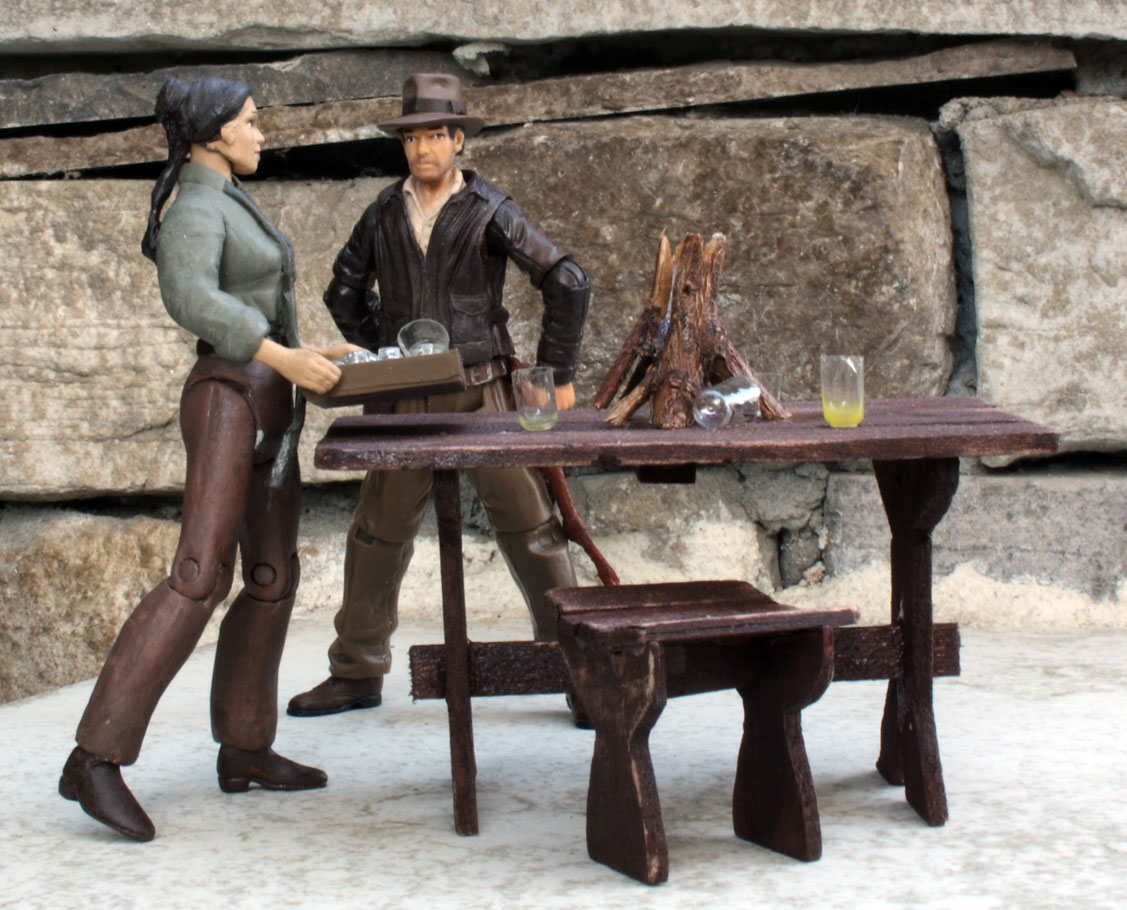
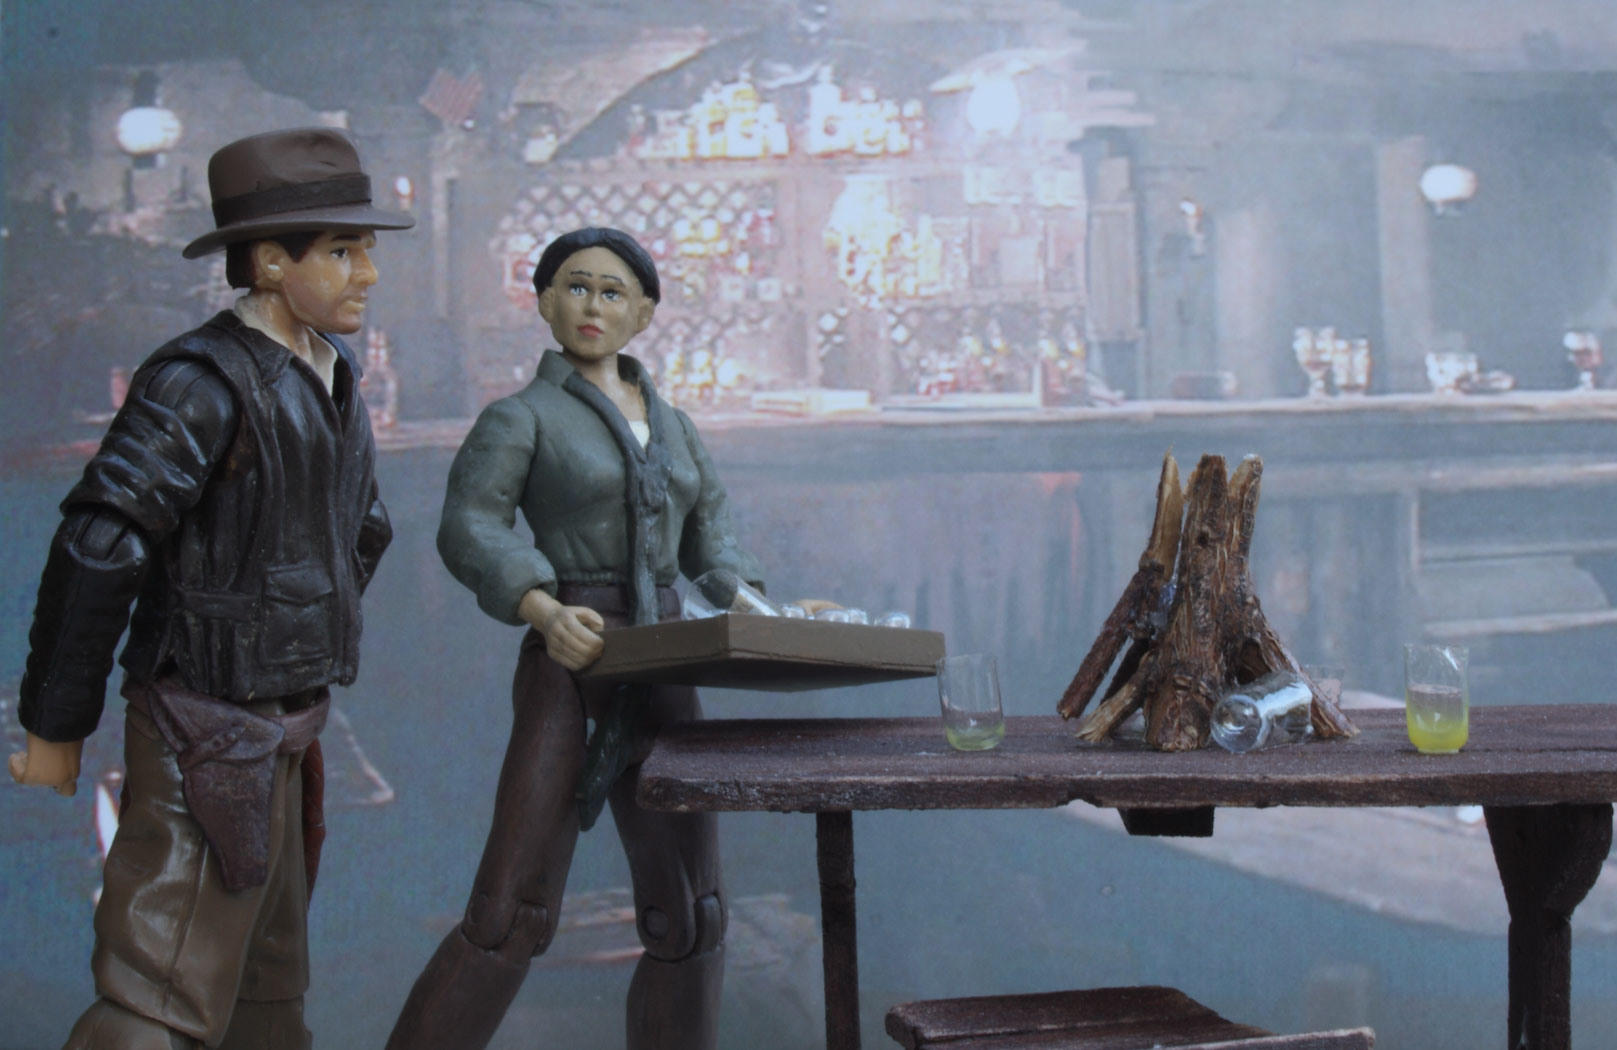
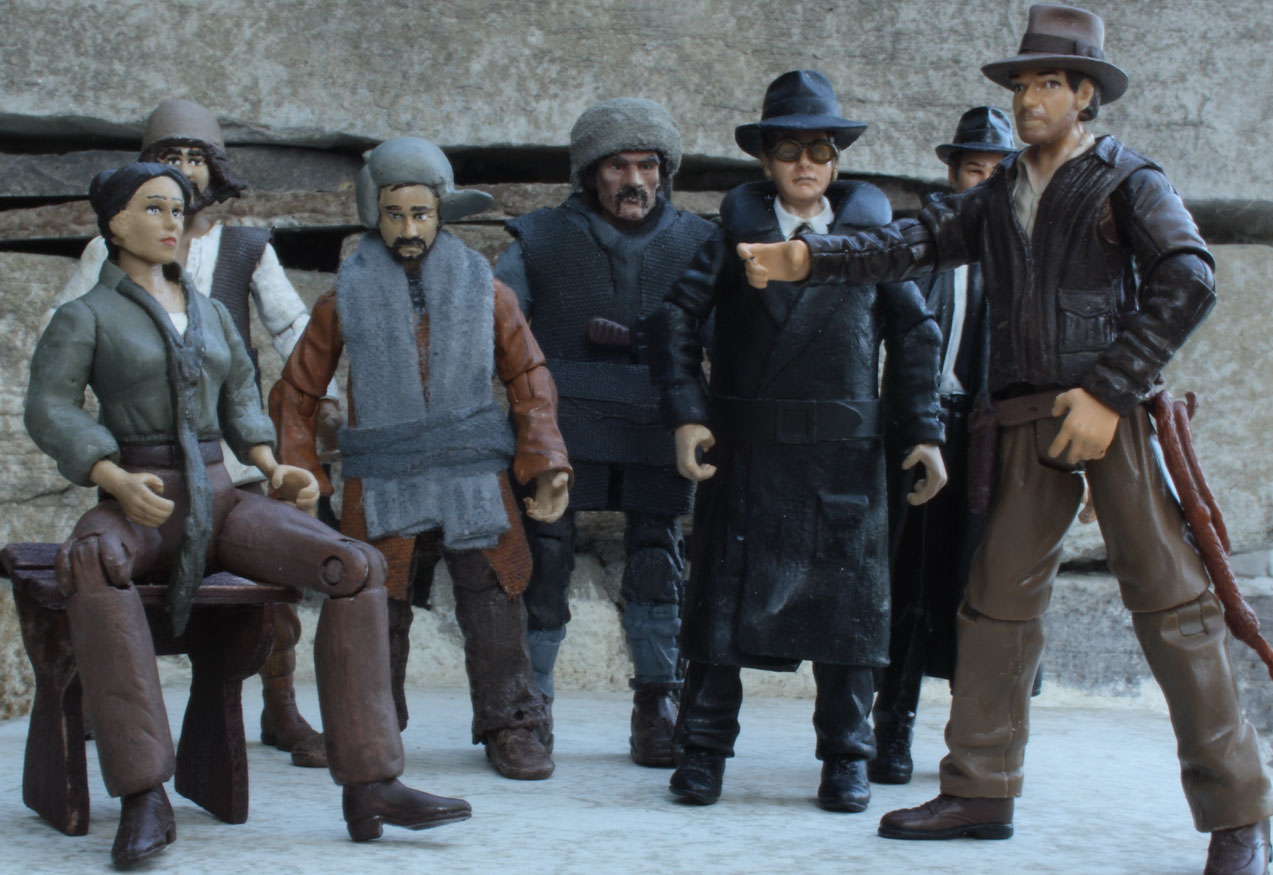 Someone at the door! Group photos at the Raven bar.
![]()
![]()
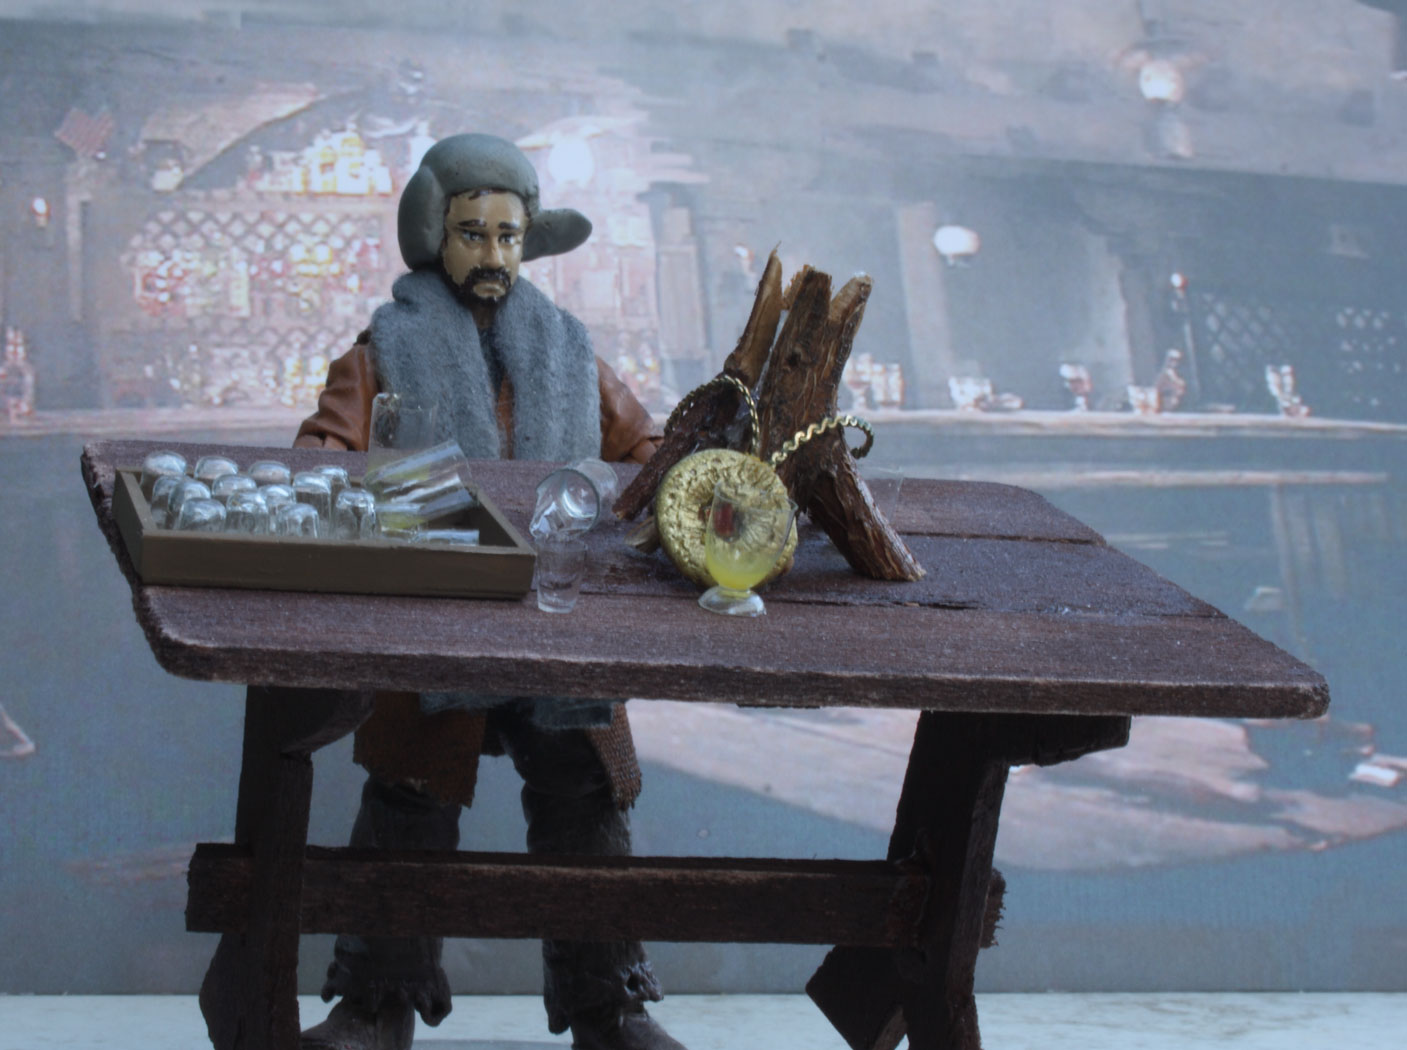
![]() 'We are, heh, not thirsty!' Here is our friend Toht. I should maybe add some steaming snow to the shoulders! (I just thought of that.) Pardon the "jungle" background! It's spring in California.
'We are, heh, not thirsty!' Here is our friend Toht. I should maybe add some steaming snow to the shoulders! (I just thought of that.) Pardon the "jungle" background! It's spring in California.
![]()
![]()
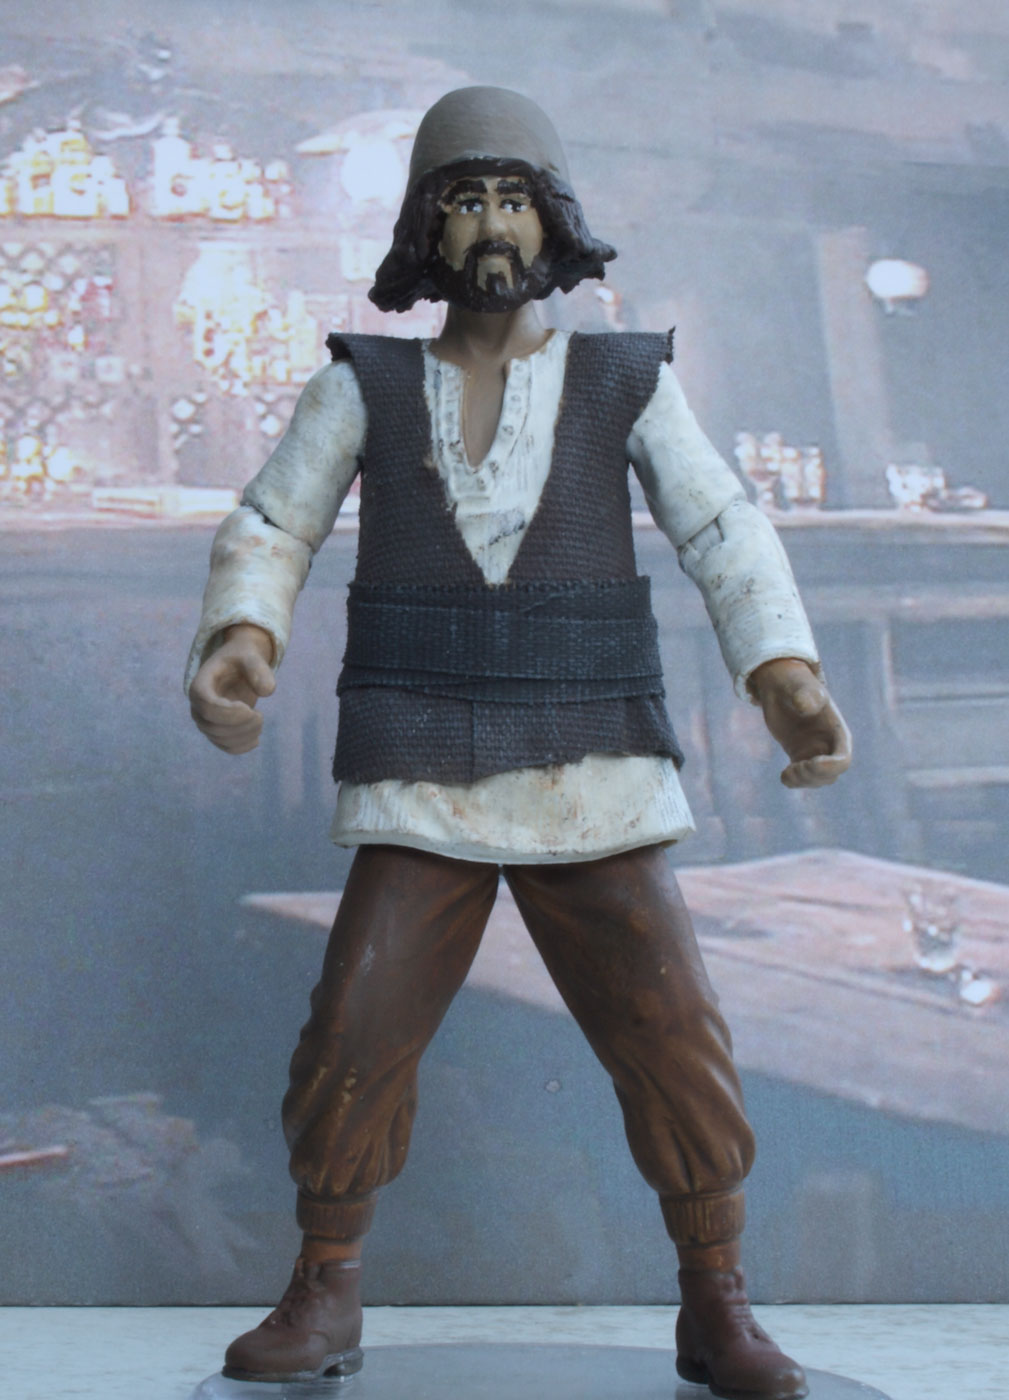
![]() Not identified by name as far as I know, here is the tall, thin, machine-gun armed companion to Toht from the Raven bar scene in Raiders of the Lost Ark.
Not identified by name as far as I know, here is the tall, thin, machine-gun armed companion to Toht from the Raven bar scene in Raiders of the Lost Ark.
![]()

![]() Raven bar Indy. I meant to put gloves on him but I can't find the hands - surplus horse Indy. Oh well, maybe later.
Raven bar Indy. I meant to put gloves on him but I can't find the hands - surplus horse Indy. Oh well, maybe later.
![]()
 The Raven bar featured some heavies, or thugs who were motivated to attack our hero in the remote Himalayan bar. Some refer to then as "Sherpas", though I would not like to go where they guide me! This is the huge guy.
![]()
![]()
 This is the little guy from the Raven bar.
 This is the guy who fights Indy with the flaming arm in the Raven bar. This guy comes in halfway through the fight and knocks Indy's automatic out of his hand with the door.
![]()
![]()
![]() Marion was constructed from a Star Wars General Leai body with a fair amount of epoxy putty build-up (including a neck). Head is a modified Marion head.
Marion was constructed from a Star Wars General Leai body with a fair amount of epoxy putty build-up (including a neck). Head is a modified Marion head.
![]()
 First picture is my Toht mock-up with LC Indy body, Star Wars Naboo soldier head and 21st Century German soldier long coat. Hat from KOTCS Indy. Second picture shows Belloq legs and custom coat being fashioned from Super Sculpey. For the Sculpey I have found out that it is better to work in layers, i.e. starting with a basic shell, baking that and then adding the collar and baking again. The added Sculpey seems to adhere quite nicely without glue.
![]()
 Raven bar machine gunner was Batman Bruce Wayne figure with 21st Century German soldier coat. I took a little licence here by going with the open coat. Hat from horse Indy. Raven bar heavies were a mixed bag. Big guy was based on a Walmart "The Corps" figure. The 'flaming arm' dude was entirely based on Sallah. The little guy used cemetery warrior legs and arms, Belloq torso (because it's so short), and Mutt head.
![]()
![]() Travelling Indy, inspired by Inky Skin's custom. This has a different head though.
Travelling Indy, inspired by Inky Skin's custom. This has a different head though.
![]()
![]()
![]()
![]() Bad weather Indy. What does Professor Jones wear when the weather gets tough? The fedora stays but a long raincoat would sure come in handy!
Bad weather Indy. What does Professor Jones wear when the weather gets tough? The fedora stays but a long raincoat would sure come in handy!
![]()
![]()
![]() When the sun comes out, so does tourist Indy, ready to hit the beach with towel, book, Bermuda shorts and loud Hawaiian shirt. Bring on the bikini babes! I had to keep the fedora ads a sun hat, otherwise..... how would you know it's Indy?
When the sun comes out, so does tourist Indy, ready to hit the beach with towel, book, Bermuda shorts and loud Hawaiian shirt. Bring on the bikini babes! I had to keep the fedora ads a sun hat, otherwise..... how would you know it's Indy?
![]()
![]()
![]() Col Musgrove from army intelligence
Col Musgrove from army intelligence
![]()
![]() Here's my interpretation of Major Eaton, army intelligence from Raiders of the Lost Ark.
Here's my interpretation of Major Eaton, army intelligence from Raiders of the Lost Ark.
![]()
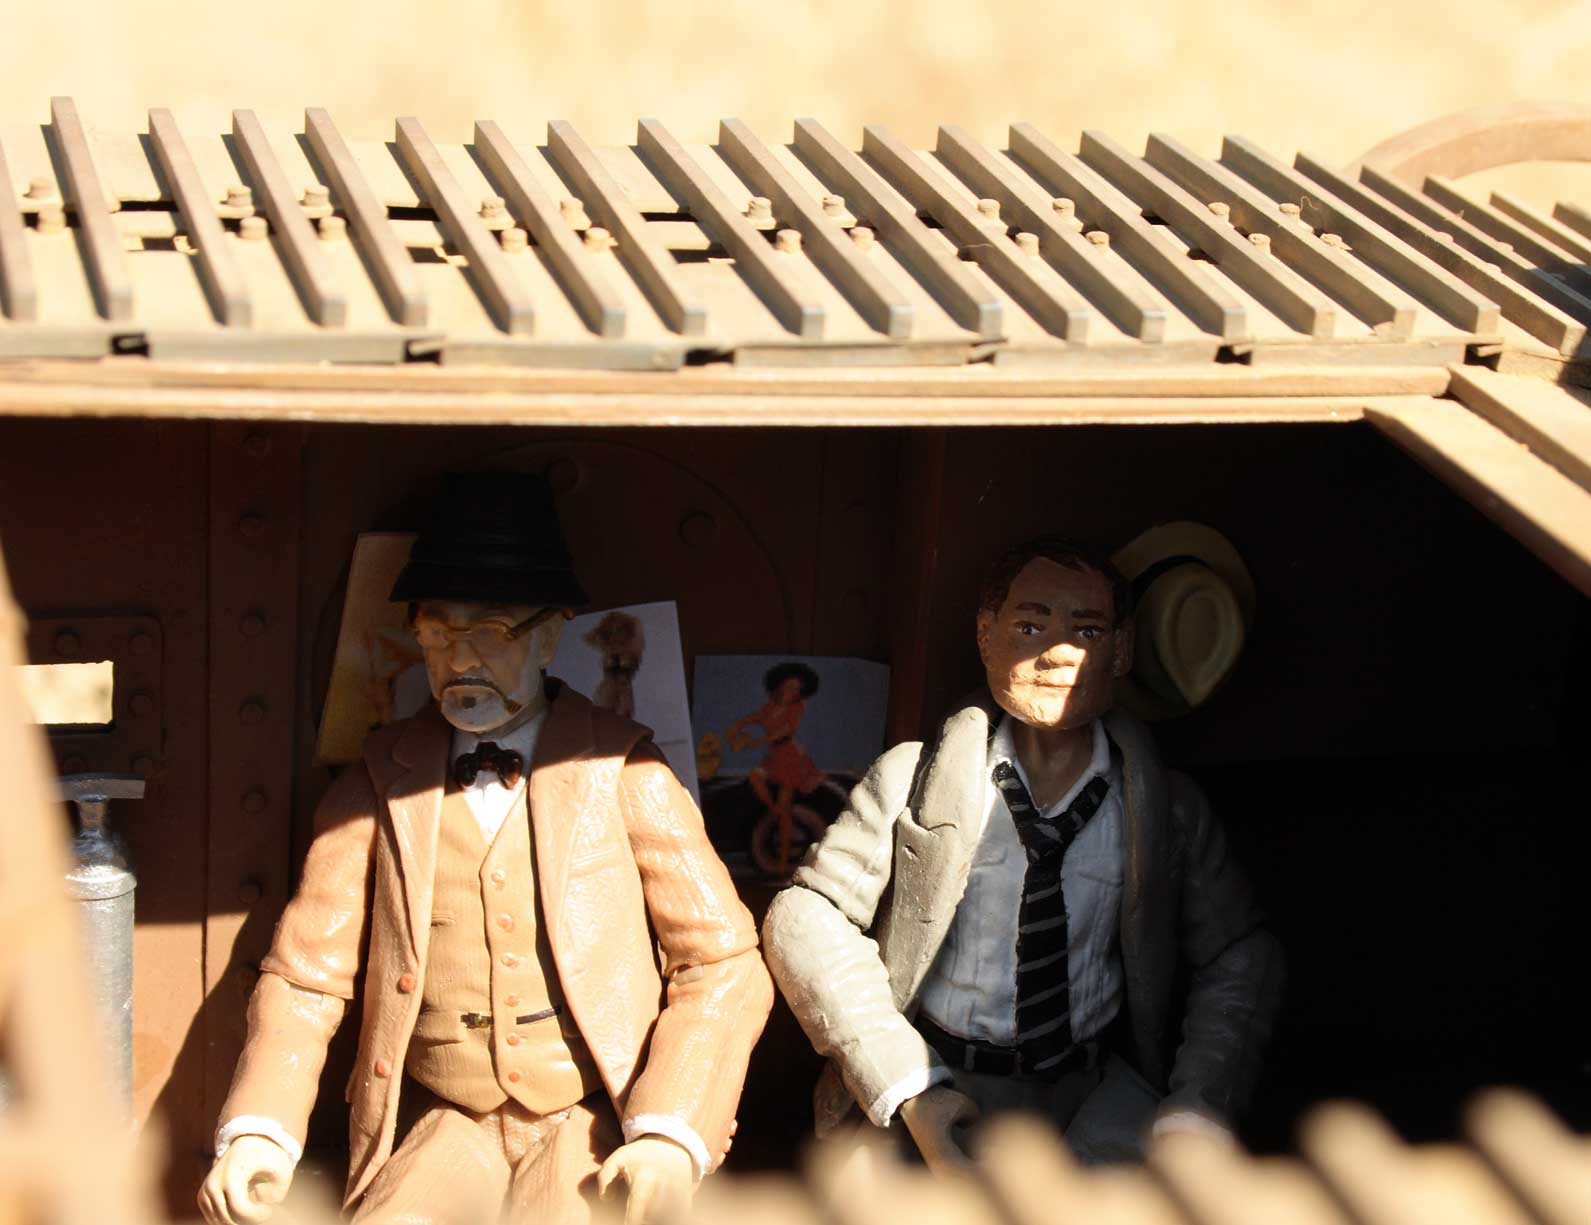
![]() Marcus Brody in blue suit. Another attempt at a custom head - I like it better than an Anakin head, but it's tough to make it look like Denholm Elliot!
Marcus Brody in blue suit. Another attempt at a custom head - I like it better than an Anakin head, but it's tough to make it look like Denholm Elliot!
 Added accessories. The medallion is a super sculpey creation, suitably painted.
![]()
![]() The mechanic that everyone hates - so I tried to disguise him in hat and jacket!
The mechanic that everyone hates - so I tried to disguise him in hat and jacket!
![]()
![]() Spare part surgery! Put some spare parts together to make this comically overloaded mechanic guy.
Spare part surgery! Put some spare parts together to make this comically overloaded mechanic guy.
![]()
![]()
**All images on this site are the property of Nick Turner. If you like them then link to my site, don't steal them!**
Comments etc. can be sent to turner-nick@comcast.net